


 本文详细介绍如何为Android应用中的Button、TextView等控件设置自定义背景,包括去除默认背景、创建自定义背景资源文件及应用渐变背景效果的方法。
Android自定义背景的设置方法
本文主要介绍最基本的控件Button、TextView、EditText的自定义背景设置方法。
比如下面的图片就用到了自定义的背景:
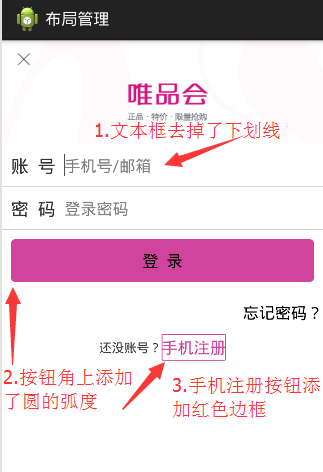
一.去掉背景色
android:background="@null"
能去掉EditText下面的下划线,也能去掉Button的背景色。
二.自定义背景的使用方法
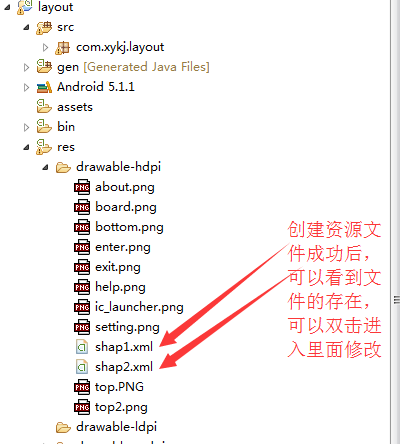
(一)在res文件夹下的drawable-hdpi文件夹里面创建一个设置背景的
资源文件shap1.xml
如图1:

如图2:
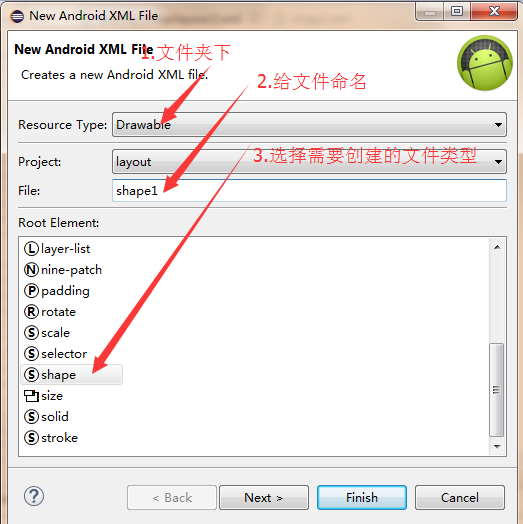
如图3:
(二)在shap1.xml文件内写入需要的功能
如:
<?xml version="1.0" encoding="utf-8"?>
<shape xmlns:android="http://schemas.android.com/apk/res/android" >
<!-- 填充的颜色 -->
<solid android:color="@android:color/transparent" />
<!-- 设置按钮的四个角为弧形 -->
<!-- android:radius 弧形的所有半径 -->
<corners android:radius="1dip" />
<!-- 边框的宽度及颜色 -->
<stroke
android:width="2px"
android:color="#ccC71485" />
</shape>
上面的代码中按钮的四个角的弧度可以是不同的,
比如:
android:topLeftRadius=" "
android:topRightRadius=" "
android:bottomLeftRadius="" android:bottomRightRadius=""
上面四个属性可以随意设置四个角度的弧度大小
(三)调用文件
文件写好后可以直接当做背景资源利用,如:
<Button
android:layout_width="match_parent"
android:layout_height="wrap_content"
android:background="@drawable/shap1" //通过文件名直接调用写好的文件资源
android:text="登 录" />
总结:其实上面就是把写好的文件资源当做一个背景图片来使用。
三.上面图片的程序代码:
(一)两个背景颜色资源文件
1.登录按钮的背景设置文件shap1.xml
<?xml version="1.0" encoding="utf-8"?>
<shape xmlns:android="http://schemas.android.com/apk/res/android" >
<!-- 填充的颜色 -->
<solid android:color="#ccC71485" />
<!-- android:radius 弧形的半径 -->
<corners android:radius="5dp" />
</shape>
2.手机注册的按钮的背景设置文件shap2.xml
<?xml version="1.0" encoding="utf-8"?>
<shape xmlns:android="http://schemas.android.com/apk/res/android">
<!-- 填充的颜色 -->
<solid android:color="@android:color/transparent" />
<!-- 设置按钮的四个角为弧形 -->
<!-- android:radius 弧形的半径 -->
<corners android:radius="1dip" />
<!-- 边框的宽度及颜色 -->
<stroke
android:width="2px"
android:color="#ccC71485" />
</shape>
(二)布局文件
效果图:
四.一些其他的知识
比如输入框外面添加一个边框就是背景资源文件的使用,
下面这个输入框只设置了外边框的颜色,角度都不用设置。
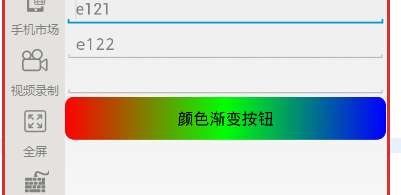
五.Drawable资源文件的其他知识
背景颜色还可以产生渐变的效果
资源文件代码如下:
<?xml version="1.0" encoding="utf-8"?>
<shape xmlns:android="http://schemas.android.com/apk/res/android" >
<!-- android:radius 弧形的半径 -->
<corners android:radius="10dip" />
<!--定义前面、中间和后面的颜色 -->
<gradient
android:startColor="#f00"
android:centerColor="#0f0"
android:endColor="#00f"
/>
</shape>
效果如下:
背景资源的用法基本上就上面这几个了,学会使用能过提高界面的美观效果。


 540
540

 被折叠的 条评论
为什么被折叠?
被折叠的 条评论
为什么被折叠?
 到【灌水乐园】发言


