


好多年没有见到这种游戏场景了,还记得 “超级玛丽” 吗? 当年的红白机都带有这类游戏。
1. 游戏介绍:
1. 黑色方块代表player,可以用键盘控制它前进、后退、跳跃。
2. 红色代表岩浆,碰到就game over。
3. 黄色方块是金币,收集到所有的金币就过关。
2. The Technology
1. 使用DOM显示游戏,通过key event获得用户的键盘输入。
2. 游戏的固定场景用table存储。
3. 可移动的物体放在场景之上,用absolute position的element。
3. Levels
var simpleLevelPlan = [
  "                      ",
  "                      ",
  "  x              = x  ",
  "  x         o o    x  ",
  "  x @      xxxxx   x  ",
  "  xxxxx            x  ",
  "      x!!!!!!!!!!!!x  ",
  "      xxxxxxxxxxxxxx  ",
  "                      "
];1. x : 墙
2. 空格 : 空白区域
3. ! : 不可移动的岩浆
4. @ : 游戏开始时,player所处位置
5. o : 金币
6. = : 水平往复移动的岩浆
7. | : 垂直移动的岩浆
8. v : 滴落的岩浆
整个游戏包含多个level。收集到所有的金币,当前level结束,进入下一level。碰到岩浆,本level重新开始。
4. Reading a Level
Level 是游戏的一关,包含所有的场景信息,主要包括:
width: 地图宽度
height: 地图高度
grid: 即地图,一个二维数组,每个数组元素中包含一种类型的 “静物” (null 空白, x 墙, ! 不动的lava)
actors: 可以移动的物体 (player, coin, 可移动的lava)
player: 玩家
status: 游戏状态,失败还是过关
finishDelay: 过关之后,游戏的场景保留一段时间,游戏的动画继续显示。这样的话,切换到下一关就不那么突兀。
function Level(plan) {
  this.width = plan[0].length;
  this.height = plan.length;
  this.grid = [];
  this.actors = [];

  for (var y = 0; y < this.height; y++) {
    var line = plan[y], gridLine = [];
    for (var x = 0; x < this.width; x++) {
      var ch = line[x], fieldType = null;
      var Actor = actorChars[ch];
      if (Actor)
        this.actors.push(new Actor(new Vector(x, y), ch));
      else if (ch == "x")
        fieldType = "wall";
      else if (ch == "!")
        fieldType = "lava";
      gridLine.push(fieldType);
    }
    this.grid.push(gridLine);
  }

  this.player = this.actors.filter(function(actor) {
    return actor.type == "player";
  })[0];
  this.status = this.finishDelay = null;
}

Level.prototype.isFinished = function() {
  return this.status != null && this.finishDelay < 0;
};actorChars,Actor,Vector,这些都是用来构建 actors 的,都在下一节定义。
5. Actors
5.1. Vector
先看Vector,第六章和第七章都用到过:
function Vector(x, y) {
  this.x = x; this.y = y;
}
Vector.prototype.plus = function(other) {
  return new Vector(this.x + other.x, this.y + other.y);
};
Vector.prototype.times = function(factor) {
  return new Vector(this.x * factor, this.y * factor);
};5.2. actorChars
var actorChars = {
  "@": Player,
  "o": Coin,
  "=": Lava, "|": Lava, "v": Lava
};5.3. Player
function Player(pos) {
  this.pos = pos.plus(new Vector(0, -0.5));
  this.size = new Vector(0.8, 1.5);
  this.speed = new Vector(0, 0);
}
Player.prototype.type = "player";
地图上的坐标不是用pixel为单位的,而是自定义的一个方块,后面会讲。所以,与位置相关的都是以方块为单位,如:Vector, size, speed, pos 等。
size: player 宽度为0.8块,高度为1.5块
speed: 用来模拟运动和重力
pos: 坐标。注意,屏幕坐标是向下延伸的。player 的高度是1.5,那么,它的bottom没有和grid对齐(左图),所以,在构造时,给它的y减去0.5(右图)。

5.4. Lava
function Lava(pos, ch) {
  this.pos = pos;
  this.size = new Vector(1, 1);
  if (ch == "=") {
    this.speed = new Vector(2, 0);
  } else if (ch == "|") {
    this.speed = new Vector(0, 2);
  } else if (ch == "v") {
    this.speed = new Vector(0, 3);
    this.repeatPos = pos;
  }
}
Lava.prototype.type = "lava";function Coin(pos) {
this.basePos = this.pos = pos.plus(new Vector(0.2, 0.1));
this.size = new Vector(0.6, 0.6);
this.wobble = Math.random() * Math.PI * 2;
}
Coin.prototype.type = "coin";好了,Level需要的所有元素都齐备了。
var simpleLevel = new Level(simpleLevelPlan);
    console.log(simpleLevel.width, "by", simpleLevel.height);
6. Encapsulation as a Burden
7. Drawing
7.1. DOMDisplay
Level如何绘制到屏幕上? 我们需要定义一个display对象,这里,用DOM元素显示,所以,该对象叫做 DOMDisplay。
function DOMDisplay(parent, level) {
  this.wrap = parent.appendChild(elt("div", "game"));
  this.level = level;

  this.wrap.appendChild(this.drawBackground());
  this.actorLayer = null;
  this.drawFrame();
}

function elt(name, className) {
  var elt = document.createElement(name);
  if (className) elt.className = className;
  return elt;
}7.2. drawBackground()
var scale = 20;

DOMDisplay.prototype.drawBackground = function() {
  var table = elt("table", "background");
  table.style.width = this.level.width * scale + "px";
  this.level.grid.forEach(function(row) {
    var rowElt = table.appendChild(elt("tr"));
    rowElt.style.height = scale + "px";
    row.forEach(function(type) {
      rowElt.appendChild(elt("td", type));
    });
  });
  return table;
};background是个<table>,grid中每一行是个<tr>,每一格是个<td>。
需要添加CSS,使background上的不同fieldType显示出来:
.background    { background: rgb(52, 166, 251);
                 table-layout: fixed;
                 border-spacing: 0;              }
.background td { padding: 0;                     }
.lava          { background: rgb(255, 100, 100); }
.wall          { background: white;              }
7.3. drawActors()
DOMDisplay.prototype.drawActors = function() {
  var wrap = elt("div");
  this.level.actors.forEach(function(actor) {
    var rect = wrap.appendChild(elt("div",
                                    "actor " + actor.type));
    rect.style.width = actor.size.x * scale + "px";
    rect.style.height = actor.size.y * scale + "px";
    rect.style.left = actor.pos.x * scale + "px";
    rect.style.top = actor.pos.y * scale + "px";
  });
  return wrap;
};
.actor { position: absolute; }
.coin { background: rgb(241, 229, 89); }
.player { background: rgb(64, 64, 64); }每个actor是个<div>,它的position是absolute。
7.4. drawFrame()
DOMDisplay.prototype.drawFrame = function() {
  if (this.actorLayer)
    this.wrap.removeChild(this.actorLayer);
  this.actorLayer = this.wrap.appendChild(this.drawActors());
  this.wrap.className = "game " + (this.level.status || "");
  this.scrollPlayerIntoView();
};胜利或失败时,player的样式稍有变化:
.lost .player {
  background: rgb(160, 64, 64);
}
.won .player {
  box-shadow: -4px -7px 8px white, 4px -7px 8px white;
}.game {
overflow: hidden;
max-width: 600px;
max-height: 450px;
position: relative;
}7.5. scrollPlayerIntoView()
DOMDisplay.prototype.scrollPlayerIntoView = function() {
  var width = this.wrap.clientWidth;
  var height = this.wrap.clientHeight;
  var margin = width / 3;

  // The viewport
  var left = this.wrap.scrollLeft, right = left + width;
  var top = this.wrap.scrollTop, bottom = top + height;

  var player = this.level.player;
  var center = player.pos.plus(player.size.times(0.5)).times(scale);

  if (center.x < left + margin)
    this.wrap.scrollLeft = center.x - margin;
  else if (center.x > right - margin)
    this.wrap.scrollLeft = center.x + margin - width;
  if (center.y < top + margin)
    this.wrap.scrollTop = center.y - margin;
  else if (center.y > bottom - margin)
    this.wrap.scrollTop = center.y + margin - height;
};
7.6. 进入下一关,删除当前场景
DOMDisplay.prototype.clear = function() {
  this.wrap.parentNode.removeChild(this.wrap);
};var simpleLevel = new Level(simpleLevelPlan);
var display = new DOMDisplay(document.body, simpleLevel);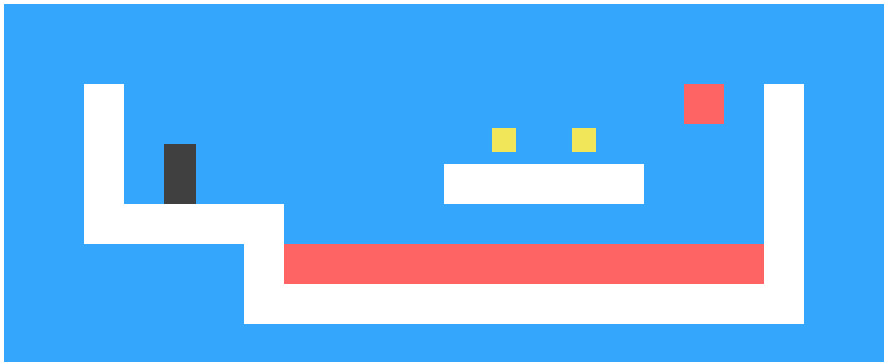
8. Motion and Collision
Motion: 每个actor都有speed属性,speed * duration 就是它的下一个位置。为了显示的平滑流畅,需要每隔一小段时间(例如:20ms)就让它移动一次(重绘)。
Collision: 碰撞检测。player会碰到墙、lava、coin,移动的lava也会碰到墙。碰撞之后,每种actor有自己特定的行为(停止、收集coin、弹回等)。类似于Motion,Collision检测也要每隔一小段时间就做一次,这样可以让动画更平滑。
8.1. 背景物体的碰撞检测方法:(只有地图上的静态物体,不包括 actors)
Level.prototype.obstacleAt = function(pos, size) {
  var xStart = Math.floor(pos.x);
  var xEnd = Math.ceil(pos.x + size.x);
  var yStart = Math.floor(pos.y);
  var yEnd = Math.ceil(pos.y + size.y);

  if (xStart < 0 || xEnd > this.width || yStart < 0)
    return "wall";
  if (yEnd > this.height)
    return "lava";
  for (var y = yStart; y < yEnd; y++) {
    for (var x = xStart; x < xEnd; x++) {
      var fieldType = this.grid[y][x];
      if (fieldType) return fieldType;
    }
  }
};第二个 if,判断是否跑到地图下边界,如果超出下边界,视同碰到lava。
在 for 循环中,判断是否与其他object(wall,lava)重叠。
8.2. 判断是否碰撞其他actors
Level.prototype.actorAt = function(actor) {
  for (var i = 0; i < this.actors.length; i++) {
    var other = this.actors[i];
    if (other != actor &&
        actor.pos.x + actor.size.x > other.pos.x &&
        actor.pos.x < other.pos.x + other.size.x &&
        actor.pos.y + actor.size.y > other.pos.y &&
        actor.pos.y < other.pos.y + other.size.y)
      return other;
  }
};
9. Actors and Actions
9.1. Level的animate方法
var maxStep = 0.05;

Level.prototype.animate = function(step, keys) {
  if (this.status != null)
    this.finishDelay -= step;

  while (step > 0) {
    var thisStep = Math.min(step, maxStep);
    this.actors.forEach(function(actor) {
      actor.act(thisStep, this, keys);
    }, this);
    step -= thisStep;
  }
};注意,step是个时间值(两次调用animate函数的时间间隔),在while循环中,我们把step切分成小的时间片,就是maxStep,0.05秒,也就是说,actor的每个动作时长最大是50ms。
第一个if,是判断当前关卡是否结束:won or lost。 如果结束了,actors也会继续执行动作,直到 finishDelay 时间耗尽。
keys 是键盘事件,由actor自行处理。其实,只有player需要处理keys,改变运动方向。
9.2. Lava 的 act()
Lava.prototype.act = function(step, level) {
  var newPos = this.pos.plus(this.speed.times(step));
  if (!level.obstacleAt(newPos, this.size))
    this.pos = newPos;
  else if (this.repeatPos)
    this.pos = this.repeatPos;
  else
    this.speed = this.speed.times(-1);
};然后,判断是否碰到别的物体,如果没碰到,移动到下一个位置。
如果碰到了,对于滴落的lava,它有个属性repeatPos(初始位置),直接移动到repeatPos;
没有repeatPos属性的lava,都可以往复运动,撞墙之后弹回,即speed逆转。
9.3. Coin 的 act()
var wobbleSpeed = 8, wobbleDist = 0.07;

Coin.prototype.act = function(step) {
  this.wobble += step * wobbleSpeed;
  var wobblePos = Math.sin(this.wobble) * wobbleDist;
  this.pos = this.basePos.plus(new Vector(0, wobblePos));
};9.4. Player 的act()
act() :
Player.prototype.act = function(step, level, keys) {
  this.moveX(step, level, keys);
  this.moveY(step, level, keys);

  var otherActor = level.actorAt(this);
  if (otherActor)
    level.playerTouched(otherActor.type, otherActor);

  // Losing animation
  if (level.status == "lost") {
    this.pos.y += step;
    this.size.y -= step;
  }
};
主要分成四部分:
1. 水平方向移动 moveX();
2. 垂直方向移动 moveY();
3. 碰撞检测 Level.playerTouched() ;
4. 游戏失败处理 lost 。
在一个平面上的移动,都可以分成两步:先水平移动,再垂直移动。 因为每次移动的时间片很短(50ms),距离也就会很短,从视觉效果看不出来分成了两步。
moveX() :
var playerXSpeed = 7;

Player.prototype.moveX = function(step, level, keys) {
  this.speed.x = 0;
  if (keys.left) this.speed.x -= playerXSpeed;
  if (keys.right) this.speed.x += playerXSpeed;

  var motion = new Vector(this.speed.x * step, 0);
  var newPos = this.pos.plus(motion);
  var obstacle = level.obstacleAt(newPos, this.size);
  if (obstacle)
    level.playerTouched(obstacle);
  else
    this.pos = newPos;
};moveY() :
var gravity = 30;
var jumpSpeed = 17;

Player.prototype.moveY = function(step, level, keys) {
  this.speed.y += step * gravity;
  var motion = new Vector(0, this.speed.y * step);
  var newPos = this.pos.plus(motion);
  var obstacle = level.obstacleAt(newPos, this.size);
  if (obstacle) {
    level.playerTouched(obstacle);
    if (keys.up && this.speed.y > 0)
      this.speed.y = -jumpSpeed;
    else
      this.speed.y = 0;
  } else {
    this.pos = newPos;
  }
};
moveY() 需要考虑重力加速度,如果没有碰撞,y方向的speed会持续增加 step * gravity 。
Level.playerTouched() :
Level.prototype.playerTouched = function(type, actor) {
  if (type == "lava" && this.status == null) {
    this.status = "lost";
    this.finishDelay = 1;
  } else if (type == "coin") {
    this.actors = this.actors.filter(function(other) {
      return other != actor;
    });
    if (!this.actors.some(function(actor) {
      return actor.type == "coin";
    })) {
      this.status = "won";
      this.finishDelay = 1;
    }
  }
};10. Tracking Keys
跟踪键盘事件,绑定三个按键的event(左、上、右)。
因为游戏是定时刷新的,所以不需要在每次收到键盘event时直接改变game场景,而是把按键的状态记下来,在下一个时间片时再处理该event。
var arrowCodes = {37: "left", 38: "up", 39: "right"};

function trackKeys(codes) {
  var pressed = Object.create(null);
  function handler(event) {
    if (codes.hasOwnProperty(event.keyCode)) {
      var down = event.type == "keydown";
      pressed[codes[event.keyCode]] = down;
      event.preventDefault();
    }
  }
  addEventListener("keydown", handler);
  addEventListener("keyup", handler);
  return pressed;
}11. Running the Game
前文一直多次提到游戏场景定时刷新,这个定时并不是用setInterval或setTimeout这样的定时器,而是用第13章讲过的requestAnimationFrame() 。该函数通知系统需要刷新屏幕,系统会选择合适的时机执行传入的函数。这样可以更好的平衡性能和游戏的流畅性。
我们需要定义一个辅助函数 runAnimation() ,用于组织 requestAnimationFrame() 的执行:
function runAnimation(frameFunc) {
  var lastTime = null;
  function frame(time) {
    var stop = false;
    if (lastTime != null) {
      var timeStep = Math.min(time - lastTime, 100) / 1000;
      stop = frameFunc(timeStep) === false;
    }
    lastTime = time;
    if (!stop)
      requestAnimationFrame(frame);
  }
  requestAnimationFrame(frame);
}2. 内部的fame函数有个time参数,它是由系统传入的,是当前系统时间;
3. 注意 var timeStep,它是当前时间与上次刷新时间的间隔,问什么要给它取个最大值(100ms)呢? 因为,如果浏览器窗口 (或tab) 被隐藏了,系统就会停止刷新该窗口,直到该窗口重新显示出来。 这可以起到暂停游戏的作用。
游戏的总控函数:
function runGame(plans, Display) {
  function startLevel(n) {
    runLevel(new Level(plans[n]), Display, function(status) {
      if (status == "lost")
        startLevel(n);
      else if (n < plans.length - 1)
        startLevel(n + 1);
      else
        console.log("You win!");
    });
  }
  startLevel(0);
}
var arrows = trackKeys(arrowCodes);
function runLevel(level, Display, andThen) {
var display = new Display(document.body, level);
runAnimation(function(step) {
level.animate(step, arrows);
display.drawFrame(step);
if (level.isFinished()) {
display.clear();
if (andThen)
andThen(level.status);
return false;
}
});
}12. Exercise: Game Over
现在的player有无数条命,如果在某一关失败了可以重复无数次。给它加个上限:3条命,如果失败3次,则从第一关开始。
    function runGame(plans, Display) {
        var lifeCount = 3;
        function startLevel(n) {
            runLevel(new Level(plans[n]), Display, function(status) {
                if (status == "lost") {
                    lifeCount --;
                    if(lifeCount > 0) {
                        startLevel(n);
                    }
                    else {
                        startLevel(0);
                    }
                }
                else if (n < plans.length - 1)
                    startLevel(n + 1);
                else
                    console.log("You win!");
            });
        }
        startLevel(0);
    }
13. Exercise: Pausing the Game
function runLevel(level, Display, andThen) {
    var display = new Display(document.body, level);
    var running = "yes";
    function handleKey(event) {
      if (event.keyCode == 27) {
        if (running == "no") {
          running = "yes";
          runAnimation(animation);
        } else if (running == "pausing") {
          running = "yes";
        } else if (running == "yes") {
          running = "pausing";
        }
      }
    }
    addEventListener("keydown", handleKey);
    var arrows = trackKeys(arrowCodes);

    function animation(step) {
      if (running == "pausing") {
        running = "no";
        return false;
      }

      level.animate(step, arrows);
      display.drawFrame(step);
      if (level.isFinished()) {
        display.clear();
        // Here we remove all our event handlers
        removeEventListener("keydown", handleKey);
        arrows.unregister(); // (see change to trackKeys below)
        if (andThen)
          andThen(level.status);
        return false;
      }
    }
    runAnimation(animation);
  }

  function trackKeys(codes) {
    var pressed = Object.create(null);
    function handler(event) {
      if (codes.hasOwnProperty(event.keyCode)) {
        var state = event.type == "keydown";
        pressed[codes[event.keyCode]] = state;
        event.preventDefault();
      }
    }
    addEventListener("keydown", handler);
    addEventListener("keyup", handler);

    // This is new -- it allows runLevel to clean up its handlers
    pressed.unregister = function() {
      removeEventListener("keydown", handler);
      removeEventListener("keyup", handler);
    };
    // End of new code
    return pressed;
  }
最后一题比较复杂,留待以后慢慢看。


 388
388

 被折叠的 条评论
为什么被折叠?
被折叠的 条评论
为什么被折叠?
 到【灌水乐园】发言


