


 本文深入探讨Android应用组件Activity的启动过程,包括Starting Window的显示、新进程的启动、Application Transition的动画效果,特别是activity和widget的Transition动画。文章详细解析了启动过程中的关键步骤和相关规则,如activity在不同场景下的Transition动画选择。
本文为原创文章,欢迎转载!转载时请注明出处:http://blog.csdn.net/windskier
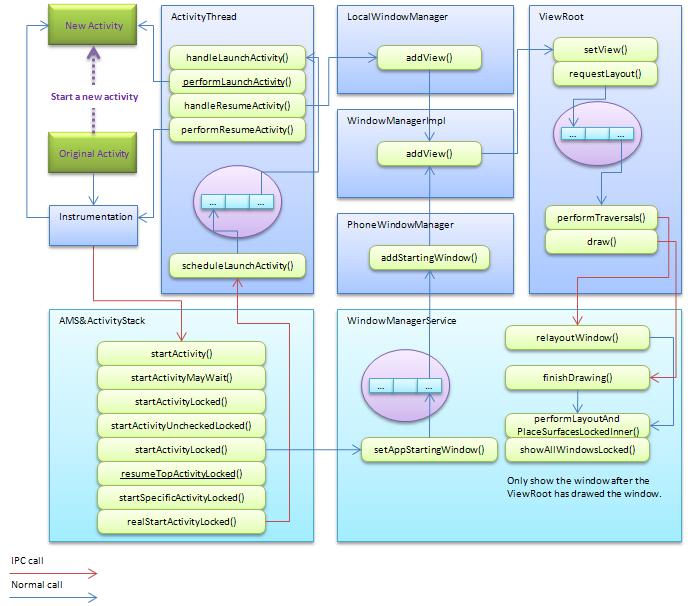
上篇文章分析完了task的创建或者复用,接下来接着分析activity在启动过程中还有哪些工作需要去完成?首先给出整个activity的过程图。
1. Starting Window
当该activity运行在新的task中或者进程中时,需要在activity显示之前显示一个Starting Window。如上图所示的setAppStartingWindow()方法,这个Starting Window上并没有绘制任何的view,它就是一个空白的Window,但是WMS赋予了它一个animation。这个Starting Window的处理过程需要注意几点:
·1. 在AMS请求WMS启动Starting Window时,这个过程是被置在WMS的消息队列中,也就是说这个过程是一个异步的过程,并且需要将其置在WMS消息队列的队首。
一般情况下,Starting Window是在activity Window之前显示的,但是由于是异步过程,因此从理论上来说activity Window较早显示是有可能的,如果这样的话,Starting Window将会被清除而不再显示。例如在addStartingWindow()@PhoneWindowManager.java方法调用addView之前做一个sleep操作,结果就可能不显示Starting Window。
setAppStartingWindow()@WindowManagerService.java
                        // The previous app was getting ready to show a
                        // starting window, but hasn't yet done so.  Steal it!
                        if (DEBUG_STARTING_WINDOW) Slog.v(TAG,
                                "Moving pending starting from " + ttoken
                                + " to " + wtoken);
                        wtoken.startingData = ttoken.startingData;
                        ttoken.startingData = null;
                        ttoken.startingMoved = true;
                        Message m = mH.obtainMessage(H.ADD_STARTING, wtoken);
                        // Note: we really want to do sendMessageAtFrontOfQueue() because we
                        // want to process the message ASAP, before any other queued
                        // messages.
                        mH.sendMessageAtFrontOfQueue(m);
                        return;
2. Starting Window是设置了Animation的
addStartingWindow()@PhoneWindowManager.java
            final WindowManager.LayoutParams params = win.getAttributes();
            params.token = appToken;
            params.packageName = packageName;
            params.windowAnimations = win.getWindowStyle().getResourceId(
                    com.android.internal.R.styleable.Window_windowAnimationStyle, 0);
            params.setTitle("Starting " + packageName);
3. Starting Window同普通的activity Window一样,均为一个PhoneWindow,其中包看着DecorView和ViewRoot。
addStartingWindow()@PhoneWindowManager.java
        try {
            Context context = mContext;
            boolean setTheme = false;
            //Log.i(TAG, "addStartingWindow " + packageName + ": nonLocalizedLabel="
            //        + nonLocalizedLabel + " theme=" + Integer.toHexString(theme));
            if (theme != 0 || labelRes != 0) {
                try {
                    context = context.createPackageContext(packageName, 0);
                    if (theme != 0) {
                        context.setTheme(theme);
                        setTheme = true;
                    }
                } catch (PackageManager.NameNotFoundException e) {
                    // Ignore
                }
            }
            if (!setTheme) {
                context.setTheme(com.android.internal.R.style.Theme);
            }
            //创建PhoneWindow
            Window win = PolicyManager.makeNewWindow(context);
            if (win.getWindowStyle().getBoolean(
                    com.android.internal.R.styleable.Window_windowDisablePreview, false)) {
                return null;
            }

            Resources r = context.getResources();
            win.setTitle(r.getText(labelRes, nonLocalizedLabel));

            win.setType(
                WindowManager.LayoutParams.TYPE_APPLICATION_STARTING);
            // Force the window flags: this is a fake window, so it is not really
            // touchable or focusable by the user.  We also add in the ALT_FOCUSABLE_IM
            // flag because we do know that the next window will take input
            // focus, so we want to get the IME window up on top of us right away.
            win.setFlags(
                WindowManager.LayoutParams.FLAG_NOT_TOUCHABLE|
                WindowManager.LayoutParams.FLAG_NOT_FOCUSABLE|
                WindowManager.LayoutParams.FLAG_ALT_FOCUSABLE_IM,
                WindowManager.LayoutParams.FLAG_NOT_TOUCHABLE|
                WindowManager.LayoutParams.FLAG_NOT_FOCUSABLE|
                WindowManager.LayoutParams.FLAG_ALT_FOCUSABLE_IM);

            win.setLayout(WindowManager.LayoutParams.MATCH_PARENT,
                                WindowManager.LayoutParams.MATCH_PARENT);

            final WindowManager.LayoutParams params = win.getAttributes();
            params.token = appToken;
            params.packageName = packageName;
            params.windowAnimations = win.getWindowStyle().getResourceId(
                    com.android.internal.R.styleable.Window_windowAnimationStyle, 0);
            params.setTitle("Starting " + packageName);

            WindowManagerImpl wm = (WindowManagerImpl)
                    context.getSystemService(Context.WINDOW_SERVICE);
            View view = win.getDecorView();

            if (
最低0.47元/天 解锁文章


 3万+
3万+

 被折叠的 条评论
为什么被折叠?
被折叠的 条评论
为什么被折叠?
 到【灌水乐园】发言


