


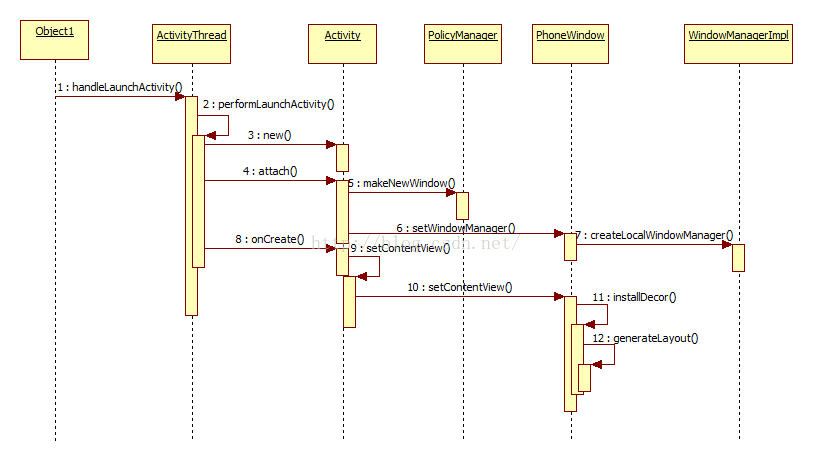
上面函数中涉及到两个重要函数:performLaunchActivity,handleResumeActivity;/** \frameworks\base\core\java\android\app\ActivityThread.java**/ private void handleLaunchActivity(ActivityClientRecord r, Intent customIntent) { ... WindowManagerGlobal.initialize(); /** 这里调用了一个performLaunchActivity的函数,创建了一个Activity*/ Activity a = performLaunchActivity(r, customIntent); if (a != null) { r.createdConfig = new Configuration(mConfiguration); Bundle oldState = r.state; /** 同样留意这个与Activity相关的函数**/ handleResumeActivity(r.token, false, r.isForward, !r.activity.mFinished && !r.startsNotResumed); ... } }
可以得到上面所完成的事情包括有:/** \frameworks\base\core\java\android\app\ActivityThread.java**/ private Activity performLaunchActivity(ActivityClientRecord r, Intent customIntent) { ActivityInfo aInfo = r.activityInfo; ... ComponentName component = r.intent.getComponent(); ... Activity activity = null; try { java.lang.ClassLoader cl = r.packageInfo.getClassLoader(); /** Instrumentation类, newActivity函数根据Activity的类名 * 通过Java反射机制来创建相应的Activity*/ activity = mInstrumentation.newActivity( cl, component.getClassName(), r.intent); StrictMode.incrementExpectedActivityCount(activity.getClass()); r.intent.setExtrasClassLoader(cl); r.intent.prepareToEnterProcess(); if (r.state != null) { r.state.setClassLoader(cl); } } catch (Exception e) { ... } try { Application app = r.packageInfo.makeApplication(false, mInstrumentation); if (activity != null) { /** 查看该函数源码知道appContext的类型其实是ContextImpl*/ Context appContext = createBaseContextForActivity(r, activity); CharSequence title = r.activityInfo.loadLabel(appContext.getPackageManager()); Configuration config = new Configuration(mCompatConfiguration); /*** 重要的attach函数**/ activity.attach(appContext, this, getInstrumentation(), r.token, r.ident, app, r.intent, r.activityInfo, title, r.parent, r.embeddedID, r.lastNonConfigurationInstances, config, r.referrer, r.voiceInteractor); if (customIntent != null) { activity.mIntent = customIntent; } r.lastNonConfigurationInstances = null; activity.mStartedActivity = false; /** 设置Activity Theme主题**/ int theme = r.activityInfo.getThemeResource(); if (theme != 0) { activity.setTheme(theme); } activity.mCalled = false; /** 这里开始调用Activity的onCreate函数**/ if (r.isPersistable()) { mInstrumentation.callActivityOnCreate(activity, r.state, r.persistentState); } else { mInstrumentation.callActivityOnCreate(activity, r.state); } ... } r.paused = true; mActivities.put(r.token, r); } catch (SuperNotCalledException e) { throw e; } catch (Exception e) { ... } return activity; }
这里涉及到两个重要类Window,View;/** \frameworks\base\core\java\android\app\Activity.java **/ public void setContentView(int layoutResID) { getWindow().setContentView(layoutResID); initWindowDecorActionBar(); } public void setContentView(View view) { getWindow().setContentView(view); initWindowDecorActionBar(); } public Window getWindow() { return mWindow; } private Window mWindow;
activity.attach(appContext, this, getInstrumentation(), r.token,
                    r.ident, app, r.intent, r.activityInfo, title, r.parent,
                    r.embeddedID, r.lastNonConfigurationInstances, config,
                    r.referrer, r.voiceInteractor);
/** \frameworks\base\core\java\android\app\Activity.java **/
final void attach(Context context, ActivityThread aThread,
                  Instrumentation instr, IBinder token, int ident,
                  Application application, Intent intent, ActivityInfo info,
                  CharSequence title, Activity parent, String id,
                  NonConfigurationInstances lastNonConfigurationInstances,
                  Configuration config, String referrer, IVoiceInteractor voiceInteractor) {
    /****** 进行一系列初始化  *****/
    // 设置Context,这里其前面创建的appContext
    attachBaseContext(context);
    // 将Fragments添加到对应的Activity上
    mFragments.attachActivity(this, mContainer, null);

    // 这里使用PolicyManager来创建PhoneWindow对象
    mWindow = PolicyManager.makeNewWindow(this);
    mWindow.setCallback(this);
    ......
    mUiThread = Thread.currentThread();
    ......
    // 前面提到Window中有一个mWindowManager对象来实现WMS进行通信
    mWindow.setWindowManager((WindowManager)context.getSystemService(Context.WINDOW_SERVICE),
            mToken, mComponent.flattenToString(),
            (info.flags & ActivityInfo.FLAG_HARDWARE_ACCELERATED) != 0);
    if (mParent != null) {
        mWindow.setContainer(mParent.getWindow());
    }
    mWindowManager = mWindow.getWindowManager();
    mCurrentConfig = config;

}
这里最重要的为mWindow初始化,这里借由PolicyManager的makeNewWindow进行初始化。
3、PolicyManager#makeNewWindow:
/**\frameworks\base\core\java\com\android\internal\policy\PolicyManager.java **/
public final class PolicyManager {
    private static final String POLICY_IMPL_CLASS_NAME =
            "com.android.internal.policy.impl.Policy";

    private static final IPolicy sPolicy;

    // 简单的单例模式
    static {
        try {
            Class policyClass = Class.forName(POLICY_IMPL_CLASS_NAME);
            sPolicy = (IPolicy)policyClass.newInstance();
        } catch (ClassNotFoundException ex) {
            ......
        }
    }

    // Cannot instantiate this class
    private PolicyManager() {}

    // 最终会进而调用IPolicy.makeNewWindow来创建Window
    public static Window makeNewWindow(Context context) {
        return sPolicy.makeNewWindow(context);
    }

}
最终通过单例模式创建一个IPolicy对象,调用其makeNewWindow进行Window创建。IPolicy是个interface,其具体实现类是Policy。
4、Policy#makeNewWindow:
/** \frameworks\base\policy\src\com\android\internal\policy\impl\Policy.java **/
public class Policy implements IPolicy {
    private static final String TAG = "PhonePolicy";

    private static final String[] preload_classes = {
            "com.android.internal.policy.impl.PhoneLayoutInflater",
            "com.android.internal.policy.impl.PhoneWindow",
            "com.android.internal.policy.impl.PhoneWindow$1",
            "com.android.internal.policy.impl.PhoneWindow$DialogMenuCallback",
            "com.android.internal.policy.impl.PhoneWindow$DecorView",
            "com.android.internal.policy.impl.PhoneWindow$PanelFeatureState",
            "com.android.internal.policy.impl.PhoneWindow$PanelFeatureState$SavedState",
    };

    // 加载所有的类
    static {
        for (String s : preload_classes) {
            try {
                Class.forName(s);
            } catch (ClassNotFoundException ex) {
            }
        }
    }

    // 看到这里最终返回一个前面所提到的PhoneWIndow类
    public Window makeNewWindow(Context context) {
        return new PhoneWindow(context);
    }
    .......

}
可以看到最终mWindow的真实类型是PhoneWindow;
前面提到Window最终间接实现与WMS进行通信,其实现方式为使用WindowManager。前面设置WindowManager,使用方法:
mWindow.setWindowManager((WindowManager)context.getSystemService(Context.WINDOW_SERVICE),
            mToken, mComponent.flattenToString(),
(info.flags & ActivityInfo.FLAG_HARDWARE_ACCELERATED) != 0);5、Window#setWindowManager:
/** \frameworks\base\core\java\android\view\Window.java **/
public void setWindowManager(WindowManager wm, IBinder appToken, String appName,
    boolean hardwareAccelerated) {
    mAppToken = appToken;
    mAppName = appName;
    mHardwareAccelerated = hardwareAccelerated
            || SystemProperties.getBoolean(PROPERTY_HARDWARE_UI, false);
    // 无论是传入参数wm,还是这里都是获取系统服务WINDOW_SERVICE
    if (wm == null) {
        wm = (WindowManager)mContext.getSystemService(Context.WINDOW_SERVICE);
    }
    // 可以看到其最终运行时类型是由WindowManagerImpl函数createLocalWindowManager决定的
    mWindowManager = ((WindowManagerImpl)wm).createLocalWindowManager(this);
}
6、继续来看WindowManagerImpl#createLocalWindowManager:
/** \frameworks\base\core\java\android\view\WindowManagerImpl.java **/
private WindowManagerImpl(Display display, Window parentWindow) {
    mDisplay = display;
    mParentWindow = parentWindow;
}

// 可以看到其实际运行类型就是WindowManagerImpl,这里对WindowManagerImpl进行了实例化赋给mWindowManager
public WindowManagerImpl createLocalWindowManager(Window parentWindow) {
    return new WindowManagerImpl(mDisplay, parentWindow);
}
总结前面的步骤可以知道这里两个重要的变量,一个mWindow变量其实际运行时类型为PhoneWindow; Window中实现与WMS进行通信的变量mWindowManager其实际运行时类型为WindowManagerImpl;
分析完Window,接下来看View;
(二)View
前面提到设置UI界面使用Activity.setContentView来设置,其具体调用
进行设置;根据Window知道,getWindow的实际类型为PhoneWindow,则接下来看:getWindow().setContentView(view);
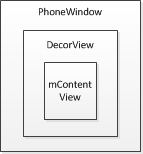
mContentParent是ViewGroup,其默认值为null,因此会首先调用installDecor函数;/** \frameworks\base\policy\src\com\android\internal\policy\impl\PhoneWindow.java **/ @Override public void setContentView(View view) { setContentView(view, new ViewGroup.LayoutParams(MATCH_PARENT, MATCH_PARENT)); } @Override public void setContentView(View view, ViewGroup.LayoutParams params) { // mContentParent是ViewGroup类型,默认为null if (mContentParent == null) { installDecor();// 首先需要生成mDecor对象 } else if (!hasFeature(FEATURE_CONTENT_TRANSITIONS)) { // 如果mContentParent不为null,即不是第一次调用SetContentView,则需要将之前的界面全部移除 // 可以看出其实setContentView是可以重复多次调用的,但一般不这样用 mContentParent.removeAllViews(); } if (hasFeature(FEATURE_CONTENT_TRANSITIONS)) { view.setLayoutParams(params); final Scene newScene = new Scene(mContentParent, view); transitionTo(newScene); } else { // 将View添加到ViewGroup中 mContentParent.addView(view, params); } final Callback cb = getCallback(); if (cb != null && !isDestroyed()) { cb.onContentChanged(); } }
2)PhoneWindow#installDecor:
    /** \frameworks\base\policy\src\com\android\internal\policy\impl\PhoneWindow.java **/
    protected DecorView generateDecor() {
        return new DecorView(getContext(), -1);
    }

    private void installDecor() {
        if (mDecor == null) {
            mDecor = generateDecor();
            ....
        }
        if (mContentParent == null) {
            // 可以看到mContentParent的创建与mDecor相关
            mContentParent = generateLayout(mDecor);
        }
        ...
} /** \frameworks\base\policy\src\com\android\internal\policy\impl\PhoneWindow.java **/
protected ViewGroup generateLayout(DecorView decor) {
// 获取Window的样式
TypedArray a = getWindowStyle();
mIsFloating = a.getBoolean(R.styleable.Window_windowIsFloating, false);
......
int layoutResource;
int features = getLocalFeatures(); /** 根据具体的样式挑选layoutResource最匹配的成员 **/
if ((features & (1 << FEATURE_SWIPE_TO_DISMISS)) != 0) {
layoutResource = R.layout.screen_swipe_dismiss;
} else if ((features & ((1 << FEATURE_LEFT_ICON) | (1 << FEATURE_RIGHT_ICON))) != 0) {
...
} else if ((features & ((1 << FEATURE_PROGRESS) |
(1 << FEATURE_INDETERMINATE_PROGRESS))) != 0 && (features & (1 << FEATURE_ACTION_BAR)) == 0) {
.....
}
mDecor.startChanging(); // 为DecorView添加
View View in = mLayoutInflater.inflate(layoutResource, null);
decor.addView(in, new ViewGroup.LayoutParams(MATCH_PARENT, MATCH_PARENT));
mContentRoot = (ViewGroup) in;
/** @value ID_ANDROID_CONTENT= "com.android.internal.R.id.content" * 该contentParent也是DecorView的一部分**/
ViewGroup contentParent = (ViewGroup) findViewById(ID_ANDROID_CONTENT);
......
mDecor.finishChanging();
return contentParent;
}1>获取Window的样式:(如常用的windowsIsFloating,windowNoTitle,windowFullscreen等);
/** \frameworks\base\core\java\android\view\Window.java **/
public final TypedArray getWindowStyle() {
    synchronized (this) {
        if (mWindowStyle == null) {
            mWindowStyle = mContext.obtainStyledAttributes(
                    com.android.internal.R.styleable.Window);
        }
        return mWindowStyle;
    }
}2>根据Feature的不同来挑选合适的layoutResource;根据指定的layoutResource来生成相应的View对象。并添加到DecorView中;
/** \frameworks\base\core\java\android\view\Window.java **/
public View findViewById(int id) {
    return getDecorView().findViewById(id);
}3>根据ID_ANDROID_CONTENT获取到mContentParent,进而PhoneWindow#setContentView之后执行mContentParent.addView将用户自定义的界面添加到mContentParent中。
因此实际上一个界面其主要的组成部分之间的关系为:
/** \frameworks\base\core\java\android\app\ActivityThread.java **/
final void handleResumeActivity(IBinder token, boolean clearHide, boolean isForward, boolean reallyResume) {
    // 这里将会导Activity中的onResume最终被调用
    ActivityClientRecord r = performResumeActivity(token, clearHide);

    if (r != null) {
        final Activity a = r.activity;
        ......
        if (r.window == null && !a.mFinished && willBeVisible) {
            // 获得Window对象
            r.window = r.activity.getWindow();
            // 获得View对象,即为DecorView
            View decor = r.window.getDecorView();
            decor.setVisibility(View.INVISIBLE); // 先设置为不可见
            // 获得WindowManager,实际上是WindowManagerImpl类型
            ViewManager wm = a.getWindowManager();
            WindowManager.LayoutParams l = r.window.getAttributes();
            a.mDecor = decor;
            l.type = WindowManager.LayoutParams.TYPE_BASE_APPLICATION;
            l.softInputMode |= forwardBit;
            if (a.mVisibleFromClient) {
                a.mWindowAdded = true;
                // 添加DecorView到WindowManager中,
                wm.addView(decor, l);
            }

        }
    }
    ......
}
2、WindowManagerImpl#addView:
/** \frameworks\base\core\java\android\view\WindowManagerImpl.java **/
private final WindowManagerGlobal mGlobal = WindowManagerGlobal.getInstance();
@Override
public void addView(@NonNull View view, @NonNull ViewGroup.LayoutParams params) {
    applyDefaultToken(params);
    mGlobal.addView(view, params, mDisplay, mParentWindow);
}
间接调用的是WindowManagerGlobal中的addView函数;在最初的ActivityThread#handleLaunchActivity中就对WindowManagerGlobal进行了初始化:
WindowManagerGlobal.initialize();故这里可以直接通过getInstance获取其实例。
/** \frameworks\base\core\java\android\view\WindowManagerImpl.java **/
public void addView(View view, ViewGroup.LayoutParams params,
                    Display display, Window parentWindow) {
    ......

    // 重要的ViewRootImpl概念
    ViewRootImpl root;
    View panelParentView = null;

    synchronized (mLock) {
        ......
        // 这里判断view是否已经添加过,如果已经添加过,则直接返回
        int index = findViewLocked(view, false);
        ......
        // 创建ViewRootImpl
        root = new ViewRootImpl(view.getContext(), display);
        view.setLayoutParams(wparams);

        // 通过WindowManagerGlobal将DecorView,与新创建的ViewRoot,以及WindowManager.LayoutParams记录下来
        // 继而注册到WMS中;三个变量均是ArrayList
        mViews.add(view);
        mRoots.add(root);
        mParams.add(wparams);
    }

    try {
        // 将View注册到WMS中,调用的是RootImpl中的相关函数
        // 通过root.setView将DecorView同步记录到ViewRootImpl内部的mView变量中
        root.setView(view, wparams, panelParentView);
    } catch (RuntimeException e) {
        ......
    }
}Activity则与ViewRoot是一一对应的关系。ViewRoot可以通过其内部的sWindowSession变量来与WMS进行通信。接下来分析ViewRoot;
现阶段ViewRootImpl已经取代ViewRoot,其ViewRootImpl的定义为:
/** \frameworks\base\core\java\android\view\ViewRootImpl.java **/
public ViewRootImpl(Context context, Display display) {
    // 创建IWindowSession与WMS进行通信
    mWindowSession = WindowManagerGlobal.getWindowSession();
    ......
    mWindow = new W(this);
    ......
}(一)与WMS的交互:
1、WindowManagerGlobal#getWindowSession:
/** \frameworks\base\core\java\android\view\WindowManagerGlobal.java **/
public static IWindowSession getWindowSession(Looper mainLooper) {
    synchronized (WindowManagerGlobal.class) {
        if (sWindowSession == null) {
            try {
                InputMethodManager imm = InputMethodManager.getInstance(mainLooper);
                // 获取IWindowManager变量
                IWindowManager windowManager = getWindowManagerService();
                // @value static IWindowSession sWindowSession;
                // 通过openSession来获得Session,来与WMS建立关联
                sWindowSession = windowManager.openSession(
                        imm.getClient(), imm.getInputContext());
                float animatorScale = windowManager.getAnimationScale(2);
                ValueAnimator.setDurationScale(animatorScale);
            } catch (RemoteException e) {
            }
        }
        return sWindowSession;
    }
}WindowManagerImpl是完全基于本地实现的,它存储于应用程序的内部用以窗口管理的相关事宜;
IWindowManager则类似于Binder机制解析中的机制,是WMS在本地端的代理,用以本地端与WMS进行通信;
看下IWindowManager windowManager由getWindowManagerService来获取:
/** \frameworks\base\core\java\android\view\WindowManagerGlobal.java **/
public static IWindowManager getWindowManagerService() {
    synchronized (WindowManagerGlobal.class) {
        if (sWindowManagerService == null) {
            sWindowManagerService = IWindowManager.Stub.asInterface(
                    ServiceManager.getService("window"));
        }
        return sWindowManagerService;
    }
}
2、IWindowManager也是明显的AIDL,其对应Serice为WindowManagerService:
/** \frameworks\base\services\core\java\com\android\server\wm\WindowManagerService.java **/
public class WindowManagerService extends IWindowManager.Stub

WindowManagerService#openSession:
/** \frameworks\base\services\core\java\com\android\server\wm\WindowManagerService.java **/
@Override
public IWindowSession openSession(IWindowSessionCallback callback, IInputMethodClient client,
                                  IInputContext inputContext) {
    if (client == null) throw new IllegalArgumentException("null client");
    if (inputContext == null) throw new IllegalArgumentException("null inputContext");

    // 可见最终IWindowSession的运行时类型是Session
    Session session = new Session(this, callback, client, inputContext);
    return session;
}
/** \frameworks\base\services\core\java\com\android\server\wm\Session.java **/
final class Session extends IWindowSession.Stub (二)WindowManagerGlobal#addView创建了ViewRootImpl实例,ViewRootImpl在创建对象过程中获取了自身与WMS之间的连接,获取到IWindowSession;
接下来addView调用root.setView(view, wparams, panelParentView);来WMS正式建立起连接;
1、ViewRootImpl#setView:
/** \frameworks\base\core\java\android\view\ViewRootImpl.java **/
public void setView(View view, WindowManager.LayoutParams attrs, View panelParentView) {
    synchronized (this) {
        if (mView == null) {
            // 前面提到的使用mView变量来记录VIewRootImpl所管理的View树的根
            // 由传入参数可知,此view即实际的DecorView
            mView = view;
            ......
            // 执行layout
            requestLayout();
            if ((mWindowAttributes.inputFeatures
                    & WindowManager.LayoutParams.INPUT_FEATURE_NO_INPUT_CHANNEL) == 0) {
                mInputChannel = new InputChannel();
            }
            try {
               .....
                // 可以看到这个函数用到了前面创建的mWindowSession,与IWindow
                res = mWindowSession.addToDisplay(mWindow, mSeq, mWindowAttributes,
                        getHostVisibility(), mDisplay.getDisplayId(),
                        mAttachInfo.mContentInsets, mAttachInfo.mStableInsets, mInputChannel);
            } catch (RemoteException e) {
            }
            ....
        }
    }
}
上面主要完成了三件事情:、
1>使用变量mView记录ViewRootImpl所管理的View树的树根,这里即DecorView;
2>调用requestLayout,执行layout
3>通过mWindowSession.addDisplay与WMS建立起关联。
2、Session#addToDisplay:
/** \frameworks\base\services\core\java\com\android\server\wm\Session.java **/
@Override
public int addToDisplay(IWindow window, int seq, WindowManager.LayoutParams attrs,
                        int viewVisibility, int displayId, Rect outContentInsets, Rect outStableInsets,
                        InputChannel outInputChannel) {
    // @value final WindowManagerService mService;
    return mService.addWindow(this, window, seq, attrs, viewVisibility, displayId,
            outContentInsets, outStableInsets, outInputChannel);
}
3、WindowManagerService#addWindow:
/** \frameworks\base\services\core\java\com\android\server\wm\WindowManagerService.java **/
public int addWindow(Session session, IWindow client, int seq,
                     WindowManager.LayoutParams attrs, int viewVisibility, int displayId,
                     Rect outContentInsets, Rect outStableInsets, InputChannel outInputChannel) {
    ......
    WindowState attachedWindow = null;
    WindowState win = null;

    synchronized(mWindowMap) {
        ......
        // 创建WindowState实例,WindowState是WMS对窗口的描述
        win = new WindowState(this, session, client, token,
                attachedWindow, appOp[0], seq, attrs, viewVisibility, displayContent);
        ......
        win.attach();
    }
    ......
    return res;
}4、WindowState#attach:
/** \frameworks\base\services\core\java\com\android\server\wm\WindowState.java **/
void attach() {
    mSession.windowAddedLocked();
}

/** \frameworks\base\services\core\java\com\android\server\wm\Session.java **/
void windowAddedLocked() {
    if (mSurfaceSession == null) {
        mSurfaceSession = new SurfaceSession();
        mService.mSessions.add(this);
        if (mLastReportedAnimatorScale != mService.getCurrentAnimatorScale()) {
            mService.dispatchNewAnimatorScaleLocked(this);
        }
    }
    mNumWindow++;
}


 1193
1193


 被折叠的 条评论
为什么被折叠?
被折叠的 条评论
为什么被折叠?
 到【灌水乐园】发言


