


 本文详细探讨了Android中ViewPostImeInputStage的onProgress和processPointerEvent处理过程,以及ViewRootImpl如何传递事件到View树。重点讲解了View的dispatchPointerEvent,包括OnTouchListener的onTouch方法和Activity的onTouchEvent方法的工作原理。当触摸事件发生时,首先由View的子类处理,然后根据onTouch的返回值决定是否继续传递给Activity的onTouchEvent。同时介绍了InputManagerService在Java层和Native层的角色以及InputChannel的重要作用。
final class SyntheticInputStage extends InputStage
final class NativePostImeInputStage extends AsyncInputStage
      implements InputQueue.FinishedInputEventCallback
final class ViewPostImeInputStage extends InputStage/** \frameworks\base\core\java\android\view\ViewRootImpl.java **/
abstract class InputStage {
private final InputStage mNext;
protected static final int FORWARD = 0;
protected static final int FINISH_HANDLED = 1;
protected static final int FINISH_NOT_HANDLED = 2;
/**
* Creates an input stage.
* @param next The next stage to which events should be forwarded.
*/
public InputStage(InputStage next) {
mNext = next;
}
/**
* 处理event
*/
public final void deliver(QueuedInputEvent q) {
// 有效的event传递给下一stage
if ((q.mFlags & QueuedInputEvent.FLAG_FINISHED) != 0) {
forward(q);
} else if (shouldDropInputEvent(q)) { // 应当被drop的Event
finish(q, false);
} else {
apply(q, onProcess(q));
}
}
/**
* 标记该event为finished,并传递给下一个stage
*/
protected void finish(QueuedInputEvent q, boolean handled) {
q.mFlags |= QueuedInputEvent.FLAG_FINISHED;
if (handled) {
q.mFlags |= QueuedInputEvent.FLAG_FINISHED_HANDLED;
}
forward(q);
}
/**
* 将event向前传递给下一个stage
*/
protected void forward(QueuedInputEvent q) {
onDeliverToNext(q);
}
/**
* 根据result code处理对应的event
* Applies a result code from {@link #onProcess} to the specified event.
*/
protected void apply(QueuedInputEvent q, int result) {
if (result == FORWARD) {
forward(q);
} else if (result == FINISH_HANDLED) {
finish(q, true);
} else if (result == FINISH_NOT_HANDLED) {
finish(q, false);
} else {
throw new IllegalArgumentException("Invalid result: " + result);
}
}
/**
* 一般继承类会Override该函数
* Called when an event is ready to be processed.
* @return A result code indicating how the event was handled.
*/
protected int onProcess(QueuedInputEvent q) {
return FORWARD;
}
/**
* 将event传递给下一stage
*/
protected void onDeliverToNext(QueuedInputEvent q) {
if (DEBUG_INPUT_STAGES) {
Log.v(TAG, "Done with " + getClass().getSimpleName() + ". " + q);
}
if (mNext != null) {
mNext.deliver(q);
} else {
// 调用ViewRootImpl的方法
finishInputEvent(q);
}
}
// 判断是否应该丢弃该Event
protected boolean shouldDropInputEvent(QueuedInputEvent q) {
if (mView == null || !mAdded) {
Slog.w(TAG, "Dropping event due to root view being removed: " + q.mEvent);
return true;
} else if ((!mAttachInfo.mHasWindowFocus || mStopped)
&& !q.mEvent.isFromSource(InputDevice.SOURCE_CLASS_POINTER)) {
// 这里是一个focus事件,但当前该window已经不持有input focus,或者已经stopped.
// 该情况可能是该event来自于previous stage,但与此同时该window失去了焦点或者已经被停止
if (isTerminalInputEvent(q.mEvent)) {
// Don't drop terminal input events, however mark them as canceled.
q.mEvent.cancel();
Slog.w(TAG, "Cancelling event due to no window focus: " + q.mEvent);
return false;
}
// Drop non-terminal input events.
Slog.w(TAG, "Dropping event due to no window focus: " + q.mEvent);
return true;
}
return false;
}
void dump(String prefix, PrintWriter writer) {
if (mNext != null) {
mNext.dump(prefix, writer);
}
}
}1)ViewPostImeInputStage#onProgress:
/** \frameworks\base\core\java\android\view\ViewRootImpl.java **/
@Override
protected int onProcess(QueuedInputEvent q) {
    if (q.mEvent instanceof KeyEvent) { // 如果是按键事件,processKeyEvent进行处理
        return processKeyEvent(q);
    } else {
        // If delivering a new non-key event, make sure the window is
        // now allowed to start updating.
        handleDispatchDoneAnimating();
        final int source = q.mEvent.getSource();
        // 通过source即事件源来分类型进行处理
        if ((source & InputDevice.SOURCE_CLASS_POINTER) != 0) {
            return processPointerEvent(q);
        } else if ((source & InputDevice.SOURCE_CLASS_TRACKBALL) != 0) {
            return processTrackballEvent(q);
        } else {
            return processGenericMotionEvent(q);
        }
    }
}
当判断是 SOURCE_CLASS_POINTER类型的事件后,会调用processPointerEvent方法进行处理。
2)ViewPostImeInputStage#processPointEvent:
/** \frameworks\base\core\java\android\view\View.java **/
private int processPointerEvent(QueuedInputEvent q) {
    final MotionEvent event = (MotionEvent)q.mEvent;

    mAttachInfo.mUnbufferedDispatchRequested = false;
    // 此时ViewRootImpl会将事件的处理权移交给View树的根节点,调用dispatchPointerEvent函数
    boolean handled = mView.dispatchPointerEvent(event);
    if (mAttachInfo.mUnbufferedDispatchRequested && !mUnbufferedInputDispatch) {
        mUnbufferedInputDispatch = true;
        if (mConsumeBatchedInputScheduled) {
            scheduleConsumeBatchedInputImmediately();
        }
    }
    return handled ? FINISH_HANDLED : FORWARD;
}
ViewRootImpl负责将Event事件传递进来,并根据source的不同进行分类处理;进而将事件的控制权与处理权移交给View树的根View进行dispatchPointerEvent进行处理。
3)View#dispatchPointerEvent:
/** \frameworks\base\core\java\android\view\View.java **/
public final boolean dispatchPointerEvent(MotionEvent event) {
    // 按照是否是TouchEvent进行分别处理
    if (event.isTouchEvent()) {
        return dispatchTouchEvent(event);
    } else { // 如果不是调用GenericMotionEvent(Generic——一般的)
        return dispatchGenericMotionEvent(event);
    }
}/** \frameworks\base\core\java\android\view\View.java **/
public boolean dispatchTouchEvent(MotionEvent event) {
......
// 根据安全策略对Touch Event进行过滤
if (onFilterTouchEventForSecurity(event)) {
//noinspection SimplifiableIfStatement
// ListenerInfo中注册了众多的Listener
ListenerInfo li = mListenerInfo;
if (li != null && li.mOnTouchListener != null
&& (mViewFlags & ENABLED_MASK) == ENABLED
&& li.mOnTouchListener.onTouch(this, event)) {
// 可以看到这里会首先调用TouchListener中的onTouch进行事件处理
result = true;
}
// 如果TouchListener中的onTouch返回结果为false的话,View中的onTouchEvent才会继续调用
if (!result && onTouchEvent(event)) {
result = true;
}
}
......
return result;
}1>onTouch方法:
onTouch方法是View的 OnTouchListener借口中定义的方法。
当一个View绑定了OnTouchLister后,当有touch事件触发时,就会调用onTouch方法。
(当把手放到View上后,onTouch方法被一遍一遍地被调用)
2>onTouchEvent方法:
onTouchEvent方法是override 的Activity的方法。
重新了Activity的onTouchEvent方法后,当屏幕有touch事件时,此方法就会别调用。
(当把手放到Activity上时,onTouchEvent方法就会一遍一遍地被调用)
View 中存在onTouchEvent方法,在定义View的时候重写onTouchEvent可以进行事件处理。
3>touch事件的传递:
在一个Activity里面放一个TextView的实例tv,并且这个tv的属性设定为 fill_parent
在这种情况下,当手放到屏幕上的时候,首先会是tv响应touch事件,执行onTouch方法。
如果onTouch返回值为true,
表示这个touch事件被onTouch方法处理完毕,不会把touch事件再传递给Activity,
也就是说onTouchEvent方法不会被调用。
(当把手放到屏幕上后,onTouch方法被一遍一遍地被调用)
如果onTouch的返回值是false,
表示这个touch事件没有被tv完全处理,onTouch返回以后,touch事件被传递给Activity,
onTouchEvent方法被调用。
来看一下上面涉及到的几个简单的类:
1>Listener的综合管理类:
/** \frameworks\base\core\java\android\view\View.java **/
static class ListenerInfo {
    /**
     * Listener used to dispatch focus change events.
     * This field should be made private, so it is hidden from the SDK.
     * {@hide}
     */
    protected OnFocusChangeListener mOnFocusChangeListener;

    /**
     * Listeners for layout change events.
     */
    private ArrayList<OnLayoutChangeListener> mOnLayoutChangeListeners;

    protected OnScrollChangeListener mOnScrollChangeListener;

    /**
     * Listeners for attach events.
     */
    private CopyOnWriteArrayList<OnAttachStateChangeListener> mOnAttachStateChangeListeners;

    /**
     * Listener used to dispatch click events.
     * This field should be made private, so it is hidden from the SDK.
     * {@hide}
     */
    public OnClickListener mOnClickListener;

    /**
     * Listener used to dispatch long click events.
     * This field should be made private, so it is hidden from the SDK.
     * {@hide}
     */
    protected OnLongClickListener mOnLongClickListener;

    /**
     * Listener used to build the context menu.
     * This field should be made private, so it is hidden from the SDK.
     * {@hide}
     */
    protected OnCreateContextMenuListener mOnCreateContextMenuListener;

    private OnKeyListener mOnKeyListener;

    private OnTouchListener mOnTouchListener;

    private OnHoverListener mOnHoverListener;

    private OnGenericMotionListener mOnGenericMotionListener;

    private OnDragListener mOnDragListener;

    private OnSystemUiVisibilityChangeListener mOnSystemUiVisibilityChangeListener;

    OnApplyWindowInsetsListener mOnApplyWindowInsetsListener;
}/** \frameworks\base\core\java\android\view\View.java **/
public void setOnClickListener(OnClickListener l) {
if (!isClickable()) {
setClickable(true);
}
getListenerInfo().mOnClickListener = l;
}
ListenerInfo getListenerInfo() {
if (mListenerInfo != null) {
return mListenerInfo;
}
mListenerInfo = new ListenerInfo();
return mListenerInfo;
}/** \frameworks\base\core\java\android\view\View.java **/
/**
* Interface definition for a callback to be invoked when a touch event is
* dispatched to this view. The callback will be invoked before the touch
* event is given to the view.
*/
public interface OnTouchListener {
/**
* Called when a touch event is dispatched to a view. This allows listeners to
* get a chance to respond before the target view.
*
* @param v The view the touch event has been dispatched to.
* @param event The MotionEvent object containing full information about
* the event.
* @return True if the listener has consumed the event, false otherwise.
*/
boolean onTouch(View v, MotionEvent event);
}/** \frameworks\base\core\java\android\view\View.java **/
public boolean onTouchEvent(MotionEvent event) {
// 获得触摸点的位置
final float x = event.getX();
final float y = event.getY();
final int viewFlags = mViewFlags;
if ((viewFlags & ENABLED_MASK) == DISABLED) {
if (event.getAction() == MotionEvent.ACTION_UP && (mPrivateFlags & PFLAG_PRESSED) != 0) {
setPressed(false);
}
// 当一个View处于disabled状态时,他仍然会消耗该event事件,但是并不会做出任何响应
return (((viewFlags & CLICKABLE) == CLICKABLE ||
(viewFlags & LONG_CLICKABLE) == LONG_CLICKABLE));
}
if (mTouchDelegate != null) {
if (mTouchDelegate.onTouchEvent(event)) {
return true;
}
}
// 如果View是CLICKABLE或者LONG_CLICKABLE的,继续对event进行处理
if (((viewFlags & CLICKABLE) == CLICKABLE ||
(viewFlags & LONG_CLICKABLE) == LONG_CLICKABLE)) {
// TouchEvent分为多种类型:ACTION_UP、ACTION_DOWN、ACTION_CANCEL、ACTION_MOVE,对其进行分别响应处理
switch (event.getAction()) {
case MotionEvent.ACTION_UP:
......
break;
case MotionEvent.ACTION_DOWN:
......
break;
case MotionEvent.ACTION_CANCEL:
......
break;
case MotionEvent.ACTION_MOVE:
......
break;
}
return true;
}
return false;
}/** \frameworks\base\core\java\android\view\View.java
View#onTouchEvent**/
case MotionEvent.ACTION_DOWN:
// 长按事件标志
mHasPerformedLongPress = false;
if (performButtonActionOnTouchDown(event)) {
break;
}
// 判断touch事件是否是在一个scrolling container中.
boolean isInScrollingContainer = isInScrollingContainer();
// For views inside a scrolling container, delay the pressed feedback for
// a short period in case this is a scroll.
if (isInScrollingContainer) {
mPrivateFlags |= PFLAG_PREPRESSED;
if (mPendingCheckForTap == null) {
mPendingCheckForTap = new CheckForTap();
}
mPendingCheckForTap.x = event.getX();
mPendingCheckForTap.y = event.getY();
postDelayed(mPendingCheckForTap, ViewConfiguration.getTapTimeout());
} else {
/** 普通touch事件,进行标志设置 **/
// 设置pressed状态
setPressed(true, x, y);
// 判断是否是LongClick事件
checkForLongClick(0);
}
break;/** \frameworks\base\core\java\android\view\View.java **/
private void setPressed(boolean pressed, float x, float y) {
if (pressed) {
drawableHotspotChanged(x, y);
}
setPressed(pressed);
}
public void setPressed(boolean pressed) {
final boolean needsRefresh = pressed != ((mPrivateFlags & PFLAG_PRESSED) == PFLAG_PRESSED);
if (pressed) {
mPrivateFlags |= PFLAG_PRESSED;
} else {
mPrivateFlags &= ~PFLAG_PRESSED;
}
// 根据是否需要进行重新UI绘制,绘制函数即为refreshDrawableState
if (needsRefresh) {
refreshDrawableState();
}
dispatchSetPressed(pressed);
}/** \frameworks\base\core\java\android\view\View.java **/
/** 判断是否是LongClick事件 **/
private void checkForLongClick(int delayOffset) {
if ((mViewFlags & LONG_CLICKABLE) == LONG_CLICKABLE) {
mHasPerformedLongPress = false;
if (mPendingCheckForLongPress == null) {
mPendingCheckForLongPress = new CheckForLongPress();
}
mPendingCheckForLongPress.rememberWindowAttachCount();
// 在事件发生规定时间(即定义为Long Click的最短长按时间)后,Post一个判断是否是Long Click的Runnable
// 如果是Long Click事件,该Runnable会进行相应的处理;
// 在后面将会看到,如果TIME_OUT之前有ACTION_UP或者ACTION_MOVE事件发生,则会调用removeLongPressCallback();移除这个Runnable
postDelayed(mPendingCheckForLongPress,
ViewConfiguration.getLongPressTimeout() - delayOffset);
}
}
private CheckForLongPress mPendingCheckForLongPress;
/** 判断是否是Long Click事件的线程 **/
private final class CheckForLongPress implements Runnable {
private intmOriginalWindowAttachCount;
@Override
public void run() {
// 判断是否仍处于Pressed状态
if (isPressed() && (mParent != null)
&& mOriginalWindowAttachCount == mWindowAttachCount) {
// 表明当前是Long Click事件,对其进行Long Click响应
if (performLongClick()) {
mHasPerformedLongPress = true;
}
}
}
public void rememberWindowAttachCount() {
mOriginalWindowAttachCount = mWindowAttachCount;
}
}
/** Long Click事件响应函数 **/
public boolean performLongClick() {
sendAccessibilityEvent(AccessibilityEvent.TYPE_VIEW_LONG_CLICKED);
// 通过调用OnLongClickListener进行响应
boolean handled = false;
ListenerInfo li = mListenerInfo;
if (li != null && li.mOnLongClickListener != null) {
handled = li.mOnLongClickListener.onLongClick(View.this);
}
if (!handled) {
handled = showContextMenu();
}
if (handled) {
performHapticFeedback(HapticFeedbackConstants.LONG_PRESS);
}
return handled;
}case MotionEvent.ACTION_MOVE:
/** @Value获得触摸点的位置,注:每个移动都会源源不断地产生很多ACTION_MOVE事件
* final float x = event.getX();
final float y = event.getY();*/
drawableHotspotChanged(x, y);
// 用以判断当前收拾是否已经超出了该View的范围
if (!pointInView(x, y, mTouchSlop)) {
// 如果超出了View的范围,则撤销ACTION_DOWN中的所有设置
removeTapCallback();
if ((mPrivateFlags & PFLAG_PRESSED) != 0) {
// 撤销Long Click状态
removeLongPressCallback();
// 撤销Click状态
setPressed(false);
}
}
break;
case MotionEvent.ACTION_UP:
    // 判断是否是pressed状态
    boolean prepressed = (mPrivateFlags & PFLAG_PREPRESSED) != 0;
    if ((mPrivateFlags & PFLAG_PRESSED) != 0 || prepressed) {
        // take focus if we don't have it already and we should in
        // touch mode.
        boolean focusTaken = false;
        if (isFocusable() && isFocusableInTouchMode() && !isFocused()) {
            focusTaken = requestFocus();
        }

        if (prepressed) {
            setPressed(true, x, y);
       }

        /** 如果是Long Click,这里就不会产生Click **/
        if (!mHasPerformedLongPress) { // 非Long Click状态
            // 撤销Long Click的Runnable线程
            removeLongPressCallback();

            /** 只有处于pressed状态,才会进行click操作 **/
            if (!focusTaken) {
                // Use a Runnable and post this rather than calling
                // performClick directly. This lets other visual state
                // of the view update before click actions start.
              // 创建一个PerformClick(Runnable),该Runnable的run函数主体就是performClick
                if (mPerformClick == null) {
                    mPerformClick = new PerformClick();
                }
                // 将该线程post,如果post不成功,直接执行官performClick
                // 可以看到performClick并不会立即执行,而是添加到队列中,等待前面执行完毕,才会执行
                if (!post(mPerformClick)) {
                    performClick();
                }
            }
        }

        /** PressedStateDuration时间之后撤销PressedState状态 **/
        if (mUnsetPressedState == null) {
            mUnsetPressedState = new UnsetPressedState();
        }

        if (prepressed) {
            postDelayed(mUnsetPressedState,
                    ViewConfiguration.getPressedStateDuration());
        } elseif (!post(mUnsetPressedState)) {
            // If the post failed, unpress right now
            mUnsetPressedState.run();
        }

        removeTapCallback();
    }
    break;
case MotionEvent.ACTION_CANCEL:
    setPressed(false);
    removeTapCallback();
    removeLongPressCallback();
    break;
/** @path: \frameworks\base\services\java\com\android\server\SystemServer.java */
class ServerThread extends Thread {
    @Override
    public void run() {
    // 可以看到IMS和WMS是紧密相关的
    ......
    // @value InputManagerService inputManager
        inputManager = new InputManagerService(context, wmHandler);

        Slog.i(TAG, "Window Manager");
        // @value WindowManagerService wm
        wm = WindowManagerService.main(context, power, display, inputManager,
                uiHandler, wmHandler,
                factoryTest != SystemServer.FACTORY_TEST_LOW_LEVEL,
                !firstBoot, onlyCore);
        ServiceManager.addService(Context.WINDOW_SERVICE, wm);
        ServiceManager.addService(Context.INPUT_SERVICE, inputManager);

        ActivityManagerService.self().setWindowManager(wm);

        inputManager.setWindowManagerCallbacks(wm.getInputMonitor());
        inputManager.start();
        .....
    }
}/** \frameworks\base\services\core\java\com\android\server\input\InputManagerService.java **/
public class InputManagerService extends IInputManager.Stub implements Watchdog.Monitor {
// 指向native端IMS类对象的地址
private final long mPtr;
public InputManagerService(Context context) {
this.mContext = context;
this.mHandler = new InputManagerHandler(DisplayThread.get().getLooper());
mUseDevInputEventForAudioJack = context.getResources().getBoolean(R.bool.config_useDevInputEventForAudioJack);
// 创建native IMS对象
mPtr = nativeInit(this, mContext, mHandler.getLooper().getQueue());
LocalServices.addService(InputManagerInternal.class, new LocalService());
}
}可以看到Java层的IMS实际上只是对Native层的InputManager的一层包装;其创建主要是native层进行创建。
/** \frameworks\base\services\core\jni\com_android_server_input_InputManagerService.cpp **/
class NativeInputManager : public virtual RefBase,
    public virtual InputReaderPolicyInterface,
    public virtual InputDispatcherPolicyInterface,
    public virtual PointerControllerPolicyInterface

static jlong nativeInit(JNIEnv* env, jclass clazz,
        jobject serviceObj, jobject contextObj, jobject messageQueueObj) {
    // 创建一个Message Queue
    sp<MessageQueue> messageQueue = android_os_MessageQueue_getMessageQueue(env, messageQueueObj);
    if (messageQueue == NULL) {
        jniThrowRuntimeException(env, "MessageQueue is not initialized.");
        return 0;
    }

    // 可以看到NativeInputManager中包含有一个Looper,用以进行事件分派
    NativeInputManager* im = new NativeInputManager(contextObj, serviceObj,
            messageQueue->getLooper());
    im->incStrong(0);
    // 返回创建的IMS实例对象的地址(强制转化为long类型)
    return reinterpret_cast<jlong>(im);
}/** \frameworks\base\services\core\java\com\android\server\input\InputManagerService.java **/
public void start() {
......
nativeStart(mPtr);
......
}
private static native void nativeStart(long ptr);/** \frameworks\base\services\core\jni\com_android_server_input_InputManagerService.cpp **/
static void nativeStart(JNIEnv* env, jclass clazz, jlong ptr) {
// ptr为创建的IMS实例的地址,这里将其强制转化成为NativeInputManager类
NativeInputManager* im = reinterpret_cast<NativeInputManager*>(ptr);
// 这里进一步调用InputManager的star方法
status_t result = im->getInputManager()->start();
if (result) {
jniThrowRuntimeException(env, "Input manager could not be started.");
}
}
// @value sp<InputManager> mInputManager;
inline sp<InputManager> getInputManager() const { return mInputManager; }/** \frameworks\native\services\inputflinger\InputManager.cpp **/
class InputManagerInterface : public virtual RefBase {
private:
sp<InputReaderInterface> mReader;
sp<InputReaderThread> mReaderThread;
sp<InputDispatcherInterface> mDispatcher;
sp<InputDispatcherThread> mDispatcherThread;
// 构造函数
InputManager::InputManager(
const sp<EventHubInterface>& eventHub,
const sp<InputReaderPolicyInterface>& readerPolicy,
const sp<InputDispatcherPolicyInterface>& dispatcherPolicy) {
mDispatcher = new InputDispatcher(dispatcherPolicy);
mReader = new InputReader(eventHub, readerPolicy, mDispatcher);
initialize();
}
/*** 进行初始化 **/
void InputManager::initialize() {
// 创建两个Thread的实例
mReaderThread = new InputReaderThread(mReader);
mDispatcherThread = new InputDispatcherThread(mDispatcher);
}
// start函数
status_t InputManager::start() {
// 可以看到这里会开启两个线程mDispatcherThread,与mReaderThread
// 分别对应InputReaderThread,InputDispatcherThread
status_t result = mDispatcherThread->run("InputDispatcher", PRIORITY_URGENT_DISPLAY);
......
result = mReaderThread->run("InputReader", PRIORITY_URGENT_DISPLAY);
if (result) {
mDispatcherThread->requestExit();
return result;
}
return OK;
}
};<一> InputReaderThread:
1、InputReaderThread类:
/** \frameworks\native\services\inputflinger\InputReader.h **/
/** 无限循环从event hub中读取event,然后读取processes他们  */
class InputReaderThread : public Thread {
public:
    InputReaderThread(const sp<InputReaderInterface>& reader);
    virtual ~InputReaderThread();

private:
    sp<InputReaderInterface> mReader;
    /** 继承Thread的子类必须实现该函数,因为这个其实是Thread的真正执行函数 **/
    // Derived class must implement threadLoop(). The thread starts its life
    // here. There are two ways of using the Thread object:
    // 1) loop: if threadLoop() returns true, it will be called again if
    //          requestExit() wasn't called.
    // 2) once: if threadLoop() returns false, the thread will exit upon return.
    virtual bool threadLoop();
};
/** \frameworks\native\services\inputflinger\InputReader.cpp **/
InputReaderThread::InputReaderThread(const sp<InputReaderInterface>& reader) :
        Thread(/*canCallJava*/true), mReader(reader) {
    // 这里初始化重要变量sp<InputReaderInterface> mReader
}

bool InputReaderThread::threadLoop() {
    // 调用mReader中的loopOnce函数,可以看出InputReaderInterface是该类的核心
    mReader->loopOnce();
    return true;
}/** \frameworks\native\services\inputflinger\InputReader.h **/
class InputReaderInterface : public virtual RefBase
class InputReader : public InputReaderInterface
/** \frameworks\native\services\inputflinger\InputReader.cpp **/
// loopOnce即事件处理函数
void InputReader::loopOnce() {
......
// 其实是通过mEventHub来获取Events的
// @value sp<EventHubInterface> mEventHub;
size_t count = mEventHub->getEvents(timeoutMillis, mEventBuffer, EVENT_BUFFER_SIZE);
......
// @value sp<QueuedInputListener> mQueuedListener;
mQueuedListener->flush();
}/** \frameworks\native\services\inputflinger\InputDispatcher.h **/
class InputDispatcherThread : public Thread {
public:
explicit InputDispatcherThread(const sp<InputDispatcherInterface>& dispatcher);
~InputDispatcherThread();
private:
virtual boolthreadLoop();
sp<InputDispatcherInterface> mDispatcher;
};
bool InputDispatcherThread::threadLoop() {
mDispatcher->dispatchOnce();
return true;
}2、InputDispatcher定义:
/** \frameworks\native\services\inputflinger\InputDispatcher.h **/
class InputDispatcher : public InputDispatcherInterface

class InputDispatcherInterface : public virtual RefBase, public InputListenerInterface/** \frameworks\native\services\inputflinger\InputManager.cpp **/
InputManager::InputManager(
const sp<EventHubInterface>& eventHub,
const sp<InputReaderPolicyInterface>& readerPolicy,
const sp<InputDispatcherPolicyInterface>& dispatcherPolicy) {
mDispatcher = new InputDispatcher(dispatcherPolicy);
// 这里初始化InputReader时就将InputReader与InputDispatcher建立起了关联
mReader = new InputReader(eventHub, readerPolicy, mDispatcher);
initialize();
}/** \frameworks\native\services\inputflinger\InputReader.cpp **/
InputReader::InputReader(const sp<EventHubInterface>& eventHub,
const sp<InputReaderPolicyInterface>& policy,
const sp<InputListenerInterface>& listener) :
mContext(this), mEventHub(eventHub), mPolicy(policy),
mGlobalMetaState(0), mGeneration(1),
mDisableVirtualKeysTimeout(LLONG_MIN), mNextTimeout(LLONG_MAX),
mConfigurationChangesToRefresh(0) {
// 这里将mDispatcher当做InputListenerInterface类型,初始化QueueInputListener
mQueuedListener = new QueuedInputListener(listener);
{ // acquire lock
AutoMutex _l(mLock);
refreshConfigurationLocked(0);
updateGlobalMetaStateLocked();
} // release lock
}/** \frameworks\native\services\inputflinger\InputListener.h **/
class QueuedInputListener : public InputListenerInterface {
protected:
virtual ~QueuedInputListener();
public:
QueuedInputListener(const sp<InputListenerInterface>& innerListener);
virtual void notifyConfigurationChanged(const NotifyConfigurationChangedArgs* args);
virtual void notifyKey(const NotifyKeyArgs* args);
virtual void notifyMotion(const NotifyMotionArgs* args);
virtual void notifySwitch(const NotifySwitchArgs* args);
virtual void notifyDeviceReset(const NotifyDeviceResetArgs* args);
void flush();
private:
sp<InputListenerInterface> mInnerListener;// mInnerListner即是InputDispatcher
Vector<NotifyArgs*> mArgsQueue; // 后面flush函数中将会用到
};/** \frameworks\native\services\inputflinger\InputListener.cpp **/
void QueuedInputListener::flush() {
size_t count = mArgsQueue.size();
for (size_t i = 0; i < count; i++) {
NotifyArgs* args = mArgsQueue[i];
// 调用NotifyArgs。notify函数
args->notify(mInnerListener);
delete args;
}
mArgsQueue.clear();
}
// 这里仅是一个封装函数,最终调用InputListenerInterface的notifyKey函数
void NotifyKeyArgs::notify(const sp<InputListenerInterface>& listener) const {
listener->notifyKey(this);
}最终调用InputListenerInterface(即InputDispatcher)的notifyKey回调函数;
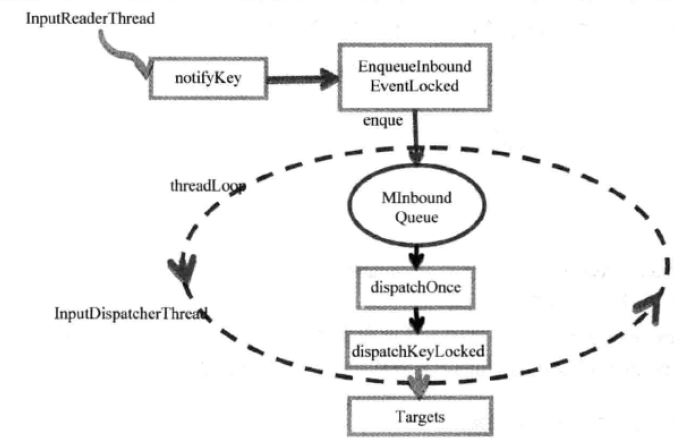
/** \frameworks\native\services\inputflinger\InputDispatcher.cpp **/
void InputDispatcher::notifyKey(const NotifyKeyArgs* args) {
    if (!validateKeyEvent(args->action)) { // 判断event是否合法
        return;
    }
    ......
    // 初始化KeyEvent
    KeyEvent event;
    event.initialize(args->deviceId, args->source, args->action,
            flags, keyCode, args->scanCode, metaState, 0,
            args->downTime, args->eventTime);

    { // acquire lock
        mLock.lock();
        ......
        KeyEntry* newEntry = new KeyEntry(args->eventTime,
                args->deviceId, args->source, policyFlags,
                args->action, flags, keyCode, args->scanCode,
                metaState, repeatCount, args->downTime);
        // 继续调用enqueueInboundEventLocked函数
        needWake = enqueueInboundEventLocked(newEntry);
        mLock.unlock();
    } // release lock
}/** \frameworks\native\services\inputflinger\InputDispatcher.cpp **/
bool InputDispatcher::enqueueInboundEventLocked(EventEntry* entry) {
// @value Queue<EventEntry> mInboundQueue;
bool needWake = mInboundQueue.isEmpty();
// 将entry入队列
mInboundQueue.enqueueAtTail(entry);
switch (entry->type) { // 如前面所述,InputEvent分为KeyEvent和MotionEvent进行分别处理
case EventEntry::TYPE_KEY: ......
case EventEntry::TYPE_MOTION: .....
}
return needWake;
}/** \frameworks\native\services\inputflinger\InputDispatcher.cpp **/
void InputDispatcher::dispatchOnce() {
nsecs_t nextWakeupTime = LONG_LONG_MAX;
{ // acquire lock
AutoMutex _l(mLock);
mDispatcherIsAliveCondition.broadcast();
// 在没有等待的commands事运行一个dispatch loop,这个loop之后可能enqueue commands
if (!haveCommandsLocked()) {
dispatchOnceInnerLocked(&nextWakeupTime);
}
// 如果有等待的commands的话,就运行所有的commands
// If any commands were run then force the next poll to wake up immediately.
if (runCommandsLockedInterruptible()) {
nextWakeupTime = LONG_LONG_MIN;
}
} // release lock
// Wait for callback or timeout or wake. (make sure we round up, not down)
nsecs_t currentTime = now();
int timeoutMillis = toMillisecondTimeoutDelay(currentTime, nextWakeupTime);
mLooper->pollOnce(timeoutMillis);
}/** \frameworks\native\services\inputflinger\InputDispatcher.cpp **/
void InputDispatcher::dispatchOnceInnerLocked(nsecs_t* nextWakeupTime) {
.......
// 根据mPendingEvent的Type的不同分别进行处理
switch (mPendingEvent->type) {
case EventEntry::TYPE_CONFIGURATION_CHANGED: {
......
done = dispatchConfigurationChangedLocked(currentTime, typedEntry);
dropReason = DROP_REASON_NOT_DROPPED; // configuration changes are never dropped
break;
}
case EventEntry::TYPE_DEVICE_RESET: {
......
done = dispatchDeviceResetLocked(currentTime, typedEntry);
dropReason = DROP_REASON_NOT_DROPPED; // device resets are never dropped
break;
}
// KeyEvent采用dispatchKeyLocked进行处理
case EventEntry::TYPE_KEY: {
KeyEntry* typedEntry = static_cast<KeyEntry*>(mPendingEvent);
......
done = dispatchKeyLocked(currentTime, typedEntry, &dropReason, nextWakeupTime);
break;
}
// MotionEvent采用dispatchMotionLocked进行处理
case EventEntry::TYPE_MOTION: {
......
done = dispatchMotionLocked(currentTime, typedEntry,
&dropReason, nextWakeupTime);
break;
}
default:
ALOG_ASSERT(false);
break;
}
}/** \frameworks\native\services\inputflinger\InputDispatcher.cpp **/
bool InputDispatcher::dispatchKeyLocked(nsecs_t currentTime, KeyEntry* entry,
DropReason* dropReason, nsecs_t* nextWakeupTime) {
......
/** 确定事件的接收方(Target) **/
Vector<InputTarget> inputTargets;
int32_t injectionResult = findFocusedWindowTargetsLocked(currentTime,
entry, inputTargets, nextWakeupTime);
setInjectionResultLocked(entry, injectionResult);
addMonitoringTargetsLocked(inputTargets);
/** 将消息dispatch给Target **/
dispatchEventLocked(currentTime, entry, inputTargets);
return true;
}/** \frameworks\native\services\inputflinger\InputDispatcher.cpp **/
int32_t InputDispatcher::findFocusedWindowTargetsLocked(nsecs_t currentTime,
const EventEntry* entry, Vector<InputTarget>& inputTargets, nsecs_t* nextWakeupTime) {
int32_t injectionResult;
String8 reason;
// mFocusedWindowHandle表示当前焦点窗口的句柄
// @value sp<InputWindowHandle> mFocusedWindowHandle;
/** 当获得焦点的窗口为null时,会丢弃这一事件 **/
if (mFocusedWindowHandle == NULL) {
if (mFocusedApplicationHandle != NULL) {
// 如果没有焦点窗口,但焦点窗口所在的应用程序进程存在,说明该应程序还在启动过程中,故等待nextWakeupTime后再重试
injectionResult = handleTargetsNotReadyLocked(currentTime, entry,
mFocusedApplicationHandle, NULL, nextWakeupTime,
"Waiting because no window has focus but there is a "
"focused application that may eventually add a window "
"when it finishes starting up.");
goto Unresponsive;
}
injectionResult = INPUT_EVENT_INJECTION_FAILED;
goto Failed;
}
/** 如果执行到这里说明当前有焦点窗口 **/
// 先判断权限
if (! checkInjectionPermission(mFocusedWindowHandle, entry->injectionState)) {
injectionResult = INPUT_EVENT_INJECTION_PERMISSION_DENIED;
goto Failed;
}
// 如果当前焦点窗口正在处理上一个事件,采取和最上面一样的作法,等待一段时间后重试
reason = checkWindowReadyForMoreInputLocked(currentTime,
mFocusedWindowHandle, entry, "focused");
if (!reason.isEmpty()) {
injectionResult = handleTargetsNotReadyLocked(currentTime, entry,
mFocusedApplicationHandle, mFocusedWindowHandle, nextWakeupTime, reason.string());
goto Unresponsive;
}
// 成功找到匹配的窗口,通过addWindowTargetLocked添加到inputTargets变量中
injectionResult = INPUT_EVENT_INJECTION_SUCCEEDED;
addWindowTargetLocked(mFocusedWindowHandle,
InputTarget::FLAG_FOREGROUND | InputTarget::FLAG_DISPATCH_AS_IS, BitSet32(0),
inputTargets);
Failed:
Unresponsive:
nsecs_t timeSpentWaitingForApplication = getTimeSpentWaitingForApplicationLocked(currentTime);
updateDispatchStatisticsLocked(currentTime, entry,
injectionResult, timeSpentWaitingForApplication);
return injectionResult;
}/** \frameworks\base\services\core\java\com\android\server\wm\InputMonitor.java **/
/* Updates the cached window information provided to the input dispatcher. */
public void updateInputWindowsLw(boolean force) {
......
// Send windows to native code.
// @value private final WindowManagerService mService;
// @value final InputManagerService mInputManager;
mService.mInputManager.setInputWindows(mInputWindowHandles);
......
}
/** \frameworks\base\services\core\java\com\android\server\input\InputManagerService.java **/
public void setInputWindows(InputWindowHandle[] windowHandles) {
nativeSetInputWindows(mPtr, windowHandles);
}
private static native void nativeSetInputWindows(long ptr, InputWindowHandle[] windowHandles);
/** \frameworks\base\services\core\jni\com_android_server_input_InputManagerService.cpp **/
static void nativeSetInputWindows(JNIEnv* env, jclass clazz,
jlong ptr, jobjectArray windowHandleObjArray) {
NativeInputManager* im = reinterpret_cast<NativeInputManager*>(ptr);
im->setInputWindows(env, windowHandleObjArray);
}
/*-----NativeInputManager-----*/
void NativeInputManager::setInputWindows(JNIEnv* env, jobjectArray windowHandleObjArray) {
Vector<sp<InputWindowHandle> > windowHandles;
......
// @value sp<InputManager> mInputManager;
mInputManager->getDispatcher()->setInputWindows(windowHandles);
......
}
/** \frameworks\native\services\inputflinger\InputManager.cpp **/
sp<InputDispatcherInterface> InputManager::getDispatcher() {
return mDispatcher;
}
/** \frameworks\native\services\inputflinger\InputDispatcher.cpp **/
void InputDispatcher::setInputWindows(const Vector<sp<InputWindowHandle> >& inputWindowHandles) {
{ // acquire lock
AutoMutex _l(mLock);
Vector<sp<InputWindowHandle> > oldWindowHandles = mWindowHandles;
mWindowHandles = inputWindowHandles;
sp<InputWindowHandle> newFocusedWindowHandle;
......
// 一系列处理
mFocusedWindowHandle = newFocusedWindowHandle;
.....
} // release lock
// Wake up poll loop since it may need to make new input dispatching choices.
mLooper->wake();
}可以看到这里涉及到了InputMonitor、WMS与IMS之间的交互;
/** \frameworks\native\services\inputflinger\InputDispatcher.h **/
/*
 * An input target specifies how an input event is to be dispatched to a particular window
 * including the window's input channel, control flags, a timeout, and an X / Y offset to
 * be added to input event coordinates to compensate for the absolute position of the
 * window area.
 */
structInputTarget {
    enum { // 该枚举类列举个关于目标窗口的各种属性值描述
        /* This flag indicates that the event is being delivered to a foreground application. */
        FLAG_FOREGROUND = 1 << 0, // 说明目标窗口是前台应用
        ......
    }
    /** InputDispatcher与WMS建立关联通信的地方 */
    sp<InputChannel> inputChannel;
};1、InputChannel:
/** \frameworks\native\include\input\InputTransport.h **/
/*
 * An input channel consists of a local unix domain socket used to send and receive
 * input messages across processes.  Each channel has a descriptive name for debugging purposes.
 *
 * Each endpoint has its own InputChannel object that specifies its file descriptor.
 *
 * The input channel is closed when all references to it are released.
 */
// 上面提到InputChannel是使用unix domain socket(UDS)进行通信的,而非Binder
class InputChannel : public RefBase {
protected:
    virtual~InputChannel();


public:
    InputChannel(const String8& name, int fd); // fd类似设备描述符
    // 用于打开一个InputChannel对(Pair),用以实现双向通信
    static status_t openInputChannelPair(const String8& name,
            sp<InputChannel>& outServerChannel, sp<InputChannel>& outClientChannel);

    inline String8 getName() const { returnmName; }
    inlineint getFd() const { returnmFd; }

    // 发送接收信息
    status_t sendMessage(const InputMessage* msg);
    status_t receiveMessage(InputMessage* msg);

    /* Returns a new object that has a duplicate of this channel's fd. */
    sp<InputChannel> dup() const;

private:
    String8 mName;
    int mFd;  // 重点要弄清该变量代表的含义
};/** \frameworks\base\services\core\java\com\android\server\wm\WindowManagerService.java **/
public int addWindow(Session session, IWindow client, int seq,
WindowManager.LayoutParams attrs, int viewVisibility, int displayId,
Rect outContentInsets, Rect outStableInsets, InputChannel outInputChannel) {
......
if (outInputChannel != null && (attrs.inputFeatures
& WindowManager.LayoutParams.INPUT_FEATURE_NO_INPUT_CHANNEL) == 0) {
// 设置当前的通道名
String name = win.makeInputChannelName();
// 打开一对InputChannel通道
InputChannel[] inputChannels = InputChannel.openInputChannelPair(name);
win.setInputChannel(inputChannels[0]);
inputChannels[1].transferTo(outInputChannel);
mInputManager.registerInputChannel(win.mInputChannel, win.mInputWindowHandle);
}
......
}
/** \frameworks\base\core\java\android\view\InputChannel.java **/
public static InputChannel[] openInputChannelPair(String name) {
    if (name == null) {
        throw new IllegalArgumentException("name must not be null");
    }
    return nativeOpenInputChannelPair(name);
}

private static native InputChannel[] nativeOpenInputChannelPair(String name);
4、InputChannel::openInputChannelPair:
/** \frameworks\native\libs\input\InputTransport.cpp **/
status_t InputChannel::openInputChannelPair(const String8& name,
        sp<InputChannel>& outServerChannel, sp<InputChannel>& outClientChannel) {
    // 建立UDS
    int sockets[2];
    if (socketpair(AF_UNIX, SOCK_SEQPACKET, 0, sockets)) {
        status_t result = -errno;
        outServerChannel.clear();
        outClientChannel.clear();
        return result;
    }

    // 设置缓冲区大小
    int bufferSize = SOCKET_BUFFER_SIZE;
    setsockopt(sockets[0], SOL_SOCKET, SO_SNDBUF, &bufferSize, sizeof(bufferSize));
    setsockopt(sockets[0], SOL_SOCKET, SO_RCVBUF, &bufferSize, sizeof(bufferSize));
    setsockopt(sockets[1], SOL_SOCKET, SO_SNDBUF, &bufferSize, sizeof(bufferSize));
    setsockopt(sockets[1], SOL_SOCKET, SO_RCVBUF, &bufferSize, sizeof(bufferSize));

    // 创建Server与Client端实例
    String8 serverChannelName = name;
    serverChannelName.append(" (server)");
    outServerChannel = new InputChannel(serverChannelName, sockets[0]);

    String8 clientChannelName = name;
    clientChannelName.append(" (client)");
    outClientChannel = new InputChannel(clientChannelName, sockets[1]);
    return OK;
}


 752
752

 被折叠的 条评论
为什么被折叠?
被折叠的 条评论
为什么被折叠?
 到【灌水乐园】发言


