


1. 分类显示 sections

在之前的文章UITableView 的资料设定方式一文中,已经示范如何在 UITableView 中设定所要显示的资料,以及分别显示这些资料的细节,但是如果资料比数太多时该怎么办?你可以参考本篇文章的做法,将资料做分类的处理,并且建立快速索引,让使用者能以最短的时间找到所需要的资料。
资料分类的概念
动态表格的内容多半是存放在阵列当中方便资料的存取,如果你有好几类不同比的资料,你可以将这些资料分别存放在不同的阵列里,最后再使用一个 NSMutableArray 将这些存放不同资料的阵列包起来,之后我们只要针对这个 NSMutableArray 做操作即可。(以下是沿用之前文章的程式码做修改)

- //资料初始化
- roleArray = [[NSArray alloc] initWithObjects:@"野蛮人", @"法师", @"弓箭手", @"盗贼", @"德鲁伊", @"骑士", nil];
- monsterArray = [[NSArray alloc] initWithObjects:@"哥布林战士", @"哥布林护卫", @"哥布林军官", @"哥布林王", @"黑暗德鲁伊", @"狼人", @"傀儡护卫", @"傀儡领主", @"蜘蛛", @"蝙蝠", nil];
- heroicaArray = [[NSMutableArray alloc] initWithObjects:roleArray, monsterArray, nil];
UITableView Sections 的设定
如果要将资料作分类显示,可以使用以下的内建方法函式,并回传一个 NSInteger,告诉 UITableViewController 你想将资料分成几类。
- - (NSInteger)numberOfSectionsInTableView:(UITableView *)tableView {
- return [heroicaArray count];
- }
程式码到此就已经算是完成资料的分类,后续的动作就是要显示这些分类好的资料,大致的程式码都和之前的文章差不多,只是操作的物件不同,可以透过方法函式所得到的 section 参数,决定于目前是要处理那一类的资料。
- //设定每一类的资料笔数
- - (NSInteger)tableView:(UITableView *)tableView numberOfRowsInSection:(NSInteger)section {
- return [[heroicaArray objectAtIndex:section] count];
- }
- //设定每一类的资料内容
- - (UITableViewCell *)tableView:(UITableView *)tableView cellForRowAtIndexPath:(NSIndexPath *)indexPath {
- //制作可重復利用的表格栏位Cell
- static NSString *CellIdentifier = @"CellIdentifier";
- UITableViewCell *cell = [tableView dequeueReusableCellWithIdentifier:CellIdentifier];
- if (cell == nil) {
- cell = [[UITableViewCell alloc] initWithStyle:UITableViewCellStyleDefault reuseIdentifier:CellIdentifier];
- }
- //设定栏位的内容与类型
- cell.textLabel.text = [[heroicaArray objectAtIndex:indexPath.section] objectAtIndex:indexPath.row];
- cell.accessoryType = UITableViewCellAccessoryDetailDisclosureButton;
- return cell;
- }
分类标题与快速索引
分类的标题可以家在分类的开头或是结尾,同样是透过方法函式所得到的 section 参数,来确认目前所在的分类。
- //设定分类开头标题
- - (NSString *)tableView:(UITableView *)tableView titleForHeaderInSection:(NSInteger)section {
- switch (section) {
- case 0:
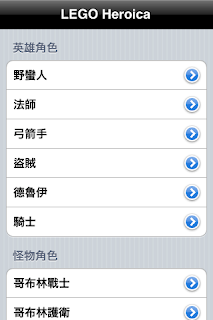
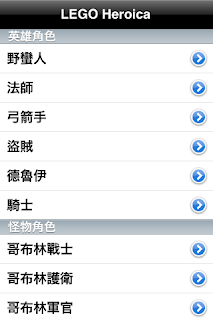
- return @"英雄角色";
- break;
- case 1:
- return @"怪物角色";
- break;
- default:
- return @"";
- break;
- }
- }
- //设定分类结尾标题
- - (NSString *)tableView:(UITableView *)tableView titleForFooterInSection:(NSInteger)section {
- }
另外,建立类似电话簿的快速索引,则可以透过下列内建方法函式,回传一个快速索引的阵列,阵列内容的顺序,就是你分类的顺序。
- //建立快速索引
- - (NSArray *)sectionIndexTitlesForTableView:(UITableView *)tableView {
- NSArray *index = [[NSArray alloc] initWithObjects:@"英雄", @"怪物", @"武器", @"道具", @"战利品", @"其他", nil];
- return index;
- }
比较好的做法
在上述分类标题与快速索引的部分,使用 switch 与静态的数值来做设定,其实这不是很恰当的做法,尤其当你的资料笔数非常庞大的时候,比较好的建议是将这些资讯同样放入阵列里面,且动态存取它们,来完成设定标题与建立索引阵列。
另外要注意的是,虽然是好几类不同的资料,但是他们最好还是能拥有相同的属性,即使该属性为 nil。例如 A 类型的资料有颜色属性,但是 B 类型没有或是不需要,但是仍需为 B 类型的资料保留颜色属性,即使它们的值都是 nil,这样的观念有点类似于多型 Polymorphism,这样不但可以减少程式码的撰写,对于表格内的资料也能保持一致性。
2. 改变外观

UITableView 所制作出来的应用程式在使用上多半大同小异,它们之间最大的不同还是在表格的呈现方面,如何设计出具有独特外观的 UITableView,才是令人头痛的问题,通常是选择制作一个全新的 UITableViewCell 来使用,但是你也可以採用比较简单的做法,使用内建的方法函式来做些微的改变,方式如下。
Table View
整个 Table View 能改变的东西实在不多,多半都是更改背景,但是当你更改背景颜色之后就会发现 Cell 与 Cell 之间会多出一条白线 Separator,你可以参考下列程式码改变它的颜色或是移除不显示。
- //改变Separator颜色
- [self.tableView setSeparatorColor:[UIColor orangeColor]];
- //移除Separator
- [self.tableView setSeparatorStyle:UITableViewCellSeparatorStyleNone];
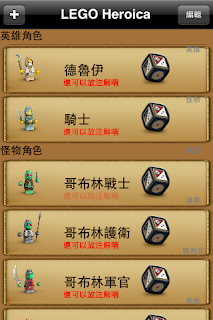
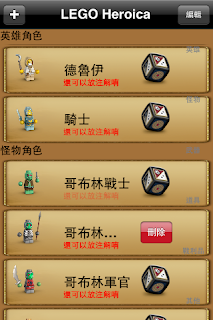
Table View Cell
Table View Cell 本身就提供一些不同的类型可供选择,如下图,你可以藉由选择不同的类型来改变文字在 Cell 中编排的方式。

Attributes 中的 Style 属性
另外如果想要在 Cell 中增加其它元件时,可以使用 addSubview 的方法函式来添加新的元件,例如在下列程式码中,除了设定左右的图像之外,还自行新增了一个 UILabel 放在其中。
- //设定文字背景为透明
- [cell.textLabel setBackgroundColor:[UIColor clearColor]];
- //设定Cell中左边的图片
- cell.imageView.image = [UIImage imageNamed:[[heroicaArray objectAtIndex:indexPath.section] objectAtIndex:indexPath.row + 1]];
- //设定Cell中右边的连结图片
- cell.accessoryView = [[UIImageView alloc] initWithImage:[UIImage imageNamed:@"dice.png"]];
- //增加UILabel
- UILabel *subtitle = [[UILabel alloc] initWithFrame:CGRectMake(95.0, 45.0, 200.0, 20.0)];
- [subtitle setTextColor:[UIColor colorWithHue:1.0 saturation:1.0 brightness:1.0 alpha:0.5]];
- [subtitle setBackgroundColor:[UIColor clearColor]];
- [subtitle setFont:[UIFont systemFontOfSize:12.0]];
- [subtitle setText:@"还可以放注解唷"];
- [cell addSubview:subtitle];
- //设定背景
- [cell setBackgroundView:[[UIImageView alloc] initWithImage:[UIImage imageNamed:@"CellBG.png"]]];
Section
透过下列内建的方法函式,可以自行更改 Section 的标题内容。
- //设定开头的分类样式
- -(UIView *)tableView:(UITableView *)tableView viewForHeaderInSection:(NSInteger)section {
- UIView *sectionView = [[UIView alloc] initWithFrame:CGRectMake(0, 0, tableView.bounds.size.width, 30)];
- [sectionView setBackgroundColor:[UIColor brownColor]];
- //增加UILabel
- UILabel *text = [[UILabel alloc] initWithFrame:CGRectMake(0, 0, 320, 18)];
- [text setTextColor:[UIColor blackColor]];
- [text setBackgroundColor:[UIColor clearColor]];
- [text setText:[[heroicaArray objectAtIndex:section] objectAtIndex:0]];
- [text setFont:[UIFont boldSystemFontOfSize:16.0]];
- [sectionView addSubview:text];
- return sectionView;
- }
- //设定结尾的分类样式
- -(UIView *)tableView:(UITableView *)tableView viewForFooterInSection:(NSInteger)section {
- }
Section Index
表格分类的快速索引虽然没有内建的方法函式可供设定外观使用,但是你仍然可以透过自制的索引介面并配合下列程式码,将表格切换到所想要的分类上。
- CGRect sectionRect = [self.tableView rectForSection:1];
- [self.tableView scrollRectToVisible:sectionRect animated:YES];
备註
如果表格个对应的资料结构有任何问题,可以在「索引式搜索」中的「元件设定」分类里找到所有有关 UITableView 的文章,查阅其他有关表格的设定方式。
来源:
http://furnacedigital.blogspot.com/2012/02/uitableview-sections.html
http://furnacedigital.blogspot.com/2012/02/uitableview_17.html


 666
666

 被折叠的 条评论
为什么被折叠?
被折叠的 条评论
为什么被折叠?
 到【灌水乐园】发言


