


学习了半个月的Spring 、 JSF2.0(使用Primefaces)以及Mybatis,今天来个整理,希望对以后有所帮助!
1) 我用的是maven项目,所以jar 包以及jar包的版本都由pom文件决定,相关内容如下:<project xmlns="http://maven.apache.org/POM/4.0.0" xmlns:xsi="http://www.w3.org/2001/XMLSchema-instance"
xsi:schemaLocation="http://maven.apache.org/POM/4.0.0 http://maven.apache.org/maven-v4_0_0.xsd">
<modelVersion>4.0.0</modelVersion>
<groupId>com.changxin</groupId>
<artifactId>mavenjsf</artifactId>
<packaging>war</packaging>
<version>0.0.1-SNAPSHOT</version>
<name>mavenjsf Maven Webapp</name>
<url>http://maven.apache.org</url>
<dependencies>
<dependency>
<groupId>junit</groupId>
<artifactId>junit</artifactId>
<version>4.10</version>
<scope>test</scope>
</dependency>
<dependency>
<groupId>org.mybatis</groupId>
<artifactId>mybatis-spring</artifactId>
<version>1.2.0</version>
</dependency>
<dependency>
<groupId>org.mybatis</groupId>
<artifactId>mybatis</artifactId>
<version>3.2.0</version>
</dependency>
<!—第三方jar包自己导入到本机仓库 –>
<dependency>
<groupId>microsoft.jdbc</groupId>
<artifactId>jdbc</artifactId>
<version>4.0</version>
</dependency>
<dependency>
<groupId>log4j</groupId>
<artifactId>log4j</artifactId>
<version>1.2.17</version>
</dependency>
<dependency>
<groupId>c3p0</groupId>
<artifactId>c3p0</artifactId>
<version>0.9.0</version>
</dependency>
<dependency>
<groupId>org.springframework</groupId>
<artifactId>spring-context</artifactId>
<version>3.0.7.RELEASE</version>
</dependency>
<dependency>
<groupId>org.springframework</groupId>
<artifactId>spring-jdbc</artifactId>
<version>3.0.7.RELEASE</version>
</dependency>
<dependency>
<groupId>cglib</groupId>
<artifactId>cglib-nodep</artifactId>
<version>2.2</version>
</dependency>
<dependency>
<groupId>org.springframework</groupId>
<artifactId>spring-web</artifactId>
<version>3.0.7.RELEASE</version>
</dependency>
<!-- 使用注解,managedBean -->
<dependency>
<groupId>org.glassfish</groupId>
<artifactId>javax.faces</artifactId>
<version>2.1.13</version>
</dependency>
<dependency>
<groupId>javax.servlet.jsp.jstl</groupId>
<artifactId>jstl-api</artifactId>
<version>1.2</version>
<scope>provided</scope>
</dependency>
<dependency>
<groupId>org.primefaces</groupId>
<artifactId>primefaces</artifactId>
<version>4.0</version>
</dependency>
<dependency>
<groupId>org.primefaces.extensions</groupId>
<artifactId>primefaces-extensions</artifactId>
<version>1.0.0</version>
</dependency>
</dependencies>
<build>
<finalName>mavenjsf</finalName>
<plugins>
<plugin>
<groupId>org.apache.maven.plugins</groupId>
<artifactId>maven-project-info-reports-plugin</artifactId>
</plugin>
<!--设置自动部署到Jetty6 web mortbay容器中 -->
<plugin>
<groupId>org.mortbay.jetty</groupId>
<artifactId>maven-jetty-plugin</artifactId>
<!-- <version>6.1.10</version> -->
<configuration>
<scanIntervalSeconds>10</scanIntervalSeconds>
<stopKey>foo</stopKey>
<stopPort>9999</stopPort>
</configuration>
<executions>
<execution>
<id>start-jetty</id>
<phase>pre-integration-test</phase>
<goals>
<goal>run</goal>
</goals>
<configuration>
<scanIntervalSeconds>0</scanIntervalSeconds>
<daemon>true</daemon>
</configuration>
</execution>
<execution>
<id>stop-jetty</id>
<phase>post-integration-test</phase>
<goals>
<goal>stop</goal>
</goals>
</execution>
</executions>
</plugin>
</plugins>
</build>
</project>
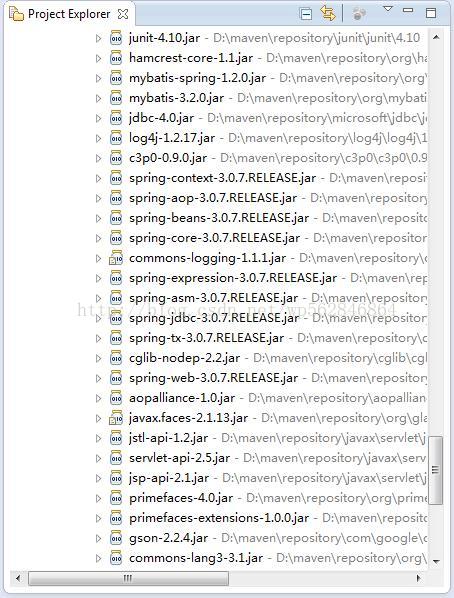
如下图:
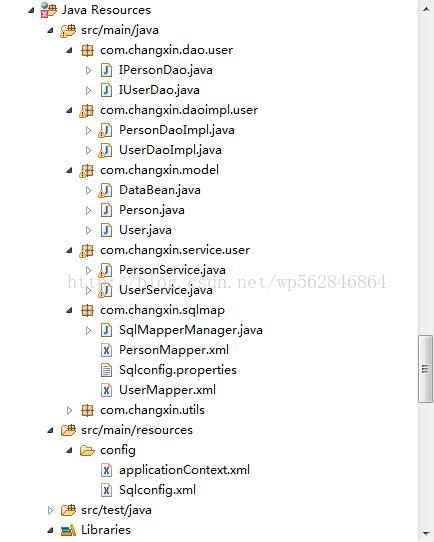
2) 整个工程的包构造如下:
3) 配置web.xml
<?xml version="1.0" encoding="UTF-8" ?>
<web-app xmlns:xsi="http://www.w3.org/2001/XMLSchema-instance"
xmlns="http://java.sun.com/xml/ns/javaee" xmlns:web="http://java.sun.com/xml/ns/javaee/web-app_2_5.xsd"
xsi:schemaLocation="http://java.sun.com/xml/ns/javaee
http://java.sun.com/xml/ns/javaee/web-app_3_0.xsd"
version="3.0">
<display-name>Archetype Created Web Application</display-name>
<!-- Faces Servlet 对文件使用jsf的方式解析文件 -->
<servlet>
<servlet-name>FacesServlet</servlet-name>
<servlet-class>javax.faces.webapp.FacesServlet</servlet-class>
<load-on-startup>1</load-on-startup>
</servlet>
<!-- Faces Servlet Mapping 对有如下后缀名的文件采取jsf方式解析文件
注意是在浏览器中访问时带有如下后缀名,而不是说源文件-->
<servlet-mapping>
<servlet-name>FacesServlet</servlet-name>
<url-pattern>*.faces</url-pattern>
<url-pattern>*.xhtml</url-pattern>
<url-pattern>*.jsf</url-pattern>
<url-pattern>/faces/*</url-pattern>
</servlet-mapping>
<!-- Spring 使用Spring时必须加载的监听器-->
<listener <listener-class>org.springframework.web.context.ContextLoaderListener</listener-class>
</listener>
<!-- Spring && JSF 如果你使用的是非注解形式,那就不需要这个拦截器了,因为你可以使用faces-config.xml文件中直接配置managedBean;但是如果你使用jsf2.0新特性,及注解时编程的话,这个是必须的,个人提倡注解开发,原因是公司svn提交少冲突 -->
<listener>
<listener-class>
org.springframework.web.context.request.RequestContextListener
</listener-class>
</listener>
<!-- 路径以及开发配置 这里有些配置不是必须的,但是路径一定要配置准确,如默认我们都是把applicationContext.xml文件写在web-root目录下,但是有些情况下不这样写会更好,所以使用路径配置 -->
<context-param>
<param-name>contextConfigLocation</param-name>
<param-value>classpath:config/applicationContext.xml</param-value>
</context-param>
<context-param>
<param-name>javax.faces.PROJECT_STAGE</param-name>
<param-value>Development</param-value>
</context-param>
<context-param>
<param-name>javax.faces.FACELETS_SKIP_COMMENTS</param-name>
<param-value>true</param-value>
</context-param>
<context-param>
<param-name>primefaces.skin</param-name>
<param-value>Eggplant</param-value>
</context-param>
<welcome-file-list>
<welcome-file>index.jsp</welcome-file>
</welcome-file-list>
</web-app>
4) 编写基本类
个人觉得,自己的设置是严重问题的,但是只是为了测试,所以就没把心思放在这里了,
首先我的EntityBean 与 BackBean整合在一起了,这个是一个大问题。当然后面我又重构了一下,添加了一个DataBean,这个Bean是一个BackBean,把User当成他的EntityBean来处理了。好吧,下面我从整合Mybatis开始说起,也是使用mybatis的新特性,
首先是EntityBean的编写:
public class User implements Serializable {
private static final long serialVersionUID = 1L;
private String id;
private String name;
private String password;
//get set 方法必须添加
}
如下进行接口的编写:
public interface IUserDao {
public List<User> selectUserByName(String name);
public User selectUserByUser(User user);
public void updateUser(User user);
public void deleteUser(User user);
public void insertUser(User user);
}
对应userMapper.xml文件
/* 这里尤其要注意,因为Mybatis自动帮我们完成接口与映射文件的配对,并且编写实现代理类,所以命名是有要求的,如方法名与id是一一对应的*/
<?xml version="1.0" encoding="UTF-8"?>
<!DOCTYPE mapper
PUBLIC "-//mybatis.org//DTD Mapper 3.0//EN"
"http://mybatis.org/dtd/mybatis-3-mapper.dtd">
<mapper namespace="com.changxin.dao.user.IUserDao">
<resultMap type="User" id="userResultMap">
<id column="u_id" property="id" />
<result column="u_name" property="name" />
<result column="u_password" property="password" />
</resultMap>
<select id="selectUserByName" parameterType="java.lang.String"
resultMap="com.changxin.dao.user.IUserDao.userResultMap">
select
u_id ,
u_name ,
u_password
from users
<where>
<if test="_parameter != null">u_name like '%${_parameter}%'</if>
</where>
</select>
<select id="selectUserByUser" parameterType="User"
resultMap="com.changxin.dao.user.IUserDao.userResultMap">
select
u_id ,
u_name ,
u_password
from users
<trim prefix="where" prefixOverrides="and|or">
<choose>
<when test="id != null ">u_id = #{id}</when>
<when test="name != null and password !=null">u_name like #{name} and u_password like #{password}</when>
<when test="name != null and password == null">u_name like #{name}</when>
</choose>
</trim>
</select>
<update id="updateUser" parameterType="User">
update users
<set>
<if test="name != null">u_name=#{name},</if>
<if test="password != null">u_password=#{password},</if>
</set>
where u_id = #{id}
</update>
<delete id="deleteUser" parameterType="User">
delete from users where
u_id = #{id}
</delete>
<insert id="insertUser" parameterType="User" >
insert into users(u_name,u_password)
values(#{name},#{password})
</insert>
</mapper>
5) 配置SqlConfig.xml
<?xml version="1.0" encoding="utf-8" ?>
<!DOCTYPE configuration
PUBLIC "-//mybatis.org//DTD Config 3.0//EN"
"http://mybatis.org/dtd/mybatis-3-config.dtd">
<configuration>
<!-- 这里除了别名之外无需配置其他信息,数据源之类信息,
映射文件信息都在applicationContext.xml文件配置 -->
<typeAliases>
<typeAlias type="com.changxin.model.User" alias="User"/>
</typeAliases>
</configuration>
6) 配置applicationContext.xml文件
<?xml version="1.0" encoding="UTF-8"?>
<beans xmlns="http://www.springframework.org/schema/beans"
xmlns:xsi="http://www.w3.org/2001/XMLSchema-instance" xmlns:tx="http://www.springframework.org/schema/tx"
xmlns:context="http://www.springframework.org/schema/context"
xsi:schemaLocation="
http://www.springframework.org/schema/beans
http://www.springframework.org/schema/beans/spring-beans-3.0.xsd
http://www.springframework.org/schema/context
http://www.springframework.org/schema/context/spring-context-3.0.xsd
http://www.springframework.org/schema/tx
http://www.springframework.org/schema/tx/spring-tx-3.0.xsd "
>
<!—配置数据源-->
<bean id="dataSource" class="com.mchange.v2.c3p0.ComboPooledDataSource">
<property name="driverClass" value="com.microsoft.sqlserver.jdbc.SQLServerDriver" />
<property name="jdbcUrl"
value="jdbc:sqlserver://localhost:1433;databaseName=Testdb"></property>
<property name="user" value="sa"></property>
<property name="password" value="123"></property>
<property name="checkoutTimeout" value="30000" />
<property name="maxPoolSize" value="30"></property>
<property name="initialPoolSize" value="10" />
</bean>
<bean id="transactionManager"
class="org.springframework.jdbc.datasource.DataSourceTransactionManager">
<property name="dataSource" ref="dataSource" />
</bean>
<!—配置注解式事务-->
<tx:annotation-driven transaction-manager="transactionManager" />
<!—这里使用Mybatis-Spring注解方式完成daoImpl的编写,所以我们只需要声明接口 不需要写实现类,这也是Spring的好处 -->
<bean id="sqlSessionFactory" class="org.mybatis.spring.SqlSessionFactoryBean">
<property name="dataSource" ref="dataSource" />
<property name="configLocation" value="classpath:config/Sqlconfig.xml" />
<property name="mapperLocations" value="classpath*:com/changxin/sqlmap/*Mapper.xml" />
</bean>
<!—找到所有需要进自动注入的文件,mapper文件 -->
<bean class="org.mybatis.spring.mapper.MapperScannerConfigurer">
<property name="basePackage" value="com.changxin.dao.user" />
</bean>
<!—配置service类,这个是必须配置的,因为后面BackBean还需要引用他作为自己的属性,但是他引用dao层的属性是通过注解自动注入的,下面就看看service如何编写 -->
<bean id="userService" class="com.changxin.service.user.UserService">
</bean>
</beans>
7) 如下编写service层代码
@Transactional
public class UserService {
@Autowired //这个注解会使spring自动完成注入,他是对应接口的实现代理类
private IUserDao userDao = null;
public List<User> selectUserByName(String name) {
return userDao.selectUserByName(name);
}
public User selectUserByUser(User user) {
return userDao.selectUserByUser(user);
}
public void updateUser(User user) {
userDao.updateUser(user);
}
public void deleteUser(User user) {
userDao.deleteUser(user);
}
public void insertUser(User user) {
userDao.insertUser(user);
}
public IUserDao getUserDao() {
return userDao;
}
public void setUserDao(IUserDao userDao) {
this.userDao = userDao;
}
}
8) 编写BackBean
@ManagedBean(name = "dataBean") //注解方式代替faces-config中managedBean的编写
@SessionScoped //采用session生命周期
public class DataBean implements Serializable {
@ManagedProperty(value="#{userService}") //applicationContext.xml配置service注入
private UserService userService;
private List<User> users;
private User user;
private User tempUser;
private User tableUser;
private boolean rendFlag;
private boolean rendFlag2;
public DataBean() {
user = new User();
}
public void init(){
users = userService.selectUserByName(null);
}
/* 自己编写校验器*/
public void validate(FacesContext context, UIComponent component, Object obj)
throws ValidatorException {
String password = (String) obj;
if (password.length() < 6) {
FacesMessage message = new FacesMessage(
FacesMessage.SEVERITY_ERROR, "字符长度小于6", "字符长度不得小于6");
throw new ValidatorException(message);
}
if (!password.matches(".+[0-9]+")) {
FacesMessage message = new FacesMessage(
FacesMessage.SEVERITY_ERROR, "密码必须包括字符与数字", "密码必须是字符加数字所组成");
throw new ValidatorException(message);
}
}
public boolean validate(User vUser){
boolean flag = true;
if("".equals(vUser.getName().trim())){
flag = false;
}
if("".equals(vUser.getPassword().trim())){
flag = false;
}
return flag;
}
/**
*
* 控制用户登录后的页面流程,根据返回值找页面,没有路径默认为根路径下的文件
*/
public String login() {
String result = "message.xhtml";
if(validate(user)){
User u = userService.selectUserByUser(user);
if(u == null)
{
result = "login.xhtml";
}else{
init();
}
}
return result;
}
public void prefInsertUser(ActionEvent event){
tempUser = new User();
rendFlag = false;
rendFlag2 = true;
}
public void prefUpdateUser(ActionEvent event){
if(tableUser != null){
rendFlag = true;
rendFlag2 = false;
}
}
public void insertUser(ActionEvent event){
if(validate(tempUser)){
userService.insertUser(tempUser);
cancel(null);
init();
}
}
public void updatetUser(ActionEvent event){
if(validate(tableUser)){
userService.updateUser(tableUser);
cancel(null);
init();
}
}
public void deleteUser(ActionEvent event){
if(tableUser != null){
userService.deleteUser(tableUser);
init();
cancel(null);
}
}
public void cancel(ActionEvent event){
this.rendFlag = false;
this.rendFlag2 = false;
this.tempUser = null;
this.tableUser = null;
}
//get set 很重要
9) 配置faces-config.xml
<?xml version="1.0" encoding="UTF-8"?>
<faces-config xmlns="http://java.sun.com/xml/ns/javaee"
xmlns:xsi="http://www.w3.org/2001/XMLSchema-instance"
xsi:schemaLocation="http://java.sun.com/xml/ns/javaee
http://java.sun.com/xml/ns/javaee/web-facesconfig_2_1.xsd"
version="2.1">
<!-- 采用spring的el解析器,那么就可以自动完成实例化BackBean的功能,并且完 成自动注入,因此这里不需要显示配置manageBean -- >
<application>
<el-resolver>org.springframework.web.jsf.el.SpringBeanFacesELResolver</el-resolver>
</application>
</faces-config>
10) 编写jsp页面
Home.xhtml
<!DOCTYPE html PUBLIC "-//W3C//DTD XHTML 1.0 Transitional//EN" "http://www.w3.org/TR/xhtml1/DTD/xhtml1-transitional.dtd">
<html xmlns="http://www.w3.org/1999/xhtml"
xmlns:h="http://java.sun.com/jsf/html"
xmlns:f="http://java.sun.com/jsf/core"
xmlns:ui="http://java.sun.com/jsf/facelets"
xmlns:p="http://primefaces.org/ui">
<f:view contentType="text/html" />
<h:head>
<title><h:outputText value="first primefaces page"></h:outputText></title>
</h:head>
<h:body>
<h:form>
<h:panelGrid columns="3">
<!-- 用来输出用户名部分 -->
<h:outputLabel value="username"></h:outputLabel>
<h:inputText id="username" value="#{dataBean.user.name}" required="true"
requiredMessage="用户名不能空" validatorMessage="长度在6--25">
<f:validateLength minimum="1" maximum="25"></f:validateLength>
</h:inputText>
<h:message for="username" style="color:red"></h:message>
<!-- 用来输出密码部分 -->
<h:outputLabel value="password"></h:outputLabel>
<h:inputSecret id="password" value="#{dataBean.user.password}" required="true"
requiredMessage="用户名不能空" validator="#{dataBean.validate}">
<!-- <f:validateLength minimum="6" maximum="25"></f:validateLength> -->
</h:inputSecret>
<h:message for="password" style="color:red"></h:message>
<f:facet name="footer">
<h:panelGroup>
<h:commandButton value="commit" action="#{dataBean.login}"></h:commandButton>
<h:outputLabel value=" "></h:outputLabel>
<h:commandButton value="reset" type="reset"></h:commandButton>
</h:panelGroup>
</f:facet>
</h:panelGrid>
</h:form>
</h:body>
</html>
Message.xhtml
<!DOCTYPE html PUBLIC "-//W3C//DTD XHTML 1.0 Transitional//EN" "http://www.w3.org/TR/xhtml1/DTD/xhtml1-transitional.dtd">
<html xmlns="http://www.w3.org/1999/xhtml"
xmlns:h="http://java.sun.com/jsf/html"
xmlns:f="http://java.sun.com/jsf/core"
xmlns:ui="http://java.sun.com/jsf/facelets"
xmlns:p="http://primefaces.org/ui">
<f:view contentType="text/html" />
<h:head>
<title>primefaces message</title>
</h:head>
<h:body>
<h:form title="employee message" id="form">
<p:panel id="dataMessage" header="Message for some Company"
style="margin-bottom:10px;">
<p:dataTable var="var" value="#{dataBean.users}" rowKey="#{var.id}"
selection="#{dataBean.tableUser}" selectionMode="single">
<p:column headerText="EmployeeId">
<h:outputText value="#{var.id}" />
</p:column>
<p:column headerText="EmployeeName">
<h:outputText value="#{var.name}" />
</p:column>
<p:column headerText="EmployeePassword">
<h:outputText value="#{var.password}" />
</p:column>
</p:dataTable>
</p:panel>
<p:commandButton value="Insert_User" id="insert"
actionListener="#{dataBean.prefInsertUser}" ajax="false" immediate="true" />
<p:spacer width="20" />
<p:commandButton value="Check_User" id="update"
actionListener="#{dataBean.prefUpdateUser}" ajax="false" />
<p:spacer width="20" />
<p:commandButton value="Delete_User" update="dataMessage" id="delete"
actionListener="#{dataBean.deleteUser}" οnclick="return verfi();"
ajax="true" />
<p:spacer width="20" />
<p:panel id="dataUpdate" header="update_information"
rendered="#{dataBean.rendFlag}" style="margin-top:10px;">
<h:panelGrid columns="3">
<!-- 用来输出用户名部分 -->
<h:outputLabel value="username"></h:outputLabel>
<h:inputText id="upusername" value="#{dataBean.tableUser.name}"
required="true" requiredMessage="用户名不能空"
validatorMessage="长度在6--25">
<f:validateLength minimum="1" maximum="25"></f:validateLength>
</h:inputText>
<h:message for="upusername" style="color:red"></h:message>
<!-- 用来输出密码部分 -->
<h:outputLabel value="password"></h:outputLabel>
<h:inputText id="uppassword" value="#{dataBean.tableUser.password}"
required="true" requiredMessage="用户名不能空"
validator="#{dataBean.validate}">
</h:inputText>
<h:message for="uppassword" style="color:red"></h:message>
<f:facet name="footer">
<h:panelGroup>
<p:commandButton value="commit" ajax="false"
actionListener="#{dataBean.updatetUser}" />
<p:commandButton value="cancel"
actionListener="#{dataBean.cancel}" ajax="false" immediate="true" />
<p:commandButton value=" reset" type="reset" />
</h:panelGroup>
</f:facet>
</h:panelGrid>
</p:panel>
<p:panel id="dataInsert" header="insert_information"
rendered="#{dataBean.rendFlag2}" style="margin-top:10px;">
<h:panelGrid columns="3">
<!-- 用来输出用户名部分 -->
<h:outputLabel value="username"></h:outputLabel>
<h:inputText id="inusername" value="#{dataBean.tempUser.name}"
required="true" requiredMessage="用户名不能空"
validatorMessage="长度在6--25">
<f:validateLength minimum="1" maximum="25"></f:validateLength>
</h:inputText>
<h:message for="inusername" style="color:red"></h:message>
<!-- 用来输出密码部分 -->
<h:outputLabel value="password"></h:outputLabel>
<h:inputSecret id="inpassword" value="#{dataBean.tempUser.password}"
required="true" requiredMessage="用户名不能空"
validator="#{dataBean.validate}">
</h:inputSecret>
<h:message for="inpassword" style="color:red"></h:message>
<h:outputLabel value="repassword"></h:outputLabel>
<h:inputSecret id="inrepassword"
required="true" requiredMessage="用户名不能空"
validator="#{dataBean.validate}">
</h:inputSecret>
<h:message for="inrepassword" style="color:red"></h:message>
<f:facet name="footer">
<h:panelGroup>
<p:commandButton value="commit" ajax = "false"
actionListener="#{dataBean.insertUser}" οnclick="return process();" />
<p:commandButton value="cancel"
actionListener="#{dataBean.cancel}" ajax="false" immediate="true" />
<p:commandButton value=" reset" type="reset" />
</h:panelGroup>
</f:facet>
</h:panelGrid>
</p:panel>
</h:form>
<script type="text/javascript">
function process() {
var pwd = document.getElementById("form:inpassword");
var rpwd = document.getElementById("form:inrepassword");
if (pwd.value != rpwd.value) {
alert("前后密码不一致");
return false;
} else {
return true;
}
return false;
}
function verfi() {
if (window.confirm("你确定要删除这条数据吗?")) {
return true;
} else {
return false;
}
}
</script>
</h:body>
</html>
11) 整个配置就已经完成了,测试的话还需要写对应的数据库,写完之后就可以部署到tomcat运行了,不过我的pom文件写了jetty插件,所以,一种更好的方式是使用命令: jetty:run
运行服务器,然后访问,但是又有问题,那就是jetty当前版本并不支持jsf2.0这种注解方式,所以你自己选择吧!
12) 休息了……………….


 235
235


 被折叠的 条评论
为什么被折叠?
被折叠的 条评论
为什么被折叠?
 到【灌水乐园】发言


