


注:学习使用,禁止转载
在web开发中,路由说的是根据浏览器上的URL的规则,将应用程序分成不同的区域。
比如我们访问一个网站的/路径,我们可能访问的是这个网站的home目录,如果我们访问/about,我们可能访问的是“about page”等等。
为什么要路由
在我们的应用程序中定义路由是有用的,因为我们能:
- 将应用程序分离成不同的区域
- 在应用程序中维护状态
- 根据特定的规则保护应用程序的区域
比如,假设我们编写一个inventory的app,它跟我们在前面描述的有点像。
当我们第一次访问时,我们可能会看到一个可以输入字符的输入框,并且获得一个匹配该字符的产品列表。
之后,我们可能想要去点击一个给定的产品去访问它的详细信息。
因为我们的程序是客户端的,所以技术上不要求我们修改页面的时候改变URL。但是值得思考一下:所有的页面都使用相同的URL后果是什么:
- 你不能在刷新页面的时候保存你在app中的位置
- 你不能去制定书签页,稍后返回来
- 你不能和其他人分享这个页面的URL
或者直接说,就是路由让我们定义一个URL字符串,这个URL字符串制定了我们在app中的哪个部分。
在我们的inventory app中,我们可以为每一个activity指定一系列不同的路由,比如:
首页由http://our-app/.代表,当我们访问这个的时候,我们会被重定向到home页面:http://our-app/home。
当访问‘About US’的时候,URL可能会变成”http://our-app/about“,如果我们发送http://our-app/about给其他人,其他人会跟我们一样看到相同的页面。
client-side路由是怎么工作的
以前,我们可能编写过服务器端的路由(虽然没有必要完成这个)。通常服务器端路由的工作是,当HTTP请求进来后,服务器会根据请求进来的URL分配一个不同的Controller。
比如,使用express你可能会写下面这样的代码:
var express = require('express');
var router = express.Router();

// define the about route
router.get('/about', function(req, res) {
   res.send('About us');
   });
或者使用Ruby on Rails你可能会像这样写:
     # routes.rb
get '/about', to: 'pages#about'

# PagesController.rb
class PagesController < ActionController::Base
def about
render
end
end
每个框架各不相同,但是大致情况都是,你有一个服务器,它接收一个请求,然后使用路由控制器根据请求的URL路由到一个特定的Controller,在Controller里面根据路径和参数运行一个特定的行动。
客户端路由概念上是非常类似的。只是实现不同。使用客户端路由,每次URL改变时,我们不必都向服务器发送请求,angular2的app我们称为SPA(单页面应用程序,Single Page Application),因为服务器仅仅给了我们一个简单的页面,渲染不同的页面是Javascript做的工作。
所以,在我们的Javascript中,怎么实现路由呢?
开始的时候:使用锚标记(anchor tag)
客户端路由有一个黑客(hack)的方式开始:不是使用页面的形式,而是使用锚标记。
你可能已经知道,锚标记就是让你在页面内直接连接到某一个地方,当你点击的时候,浏览器会滚动到定义锚的地方。
比如,我们在一个HTML页面定义一个锚标记。
<!-- ... lots of page content here ... -->
<a name="about"><h1>About</h1></a>然后我们访问http://something/#about,浏览器会直接跳转到定义了about锚标记的H1标签那里。
客户端框架的一个聪明做法是利用锚标记,通过格式化它们作为路径,在我们的app中代表路由。
比如,SPA里面的about路由,它可能会像http://something/#/about,这个被叫着基于hash的路由(hash-based routing)
这个技巧的明晰的是,它看起来像一个正常的URL,因为他使用一个锚标记的开始。
进化:HTML5客户端路由
通过引入HTML5,浏览器获得了创建和更改显示URL的能力,而不需要一个新的请求。
这个是通过history.pushState函数完成的,它向Javascript暴露了浏览器的导航历史。
所以现在,不需要依靠锚标记,而是依靠pushState去执行无需重新加载的历史操作。
:fa-info-circle: 这种route方式在angular1中就已经有了,不过需要使用$locationProvider.html5Mode(true)激活它们。
然而,在angular2中,html是默认的方式,在这章的后面,我们会讲解这样将html模式修改为旧的锚标记的模式。
:fa-info-circle: 当时用HTML模式时,有两个事情需要注意
- 不是所有的浏览器都支持HTML5模式,如果你需要兼容旧的浏览器,你需要使用锚标记的方式
- 服务器必须支持HTML5的路由。
对于服务器必须支持HTML5路由可能是不明晰的,在这章的后面我们会详细讨论。
编写我们的第一个路由
在angular中,配置路由是通过映射路径到处理它们的组件那里。
让我们创建一个具有多个路由的app,在我们的app中有三个路由:
- 一个主页面路由,使用/#/home路径
- 一个关于页面,使用/#/about路径
- 一个联系我们页面,使用/#/contact路径
并且,当我们访问首页的时候,会重定向到home路径。
angular2的组件路由
注意:
知道编写这版的时候(May 5th, 2016, rc.1),rout怎么发生一些变化,下面标志了/@router-deprecated的代码,这些事来自beta17的。
我们会尽快更新组件路由这章。在那之前,许多概念都是相同的。
在angular2中,配置组件路由有三个主要的部分:
- RouteConfig注解描述我们的app支持的路由
- RouterOutlet是一个组件占位符,它扩展每个路由的内容
- RouterLink使用去链接路由
让我详细看看
RouteConfig
为了定义app的路由,我们使用RouteConfig配置我们的组件。
code/routes/basic/app/ts/app.ts
@RouteConfig([
  { path: '/', name: 'root', redirectTo: ['/Home'] },
  { path: '/home', name: 'Home', component: HomeComponent },
  { path: '/about', name: 'About', component: AboutComponent },
  { path: '/contact', name: 'Contact', component: ContactComponent },
  { path: '/contactus', name: 'ContactUs', redirectTo: ['/Contact'] },
])
关于这个组件注意下面这个事情:
- path标识了路由的URL
- name唯一标识当前路由,在RouteLink,redirectTo或者Route API中使用
- component将当前路由与一个组件绑定
- redirectTo用于将指定路径重定向到一个存在的路径
总的来说,路由的目标是指定那个组件处理那个路径
Redirections:重定向
当我们在路由定义上使用redirectTo,它告诉路由器,当我们访问这个路径的时候,我们想要重定向到另外一个路径。
在上面的代码中,如果我们访问http://localhost:8080/#/的根路径,会被重定向到默认的路由home。
另外一个联系我们的例子:
{ path: '/contactus', name: 'ContactUs', redirectTo: ['/Contact'] },在这个例子中,如果我们访问http://localhost:8080/#/contactus,我们会看到浏览器重定向到/contact
RouterOutlet
我们的@View有一个模板,它标识了一些div结构,作为导航的部分。和一个叫着router-outlet的指令
当我们改变路由的时候,我们想要去保持我们的模板,仅仅只修改里面的一部分。
在angular中,为了描述我们想要在哪里绘制路由的内容,我们使用RouterOutlet指令去标识
router-outlet预示路由组件在哪里渲染。
为了使用它,我们需要声明ROUTER_DIRECTIVES作为我们组件的directives,然后在html中增加一个标签
code/routes/basic/app/ts/app.ts
@Component({
  selector: 'router-app',
  directives: [ROUTER_DIRECTIVES],
  template: `
  <div>
    <nav>
      <a>Navigation:</a>
      <ul>
        <li><a [routerLink]="['/Home']">Home</a></li>
        <li><a [routerLink]="['/About']">About</a></li>
        <li><a [routerLink]="['/Contact']">Contact us</a></li>
      </ul>
    </nav>

    <router-outlet></router-outlet>
  </div>
  `
})
如果你仔细看了上面的代码,你会发现在最后添加了一个router-outlet,当我们访问/home的时候,这里将会渲染HomeComponent。其他的组件也是一样。
RouterLink
现在我们知道在哪里渲染模板,那我们怎么告诉angular去导航到特定的路由呢?
我们可能试着直接在html建立链接:
<a href="/#/home">Home</a>但是,如果我们这样做,当我们点击的时候,会发现页面重新加载了。在SPA中,这个永远不是我们需要的。
为了解决这个问题,angular2提供了一个解决方案,它可以让我们连接到特定的路由,但是让页面不重新加载:RouterLink指令。
code/routes/basic/app/ts/app.ts
<ul>
        <li><a [routerLink]="['/Home']">Home</a></li>
        <li><a [routerLink]="['/About']">About</a></li>
        <li><a [routerLink]="['/Contact']">Contact us</a></li>
      </ul>
我们可以看到,在a标签里面使用了[routerLink]。右边,我们有一个数组,”[‘/Home’]” or “[‘/About’]”,它指定我们点击的时候跳转到指定的路由页面。
它可能有点奇怪,它的值是一个字符数组,这是因为当我们点击我们可以做更多的事情,详细信息见自路由一节。
现在,我们仅仅使用route name。
所有东西放在一起
所以,现在,我们每一个部分都有了,就是将他们组合起来。
第一件事情就是编写index.html。下面是所有的代码:
code/routes/basic/app/index.html
<!doctype html>
<html>
  <head>
    <base href="/">
    <title>ng-book 2: Angular 2 Router</title>

    {% for (var css in o.htmlWebpackPlugin.files.css) { %}
      <link href="{%=o.htmlWebpackPlugin.files.css[css] %}" rel="stylesheet">
    {% } %}
  </head>
  <body>
    <router-app></router-app>
    <script src="/core.js"></script>
    <script src="/vendor.js"></script>
    <script src="/bundle.js"></script>
  </body>
</html>
除了这条线,下面的代码应该很熟悉了
<base href="/">这条线定义了一个基本的HTML标签,这个是用来告诉浏览器,在哪里查找图像和其他资源。
原来,angular路由器也依靠这个来构建它的路由信息。
比如,如果我们有一个/path路径的路由,并且有一个base定义,href=”/app”,完整的路径会混合起来。
有时,angular程序员不会去访问HTML的头部。比如,在一个大型应用程序中,重用头部和脚部的时候。
幸运的是,对于这个事情,有一个解决方案。当启动应用程序的时候,你可以以编程方式定义基础路径。
bootstrap(RoutesDemoApp, [
 ROUTER_PROVIDERS,
 provide(APP_BASE_HREF, {useValue: '/'})
 ]);
注入provide(APP_BASE_HREF, {useValue: ‘/’}),等同于使用base=‘/’。
创建组件
在讲解主页面之前,让我们为每一个路由创建一个组件。
HomeComponent
HomeComponent只有一个H1标签,它显示Welcome。
code/routes/basic/app/ts/components/HomeComponent.ts
/*
 * Angular
 */
import {Component} from '@angular/core';

@Component({
  selector: 'home',
  template: `<h1>Welcome!</h1>`
})
export class HomeComponent {
}
AboutComponent
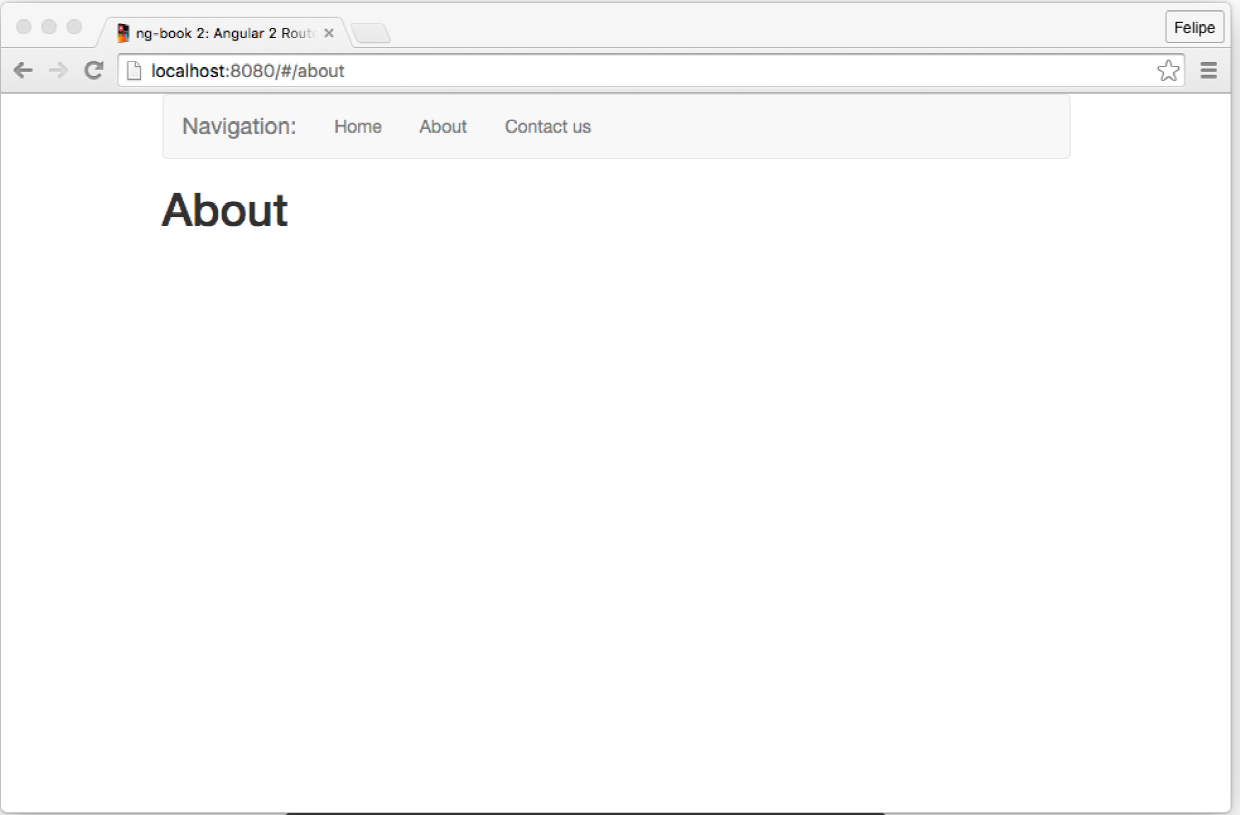
同理,AboutComponent也仅仅只有一个h1
code/routes/basic/app/ts/components/AboutComponent.ts
/*
 * Angular
 */
import {Component} from '@angular/core';

@Component({
  selector: 'about',
  template: `<h1>About</h1>`
})
export class AboutComponent {
}
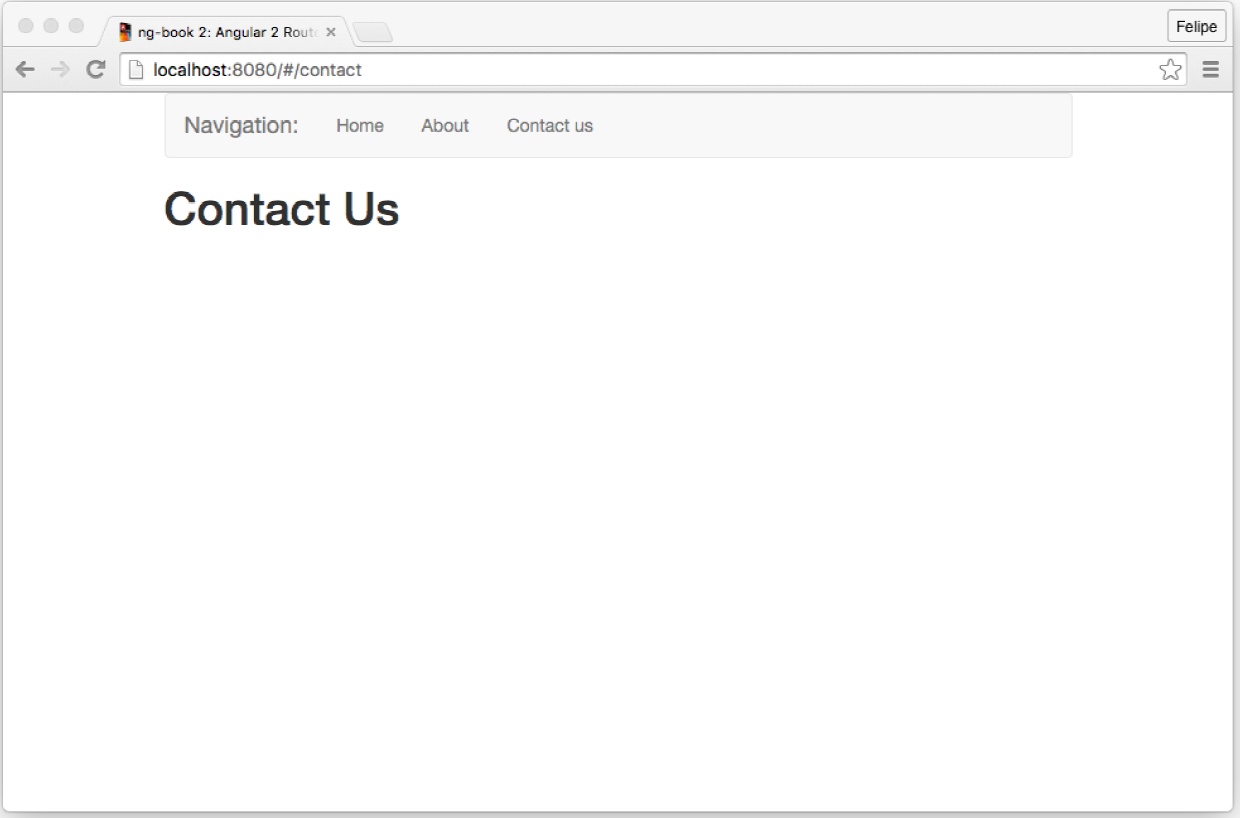
ContactComponent
跟aboutComponent一样。
code/routes/basic/app/ts/components/ContactComponent.ts
/*
 * Angular
 */
import {Component} from '@angular/core';

@Component({
  selector: 'contact',
  template: `<h1>Contact Us</h1>`
})
export class ContactComponent {
}
Application component
现在我们创建一个根组件,将这些组件组合起来。
开始导入需要的指令
code/routes/basic/app/ts/app.ts
import {provide, Component} from '@angular/core';
import {bootstrap} from '@angular/platform-browser-dynamic';
import {
  ROUTER_DIRECTIVES,
  ROUTER_PROVIDERS,
  RouteConfig,
} from '@angular/router-deprecated';

import {LocationStrategy, HashLocationStrategy} from '@angular/common';
接下来,导入我们上面创建的组件
code/routes/basic/app/ts/app.ts
/*
 * Components
 */
import {HomeComponent} from 'components/HomeComponent';
import {AboutComponent} from 'components/AboutComponent';
import {ContactComponent} from 'components/ContactComponent';
现在,让我们看看真正的组件代码
code/routes/basic/app/ts/app.ts
@Component({
  selector: 'router-app',
  directives: [ROUTER_DIRECTIVES],
  template: `
  <div>
    <nav>
      <a>Navigation:</a>
      <ul>
        <li><a [routerLink]="['/Home']">Home</a></li>
        <li><a [routerLink]="['/About']">About</a></li>
        <li><a [routerLink]="['/Contact']">Contact us</a></li>
      </ul>
    </nav>

    <router-outlet></router-outlet>
  </div>
  `
})
在这个组件中,我使用两个路由指令:RouterOutlet和RouterLink。
这些指令和其他的通用路由组件定义在 ROUTER_DIRECTIVES中,当我们导入directive时,我们基本上导入了路由相关的所有指令。
回顾一下,RouterOutlet指令预示在哪里渲染我们的路由内容,使用戴白哦。
RouterLink只用来创建一个链接。
code/routes/basic/app/ts/app.ts
<li><a [routerLink]="['/Home']">Home</a></li>
        <li><a [routerLink]="['/About']">About</a></li>
        <li><a [routerLink]="['/Contact']">Contact us</a></li>
这将会使得angular获得点击事情的权利并根据路由定义导航到特定页面。
接下来,我们使用RouteConfig定义所有的路由
code/routes/basic/app/ts/app.ts
@RouteConfig([
  { path: '/', name: 'root', redirectTo: ['/Home'] },
  { path: '/home', name: 'Home', component: HomeComponent },
  { path: '/about', name: 'About', component: AboutComponent },
  { path: '/contact', name: 'Contact', component: ContactComponent },
  { path: '/contactus', name: 'ContactUs', redirectTo: ['/Contact'] },
])
最后,我们定义RoutesDemoApp
code/routes/basic/app/ts/app.ts
class RoutesDemoApp {
}
在app.ts的最后,我们启动应用程序。
code/routes/basic/app/ts/app.ts
bootstrap(RoutesDemoApp, [
  ROUTER_PROVIDERS,
  provide(LocationStrategy, {useClass: HashLocationStrategy})
]);
上面的代码,不同的地方就是提供了bootstrap的第二个参数,第二个参数是需要注入我们应用程序的一个可注入的数组。
我们需要注入的第一个是ROUTER_PROVIDERS常量,这个常量是所有route 类的数组,像RouteRegistry和Location,它是必须的,对于route的工作来说。
第二个看起来更加复杂
provide(LocationStrategy, {useClass: HashLocationStrategy})让我们深入讲解着第二个参数
路由策略(route strategies)
angular去解析和创建来自路由定义的方式叫路由策略(location strategy)
:fa-info-circle:在angular1中叫路由模式(routing mode)
模式的策略是PathLocationStrategy,它使用的是HTML5路由。当使用这个策略的时候,路由是通过正规路径表示,像/home或者/contact
我们可以改变路由策略,通过将LocationStrategy绑定到一个新的策略,或者直接重新创建一个策略。
代替使用默认的PathLocationStrategy,我们也可以使用HashLocationStrategy.
我们默认使用hash strategy的愿意是因为如果我们使用HTML5策略,我们的路径是正规的。
这种方式,当我们点击一个链接然后跳转的时候,让我们看看从/about到/contact。
如果我们刷新页面,不是像服务器请求跟目录,而是请求的是/about或者/contact,但是,服务器不知道该路径,会返回一个404页面回来。
hash strategy的策略是基于锚标记的,像/#/home 或者 /#/contact,并且,服务器会理解/标签,后面的不用管,这样就能拿到正确的资源(这也是angular1默认使用这个策略的原因)。
:fa-info-circle:让我们看看怎么使用HTML5的模式
为了使用HTML路由模式,你必须配置所有的未知路径到根路径,在routes/basic项目中,我们包含了一个使用webpack-dev-server开发的脚本,它允许使用HTML5的模式。
为了使用它, cd routes/basic 并且运行 node html5-dev-server.js
最后,为了让我们的app使用这个新的策略,我们必须导入LocationStrategy和HashLocationStrategy:
code/routes/basic/app/ts/app.ts
import {provide, Component} from '@angular/core';
import {bootstrap} from '@angular/platform-browser-dynamic';
import {
  ROUTER_DIRECTIVES,
  ROUTER_PROVIDERS,
  RouteConfig,
} from '@angular/router-deprecated';

import {LocationStrategy, HashLocationStrategy} from '@angular/common';
然后,直接加了引用给bootstrap
code/routes/basic/app/ts/app.ts
bootstrap(RoutesDemoApp, [
  ROUTER_PROVIDERS,
  provide(LocationStrategy, {useClass: HashLocationStrategy})
]);
:fa-info-circle:如果你想要编写你自己的策略,只需要继承LocationStrategy,并且实现它的接口就可以了。一个好的学习方式就是去阅读HashLocationStrategy和PathLocationStrategy的源码。
Path location strategy
在我们的实例文件夹下,你会发现app/ts/app.html5.ts文件,如果你想要使用默认的路由策略,你只需要拷贝这个文件的内容到app.ts里面就可以了。
运行应用程序
你现在可以进入应用程序根目录(code/routes),并且运行npm run server去启动应用程序。
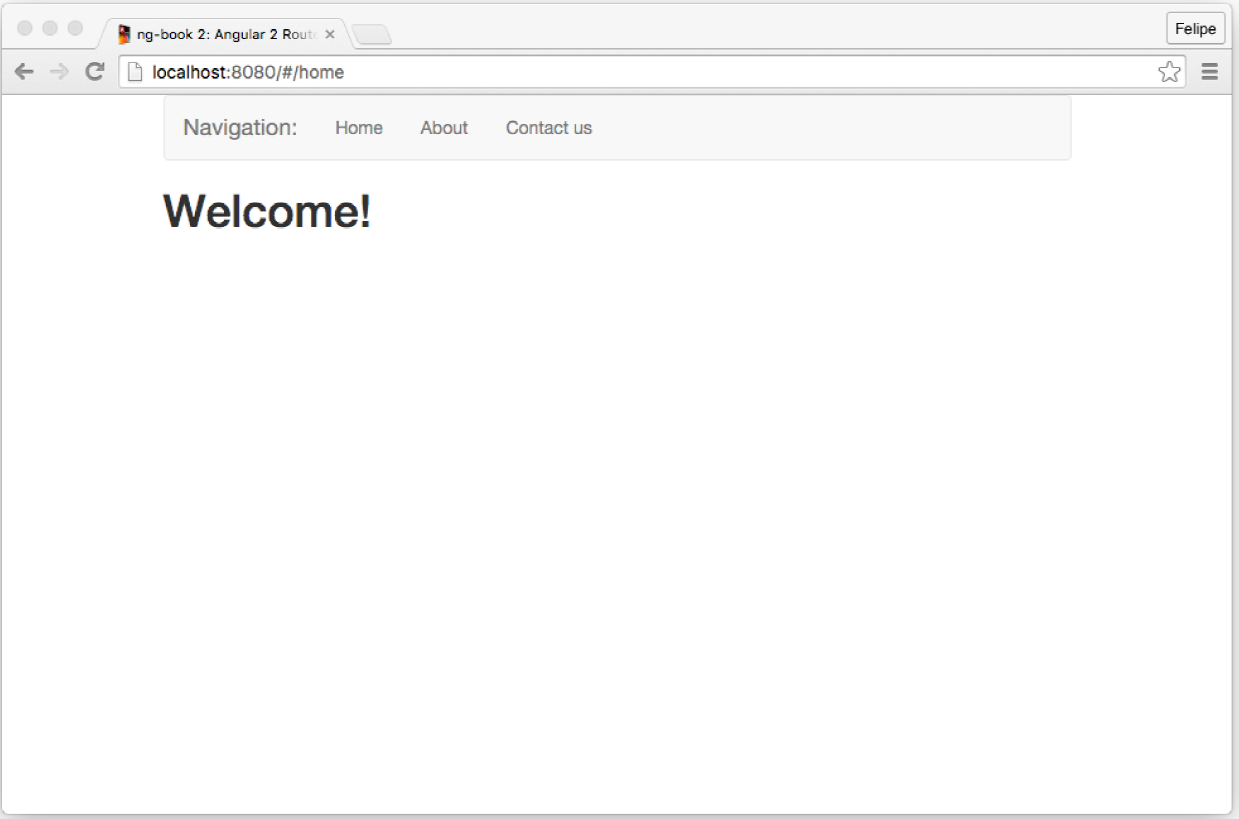
注意,浏览器的URL已经重定向到了#/home下面。
点击about。
路由参数(route parameter)
在我们的app中,我们通常希望导航到一个特定的资源,比如,我们有一个许多文章的网站,每篇文章有一个id。如果我们有文章的ID,我们可以导航到文章的详情页面,通过下面的URL:
/articles/3或者ID为4的文章:
/articles/4等等
很显然,我们不希望对每一个文章都写路由,我们希望使用一个变量或者叫路由参数去标注,我们可以在路由后面加一个冒号,后面添加参数,像这样:
/route/:param在我们的新闻网站上,我们可能希望这样标注:
/articles/:id为了增加参数到路由配置上,我们像下面这样写:
code/routes/music/app/ts/app.ts
@RouteConfig([
  { path: '/', name: 'root', redirectTo: ['Search'] },
  { path: '/search', name: 'Search', component: SearchComponent },
  { path: '/artists/:id', name: 'Artists', component: ArtistComponent },
  { path: '/tracks/:id', name: 'Tracks', component: TrackComponent },
  { path: '/albums/:id', name: 'Albums', component: AlbumComponent },
])
当我们访问/artist/123的时候,123将作为参数传递进路由里面去。但是我们怎么去获取这个路由参数呢,
RouteParams
为了使用路由参数,我们首先需要导入RouteParams:
import {RouteParams} from "@angular/router-deprecated";然后,将RouteParams注入构造器,让我们看看,有一个路由并且标识在下面:
@RouteConfig([
 { path: "/articles/:id", name: "articles", component: ArticleComponent }
 ])
然后,我们编写ArticleComponent,我们增加RouteParams作为组件构造器的参数。
export class ArticleComponent {
 id: string;

 constructor(private routeParams: RouteParams) {
 this.id = routeParams.get("id");
 }
 }
然后我们传递/articles/230,我们的组件ID属性会接收到230。
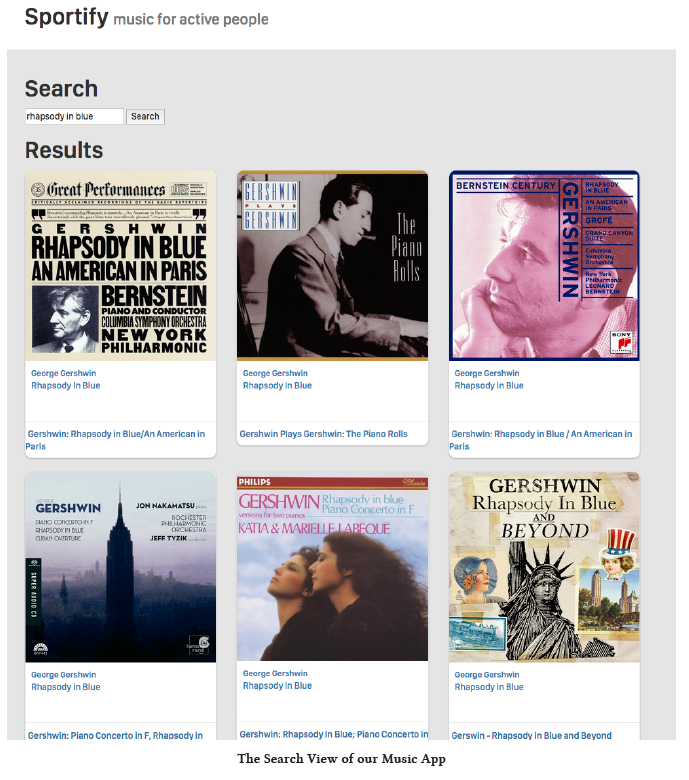
Music Search App
让我们编写一个更复杂的应用程序,我们构建一个音乐搜索程序,它有下面这些特征:
- 查找更定的音乐
- 在一个grid中显示搜索结果
- 显示歌手的详细信息
- 显示专辑的详细信息
- 显示音乐的详细信息,当点击音乐名字的时候,用户可以去播放
这个app会使用下面的路由:
- /search: 搜索表单和结果
- /artists/:id:歌手详细信息
- /albums/:id:专辑详细信息
- /tracks/:id:歌曲详细信息
第一步
第一件事情就是app.ts,看看它的导入:
code/routes/music/app/ts/app.ts
/*
 * Angular
 */
import {
  Component,
  provide
} from '@angular/core';
import {bootstrap} from '@angular/platform-browser-dynamic';
import {HTTP_PROVIDERS} from '@angular/http';
import {

  ROUTER_DIRECTIVES,
  ROUTER_PROVIDERS,
  ROUTER_PRIMARY_COMPONENT,

  Router,
  RouteConfig,
} from '@angular/router-deprecated';
import {LocationStrategy, HashLocationStrategy, APP_BASE_HREF} from '@angular/common';
然后,我们考虑组件怎么使用每一个路由:
- 对于Search路由,我们创建一个SearchComponent.,这个组件会告诉Spotify API去执行搜索操作,并且显示结果
- 对于Albums路由,我们会创建一个AlbumComponent,它会显示album的歌曲列表
- 对于Tracks路由,我们会创建TrackComponent,它会显示歌曲并且显示歌曲预览
现在,这个组件将于Spotify API进行交互,它看起来需要新建一个服务,然后使用http模块与之交互
让我们首先构建SpotifyService。
SpotifyService
我们将要实现的第一个方法就是searchByTrack,它会通过给定的字符搜索歌曲,具体参照Spotify API的搜索文档,这个节点定义了我们需要的东西:需要一个请求和一个type参数。
下面是第一版:
class SpotifyService {
    constructor(public http:Http) {
    }

    searchByTrack(query:string) {
        let params:string = [
            `q=${query}`,
            `type=track`
        ].join("&");
        let queryURL:
        `https://api.spotify.com/v1/search?${params}`;
        return this.http.request(queryURL).map(res => res.json());
    }
}
这个函数对https://api.spotify.com/v1/search执行一个GET请求,传递我们的search参数和type参数。
所有调用searchByQuery函数的需要订阅Obsevable API,像下面这样:
service
 .searchTrack('query')
 .subscribe((res: any) => console.log('Got object', res))
SearchComponent
既然我们有了搜索歌曲的服务,接下来我们可以编写我们的组件了:
code/routes/music/app/ts/components/SearchComponent.ts
import {Component, OnInit} from '@angular/core';
import {CORE_DIRECTIVES} from '@angular/common';
import {
  Router,
  RouterLink,
  RouteParams,
} from '@angular/router-deprecated';

/*
 * Services
 */
import {SpotifyService} from 'services/SpotifyService';
这里,我们导入通用的内容,然后注入我们刚创建的SpotifyService。
code/routes/music/app/ts/components/SearchComponent.ts
@Component({
selector: 'search',
directives: [RouterLink, CORE_DIRECTIVES],
template: `
<h1>Search</h1>
<p>
<input type="text" #newquery
[value]="query"
(keydown.enter)="submit(newquery.value)">
<button (click)="submit(newquery.value)">Search</button>
</p>
<div *ngIf="results">
<div *ngIf="!results.length">
No tracks were found with the term '{{ query }}'
</div>
<div *ngIf="results.length">
<h1>Results</h1>
<div class="row">
<div class="col-sm-6 col-md-4" *ngFor="let t of results">
<div class="thumbnail">
<div class="content">
<img src="{{ t.album.images[0].url }}" class="img-responsive">
<div class="caption">
<h3>
<a [routerLink]="['/Artists', {id: t.artists[0].id}]">
{{ t.artists[0].name }}
</a>
</h3>
<br>
<p>
<a [routerLink]="['/Tracks', {id: t.id}]">
{{ t.name }}
</a>
</p>
</div>
<div class="attribution">
<h4>
<a [routerLink]="['/Albums', {id: t.album.id}]">
{{ t.album.name }}
</a>
</h4>
</div>
</div>
</div>
</div>
</div>
</div>
</div>
`
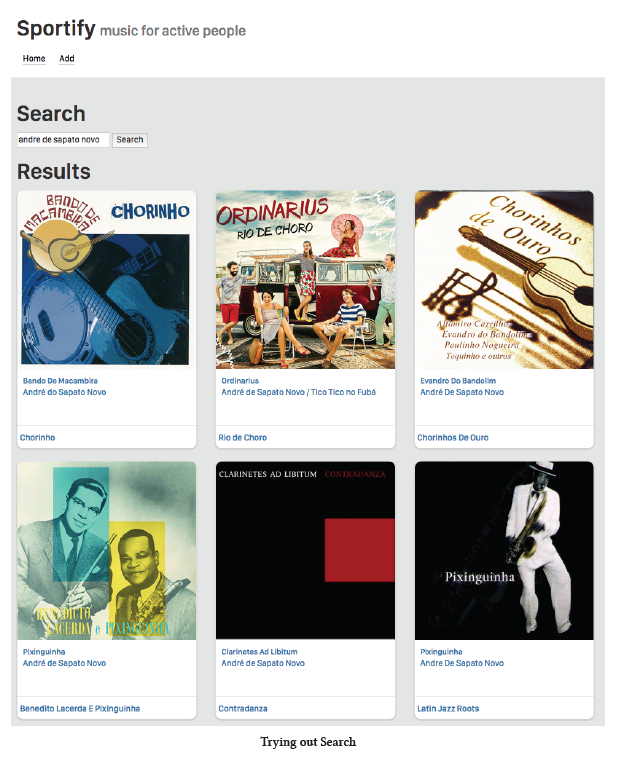
})然后,我们的目标就是像下面这样渲染歌曲:

搜索字段
让我们分解模板,第一部分就是一个搜索域。
code/routes/music/app/ts/components/SearchComponent.ts
<p>
    <input type="text" #newquery
      [value]="query"
      (keydown.enter)="submit(newquery.value)">
    <button (click)="submit(newquery.value)">Search</button>
  </p>
这里,我们有一个输入框,并且绑定它的值到我们组件的query属性。我们也给这个input一个模板变量名字:#newquery.,我们在组件中使用newquery.value访问input的值。
这个button将会出发组件的submit函数,将input的值作为参数传递进去。
当敲击enter的时候,submit也会被触发。
搜索结果和链接
接下来就是显示结果,我们可以使用ngFor去迭代每一个result对象
code/routes/music/app/ts/components/SearchComponent.ts
<div class="row">
 <div class="col-sm-6 col-md-4" *ngFor="let t of results">
对于每一个歌曲,我们显示歌手名字:
code/routes/music/app/ts/components/SearchComponent.ts
<h3>
<a [routerLink]="['/Artists', {id: t.artists[0].id}]">
{{ t.artists[0].name }}
注意,我们使用RouterLink去定向[‘/artists’, {id: t.artists[0].id}].
这就是我们设置给定route的参数的方式,下面你会看到id这个值在一个合适的组件中被处理。
然后显示歌曲:
code/routes/music/app/ts/components/SearchComponent.ts
<p>
<a [routerLink]="['/Tracks', {id: t.id}]">
 {{ t.name }}
以及专辑
code/routes/music/app/ts/components/SearchComponent.ts
<h4>
 <a [routerLink]="['/Albums', {id: t.album.id}]">
 {{ t.album.name }}
SearchComponent类
让我们看看它的构造函数
code/routes/music/app/ts/components/SearchComponent.ts
export class SearchComponent implements OnInit {
  query: string;
  results: Object;

  constructor(public spotify: SpotifyService, public router: Router,
              public routeParams: RouteParams) {
  }
这里定义了两个属性:
- query:代表当前输入
- results:代表搜索结果
构造器中注入了SpotifyService、Router和RouteParams。
search
为了执行搜索操作,我们定义了search函数
code/routes/music/app/ts/components/SearchComponent.ts
search(): void {
    this.query = this.routeParams.get('query');
    if (!this.query) {
      return;
    }

    this.spotify
      .searchTrack(this.query)
      .subscribe((res: any) => this.renderResults(res));
  }
我们希望获取query参数,如果参数是空的不进行搜索。
然后调用searchTrack去搜索歌曲,订阅结果,最后显示结果通过renderResults
code/routes/music/app/ts/components/SearchComponent.ts
renderResults(res: any): void {
    this.results = null;
    if (res && res.tracks && res.tracks.items) {
      this.results = res.tracks.items;
    }
  }
我们定义了一个results的属性,不管它何时更新,angular都会告知view去更新。
页面加载的时候搜索
当页面加载的时候,我们进行一次搜索:
code/routes/music/app/ts/components/SearchComponent.ts
ngOnInit(): void {
    this.search();
  }
submit
让我们看看,当我们提交一个表单的时候做了什么?
code/routes/music/app/ts/components/SearchComponent.ts
submit(query: string): void {
    this.router.navigate(['/Search', {query: query}]);
    this.search();
  }
我们会手动导航到搜索栏,然后执行一个搜索操作。做这个事情的意义就是,当浏览器重新加载的时候,我们会看到相同的搜索结果。
合起来
code/routes/music/app/ts/components/SearchComponent.ts
/*
 * Angular
 */

import {Component, OnInit} from '@angular/core';
import {CORE_DIRECTIVES} from '@angular/common';
import {
  Router,
  RouterLink,
  RouteParams,
} from '@angular/router-deprecated';

/*
 * Services
 */
import {SpotifyService} from 'services/SpotifyService';

@Component({
  selector: 'search',
  directives: [RouterLink, CORE_DIRECTIVES],
  template: `
  <h1>Search</h1>

  <p>
    <input type="text" #newquery
      [value]="query"
      (keydown.enter)="submit(newquery.value)">
    <button (click)="submit(newquery.value)">Search</button>
  </p>

  <div *ngIf="results">
    <div *ngIf="!results.length">
      No tracks were found with the term '{{ query }}'
    </div>

    <div *ngIf="results.length">
      <h1>Results</h1>

      <div class="row">
        <div class="col-sm-6 col-md-4" *ngFor="let t of results">
          <div class="thumbnail">
            <div class="content">
              <img src="{{ t.album.images[0].url }}" class="img-responsive">
              <div class="caption">
                <h3>
                  <a [routerLink]="['/Artists', {id: t.artists[0].id}]">
                    {{ t.artists[0].name }}
                  </a>
                </h3>
                <br>
                <p>
                  <a [routerLink]="['/Tracks', {id: t.id}]">
                    {{ t.name }}
                  </a>
                </p>
              </div>
              <div class="attribution">
                <h4>
                  <a [routerLink]="['/Albums', {id: t.album.id}]">
                    {{ t.album.name }}
                  </a>
                </h4>
              </div>
            </div>
          </div>
        </div>
      </div>
    </div>
  </div>
  `
})
export class SearchComponent implements OnInit {
  query: string;
  results: Object;

  constructor(public spotify: SpotifyService, public router: Router,
              public routeParams: RouteParams) {
  }

  ngOnInit(): void {
    this.search();
  }

  submit(query: string): void {
    this.router.navigate(['/Search', {query: query}]);
    this.search();
  }

  search(): void {
    this.query = this.routeParams.get('query');
    if (!this.query) {
      return;
    }

    this.spotify
      .searchTrack(this.query)
      .subscribe((res: any) => this.renderResults(res));
  }

  renderResults(res: any): void {
    this.results = null;
    if (res && res.tracks && res.tracks.items) {
      this.results = res.tracks.items;
    }
  }
}
试着搜索
现在,我们可以完成搜索的代码
TrackComponent
对于track路由,我们使用TrackComponent,它会显示歌曲名字,专辑图片,并能够让用户播放歌曲
code/routes/music/app/ts/components/TrackComponent.ts
<p>
      <audio controls src="{{ track.preview_url }}"></audio>
    </p>
在搜索之前,让我们了解searchTrack函数和其他两个有用的函数。
code/routes/music/app/ts/services/SpotifyService.ts
query(URL: string, params?: Array<string>): Observable<any[]> {
    let queryURL: string = `${SpotifyService.BASE_URL}${URL}`;
    if (params) {
      queryURL = `${queryURL}?${params.join('&')}`;
    }

    return this.http.request(queryURL).map((res: any) => res.json());
  }

  search(query: string, type: string): Observable<any[]> {
    return this.query(`/search`, [
      `q=${query}`,
      `type=${type}`
    ]);
  }
注意,我们展开了,简化版会变成:
code/routes/music/app/ts/services/SpotifyService.ts
searchTrack(query: string): Observable<any[]> {
    return this.search(query, 'track');
  }
接下来,我们创建一个歌曲组件,接收一个歌曲的ID。
code/routes/music/app/ts/services/SpotifyService.ts
getTrack(id: string): Observable<any[]> {
    return this.query(`/tracks/${id}`);
  }
然后,我们可以在ngOnInit函数中使用getTrack。
code/routes/music/app/ts/components/TrackComponent.ts
ngOnInit(): void {
    this.spotify
      .getTrack(this.id)
      .subscribe((res: any) => this.renderTrack(res));
  }
其他组件是很简单的。
包装音乐搜索
现在,我们有一个有趣的引用搜索类,并且可以去展示。下面试一下:

路由生命周期回调
当路由改变的时候,我们有很多次机会去执行一些操作。
最经典的例子就是就是登陆验证,我们有一个login路由,也有一个protect路由。
我们想要,只有当在login的时候提供了正确的用户名和密码,才让其跳转到protect路由,为了做这件事情,我们需要回调路由周期函数,当protect被激活的时候希望得到通知。然后我们调用验证服务器,确保用户提供了正确的证书。
angular2 route提供了6个不同的回调。
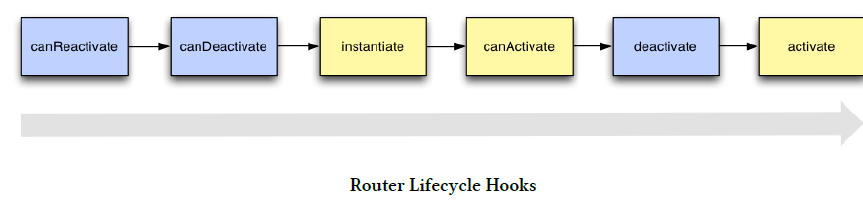
回调被调用,跟上面的顺序是一样的。
当组件要离开的时候,前面两个浅绿色会被调用。当组件路由到的时候,黄色的会被调用。
所以,如果你从login路由导航到protect路由,调用顺序如下:
- LoginComponent.canReactivate,如果返回false,停止导航
- LoginComponent.canDeactivate,如果返回false,停止导航
- ProtectedComponent.instantiate
- ProtectedComponent.canActivate,如果返回false,停止导航
- LoginComponent.deactivate;
- ProtectedComponent.activate;
对于这些回调,除了canActivate,你所有要做的就是声明一个函数,使用回调:
class MyComponent {
 canReactivate() {
 // ...
 }
 }
AuthService
让我们创建一个非常简单的service,负责去验证。
code/routes/auth/app/ts/services/AuthService.ts
import {Injectable, provide} from '@angular/core';

@Injectable()
export class AuthService {
  login(user: string, password: string): boolean {
    if (user === 'user' && password === 'password') {
      localStorage.setItem('username', user);
      return true;
    }

    return false;
  }
当提供的用户名/密码对匹配的时候,返回true,否则返回false。
它也去校验是否已经登录,
code/routes/auth/app/ts/services/AuthService.ts
getUser(): any {
    return localStorage.getItem('username');
  }
logout函数去清楚用户名
code/routes/auth/app/ts/services/AuthService.ts
logout(): any {
    localStorage.removeItem('username');
  }
和isLogin返回是否等路
code/routes/auth/app/ts/services/AuthService.ts
isLogged(): boolean {
    return this.getUser() !== null;
  }
最后就是导出AUTH_PROVIDERS,以便我们在应用程序中可以注入:
code/routes/auth/app/ts/services/AuthService.ts
export var AUTH_PROVIDERS: Array<any> = [
  provide(AuthService, {useClass: AuthService})
];
登录组件
这个组件就是当用户没有登录的时候显示一个登录表单,登录之后显示一个导航,并且提供一个退出按钮。
code/routes/auth/app/ts/components/LoginComponent.ts
this.message = '';
    if (!this.authService.login(username, password)) {
      this.message = 'Incorrect credentials.';
      /* tslint:disable */
      setTimeout(function() {
        this.message = '';
      }.bind(this), 2500);
      /* tslint:enable */
    }
    return false;
  }

  logout(): boolean {
    this.authService.logout();
    return false;
  }
一旦我们的service校验之后,就可以登录了。
组件根据是否登录有两部分。
第一部分就是登录表单。
code/routes/auth/app/ts/components/LoginComponent.ts
<form class="form-inline" *ngIf="!authService.getUser()">
    <div class="form-group">
      <label for="username">User:</label>
      <input class="form-control" name="username" #username>
    </div>

    <div class="form-group">
      <label for="password">Password:</label>
      <input class="form-control" type="password" name="password" #password>
    </div>

    <a class="btn btn-default" (click)="login(username.value, password.value)">
      Submit
    </a>
  </form>
和信息栏
code/routes/auth/app/ts/components/LoginComponent.ts
<div class="well" *ngIf="authService.getUser()">
    Logged in as <b>{{ authService.getUser() }}</b>
    <a href (click)="logout()">Log out</a>
  </div>
这里有另外的显示一个错误,当我们登录失败的时候。
code/routes/auth/app/ts/components/LoginComponent.ts
  template: `
  <div class="alert alert-danger" role="alert" *ngIf="message">
    {{ message }}
  </div>
现在,我们可以处理用户登录,让我们创建一个受限制的资源。
ProtectedComponent
这个组件只对校验的用户开放,但是我们怎么做呢?
答案是使用路由回调,我们可以使用CanActivate回调。
这个回调当一个路由从一个到另一个的时候被触发。返回false,组织导航到这里。
为了实现这个,我们必须先导入CanActivate注解。
并且使用它注解我们的组件。
code/routes/auth/app/ts/components/ProtectedComponent.ts
@CanActivate(
(nextInstr: any, currInstr: any) => {
let injector: any = ReflectiveInjector.resolveAndCreate([AuthService]);
let authService: AuthService = injector.get(AuthService);
return authService.isLogged();
}
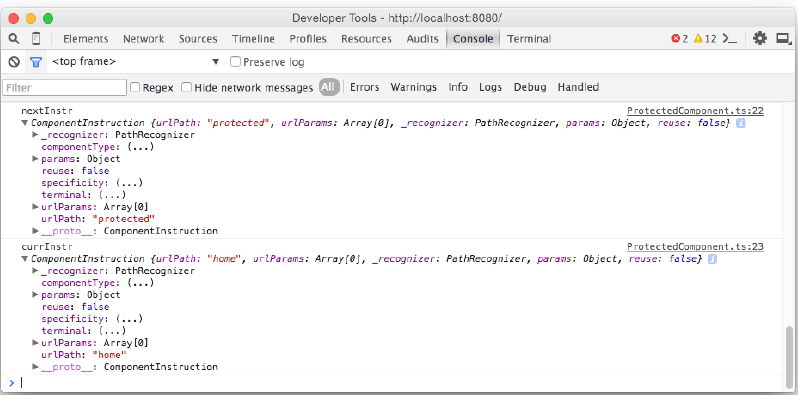
)正如你所看到的,CanActivate注解需要一个函数。这个函数接收两个参数,他们都代表了一个路线指示。
这个就是angular的导航信息,包含路径,查询参数等。
nextInstr表示用户试着去跳转到的路由,currInstr代表当前路由。
注意,你可以使用非常细粒度的控制用户是否可以导航到那些地方去。
在我们的例子中,由于我们将保护组件作为一个整体,当没有登录的时候返回false就可以了。
:fa-info-circle:如果我们打印CanActivate函数
 console.log('nextInstr', nextInstr);
 console.log('currInstr', currInstr);
我们会看到下面的信息:
如果你想要更加深入地了解,可以读读angular的源码。
返回组件,让我们看看代码做了什么?
code/routes/auth/app/ts/components/ProtectedComponent.ts
let injector: any = ReflectiveInjector.resolveAndCreate([AuthService]);
    let authService: AuthService = injector.get(AuthService);
    return authService.isLogged();
我们首先获取到AuthService.
然后我们调用isLogged()函数去校验是否已经登录了。
为了使用这个组件,我们在app.ts里面增加下面的导入。
code/routes/auth/app/ts/app.ts
/*
 * Components
 */
import {LoginComponent} from 'components/LoginComponent';
import {HomeComponent} from 'components/HomeComponent';
import {AboutComponent} from 'components/AboutComponent';
import {ContactComponent} from 'components/ContactComponent';
import {ProtectedComponent} from 'components/ProtectedComponent';
/*
 * Services
 */
import {AUTH_PROVIDERS} from 'services/AuthService';
并且将它增加到bootstrap里面去
code/routes/auth/app/ts/app.ts
bootstrap(RoutesDemoApp, [
  ROUTER_PROVIDERS,
  AUTH_PROVIDERS,
  provide(LocationStrategy, {useClass: HashLocationStrategy})
]);
然后增加一个新的/protect路径到路由里面。
code/routes/auth/app/ts/app.ts
@RouteConfig([
  { path: '/',          name: 'root',      redirectTo: ['Home'] },
  { path: '/home',      name: 'Home',      component: HomeComponent },
  { path: '/about',     name: 'About',     component: AboutComponent },
  { path: '/contact',   name: 'Contact',   component: ContactComponent },
  { path: '/protected', name: 'Protected', component: ProtectedComponent },
])
现在我们已经增加了:
- LoginComponent到指令列表
- 一个新的protect路由
- 一个标签
现在它看起来像这样:
code/routes/auth/app/ts/app.ts
@Component({
selector: 'router-app',
directives: [ROUTER_DIRECTIVES, LoginComponent],
template: `
<div class="page-header">
<div class="container">
<h1>Router Sample</h1>
<div class="navLinks">
<a [routerLink]="['/Home']">Home</a>
<a [routerLink]="['/About']">About</a>
<a [routerLink]="['/Contact']">Contact us</a>
<a [routerLink]="['/Protected']">Protected</a>
</div>
</div>
</div>
<div id="content">
<div class="container">
<login></login>
<hr>
<router-outlet></router-outlet>
</div>
</div>
`
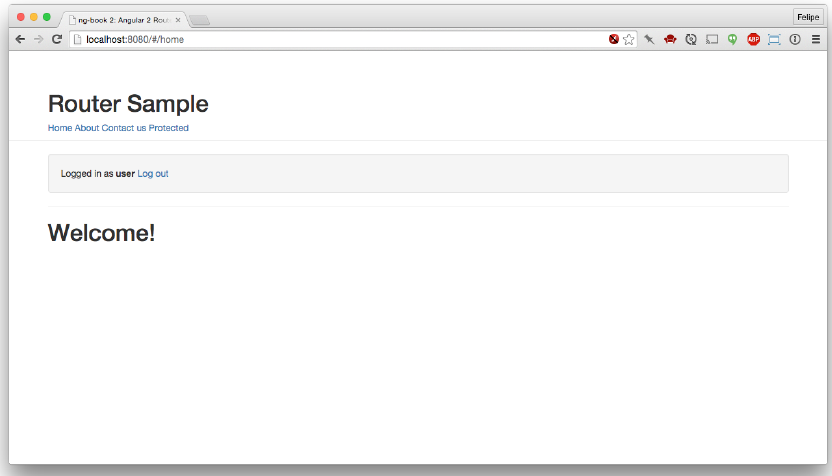
})现在,当我们打开应用程序时,显示如下:
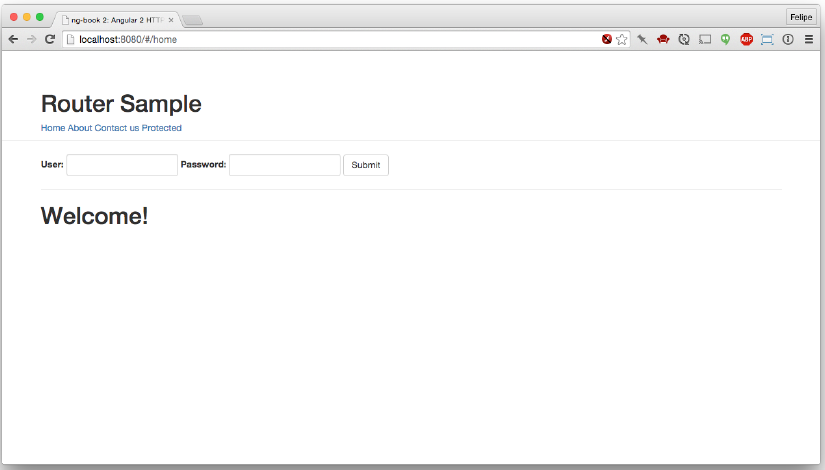
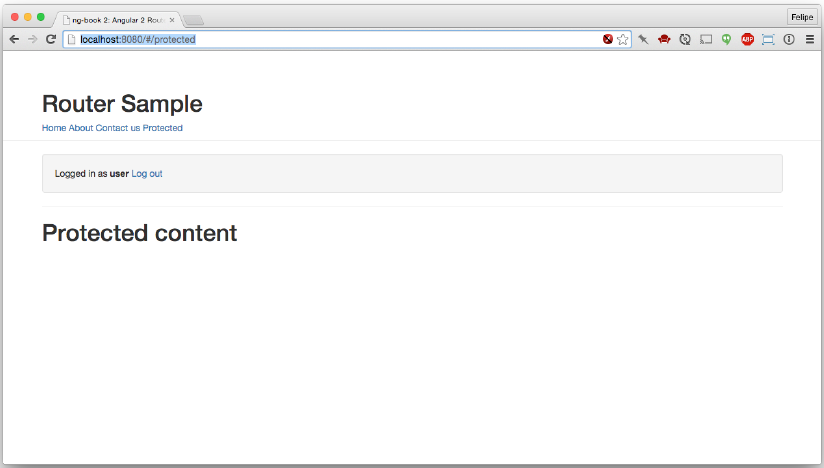
如果你点击Protected连接,什么事情都不会发生,或者你直接访问http://localhost:8080/#/protected时候,也是一样。
现在,输入user和password在表单中,并点击提交按钮。你可以看到我们当前用户显示在了一个banner上面。
现在,我们再次点击protect连接的时候,会跳转到下面的页面:
嵌套路由
嵌套路由的概念就是允许在路由中再加上路由。
让我们假设我们有一个网站,在一个区域允许用户知道我们的团队,叫who we are?并且另外一个是我们的产品。
我们可以任务who we are的路由是/about而产品的路由是/products
当访问这个区域的时候,会显示我们的所有团队和产品。
但是随着产品的更新,我们需要显示团队里面每个人的信息和每个产品的信息。
为了支持这个,路由支持嵌套。
你可以有多个嵌套的router-outlet,我们app的每个区域都有它自己的子组件,也有它自己的路由。
在我们的例子中,我们有一个产品的区域,用户在该区域可以看到两个高亮的产品。对于其他的产品,路由会使用ID去显示。
配置路由
code/routes/nested/app/ts/app.ts
 { path: '/home', name: 'Home', component: HomeComponent, useAsDefault: true },
  { path: '/products/...', name: 'Products', component: ProductsComponent },
home路由看起来是很熟悉的,但是product路由/products/…是什么鬼?这个代表products下面有子路由的时候的定义方式。
ProductsComponent
路由配置
code/routes/nested/app/ts/components/ProductsComponent.ts
@RouteConfig([
  { path: '/main', name: 'Main', component: MainComponent, useAsDefault: true },
  { path: '/:id',  name: 'ById', component: ByIdComponent },
  { path: '/interest', name: 'Interest', component: InterestComponent },
  { path: '/sportify', name: 'Sportify', component: SportifyComponent },
])
最后三个也是熟悉的,但是useAsDefault是什么?
如果不声明这个,当我们访问/products的时候,将会发生什么。
比较礼貌的方式就是获得一个错误信息,路由不知道导向哪里
使用了这个属性,当访问/product的时候,会被导向main路由。
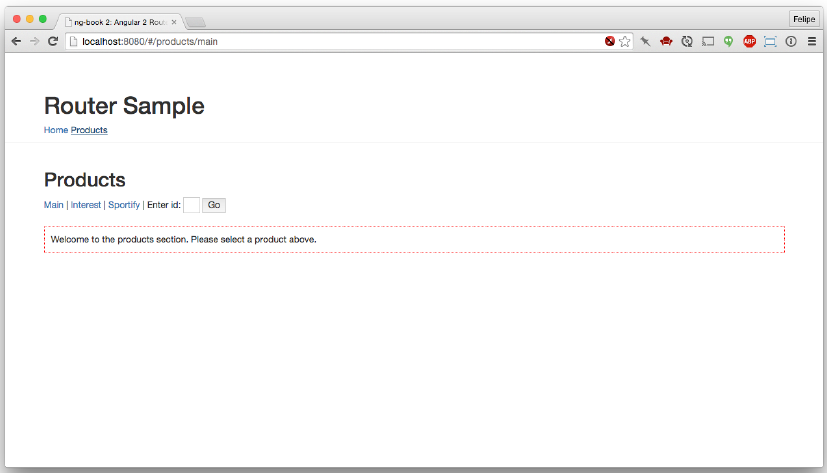
现在,在模板中,有一个静态的导航。
code/routes/nested/app/ts/components/ProductsComponent.ts
<a [routerLink]="['./Main']">Main</a> |
    <a [routerLink]="['./Interest']">Interest</a> |
    <a [routerLink]="['./Sportify']">Sportify</a> |
    Enter id: <input #id size="6">
你可以看到,每一个routelink都有一个./,这个说明的是希望从当前路由路由到下一个路由,跟相对路径差不多。
你也可以是使用[‘Products’, ‘Main’]方式,它代表路由到Products下的Main,如果你希望重用你的组件,像这样写也可以。
接下来,我们定义一个input,让用户输入产品id,然后点击导航到该产品页面:
code/routes/nested/app/ts/components/ProductsComponent.ts
Enter id: <input #id size="6">
    <button (click)="goToProduct(id.value)">Go</button>
goToProduct方法下面定义
code/routes/nested/app/ts/components/ProductsComponent.ts
constructor(public router: Router) {
  }

  goToProduct(id: string): void {
    this.router.navigate(['./ById', {id: id}]);
  }
我们使用router的navigate函数,传递进route的名字和route需要的参数,导航到特定页面。
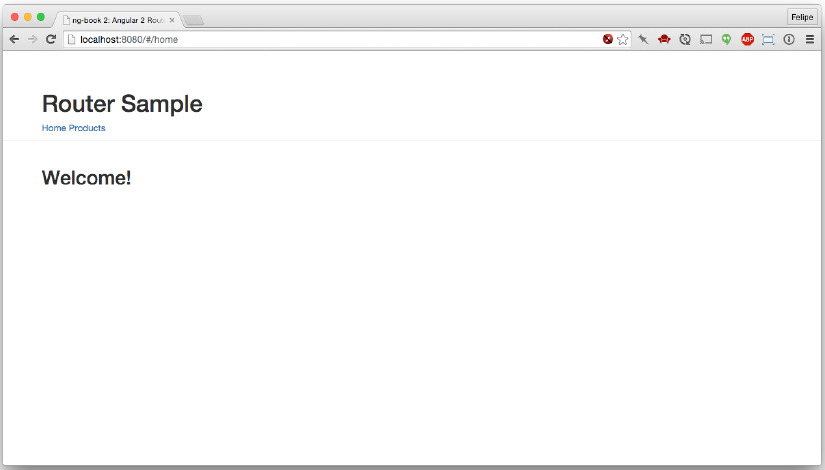
现在,如果运行应用程序,主页面是这样的。
如果你点击products链接,会重定向到products/main路由,显示如下:
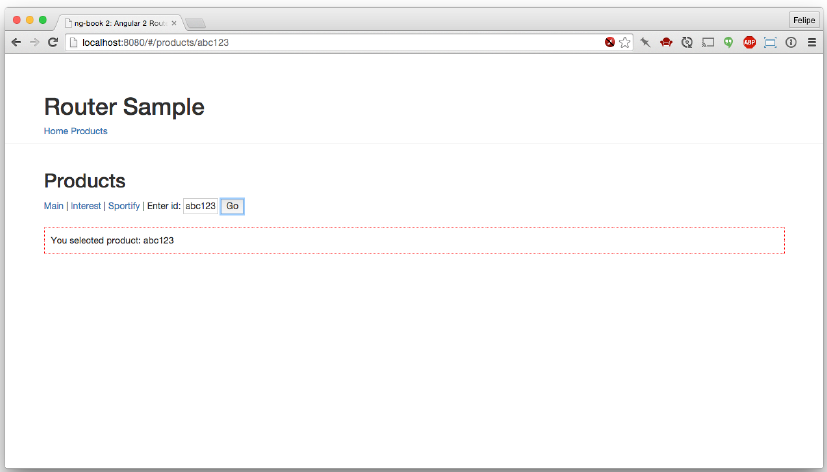
当你输入一个产品id,并点击go的时候,导航到特定产品的页面:
重定向和嵌套路由
如果我们希望导航到顶层的myRoute页面,可以使用[‘myRoute’]导航。这个仅仅在你现在就在顶部页面的时候。
如果你在子页面想要导航到myRoute,angular会试着查找一个兄弟路由,如果找不到会抛出错误。在这种情况下,需要使用[‘/myRoute’]。
同理,如果你在顶层元素,你需要导航到自路由的时候,你也需要构建一个路由数组,从顶层开始,比如:
[‘Product’, ‘Show’]
其实这种方式跟绝对路径与相对路径是一样的道理。
总结
新的angular路由是非常灵活和强大的。


 4448
4448

 被折叠的 条评论
为什么被折叠?
被折叠的 条评论
为什么被折叠?
 到【灌水乐园】发言


