


spring 的注入方式:xml 这个在项目中的使用比较简单,结构也比较明了。代码的可读性高,但是代码量要远远大于annotation的方式。所以一般情况下。小项目,中型项目都用annotation来完成,但是大型项目一般用xml方式,虽然这样beans文件非常大,但是为了可读性也只能这么处理;
xml的注解方式非常简单这里把代码直接贴出来了:
<?xml version="1.0" encoding="UTF-8"?>
<beans xmlns="http://www.springframework.org/schema/beans"
       xmlns:xsi="http://www.w3.org/2001/XMLSchema-instance"
       xsi:schemaLocation="http://www.springframework.org/schema/beans
           http://www.springframework.org/schema/beans/spring-beans-3.0.xsd">

    <!--
    创建如下bean等于完成了:HelloWorld helloWorld = new HelloWorld()
     -->
    <bean id="helloWorld" class="com.wfg.model.HelloWorld" scope="prototype"/>

    <!-- 创建了一个User对象user,id为1,username为悟空,如果要注入值不使用ref而是使用value -->
    <bean id="user" class="com.wfg.model.User">
        <property name="id" value="2"/>
        <property name="username" value="八戒"/>
    </bean>

    <bean id="userDao" class="com.wfg.dao.UserDao"></bean>
    <bean id="userJDBCDao" class="com.wfg.dao.UserJDBCDao"></bean>

    <!-- autowire=byName表示会根据name来完成注入,
    byType表示根据类型注入 ,使用byType注入如果一个类中有两个同类型的对象就会抛出异常
    所以在开发中一般都是使用byName
    虽然自动注入可以减少配置,但是通过bean文件无法很好了解整个类的结果,所以不建议使用autowire-->
    <bean id="userService" class="com.wfg.service.UserService">
        <!-- name中的值会在userService对象中调用setXX方法来注入,诸如:name="userDao"
        在具体注入时会调用setUserDao(IUserDao userDao)来完成注入
        ref="userDao"表示是配置文件中的bean中所创建的DAO的id -->
        <property name="userDao" ref="userDao"></property>
    </bean>

    <!-- 对于UserAction而言,里面的属性的值的状态会根据不同的线程得到不同的值,所以应该使用多例 -->
    <bean id="userAction" class="com.wfg.action.UserAction" scope="prototype">
        <property name="userService" ref="userService"/>
        <property name="user" ref="user"/>
        <property name="id" value="12"/>
        <!-- 同样可以注入列表,但是也不常用 -->
        <property name="names">
            <list>
                <value>aaa</value>
                <value>bbb</value>
                <value>ccc</value>
            </list>
        </property>
    </bean>

    <!-- 以下是使用构造函数来注入,不常用,基本都是使用set方法注入 -->
    <!-- <bean id="userAction" class="com.wfg.action.UserAction" scope="prototype">
        <constructor-arg ref="userService"/>
    </bean> -->
</beans>
下面来详细介绍annotation注入方式:
介绍之前先上代码
spring的配置文件
(这里注意这里要加schema)
<?xml version="1.0" encoding="UTF-8"?>
<beans xmlns="http://www.springframework.org/schema/beans"
     xmlns:xsi="http://www.w3.org/2001/XMLSchema-instance"
     xmlns:context="http://www.springframework.org/schema/context"
     xsi:schemaLocation="http://www.springframework.org/schema/beans
         http://www.springframework.org/schema/beans/spring-beans-3.0.xsd
         http://www.springframework.org/schema/context
         http://www.springframework.org/schema/context/spring-context-3.0.xsd">
   <!-- 打开Spring的Annotation支持 -->
   <context:annotation-config/>
   <!-- 设定Spring 去哪些包中找Annotation -->
   <context:component-scan base-package="com.wfg"/>

</beans>
dao层
//@Component
@Repository
public class UserDao {

    private User user;

    public void save(User user){
        System.out.println(user.toString());
    }
}
service层
//@Component
@Service
public class UserService {

    @Resource
    private UserDao userDao;

    public void save(User user){
        userDao.save(user);
    }
}
action层
//@Component
@Controller
public class UserAction {

    @Resource
    private UserService userService;


    public void save(User user){
        userService.save(user);
    }
}
测试代码
public class Test {

    public static void main(String[] args) {
        ApplicationContext context = new ClassPathXmlApplicationContext("applicationContext.xml");
        UserAction userAction = context.getBean(UserAction.class);
        userAction.save(new User(12, "张三"));
    }
}
1.1 使用注解完成自动装配
Spring2.0 以后,我们可以使用annotation 完成(IOC)注入,甚至完成自动扫描装配。这里又可以使用两种方式的注解,spring提供的Autowired与JavaSE提供的@Resource。
1.1.1 使用@AUTOWIRED(自动绑定)
Spring提供了@Autowired注解可以在Field 上和该Field所对应的setter方法上使用,来完成自动装配的工作。它会自动在Spring容器中查找匹配的类型(按类型自动装配)。@Autowired为spring框架提供的注解,无法移植,这种方式不推荐使用。 Spring又提供了@Qualifier与Autowired结合使用,@Qualifier可以限制注入的对象是Spring中具体哪个对象,当配置文件中有多个对象时,必须指定。
1.1.1.1 启动 annotation 支持
<!-- 打开Spring的Annotation支持 -->
   <context:annotation-config/>
   <!-- 设定Spring 去哪些包中找Annotation -->
   <context:component-scan base-package="com.wfg"/>
spring根据类别自动装配
//spring注解,默认按类别查找,
@Autowired(required=true)
@Qualifier(“ziyijiejie”) //当配置文件有多个实现类时,必须指定
private Nvzhujue nvzhujue;
Spring还支持Java平台的公共注解@Resource。Java平台的公共注解来自JDK中的
javax.annotation.*包。
@Resource的作用相当于@Autowired,区别是@Autowired按byType(按类型)自动注入,而@Resource默认按 byName(按名称)自动注入。@Resource有两个属性比较重要,分别是name和type,spring将@Resource注解的name属性解析为bean的名字,而type属性则解析为bean的类型。所以如果使用name 属性,则使用byName的自动注入策略,而使用type属性时则使用byType自动注入策略。如果既不指定name也不指定type属性,这时将通过反射机制使用byName自动注入策略。
对容器中的对象进行标识,这就需要使用使用 @Service(业务),@Controller(控制器), @Repository(仓库) ,@Component(组件)这几个注解来标识这些类了,他们只有语义上的区别,使用的时候没有任何区别。一般在DAO的类上标注@Repository,在业务逻辑类上标注@Service,在Struts控制器上标注@Controller,当组件不好归类的时候标注@Component。 自动扫描的时候,看到有的组件使用了上面的Annotation,就将它纳入容器管理起来,在Annotation上使用名称进行标识。
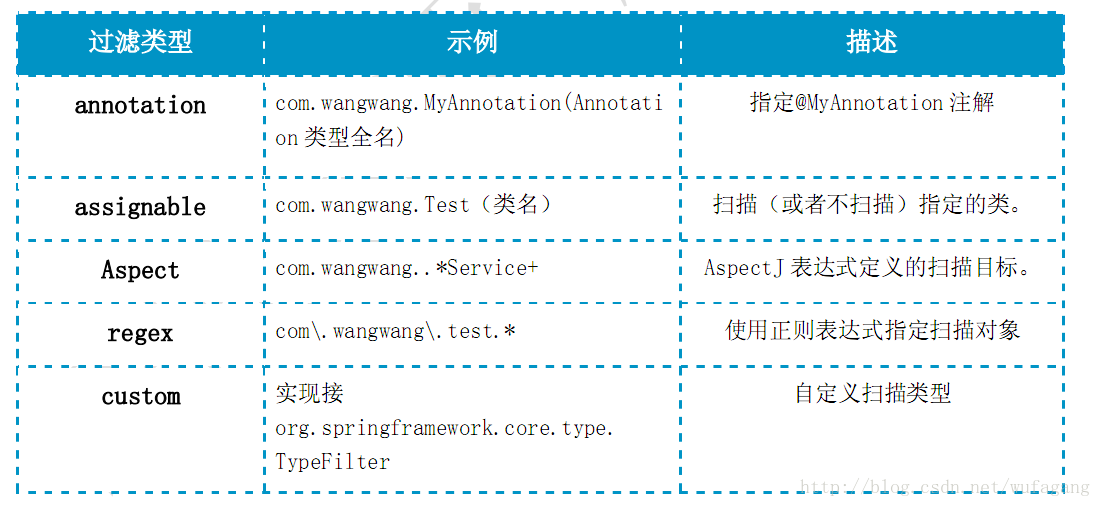
如果我们指定的包中有些类不想被纳入Spirng容器,可以使用context命名空间中的
和来进行过滤。该子节点提供属性type和expression,其中type表示过滤类型(包括:annotation、assignable、aspectj、regex、custom),expression表示过滤条件。
 <!-- 设定Spring 去哪些包中找Annotation -->
   <context:component-scan base-package="com.wfg">
    <context:exclude-filter type="annotation" expression="org.springframework.stereotype.Service"/>
   </context:component-scan>
加上这一行代码就会报service空指针异常


 802
802


 被折叠的 条评论
为什么被折叠?
被折叠的 条评论
为什么被折叠?
 到【灌水乐园】发言


