


转载
本文转自郭霖的专栏。
在公司各种拥抱变化,可能又要转回Android应用开发了。趁着空档的机会学习一下View的实现机制。
LayoutInfalter
首先,来看一下LayoutInflater的用法。LayoutInflater有两种写法,分别为:
- 工厂模式。
LayoutInflater mLayoutInflater = LayoutInflater.from(context);- Server模式。
LayoutInflater mLayoutInflater = (LayoutInflater)context.getSystemService(Context.LAYOUT_INFLATER_SERVICE);其实,第一种是第二种的简单写法,只是Android给我们做了一下封装而已。具体可以查看源码(/frameworks/base/core/java/android/view/LayoutInflater.java):
public static LayoutInflater from(Context context)
{
    LayoutInflater LayoutInflater =
        (LayoutInflater) context.getSystemService(Context.LAYOUT_INFLATER_SERVICE);
    if (LayoutInflater == null) {
        throw new AssertionError("LayoutInflater not found.");
    }
    return LayoutInflater;
}
得到LayoutInflater的实例后,我们就可以通过调用它的inflate()方法来加载布局了,如下所示:
mLayoutInflater.inflate(resourceId, root);inflate方法一般接收两个参数,第一个参数是加载时的布局id,第二个参数是指给该布局的外部再嵌套一层父布局,如果不需要就直接传null。这样就成功的创建了一个布局的实例,之后再将它添加到指定的位置就可以显示出来了。
接下来,我们从源码的角度分析一下inflate函数的具体实现。
源码解析
基于Android 2.3源码进行分析(原理是一样的,而且Android 2.3代码还是容易理解一点)。源码位置:/frameworks/base/core/java/android/view/LayoutInflater.java。
public View inflate(int resource, ViewGroup root)
{
    return inflate(resource, root, root != null);
}

public View inflate(int resource, ViewGroup root, boolean attachToRoot)
{
    XmlResourceParser parser = getContext().getResources().getLayout(resource);
    try {
        return inflate(parser, root, attachToRoot);
    } finally {
        parser.close();
    }
}

public View inflate(XmlPullParser parser, ViewGroup root, boolean attachToRoot) {
    // ......最终被调用的方法
}
所有调用inflate的重载的方法,最终都被调到最后的那个函数里。我们来分析一下这个最终函数的具体实现:
public View inflate(XmlPullParser parser, ViewGroup root, boolean attachToRoot)
{
    synchronized(mConstructorArgs) {
        final AttributeSet attrs = Xml.asAttributeSet(parser);
        mConstructorArgs[0] = mContext;
        View result = root;

        try {
            int type;
            while ((type = parser.next()) != XmlPullParser.START_TAG &&
                type != XmlPullParser.END_DOCUMENT) {
                // Empty
            }

            if (type != XmlPullParser.START_TAG) {
                throw new InflateException("No start tag found!");
            }

            final String name = parser.getName();

            if (TAG_MERGE.equals(name)) {
                if (root == null || !attachToRoot) {
                    throw new InflateException("<merge /> can be used only with a valid ViewGroup and attachToRoot=true");
                }
                rInflate(parser, root, attrs);
            } else {
                View temp = createViewFromTag(name, attrs);
                ViewGroup.LayoutParams params = null;

                if (root != null) {
                    System.out.println("Creating params from root: " + root);
                    params = root.generateLayoutParams(attrs);
                    if (!attachToRoot) {
                        temp.setLayoutParams(params);
                    }
                }

                System.out.println("-----> start inflating children");

                rInflate(parser, temp, attrs);

                System.out.println("-----> done inflating children");

                if (root != null && attachToRoot) {
                    root.addView(temp, params);
                }

                if (root == null || !attachToRoot) {
                    result = temp;
                }
            }
        } catch (XmlPullParserException e) {
            // throw excepiton
        } catch (IOException e) {
            // throw exception
        }

        return result;
    }
}
这个函数还是比较简单的,主要做的事情就是:解析xml文件,得到root节点的tag,并通过createViewFromTag函数来创建root节点的view为temp,之后再调用rInflate函数,将xml剩余的tag挂到以temp为根节点的view树上。rInflate函数的具体实现如下:
private void rInflate(XmlPullParser parser, View parent, final AttributeSet attrs) throws XmlPullParserException, IOException {
    final int depth = parser.getDepth();
    int type;

    while ((type = parser.next() != XmlPullParser.END_TAG ||
        parser.getDepth() > depth) && type != XmlPullParser.END_DOCUMENT) {
        if (type != XmlPullParser.START_TAG) {
            continue;
        }

        final String name = parser.getName();

        if (TAG_REQUEST_FOCUS.equals(name)) {
            parseRequestFocus(parser, parent);
        } else if (TAG_INCLUDE.equals(name)) {
            if (parser.getDepth() == 0) {
                throw new InflateException("<include /> cannot be the root element");
            }
            parseInclude(parser, parent, attrs);
        } else {
            final View view = createViewFromTag(name, attrs);
            final ViewGroup viewGroup = (ViewGroup) parent;
            final ViewGroup.LayoutParams params = viewGroup.generateLayoutParams(attrs);
            // 递归的构造view树
            rInflate(parser, view, attrs);
            viewGroup.addView(view, params);
        }
    }

    parent.onFinishInflate();
}递归的原理也很简单,终止条件是type==XmlPullParser.END_TAG。接下来,举一个简单的例子,来模拟一下LayoutInflater.inflate函数生成View数的过程。
示例layout:
<RelativeLayout>
    <ImageView1 />
    <TextView1 />
    <LinearLayoyt>
        <ImageView2 />
        <TextView2 />
    </LinearLayout>
</RelativeLayout>
依据inflate方法的流程:
- 函数首先通过最初的Tag创建了RelativeLayout的View。然后调用了rInflate方法,传入的参数为(parser, parent=RelativeLayout, attrs);
- 进入到rInflate方法后,由于ImageView1和TextView1没有子结构,所以递归调用rInflate的时候会遇到
type==XmlPullParser.END_TAG的终止条件,因此这两个View都被add到了RelativeLayout上。 - 但是,继续向下解析的时候,到LinearLayout就不一样了。LinearLayout递归调用rInflate的时候,会把自己作为parent传入,导致解析ImageView2和TextView2的时候,均为add到LinearLayout上。最后,LinearLayout再被add到最外层root节点RelativeLayout上。
通过源码的分析,我们就比较清楚的了解inflate的实现了。还可以通过源码延伸的讲解一下attachToRoot参数的作用:
- 如果root为null,attachToRoot将失去意义,设置任何值都没有意义。
- 如果root不为null,attachToRoot为true,则会给加载的布局文件指定一个父布局,即root。
- 如果root部位null,attachToRoot为false,则会将布局文件最外层的所有layout属性进行设置,当该view被添加到父view当中时,这些layout属性会自动生效。
- 在不设置attachToRoot参数时,当root不为null,attachToRoot默认为true。
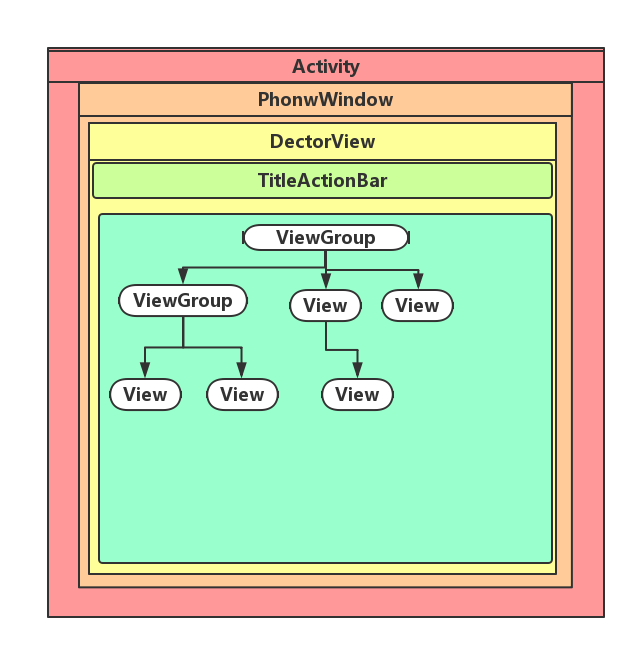
同时,附上Activity界面加载显示后的View树:


 961
961

 被折叠的 条评论
为什么被折叠?
被折叠的 条评论
为什么被折叠?
 到【灌水乐园】发言


