


设计并实现一个简易的计算器—使用页面上提供的基本数码(0-9)按键在两个文本框TextBox1、TextBox2中输入两个数然后按下算符按键(加法运算符按键btnADD、减法运算符按键btnSubtractor、乘法算符按键btnMultiplying、除法算符按键btnDivision),能做相应的的某个单种类运算,在显示结果的只读文本框TextBox3上能显示相应的运算的结果。
具体的操作步骤如下:
(1)、选择“网站|添加新项”命令,添加一个Web窗体页。
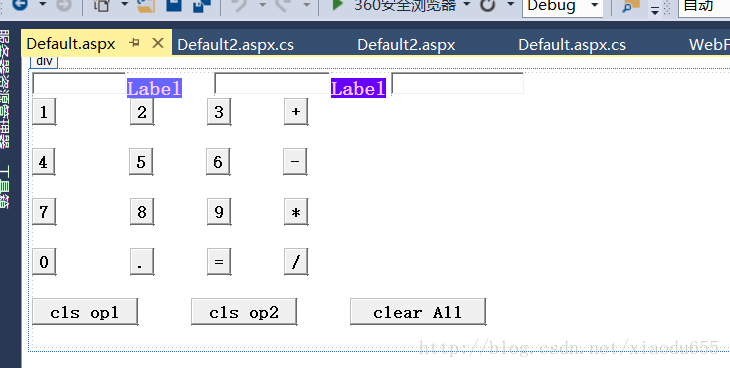
(2)、设计如下所示的界面,两个文本框TextBox1、TextBox2中输入两个数,以及Button按钮。具体的设计界面如下。
(3)、纯白文本框的enabled的属性在程序运行中被设置为true,灰色文本框的enabled的属性在程序运行中被设置为false;0~9按键的Click事件处理方法(也叫函数)可用同一方法button_Click其第一形参sender将携带被单击的数字按键的对象信息,只要注意到被单击的数字按键对象是由button类产生的,而button_Click其第一形参sender的数据类型是object, 在方法体内对形参sender做强制类型转换,使得强制转换为button类的对象,之后就可以获得button界面上的数码信息。(但在此例中我的办法比较蠢,我将10个Button全都进行插入编写了代码)
具体的代码为:
using System;
using System.Collections.Generic;
using System.Linq;
using System.Web;
using System.Web.UI;
using System.Web.UI.WebControls;

public partial class _Default : System.Web.UI.Page
{
    protected void Page_Load(object sender, EventArgs e)
    {

    }
    double op1, op2, result = 0;//定义三个操作数
    char op;//运算符
    protected void Button_Click(object sender, EventArgs e)
    {
        Button btn = (Button)sender;
        if (TextBox1.Enabled)
            TextBox1.Text += btn.Text;
        else if (TextBox2.Enabled)
            TextBox2.Text += btn.Text;
    }
    protected void Button2_Click(object sender, EventArgs e)
    {
        Button btn = (Button)sender;
        if (TextBox1.Enabled)
            TextBox1.Text += btn.Text;
        else if (TextBox2.Enabled)
            TextBox2.Text += btn.Text;
    }
    protected void Button4_Click(object sender, EventArgs e)
    {
        Label1.Text = "+";
        TextBox1.Enabled = false;
    }
    protected void Button8_Click(object sender, EventArgs e)
    {
        Label1.Text = "-";
        TextBox1.Enabled = false;
    }

    protected void Button12_Click(object sender, EventArgs e)
    {
        Label1.Text = "*";
        TextBox1.Enabled = false;
    }

    protected void Button16_Click(object sender, EventArgs e)
    {
        Label1.Text = "/";
        TextBox1.Enabled = false;
    }

    protected void Button15_Click(object sender, EventArgs e)
    {
        Label2.Text = "=";
        TextBox2.Enabled = false;
        op1 = double.Parse(TextBox1.Text);
        op2 = double.Parse(TextBox2.Text);
        op = Convert.ToChar(Label1.Text);
        switch(op)//操作符的几个形式
        {
            case '+':
                result = op1 + op2;
                TextBox3.Text = result.ToString();
                break;
            case '-':
                result = op1 - op2;
                TextBox3.Text = result.ToString();
                break;
            case '*':
                result = op1 * op2;
                TextBox3.Text = result.ToString();
                break;
            case '/':
                result = op1 / op2;
                TextBox3.Text = result.ToString();
                break;
            default:
                break;
        }
        }
    protected void Button17_Click(object sender, EventArgs e)
    {
        TextBox1.Text = "";
        TextBox1.Enabled = true;
    }
   protected void Button18_Click(object sender, EventArgs e)
    {
        TextBox2.Text = "";
        TextBox2.Enabled = true;
    }

   protected void Button19_Click(object sender, EventArgs e)
   {
       Label1.Text = "";
       Label2.Text = "";
       TextBox1.Enabled = true;
       TextBox2.Enabled = true;
       TextBox1.Text = "";
       TextBox2.Text = "";
       TextBox3.Text = "";
   }
   protected void TextBox1_TextChanged(object sender, EventArgs e)
   {

   }

   protected void TextBox2_TextChanged(object sender, EventArgs e)
   {

   }
   protected void Button3_Click(object sender, EventArgs e)
   {
       Button btn = (Button)sender;
       if (TextBox1.Enabled)
           TextBox1.Text += btn.Text;
       else if (TextBox2.Enabled)
           TextBox2.Text += btn.Text;
   }

   protected void Button5_Click(object sender, EventArgs e)
   {
       Button btn = (Button)sender;
       if (TextBox1.Enabled)
           TextBox1.Text += btn.Text;
       else if (TextBox2.Enabled)
           TextBox2.Text += btn.Text;
   }

   protected void Button6_Click(object sender, EventArgs e)
   {
       Button btn = (Button)sender;
       if (TextBox1.Enabled)
           TextBox1.Text += btn.Text;
       else if (TextBox2.Enabled)
           TextBox2.Text += btn.Text;
   }

   protected void Button7_Click(object sender, EventArgs e)
   {
       Button btn = (Button)sender;
       if (TextBox1.Enabled)
           TextBox1.Text += btn.Text;
       else if (TextBox2.Enabled)
           TextBox2.Text += btn.Text;
   }

   protected void Button9_Click(object sender, EventArgs e)
   {
       Button btn = (Button)sender;
       if (TextBox1.Enabled)
           TextBox1.Text += btn.Text;
       else if (TextBox2.Enabled)
           TextBox2.Text += btn.Text;
   }

   protected void Button10_Click(object sender, EventArgs e)
   {
       Button btn = (Button)sender;
       if (TextBox1.Enabled)
           TextBox1.Text += btn.Text;
       else if (TextBox2.Enabled)
           TextBox2.Text += btn.Text;
   }

   protected void Button11_Click(object sender, EventArgs e)
   {
       Button btn = (Button)sender;
       if (TextBox1.Enabled)
           TextBox1.Text += btn.Text;
       else if (TextBox2.Enabled)
           TextBox2.Text += btn.Text;
   }

   protected void Button13_Click(object sender, EventArgs e)
   {
       Button btn = (Button)sender;
       if (TextBox1.Enabled)
           TextBox1.Text += btn.Text;
       else if (TextBox2.Enabled)
           TextBox2.Text += btn.Text;
   }
}
设计部分的源代码为:
<%@ Page Language="C#" AutoEventWireup="true" CodeFile="Default.aspx.cs" Inherits="_Default" %>
<!DOCTYPE html>
<html xmlns="http://www.w3.org/1999/xhtml">
<head runat="server">
<meta http-equiv="Content-Type" content="text/html; charset=utf-8"/>
<title></title>
<style type="text/css">
.auto-style1 {
font-weight: bold;
}
.auto-style2 {
background-color: #6666FF;
}
.auto-style3 {
font-weight: bold;
background-color: #6600FF;
}
</style>
</head>
<body style="color: #FFCCFF; margin-bottom: 19px">
<form id="form1" runat="server">
<div>
<asp:TextBox ID="TextBox1" runat="server" Width="87px" OnTextChanged="TextBox1_TextChanged" CssClass="auto-style1"></asp:TextBox>
<b>
<asp:Label ID="Label1" runat="server" Text="Label" CssClass="auto-style2"></asp:Label>
</b>
<asp:TextBox ID="TextBox2" runat="server" Width="109px" OnTextChanged="TextBox2_TextChanged" CssClass="auto-style1"></asp:TextBox>
<asp:Label ID="Label2" runat="server" Text="Label" CssClass="auto-style3"></asp:Label>
<asp:TextBox ID="TextBox3" runat="server" Width="126px" style="margin-left: 5px" CssClass="auto-style1"></asp:TextBox>
<b>
<br />
</b>
<asp:Button ID="Button1" runat="server" Text="1" OnClick="Button_Click" CssClass="auto-style1" />
<b> </b> <asp:Button ID="Button2" runat="server" Text="2" OnClick="Button2_Click" CssClass="auto-style1" />
<b> </b> <asp:Button ID="Button3" runat="server" Text="3" CssClass="auto-style1" OnClick="Button3_Click" />
<b> </b> <asp:Button ID="Button4" runat="server" Text="+" OnClick="Button4_Click" CssClass="auto-style1" />
<b>
<br />
<br />
</b>
<asp:Button ID="Button5" runat="server" Text="4" CssClass="auto-style1" OnClick="Button5_Click" style="width: 23px" />
<b> </b> <asp:Button ID="Button6" runat="server" Text="5" CssClass="auto-style1" OnClick="Button6_Click" />
<b> </b> <asp:Button ID="Button7" runat="server" Text="6" CssClass="auto-style1" OnClick="Button7_Click" />
<b> </b> <asp:Button ID="Button8" runat="server" Text="-" OnClick="Button8_Click" CssClass="auto-style1" />
<b>
<br />
<br />
</b>
<asp:Button ID="Button9" runat="server" Text="7" CssClass="auto-style1" OnClick="Button9_Click" />
<b> </b> <asp:Button ID="Button10" runat="server" Text="8" CssClass="auto-style1" OnClick="Button10_Click" style="height: 27px" />
<b> </b> <asp:Button ID="Button11" runat="server" Text="9" CssClass="auto-style1" OnClick="Button11_Click" />
<b> </b> <asp:Button ID="Button12" runat="server" Text="*" OnClick="Button12_Click" CssClass="auto-style1" />
<b>
<br />
<br />
</b>
<asp:Button ID="Button13" runat="server" Text="0" CssClass="auto-style1" OnClick="Button13_Click" />
<b> </b> <asp:Button ID="Button14" runat="server" Text="." CssClass="auto-style1" />
<b> </b> <asp:Button ID="Button15" runat="server" Text="=" OnClick="Button15_Click" CssClass="auto-style1" />
<b>
</b>
<asp:Button ID="Button16" runat="server" Text="/" OnClick="Button16_Click" CssClass="auto-style1" />
<b>
<br />
<br />
</b>
<asp:Button ID="Button17" runat="server" Text="cls op1" OnClick="Button17_Click" CssClass="auto-style1" />
<b>
</b>
<asp:Button ID="Button18" runat="server" Text="cls op2" OnClick="Button18_Click" CssClass="auto-style1" />
<b>
</b>
<asp:Button ID="Button19" runat="server" Text="clear All" OnClick="Button19_Click" CssClass="auto-style1" />
<b>
<br />
</b>
</div>
</form>
</body>
</html>
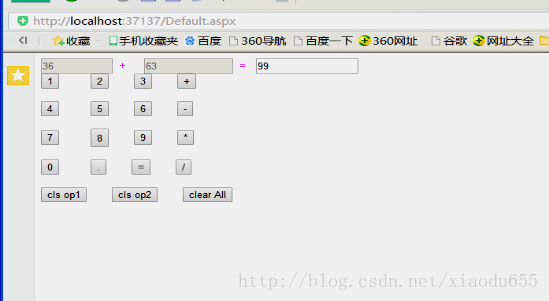
(4)、具体的运行界面为:(有点丑)
本人是个Web初学者,希望大家给予多多发表自己的意见。


 468
468


 被折叠的 条评论
为什么被折叠?
被折叠的 条评论
为什么被折叠?
 到【灌水乐园】发言


