


现在要编写一个界面比较复杂和美观的聊天界面,先创建一个名为UIBestPractice的项目。
1、制作Nine-Patch图片
假设现在有一张图片名为message_left.png,现在作为LinearLayout的背景图片,如果这个layout的宽度设置为match_parent,那么整个图片就会被拉伸,导致效果不好:
<LinearLayout android:layout_width="match_parent"
    android:layout_height="match_parent"
    xmlns:android="http://schemas.android.com/apk/res/android"
    android:orientation="vertical">

    <LinearLayout android:layout_width="match_parent" android:layout_height="wrap_content"
        android:background="@drawable/message_left">

    </LinearLayout>
</LinearLayout>
所以这个时候需要用到Android-SDK里自带的draw9patch.bat文件来制作Nine-Patch图片
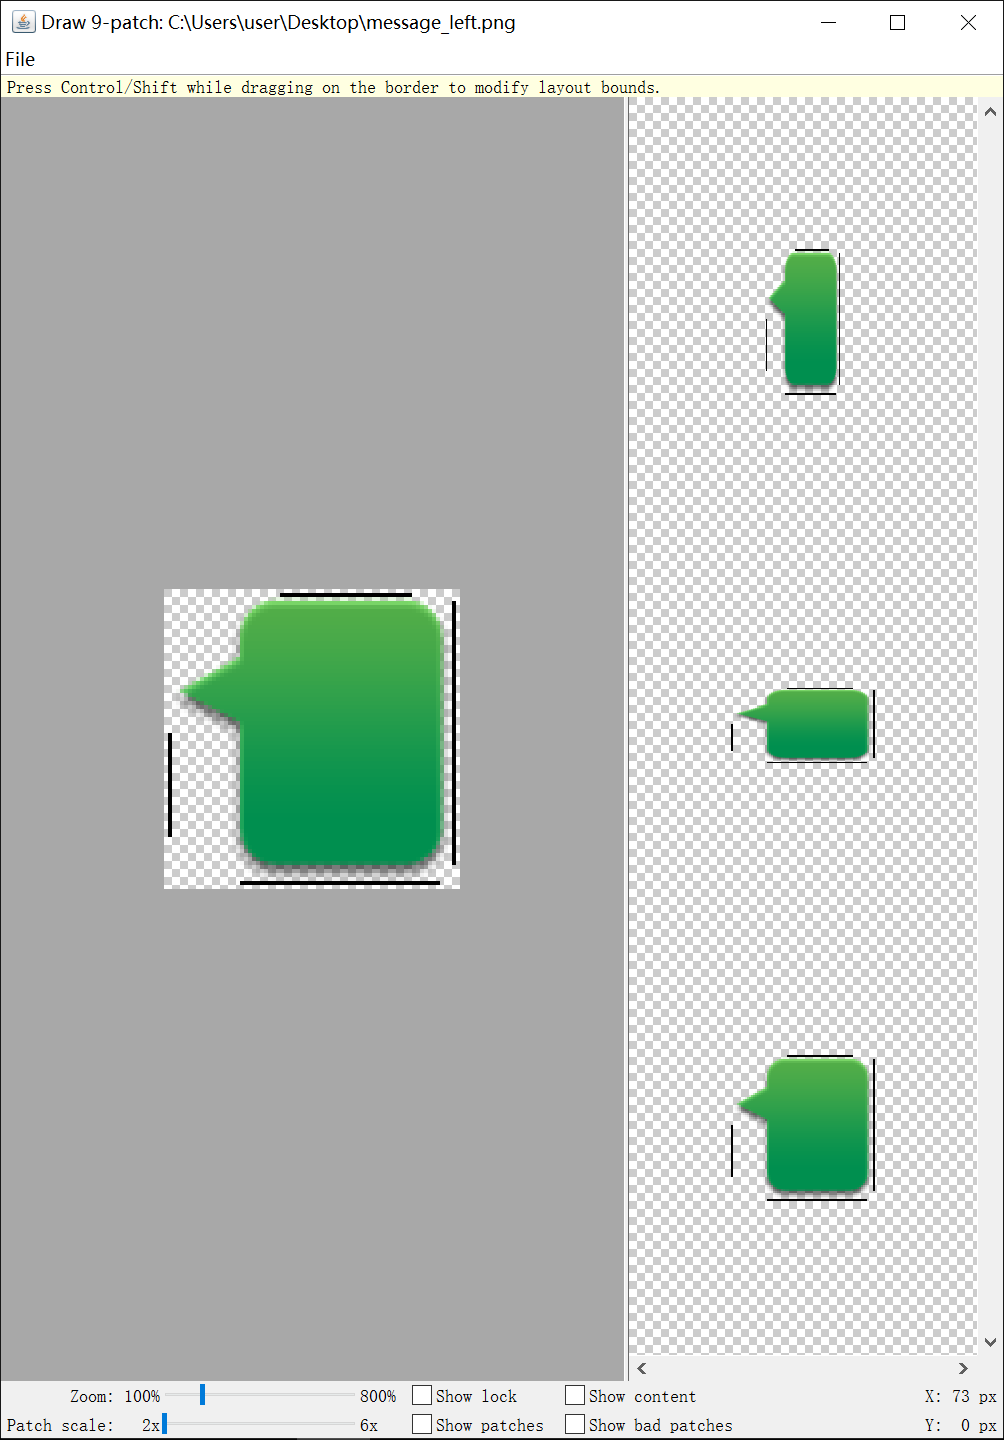
这个进行调节的方式我也不是很清楚,总之是可以改变拉伸的角度的。最后的效果不怎么好,下次再学习一下这个工具怎么用。
2、编写精美的聊天界面
2.1 主界面 activity_main.xml
<LinearLayout xmlns:android="http://schemas.android.com/apk/res/android"
    android:layout_width="match_parent"
    android:layout_height="match_parent"
    android:background="#d8e0e8"
        android:orientation="vertical" >
    <ListView
        android:id="@+id/msg_list_view"
        android:layout_width="match_parent"
        android:layout_height="0dp"
        android:layout_weight="1"
        android:divider="#0000" >
    </ListView>
    <LinearLayout
        android:layout_width="match_parent"
        android:layout_height="wrap_content" >
        <EditText
            android:id="@+id/input_text"
            android:layout_width="0dp"
            android:layout_height="wrap_content"
            android:layout_weight="1"
            android:hint="Type somthing here"
            android:maxLines="2" />
        <Button
            android:id="@+id/send"
            android:layout_width="wrap_content"
            android:layout_height="wrap_content"
            android:text="Send" />
    </LinearLayout>
</LinearLayout>
ListView用来显示对话内容,EditText和Button则用来发送对话内容。注意ListView的devider属性的意思是每一项之间的分隔线。
2.2 消息实体类 Msg
public class Msg {

    public static final int TYPE_RECEIVED = 0;

    public static final int TYPE_SENT = 1;

    private String content;

    private int type;

    public Msg(String content, int type) {
        this.content = content;
        this.type = type;
    }

    public String getContent() {
        return content;
    }

    public int getType() {
        return type;
    }
}
消息根据type的值分为两种:自己发送的(TYPE_RECEIVED)和接收的(TYPE_SENT)
2.3 子项布局 msg_item.xml
<LinearLayout xmlns:android="http://schemas.android.com/apk/res/android"
    android:layout_width="match_parent"
    android:layout_height="match_parent"
    android:orientation="vertical"
    android:padding="10dp" >
    <LinearLayout
        android:id="@+id/left_layout"
        android:layout_width="wrap_content"
        android:layout_height="wrap_content"
        android:layout_gravity="left"
        android:background="@drawable/message_left" >
        <TextView
            android:id="@+id/left_msg"
            android:layout_width="wrap_content"
            android:layout_height="wrap_content"
            android:layout_gravity="center"
            android:layout_margin="10dp"
            android:textColor="#fff" />
    </LinearLayout>
    <LinearLayout
        android:id="@+id/right_layout"
        android:layout_width="wrap_content"
        android:layout_height="wrap_content"
        android:layout_gravity="right"
        android:background="@drawable/message_right" >
        <TextView
            android:id="@+id/right_msg"
            android:layout_width="wrap_content"
            android:layout_height="wrap_content"
            android:layout_gravity="center"
            android:layout_margin="10dp" />
    </LinearLayout>
</LinearLayout>
2.4 ListView的适配器 MsgAdapter
public class MsgAdapter extends ArrayAdapter<Msg>{

    private int resourceId;

    public MsgAdapter(Context context, int resource, List<Msg> objects) {
        super(context, resource, objects);
        resourceId = resource;
    }

    @Override
    public View getView(int position, View convertView, ViewGroup parent) {
        Msg msg = getItem(position);
        View view;
        ViewHolder viewHolder;
        if (convertView == null) {
            view = LayoutInflater.from(getContext()).inflate(resourceId, null);
            viewHolder = new ViewHolder();
            viewHolder.leftLayout = (LinearLayout) view.findViewById(R.id.left_layout);
            viewHolder.rightLayout = (LinearLayout) view.findViewById(R.id.right_layout);
            viewHolder.leftMsg = (TextView) view.findViewById(R.id.left_msg);
            viewHolder.rightMsg = (TextView) view.findViewById(R.id.right_msg);
            view.setTag(viewHolder);
        }
        else {
            view = convertView;
            viewHolder = (ViewHolder) view.getTag();
        }

        if (msg.getType() == Msg.TYPE_RECEIVED) {
            // 如果是接收到的消息,就在左边显示消息布局,右边的隐藏
            viewHolder.leftLayout.setVisibility(View.VISIBLE);
            viewHolder.rightLayout.setVisibility(View.GONE);
            viewHolder.leftMsg.setText(msg.getContent());
        }
        else {
            // 如果是发出的消息则把左边的消息布局隐藏,右边的显示
            viewHolder.rightLayout.setVisibility(View.VISIBLE);
            viewHolder.leftLayout.setVisibility(View.GONE);
            viewHolder.rightMsg.setText(msg.getContent());
        }

        return super.getView(position, convertView, parent);
    }

    class ViewHolder {
        LinearLayout leftLayout;
        LinearLayout rightLayout;
        TextView leftMsg;
        TextView rightMsg;
    }

}
2.5 MainActivity.java中初始化数据,并添加按钮点击相应事件
@Override
protected void onCreate(Bundle savedInstanceState) {
super.onCreate(savedInstanceState);
requestWindowFeature(Window.FEATURE_NO_TITLE);
setContentView(R.layout.activity_main);
initMsgs();
adapter = new MsgAdapter(MainActivity.this, R.layout.msg_item, msgList);
listView = (ListView) findViewById(R.id.msg_list_view);
listView.setAdapter(adapter);
inputText = (EditText) findViewById(R.id.input_text);
send = (Button) findViewById(R.id.send);
send.setOnClickListener(new View.OnClickListener() {
@Override
public void onClick(View view) {
String content = inputText.getText().toString();
if (!content.isEmpty()) {
Msg msg = new Msg(content, Msg.TYPE_SENT);
msgList.add(msg);
adapter.notifyDataSetChanged(); // 当有消息更新的时候,刷新ListView中的显示
listView.setSelection(msgList.size()); // 把ListView定位到最后一行
inputText.setText(""); // 清空输入框的内容
}
}
});
}
private void initMsgs() {
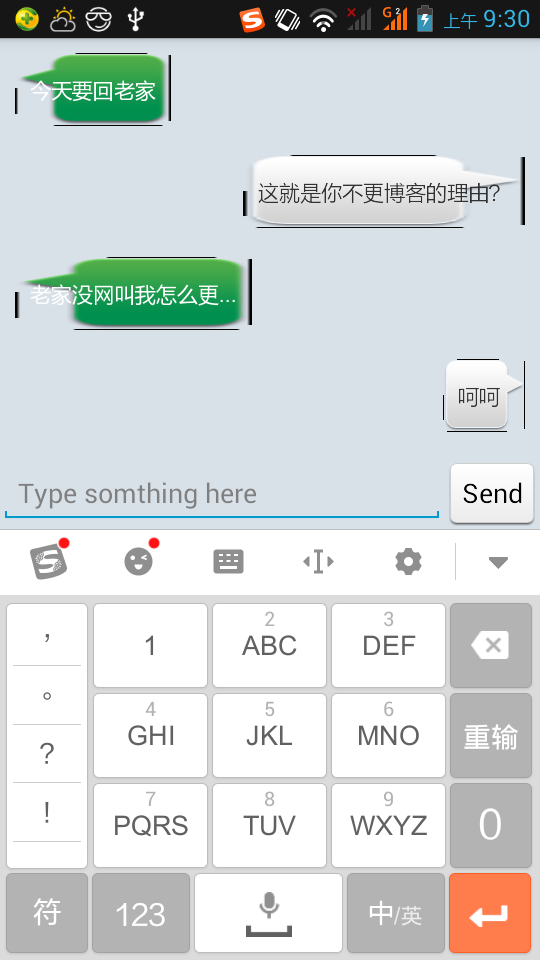
Msg msg1 = new Msg("今天要回老家", Msg.TYPE_RECEIVED);
msgList.add(msg1);
Msg msg2 = new Msg("这就是你不更博客的理由?", Msg.TYPE_SENT);
msgList.add(msg2);
Msg msg3 = new Msg("老家没网叫我怎么更...", Msg.TYPE_RECEIVED);
msgList.add(msg3);
}最终效果如下:


 889
889


 被折叠的 条评论
为什么被折叠?
被折叠的 条评论
为什么被折叠?
 到【灌水乐园】发言


