


基本线程机制
1.常用Executor的三种区别:
- CachedTreadPool会在执行过程中通常创建与所需数量相同的线程,然后又在一定时间内回收线程。
- FixedThreadPool一次性按预先执行代价高昂的线程分配,当超过其线程最大的数量时,会按照其提交的顺序排队。
- SingleThreadExecutor就是单个可重用的线程,其执行顺序为提交的顺序。
代码例子:
public class LiftOff implements Runnable {
  protected int countDown = 10;
  private static int taskCount = 0;
  private final int id = taskCount++;
  public LiftOff() {}
  public LiftOff(int countDown) {
    this.countDown = countDown;
  }
  public String status() {
    return "#" + id + "(" +
      (countDown > 0 ? countDown : "Liftoff!") + "), ";
  }
  public void run() {
    while(countDown-- > 0) {
      System.out.print(status());
      Thread.yield();
    }
  }
}
//将会创建6个线程,会回收超过60s空闲状态的线程
public class CachedThreadPool {
      public static void main(String[] args) {
        ExecutorService exec = Executors.newCachedThreadPool();
        for(int i = 0; i < 6; i++)
          exec.execute(new LiftOff());
        exec.shutdown();
      }
    }
//将会创建5个线程
    public class FixedThreadPool {
  public static void main(String[] args) {
    ExecutorService exec = Executors.newFixedThreadPool(5);
    for(int i = 0; i < 5; i++)
      exec.execute(new LiftOff());
    exec.shutdown();
  }
}
//创建单个线程,按其提交顺序执行
public class SingleThreadExecutor {
  public static void main(String[] args) {
    ExecutorService exec =
      Executors.newSingleThreadExecutor();
    for(int i = 0; i < 5; i++)
      exec.execute(new LiftOff());
    exec.shutdown();
  }
}
2.一个线程可以在其他线程之上调用join()方法,其效果是等待一段时间直到第二个线程才继续执行,如果某个线程在另一个线程t上调用t.join(),此线程将被挂起,直到目标线程t结束才恢复。
代码例子:
class Sleeper extends Thread {
      private int duration;
      public Sleeper(String name, int sleepTime) {
        super(name);
        duration = sleepTime;
        start();
      }
      public void run() {
        try {
            //阻塞,可以被中断
          sleep(duration);
        } catch(InterruptedException e) {
            //isInterrupted在catch中中断标志会被清除
          System.out.println(getName() + " was interrupted. " +
            "isInterrupted(): " + isInterrupted());
          return;
        }
        System.out.println(getName() + " has awakened");
      }
    }

    class Joiner extends Thread {
      private Sleeper sleeper;
      public Joiner(String name, Sleeper sleeper) {
        super(name);
        this.sleeper = sleeper;
        start();
      }
      public void run() {
       try {
           //唤醒 Sleeper线程,阻塞当前线程,直到Sleeper线程完成
          sleeper.join();
        } catch(InterruptedException e) {
            System.out.println("Interrupted");
        }
       System.out.println(getName() + " join completed");
      }
    }

    public class Joining {
      public static void main(String[] args) {
        Sleeper
          sleepy = new Sleeper("Sleepy", 1500),
          grumpy = new Sleeper("Grumpy", 1500);
        Joiner
          dopey = new Joiner("Dopey", sleepy),
          doc = new Joiner("Doc", grumpy);
        grumpy.interrupt();
      }
    }
结果:
Grumpy was interrupted. isInterrupted(): false
Doc join completed
Sleepy has awakened
Dopey join completed
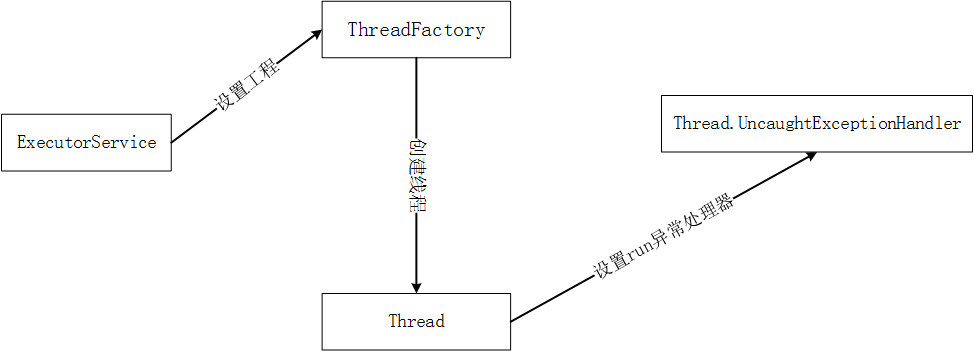
3.由于线程的本质特性,使得你不能捕获从线程中逃逸的异常,一旦异常逃出任务的run()方法,它就会向外传播到控制台。不过可以用ThreadFactory和UncaughtExceptionHandler来解决,其过程如图:
代码例子:
//线程类
class ExceptionThread2 implements Runnable {
      public void run() {
        Thread t = Thread.currentThread();
        System.out.println("run() by " + t);
        System.out.println(
          "eh = " + t.getUncaughtExceptionHandler());
        throw new RuntimeException();
      }
    }
    //线程异常处理器
    class MyUncaughtExceptionHandler implements
    Thread.UncaughtExceptionHandler {
      public void uncaughtException(Thread t, Throwable e) {
        System.out.println("caught " + e);
      }
    }
    //线程工厂
    class HandlerThreadFactory implements ThreadFactory {
      public Thread newThread(Runnable r) {
        System.out.println(this + " creating new Thread");
        Thread t = new Thread(r);
        System.out.println("created " + t);
        //设置线程处理器
        t.setUncaughtExceptionHandler(
          new MyUncaughtExceptionHandler());
        System.out.println(
          "eh = " + t.getUncaughtExceptionHandler());
        return t;
      }
    }

    public class CaptureUncaughtException {
      public static void main(String[] args) {
        ExecutorService exec = Executors.newCachedThreadPool(
          new HandlerThreadFactory());
        exec.execute(new ExceptionThread2());
      }
    }
运行结果:
beyondboy.HandlerThreadFactory@1a3a2a52 creating new Thread
created Thread[Thread-0,5,main]
eh = beyondboy.MyUncaughtExceptionHandler@13883d5f
run() by Thread[Thread-0,5,main]
eh = beyondboy.MyUncaughtExceptionHandler@13883d5f
beyondboy.HandlerThreadFactory@1a3a2a52 creating new Thread
created Thread[Thread-1,5,main]
eh = beyondboy.MyUncaughtExceptionHandler@a5ae1e7
caught java.lang.RuntimeException
共享资源
1.一个任务可以多次获得对象的锁,如果一个方法在同一个对象上调用了第二个方法,后者又调用了同一个对象上的另一个方法,就会发生这种情况。JVM负责跟踪对象被加锁的次数,如果一个对象被解锁(即锁被完全释放),其计数变为0,在任务第一次给对象加锁的时候,计数变为1,每当这个相同的任务在这个对象上获得锁时,计数都会梯增。
2.原子操作是不能被线程调度机制中断的操作,一旦操作开始,那么它一定可以在可能发生的上下文切换之前(切换到其他线程执行)执行完毕。在Java中,原子性可以应用于除了long和double之外的所有基本类型之上的简单操作。
3.关于原子操作的相关理解以及volatile关键字的解析,可以参考一下两篇博客:
public class SerialNumberGenerator {
      private static volatile int serialNumber = 0;
      //由于该操作不是原子操作,所以其数字变化是不稳定的
      public static int nextSerialNumber() {
        return serialNumber++;
      }
    }
    class CircularSet {
      private int[] array;
      private int len;
      private int index = 0;
      public CircularSet(int size) {
        array = new int[size];
        len = size;
        //初始化数组
        for(int i = 0; i < size; i++)
          array[i] = -1;
      }
      public synchronized void add(int i) {
        array[index] = i;
        //循环覆盖原来的元素防止溢出
        index = ++index % len;
      }
      public synchronized boolean contains(int val) {
        for(int i = 0; i < len; i++)
          if(array[i] == val) return true;
        return false;
      }
    }

    public class SerialNumberChecker {
      private static final int SIZE = 10;
      private static CircularSet serials =
        new CircularSet(1000);
      private static ExecutorService exec =
        Executors.newCachedThreadPool();
      static class SerialChecker implements Runnable {
        public void run() {
          while(true) {
            int serial =
                    SerialNumberGenerator.nextSerialNumber();
            if(serials.contains(serial)) {
              System.out.println("Duplicate: " + serial);
              System.exit(0);
            }
            serials.add(serial);
          }
        }
      }
      public static void main(String[] args) throws Exception {
        for(int i = 0; i < SIZE; i++)
          exec.execute(new SerialChecker());
        if(args.length > 0) {
          TimeUnit.SECONDS.sleep(new Integer(args[0]));
          System.out.println("No duplicates detected");
          System.exit(0);
        }
      }
    }
第一次运行结果:
Duplicate: 7409
第二次运行结果:
Duplicate: 293
4.Java SE5引入了诸如AtomicInteger,AtomicLong,AtomicReference等特殊的原子性变量类,这些类被调整为可以使用在某些现代处理器上的可获得的,并且是在机器级别上的原子性,因此在使用它们时,通常不需要担心。
代码例子:
public class AtomicIntegerTest implements Runnable {
    //原子性操作
      private AtomicInteger i = new AtomicInteger(0);
      public int getValue() { return i.get(); }
      private void evenIncrement() { i.addAndGet(2); }
      public void run() {
        while(true)
          evenIncrement();
      }
      public static void main(String[] args) {
        new Timer().schedule(new TimerTask() {
          public void run() {
            System.err.println("Aborting");
            System.exit(0);
          }
        }, 5000); //5秒后会终止程序
        ExecutorService exec = Executors.newCachedThreadPool();
        AtomicIntegerTest ait = new AtomicIntegerTest();
        exec.execute(ait);
        while(true) {
          int val = ait.getValue();
          if(val % 2 != 0) {
            System.out.println(val);
            System.exit(0);
          }
        }
      }
    }
多次运行结果:
Aborting
5.有时,你为了防止多个线程同时访问方法内部的部分代码而不是防止访问整个方法,这种方式分离出来的代码段被称为临界区,它使用synchronized关键字建立的。通过synchronized关键字同步方法内部的部分代码比同步整个方法的性能要高。
代码例子:
//多线程不安全的一个类
class Pair {
      private int x, y;
      public Pair(int x, int y) {
        this.x = x;
        this.y = y;
      }
      public Pair() { this(0, 0); }
      public int getX() { return x; }
      public int getY() { return y; }
      public void incrementX() { x++; }
      public void incrementY() { y++; }
      public String toString() {
        return "x: " + x + ", y: " + y;
      }
      public class PairValuesNotEqualException
      extends RuntimeException {
        public PairValuesNotEqualException() {
          super("Pair values not equal: " + Pair.this);
        }
      }
      // 不相等,抛出异常终止程序
      public void checkState() {
        if(x != y)
          throw new PairValuesNotEqualException();
      }
    }

    // 一个安全让多线程操作的类
    abstract class PairManager {
      AtomicInteger checkCounter = new AtomicInteger(0);
      protected Pair p = new Pair();
      private List<Pair> storage =
        Collections.synchronizedList(new ArrayList<Pair>());
      public synchronized Pair getPair() {
        return new Pair(p.getX(), p.getY());
      }
      //线程暂停一段时间,自增checkCounter变量来测试两种同步的性能
      protected void store(Pair p) {
        storage.add(p);
        try {
          TimeUnit.MILLISECONDS.sleep(50);
        } catch(InterruptedException ignore) {}
      }
      public abstract void increment();
    }

    // 同步整个方法
    class PairManager1 extends PairManager {
      public synchronized void increment() {
        p.incrementX();
        p.incrementY();
        store(getPair());
      }
    }

    //同步方法里的部分代码
    class PairManager2 extends PairManager {
      public void increment() {
        Pair temp;
        synchronized(this) {
          p.incrementX();
          p.incrementY();
          temp = getPair();
        }
        store(temp);
      }
    }

    class PairManipulator implements Runnable {
      private PairManager pm;
      public PairManipulator(PairManager pm) {
        this.pm = pm;
      }
      public void run() {
        while(true)
          pm.increment();
      }
      public String toString() {
        return "Pair: " + pm.getPair() +
          " checkCounter = " + pm.checkCounter.get();
      }
    }

    class PairChecker implements Runnable {
      private PairManager pm;
      public PairChecker(PairManager pm) {
        this.pm = pm;
      }
      public void run() {
        while(true) {
          pm.checkCounter.incrementAndGet();
          pm.getPair().checkState();
        }
      }
    }

    public class CriticalSection {
      // 测试两种不同同步方式的性能
      static void
      testApproaches(PairManager pman1, PairManager pman2) {
        ExecutorService exec = Executors.newCachedThreadPool();
        PairManipulator
          pm1 = new PairManipulator(pman1),
          pm2 = new PairManipulator(pman2);
        PairChecker
          pcheck1 = new PairChecker(pman1),
          pcheck2 = new PairChecker(pman2);
        exec.execute(pm1);
        exec.execute(pm2);
        exec.execute(pcheck1);
        exec.execute(pcheck2);
        try {
          TimeUnit.MILLISECONDS.sleep(500);
        } catch(InterruptedException e) {
          System.out.println("Sleep interrupted");
        }
        System.out.println("pm1: " + pm1 + "\npm2: " + pm2);
        System.exit(0);
      }
      public static void main(String[] args) {
        PairManager
          pman1 = new PairManager1(),
          pman2 = new PairManager2();
        testApproaches(pman1, pman2);
      }
    }
运行结果:
pm1: Pair: x: 11, y: 11 checkCounter = 1672181
pm2: Pair: x: 12, y: 12 checkCounter = 21139228
再次运行结果:
pm1: Pair: x: 14, y: 14 checkCounter = 1237209
pm2: Pair: x: 16, y: 16 checkCounter = 25719169
通过其结果可以看出第二种同步方式,性能要高很多。
终结任务
1.Thread类包含interrupt()方法,因此你可以终止被阻塞的任务,这个方法将设置线程的中断状态,终止任务有两种方式:
- 如果一个线程已经调用sleep(),await()等方法被阻塞,或者试图执行一个阻塞操作,在线程上调用interrupt()方法,会让线程抛出interruptedException异常来终止去阻塞任务。(注意:在被捕获的catch里面,线程中断状态将被清除,因此在catch里面的isInterrupted或interrupted返回false)
- 调用Thread.interrupted()和Thread.isInterrupted()方法来离开run()循环而不抛出异常。其两者区别可以参考这篇博客:interrupted()和isInterrupted区别
2.如果在Executor上调用shutdownNow(),那么它将发送一个interrupt()调用给它启动的所有线程,如果你想中断某个单一的线程任务,可以调用其submit返回一个泛型Future
class SleepBlocked implements Runnable {
      public void run() {
        try {
          TimeUnit.SECONDS.sleep(100);
        } catch(InterruptedException e) {
          System.out.println("InterruptedException");
        }
        System.out.println("Exiting SleepBlocked.run()");
      }
    }
    //IO阻塞不能被中断
    class IOBlocked implements Runnable {
      private InputStream in;
      public IOBlocked(InputStream is) { in = is; }
      public void run() {
        try {
            System.out.println("Waiting for read():");
          in.read();
        } catch(IOException e) {
          if(Thread.currentThread().isInterrupted()) {
              System.out.println("Interrupted from blocked I/O");
          } else {
            throw new RuntimeException(e);
          }
        }
        System.out.println("Exiting IOBlocked.run()");
      }
    }
    //同步阻塞不能被中断
    class SynchronizedBlocked implements Runnable {
      public synchronized void f() {
        while(true) // Never releases lock
          Thread.yield();
      }
      public SynchronizedBlocked() {
        new Thread() {
          public void run() {
            f();
          }
        }.start();
      }
      public void run() {
          System.out.println("Trying to call f()");
          //同步阻塞
        f();
        System.out.println("Exiting SynchronizedBlocked.run()");
      }
    }

    public class Interrupting {
      private static ExecutorService exec =
        Executors.newCachedThreadPool();
      static void test(Runnable r) throws InterruptedException{
        Future<?> f = exec.submit(r);
        TimeUnit.MILLISECONDS.sleep(100);
        System.out.println("Interrupting " + r.getClass().getName());
        //中断单一线程任务
        f.cancel(true);
        System.out.println("Interrupt sent to " + r.getClass().getName());
      }
      public static void main(String[] args) throws Exception {
        test(new SleepBlocked());
        test(new IOBlocked(System.in));
        test(new SynchronizedBlocked());
        TimeUnit.SECONDS.sleep(3);
        System.out.println("Aborting with System.exit(0)");
        System.exit(0);
      }
    }
运行结果:
Interrupting beyondboy.SleepBlocked
Interrupt sent to beyondboy.SleepBlocked
InterruptedException
Exiting SleepBlocked.run()
Waiting for read():
Interrupting beyondboy.IOBlocked
Interrupt sent to beyondboy.IOBlocked
Trying to call f()
Interrupting beyondboy.SynchronizedBlocked
Interrupt sent to beyondboy.SynchronizedBlocked
Aborting with System.exit(0)
3.对于中断IO阻塞,可以调用IO的close()来释放锁来解除其阻塞状态,或者调用其Future.cancel()来产生一个IO中断(这个要对新IO才可以)
代码例子:
class NIOBlocked implements Runnable {
      private final SocketChannel sc;
      public NIOBlocked(SocketChannel sc) { this.sc = sc; }
      public void run() {
        try {
          System.out.println("Waiting for read() in " + this);
          sc.read(ByteBuffer.allocate(1));
        } catch(ClosedByInterruptException e) {
            System.out.println("ClosedByInterruptException");
        } catch(AsynchronousCloseException e) {
            System.out.println("AsynchronousCloseException");
        } catch(IOException e) {
          throw new RuntimeException(e);
        }
        System.out.println("Exiting NIOBlocked.run() " + this);
      }
    }

    public class NIOInterruption {
      public static void main(String[] args) throws Exception {
        ExecutorService exec = Executors.newCachedThreadPool();
        ServerSocket server = new ServerSocket(8080);
        InetSocketAddress isa =
          new InetSocketAddress("localhost", 8080);
        SocketChannel sc1 = SocketChannel.open(isa);
        SocketChannel sc2 = SocketChannel.open(isa);
        Future<?> f = exec.submit(new NIOBlocked(sc1));
        exec.execute(new NIOBlocked(sc2));
        //这种中断对IO阻塞来说无效
        exec.shutdown();
        TimeUnit.SECONDS.sleep(1);
        // 会产生一个IO中断
        f.cancel(true);
        TimeUnit.SECONDS.sleep(1);
        //通过关闭通道,来释放锁以中断其IO阻塞
        sc2.close();
      }
    }
运行结果:
Waiting for read() in beyondboy.NIOBlocked@2e6b611e
Waiting for read() in beyondboy.NIOBlocked@bb51061
ClosedByInterruptException
Exiting NIOBlocked.run() beyondboy.NIOBlocked@2e6b611e
AsynchronousCloseException
Exiting NIOBlocked.run() beyondboy.NIOBlocked@bb51061


 7万+
7万+

 被折叠的 条评论
为什么被折叠?
被折叠的 条评论
为什么被折叠?
 到【灌水乐园】发言


