


转载请标明出处:http://blog.csdn.net/xx326664162/article/details/51910837 文章出自:薛瑄的博客
你也可以查看我的其他同类文章,也会让你有一定的收货!
一、Retrofit 是什么?
Retrofit is a type-safe HTTP client for Android and java.
Retrofit 是与 Web 服务器提供的 API 接口(URL)进行通信的一个库
二、Retrofit、volley、OkHttp等的关系
网上有很多用于网络通信的库,但是彼此之间还是有一定的差异。
更多内容:okhttp,retrofit,android-async-http,volley应该选择哪一个?
volley, retrofit, android-async-http 帮你封装了具体的请求,线程切换以及数据转换。
OkHttp 是基于http协议封装的一套请求客户端,虽然它也可以开线程,但根本上它更偏向真正的请求,跟HttpClient, HttpUrlConnection的职责是一样的。
三、Retrofit的示例
来自:
retrofit官网
[Android] Retrofit 初步使用
先通过一个简单的demo,整体认识一下Retrofit是怎么工作的,
1、Retrofit turns your HTTP API into a Java interface.
根据URL来构造一个java 接口,接口名称可自定义。
public interface GitHubService {
  @GET("users/{user}")
  Call<TestModel> repo(@Path("user") String user);
}- 在此处 GET 的意思是 发送一个 GET请求,请求的地址为:baseUrl + “/users/{user}”。 baseUrl 在下面第三步指定具体的值。
{user} 类似于占位符的作用,具体类型由 repo(@Path(“user”) String user) 指定,这里表示 {user} 将是一段字符串。
2、定义返回数据类型
这里定义的类型就是上面 Call< TestModel> 中的TestModel。
请求会将 Json 数据转化为 Java 实体类,所以我们需要自定义一个 javabean:
public class TestModel {
  private String login;

  public String getLogin() {
    return login;
  }

  public void setLogin(String login) {
    this.login = login;
  }
}
3、The Retrofit class generates an implementation of the GitHubService interface.
GitHubService 接口是在第一步中定义的,这一步来实现这个接口
Retrofit retrofit= new Retrofit.Builder()
.baseUrl("https://api.github.com")
.addConverterFactory(GsonConverterFactory.create())
.build();

GitHubService service = retrofit.create(GitHubService.class);
在构造 Retrofit 对象时添加baseUrl为https://api.github.com
4、Each Call from the created GitHubService can make a synchronous or asynchronous HTTP request to the remote webserver.
使用GitHubService接口创建一个请求对象。
Call<TestModel> repos = service.repo("jantxue");注意这里的 .repo(“jantxue”) 替换第一步中的 {user}。到这里,我们要访问的地址就成了:
https://api.github.com/users/jantxue可以使用不同参数访问同一个 Web 域名,比如可以改成 .repo(“ligoudan”),就是访问下面这个地址
https://api.github.com/users/ligoudan5、最后,就可以发送请求了!
通过调用Retrofit的execute(同步)或者enqueue(异步)方法,发送请求到网络服务器,并返回一个响应(Response)。
repos.enqueue(new Callback<TestModel>() {
  @Override
  public void onResponse(Call<TestModel> call, Response<TestModel> response) {
    // Log.e("Test", response.body().getLogin());
    System.out.print(response.body().getLogin());
  }

  @Override
  public void onFailure(Call<TestModel> call, Throwable t) {
    System.out.print(t.getMessage());
  }
  });
下面部分是对第三点每个步骤的深入探讨,所以在继续看下面之前,把第三点理解透彻
四、Call对象,代表被封装的一个请求/响应,只能被使用一次
1、 Retrofit 2 里也多了一个 call 对象。语法和 OkHttp 基本一模一样,唯一不同是这个函数知道如何做数据的反序列化。它知道如何将 HTTP 响应转换成对象。
2、 每一个 call 对象实例只能被用一次,所以说 request 和 response 是一一对应的。可以通过 Clone 方法来创建一个一模一样的实例,这个开销是很小的。比如:可以在每次决定发请求前 clone 一个之前的实例。
3、 retrofit.create()得到接口的实例.
调用接口中的函数,获得一个Call 实例。
之后调用Call 的 execute ()来访问对应网址.
interface GitHubService {
  @GET("/repos/{owner}/{repo}/contributors")
  Call<List<Contributor>> repoContributors(
      @Path("owner") String owner,
      @Path("repo") String repo);
}

GitHubService gitHubService= retrofit.create(GitHubService.class);


Call<List<Contributor>> call =
    gitHubService.repoContributors("square", "retrofit");


response = call.execute();

// This will throw IllegalStateException:
response = call.execute();

Call<List<Contributor>> call2 = call.clone();
// This will not throw:
response = call2.execute();
4、 另一个大的进步是 2.0 支持了在一个类型中的同步和异步。
5、一个请求也可以被真正地终止。终止操作会对底层的 http client 执行 cancel 操作。即便是正在执行的请求,也能立即切断。当你将一些异步请求压入队列后,甚至你在执行同步请求的时候,你可以随时调用 cancel 方法来取消请求:
Call<List<Contributor>> call =
    gitHubService.repoContributors("square", "retrofit");

//执行异步请求
call.enqueue(         );
// 或者执行同步请求
call.execute();

// later...
call.cancel();
五、参数
参考:
好用的网络请求库Retrofit2(入门及讲解)
retrofit官网
Retrofit网络请求库教程
1、固定参数
每个方法必须有一个HTTP注解,这个注解提供请求方法和相对URL。共有五种注解:GET, POST, PUT, DELETE, HEAD。URL中的路径被指定在注解中。
1.1
@GET("users/list")
// 请求内容
// GET users/list HTTP/1.1
1.2、也可以指定一个查询参数在URL中
@GET("users/list?sort=desc")

// 请求内容
//GET users/list?sort=desc HTTP/1.1
2、动态参数
URL可以使用替换块和动态更新参数。字符{ 和 }之间的内容是可被替换的。相应的参数必须和@Path注解使用相同的字符串
2.1、
@GET("group/{id}/users")
Call<List<User>> someEndpoint(@Path("id") int groupId);


// 方法调用
someService.someEndpoint("a");


//请求内容
//GET group/a/users HTTP/1.1
2.2、查询参数也可以被添加
@GET("group/{id}/users")
Call<List<User>> someEndpoint(@Path("id") int groupId, @Query("sort") String sort);

// 方法调用
someService.someEndpoint(1,"desc");

// 请求头
// GET group/1/users?sort=desc   HTTP/1.1
2.3、由Map组成的复合查询参数
@GET("group/{id}/users")
Call<List<User>> someEndpoint(@Path("id") int groupId, @QueryMap Map<String, String> options);


// 方法调用
someService.someEndpoint(1,
Collections.singletonMap("dynamic", "query"));

// 请求头
// GET group/1/users?dynamic=query HTTP/1.1
2.4、固定+动态参数
interface SomeService {
 @GET("/some/endpoint?fixed=query")
 Call<SomeResponse> someEndpoint(
 @Query("dynamic") String dynamic);
}

// 方法调用
someService.someEndpoint("query");

// 请求头
// GET /some/endpoint?fixed=query&dynamic=query HTTP/1.1
3、Post请求主体
一个对象可以被指定为一个HTTP请求主体通过使用@Body 注解
3.1、Post请求有Body
interface SomeService {
 @POST("/some/endpoint")
 Call<SomeResponse> someEndpoint(
 @Body SomeRequest body);
}

someService.someEndpoint();

// POST /some/endpoint HTTP/1.1
// Content-Length: 3
// Content-Type: greeting
//
// Hi!
3.2、Post请求,无Body
interface SomeService {
 @POST("/some/endpoint")
 Call<SomeResponse> someEndpoint();
}

someService.someEndpoint();

// POST /some/endpoint?fixed=query HTTP/1.1
// Content-Length: 0
这个对象将被转变使用Retrofit实例中指定的转变方法。如果没有转变方法,则只有RequestBody可以使用
4、Form表单提交和多部分参数
当@FormUrlEncoded出现在方法中,Form表单数据会被发送。每个键值对被注解,通过使用@Field 包括名字和值(由对象提供)
4.1、 表单编码字段
interface SomeService {
 @FormUrlEncoded
 @POST("/some/endpoint")
 Call<SomeResponse> someEndpoint(
 @Field("name1") String name1,
 @Field("name2") String name2);
}

someService.someEndpoint("value1", "value2");

// POST /some/endpoint HTTP/1.1
// Content-Length: 25
// Content-Type: application/x-www-form-urlencoded
//
// name1=value1&name2=value2
4.2、表单编码字段(Map)
interface SomeService {
 @FormUrlEncoded
 @POST("/some/endpoint")
 Call<SomeResponse> someEndpoint(
 @FieldMap Map<String, String> names);
}

someService.someEndpoint(
 // ImmutableMap是OKHttp中的工具类
 ImmutableMap.of("name1", "value1", "name2", "value2"));

// POST /some/endpoint HTTP/1.1
// Content-Length: 25
// Content-Type: application/x-www-form-urlencoded
//
// name1=value1&name2=value2
4.3、一般用于上传文件等,@Part可以是文件
Multipart requests are used when @Multipart is present on the method. Parts are declared using the @Part annotation.
多个部分参数被请求当方法中出现@Multipart,使用@Part注解来声明Parts
@Multipart
@PUT("user/photo")
Call<User> updateUser(@Part("photo") RequestBody photo, @Part("description") RequestBody description);
Multipart parts use one of Retrofit’s converters or they can implement RequestBody to handle their own serialization.
5、关于HEADER 的操作
5.1、固定头
interface SomeService {
 @GET("/some/endpoint")
 @Headers("Accept-Encoding: application/json")
 Call<SomeResponse> someEndpoint();
}

someService.someEndpoint();

// GET /some/endpoint HTTP/1.1
// Accept-Encoding: application/json
5.2、动态头
interface SomeService {
 @GET("/some/endpoint")
 Call<SomeResponse> someEndpoint(
 @Header("Location") String location);
}

someService.someEndpoint("Droidcon NYC 2015");

// GET /some/endpoint HTTP/1.1
// Location: Droidcon NYC 2015
5.3、固定+动态头
interface SomeService {
 @GET("/some/endpoint")
 @Headers("Accept-Encoding: application/json")
 Call<SomeResponse> someEndpoint(
 @Header("Location") String location);
}

someService.someEndpoint("Droidcon NYC 2015");

// GET /some/endpoint HTTP/1.1
// Accept-Encoding: application/json
// Location: Droidcon NYC 2015
六、Converters
默认情况下,Retrofit 仅反序列化HTTP的主体内容为OkHttp的ResponseBody类型 。它只能接受类型为RequestBody 的@Body
Converters can be added to support other types. Six sibling modules adapt popular serialization libraries for your convenience.
Gson: com.squareup.retrofit2:converter-gson
Jackson: com.squareup.retrofit2:converter-jackson
Moshi: com.squareup.retrofit2:converter-moshi
Protobuf: com.squareup.retrofit2:converter-protobuf
Wire: com.squareup.retrofit2:converter-wire
Simple XML: com.squareup.retrofit2:converter-simplexml
Scalars (primitives, boxed, and String): com.squareup.retrofit2:converter-scalars
Retrofit2 使用FastJson作为Converter
Retrofit2+RxJava+LoganSquare最佳实践
这里有一个例子使用GsonConverterFactory类生成GitHubService接口的一个实现使用Gson反序列化。
Retrofit retrofit = new Retrofit.Builder()
    .baseUrl("https://api.github.com")
    .addConverterFactory(GsonConverterFactory.create())
    .build();

GitHubService service = retrofit.create(GitHubService.class);
七、OkHttp 提供支持
下面的部分来自:用 Retrofit 2 简化 HTTP 请求
OkHttp 提供支持
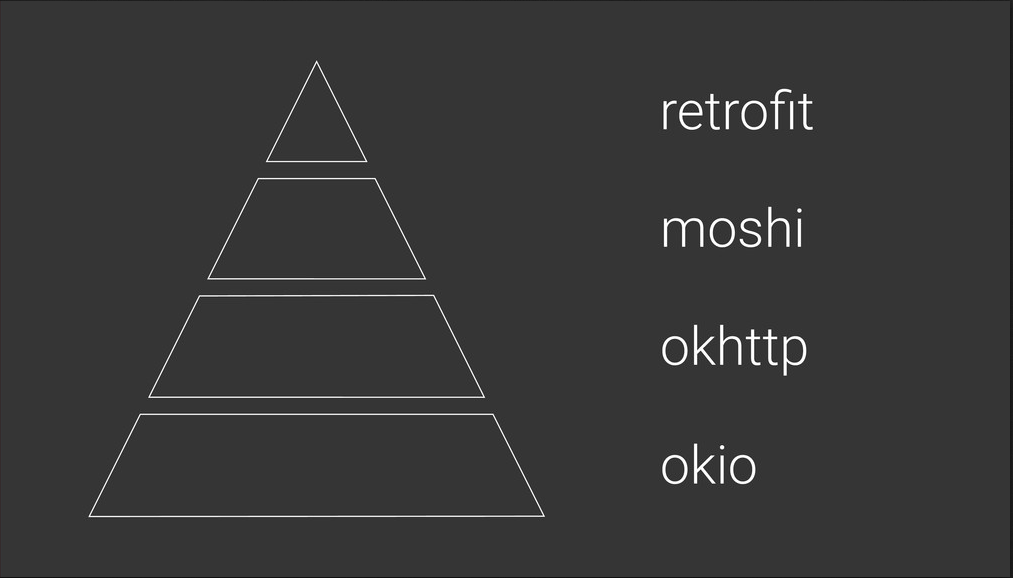
Retrofit 2 现在开始依赖了 OkHttp 了,而且这部分不再支持替换。这是一件比较有争议的事情。但是希望我能证明为什么这是一个对的决定。
OkHttp 现在很小而且很聚焦,有很多好用的 API 接口。我们在 Retrofit 2 里都有对 OkHttp 的接口映射,也基本具备了我们需要的所有的特性,包括提到的所有的抽象类们。这些都超赞!这是压缩 Retrofit 库大小的一个法宝。我们最终减小了Retrofit 60% 的体积,同时又具有了更多的特性。
OkHttp 提供支持 (以及 Okio!)
另一个用 OkHttp 的好处就是我们能够在 Retrofit 2 把 OkHttp 以公开接口的方式直接导出。你可能在 error body 方法或者响应里见到过 response body 的内容。显然,我们在 Retrofit 的 Reponse 对象里直接返回了 OkHttp 的 Response body。我们正在导出这些类型,OkHttp 的类型基本上已经以更好更简洁的 API 替代 Retrofit 1.0 的一些接口。
OkHttp 的背后是一个叫做 Okio 的库,提供的 IO 支持。我之前在 Droidcon Montreal 做过关于这个库的演讲。讨论过为什么它是众多 IO 库中更好的选择,还讨论了它为何极度高效,以及为什么你应该使用它们。演讲中我还提到 Retrofit 2 ,当时它还是脑海里的一个概念。现在 Retrofit 2 已经实现了。
八、Retrofit执行模式
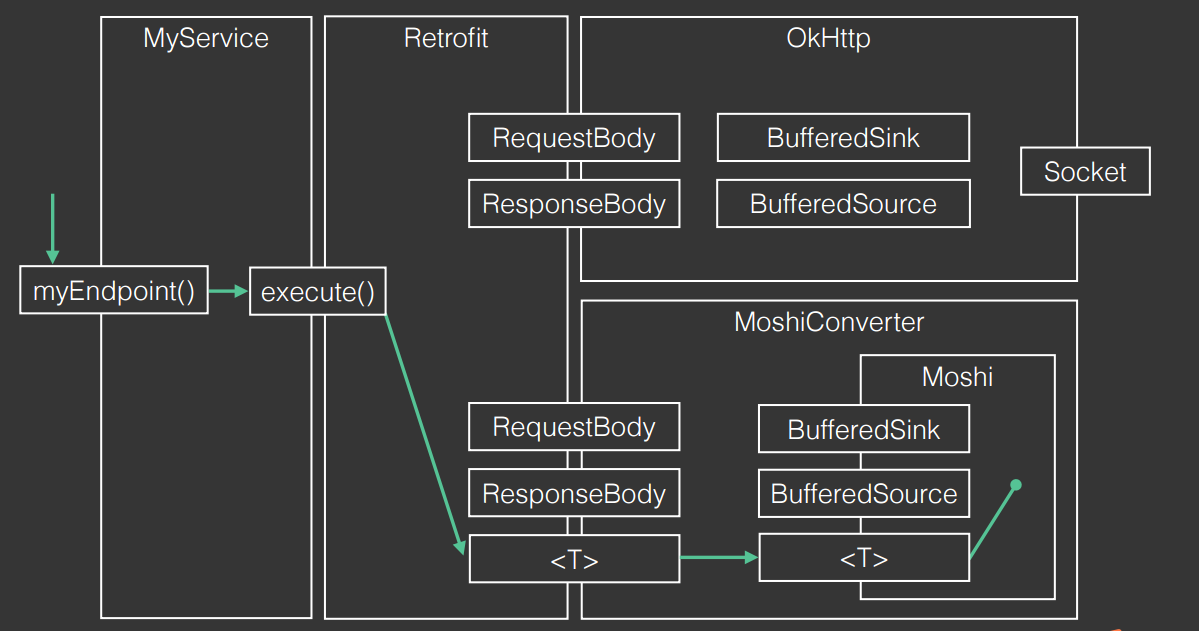
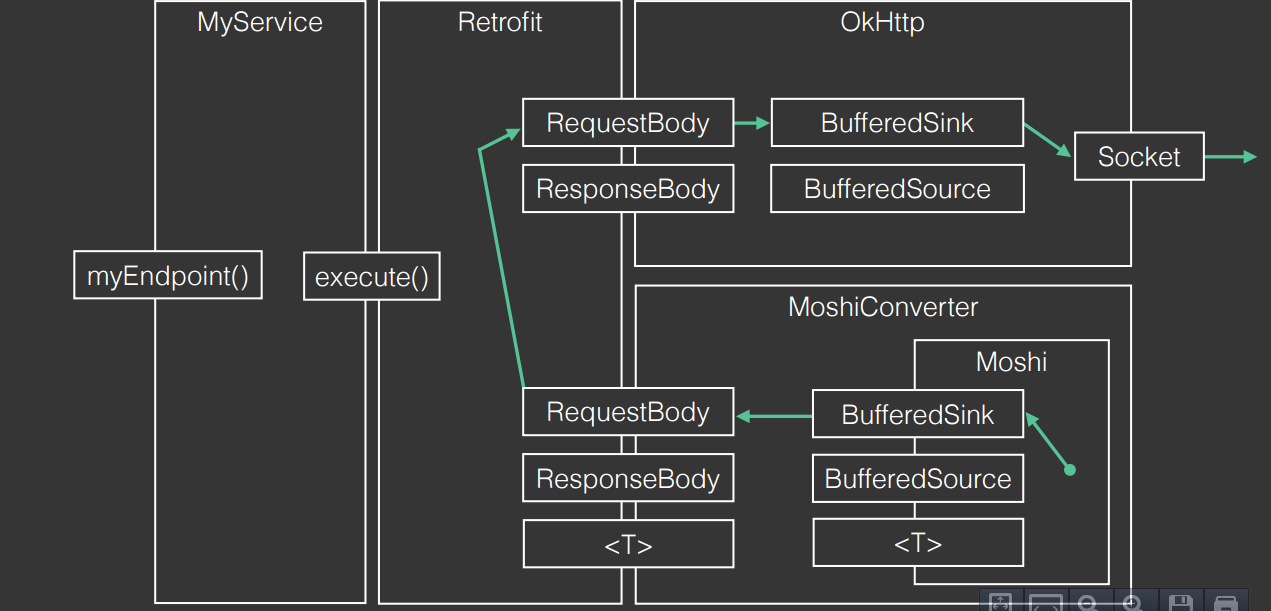
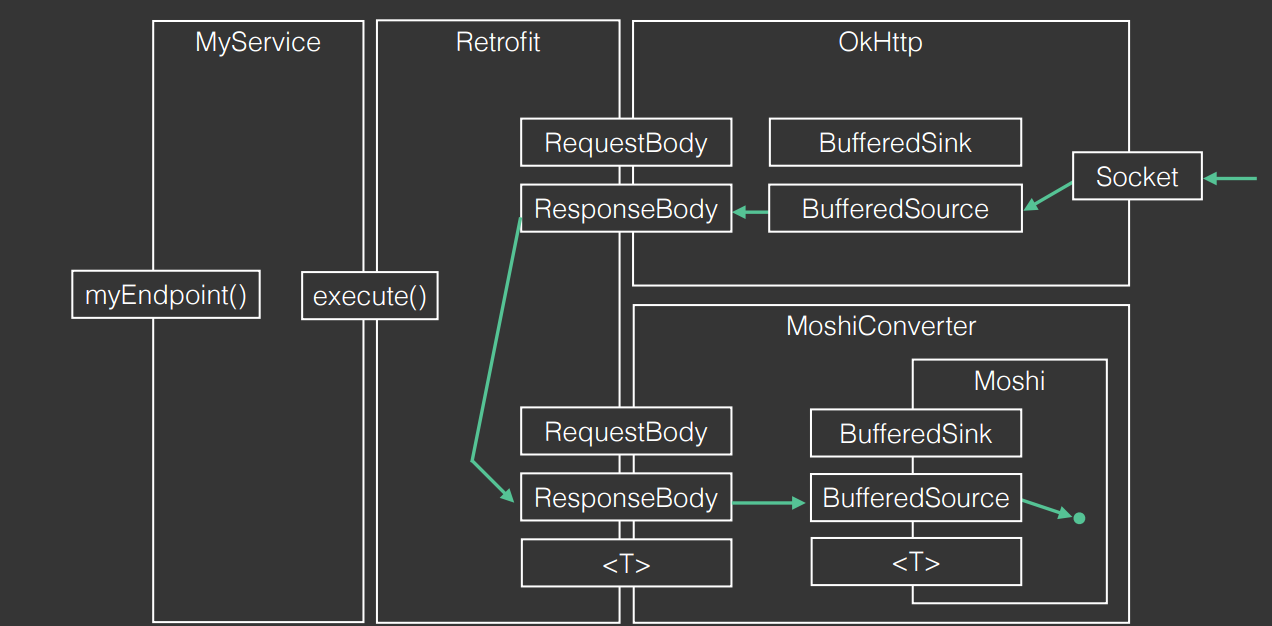
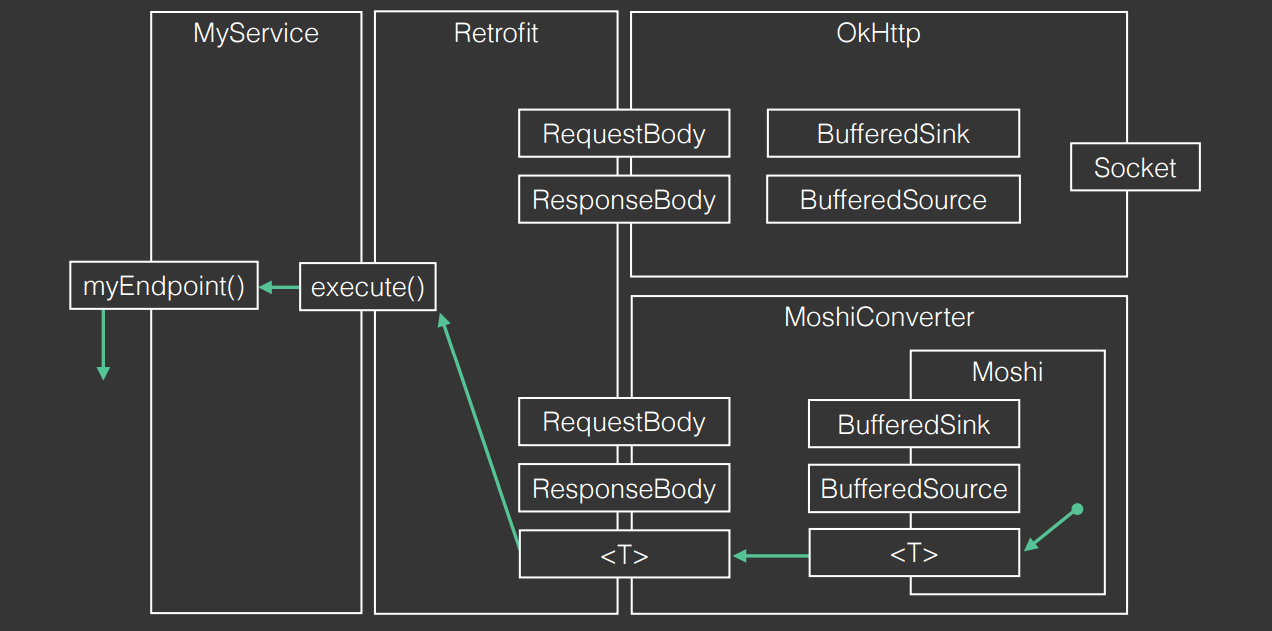
拓展:Retrofit分析-漂亮的解耦套路
http://square.github.io/retrofit/2.x/retrofit/
http://blog.csdn.net/qq_21430549/article/details/50113387
关注我的公众号,轻松了解和学习更多技术


 1164
1164

 被折叠的 条评论
为什么被折叠?
被折叠的 条评论
为什么被折叠?
 到【灌水乐园】发言


