


FragmentTabHost继承TabHost,增加了对Fragment的支持。
Fragment是从Android3.0才引入,Fragment有自己单独的生命周期,在Activity运行的时候可以很方便的使用。
这里只是介绍FragmentTabHost的用法。
1. 先看看谷歌官方文档上的两个例子:
import com.example.android.supportv4.R;

import android.os.Bundle;
import android.support.v4.app.FragmentActivity;
import android.support.v4.app.FragmentTabHost;

/**
 * This demonstrates how you can implement switching between the tabs of a
 * TabHost through fragments, using FragmentTabHost.
 */
public class FragmentTabs extends FragmentActivity {
    private FragmentTabHost mTabHost;

    @Override
    protected void onCreate(Bundle savedInstanceState) {
        super.onCreate(savedInstanceState);

        setContentView(R.layout.fragment_tabs);
        mTabHost = (FragmentTabHost)findViewById(android.R.id.tabhost);
        mTabHost.setup(this, getSupportFragmentManager(), R.id.realtabcontent);

        mTabHost.addTab(mTabHost.newTabSpec("simple").setIndicator("Simple"),
                FragmentStackSupport.CountingFragment.class, null);
        mTabHost.addTab(mTabHost.newTabSpec("contacts").setIndicator("Contacts"),
                LoaderCursorSupport.CursorLoaderListFragment.class, null);
        mTabHost.addTab(mTabHost.newTabSpec("custom").setIndicator("Custom"),
                LoaderCustomSupport.AppListFragment.class, null);
        mTabHost.addTab(mTabHost.newTabSpec("throttle").setIndicator("Throttle"),
                LoaderThrottleSupport.ThrottledLoaderListFragment.class, null);
    }
}
import com.example.android.supportv4.R;
import android.os.Bundle;
import android.support.v4.app.Fragment;
import android.support.v4.app.FragmentTabHost;
import android.view.LayoutInflater;
import android.view.View;
import android.view.ViewGroup;
public class FragmentTabsFragmentSupport extends Fragment {
private FragmentTabHost mTabHost;
@Override
public View onCreateView(LayoutInflater inflater, ViewGroup container,
Bundle savedInstanceState) {
mTabHost = new FragmentTabHost(getActivity());
mTabHost.setup(getActivity(), getChildFragmentManager(), R.id.fragment1);
mTabHost.addTab(mTabHost.newTabSpec("simple").setIndicator("Simple"),
FragmentStackSupport.CountingFragment.class, null);
mTabHost.addTab(mTabHost.newTabSpec("contacts").setIndicator("Contacts"),
LoaderCursorSupport.CursorLoaderListFragment.class, null);
mTabHost.addTab(mTabHost.newTabSpec("custom").setIndicator("Custom"),
LoaderCustomSupport.AppListFragment.class, null);
mTabHost.addTab(mTabHost.newTabSpec("throttle").setIndicator("Throttle"),
LoaderThrottleSupport.ThrottledLoaderListFragment.class, null);
return mTabHost;
}
@Override
public void onDestroyView() {
super.onDestroyView();
mTabHost = null;
}
}
第二个例子是在Fragment中使用,通过构造函数 mTabHost = new FragmentTabHost(getActivity())和setup(Context, FragmentManager, int) 完成TabHost的初始化,再依次添加Tab。
注意:
getFragmentManager拿到的是activity对所包含fragment的Manager;
getChildFragmentManager()拿到fragment嵌套fragment的Manager;
引用android-support-v4的话,要使用 getSupportFragmentManager();
2. FragmentTabHost常见用法:
2.1 如果是在XML文件中定义,通过 mTabHost = (FragmentTabHost) findViewById(android.R.id.tabhost)拿到FragmentTabHost,
也可以像第二个例子中使用构造函数拿到FragmentTabHost
FragmentTabHost(Context context, AttributeSet attrs)
2.2 对FragmentTabHost做初始化的操作
public void setup (Context context, FragmentManager manager)
public void setup (Context context, FragmentManager manager, int containerId) args)Bundle
2.3 添加tabSpec标签和Fragment类
addTab(TabHost.TabSpec tabSpec, Class<?> clss, Bundle args)2.4 设置Tab样式,三个方法
setIndicator(CharSequence label, Drawable icon);第二种可以使用文字+icon标识tab
View v = getLayoutInflater().inflate( R.layout.tab_main_first, null);
//设置自定义Tab视图
TabSpec spec1 = mTabHost.newTabSpec(TabTag[i]).setIndicator(v);
//将Tab按钮添加进Tab选项卡中
mTabHost.addTab(spec1,ClassTab[i], b );
2.5 设置tab之间分割线颜色
mTabHost.getTabWidget().setDividerDrawable(R.color.white)
注意:不设置的话,Tab选项之间会有分隔线
2.6 设置Tab按钮的背景,当然也可以在XML文件中指定
mTabHost.getTabWidget().getChildAt(i).setBackgroundResource(R.drawable.selector_tab_background);
2.7 关于XML
2.7.1 兼容3.0以下使用 android.support.v4.app.FragmentTabHost命名空间;
2.7.2 使用android:id="@android:id/tabhost"系统命名
2.7.3 tab选项卡的内容FrameLayout使用 android:id="@android:id/tabcontent"系统命名
2.7.4 TabWidget使用 android:id="@android:id/tabs"系统命名
常见布局,最常见的就是这种
<?xml version="1.0" encoding="utf-8"?>
<LinearLayout xmlns:android="http://schemas.android.com/apk/res/android"
    android:layout_width="fill_parent"
    android:layout_height="fill_parent"
    android:orientation="vertical" >

    <FrameLayout
        android:id="@+id/realtabcontent"
        android:layout_width="fill_parent"
        android:layout_height="0dip"
        android:layout_weight="1" />

    <android.support.v4.app.FragmentTabHost
        android:id="@android:id/tabhost"
        android:layout_width="fill_parent"
        android:layout_height="wrap_content"
        android:background="@drawable/maintab_toolbar_bg">

        <FrameLayout
            android:id="@android:id/tabcontent"
            android:layout_width="0dp"
            android:layout_height="0dp"
            android:layout_weight="0" />
    </android.support.v4.app.FragmentTabHost>

</LinearLayout>
使用tabwidget,很多人说这种用法会报错,其实用法大同小异,上面的布局 setup时使用 R.id.realtabcontent,而这种使用android.R.id.tabcontent,下面的Demo中就使用这种
<?xml version="1.0" encoding="utf-8"?>
<android.support.v4.app.FragmentTabHost xmlns:android="http://schemas.android.com/apk/res/android"
    android:id="@android:id/tabhost"
    android:layout_width="match_parent"
    android:layout_height="wrap_content" >

    <LinearLayout
        android:layout_width="fill_parent"
        android:layout_height="fill_parent"
        android:orientation="vertical" >

        <!-- 这里是tab选项卡的内容 ,宽度要填满,高度自动适应 -->
        <FrameLayout
            android:id="@android:id/tabcontent"
            android:layout_width="fill_parent"
            android:layout_height="0dip"
            android:layout_weight="1" >
        </FrameLayout>

        <!-- tabhost上面一条黑色分割 @drawable/line_shop -->
        <View
            android:id="@+id/view_2"
            android:layout_width="fill_parent"
            android:layout_height="0.1dip"
            android:background="#D1D1D1" >
        </View>

        <!-- 调换framelayout和tabwidget的前后顺序可以分别实现tab的top和在底下的效果 -->
        <TabWidget
            android:id="@android:id/tabs"
            android:layout_width="fill_parent"
            android:layout_height="wrap_content" >
        </TabWidget>
    </LinearLayout>

</android.support.v4.app.FragmentTabHost>
使用RadioGroup和 RadioButton定义Tab,这种需要给RadioGroup添加setOnCheckedChangeListener事件,不推荐
<LinearLayout xmlns:android="http://schemas.android.com/apk/res/android"
android:layout_width="match_parent"
android:layout_height="match_parent"
android:orientation="vertical" >
<FrameLayout
android:id="@+id/content"
android:layout_width="match_parent"
android:layout_height="match_parent"
android:layout_weight="1" />
<RadioGroup
android:id="@+id/radioGroup1"
android:layout_width="match_parent"
android:layout_height="wrap_content"
android:layout_alignParentBottom="true"
android:orientation="horizontal" >
<RadioButton
android:id="@+id/radio0"
android:layout_width="wrap_content"
android:layout_height="wrap_content"
android:layout_weight="1"
android:button="@null"
android:checked="true"
android:gravity="center_horizontal"
android:textColor="@color/font_selector"
android:textSize="18dp"
android:text="首页" />
<RadioButton
android:id="@+id/radio1"
android:layout_width="wrap_content"
android:layout_height="wrap_content"
android:layout_weight="1"
android:button="@null"
android:gravity="center_horizontal"
android:textSize="18dp"
android:textColor="@color/font_selector"
android:text="消息" />
<RadioButton
android:id="@+id/radio2"
android:layout_width="wrap_content"
android:layout_height="wrap_content"
android:layout_weight="1"
android:button="@null"
android:gravity="center_horizontal"
android:textSize="18dp"
android:textColor="@color/font_selector"
android:text="我的" />
</RadioGroup>
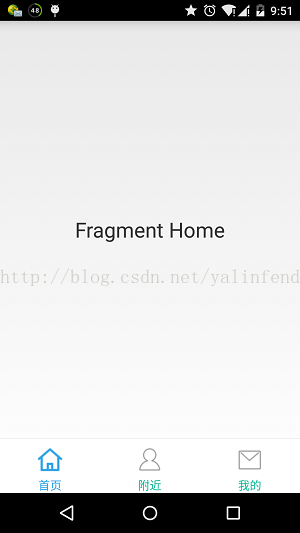
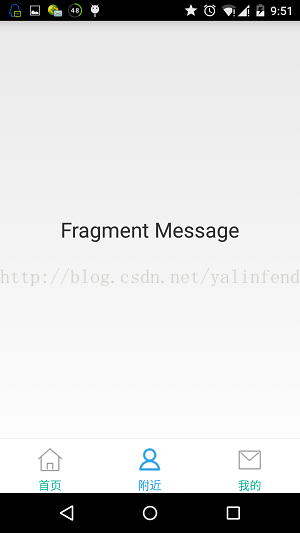
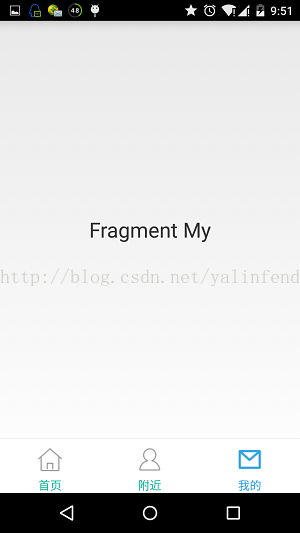
</LinearLayout>3. FragmentTabHost DEMO效果图和代码
3.1 定义主Tabmaintabs.xml
<?xml version="1.0" encoding="utf-8"?>
<android.support.v4.app.FragmentTabHost xmlns:android="http://schemas.android.com/apk/res/android"
    android:id="@android:id/tabhost"
    android:layout_width="match_parent"
    android:layout_height="wrap_content" >

    <LinearLayout
        android:layout_width="fill_parent"
        android:layout_height="fill_parent"
        android:orientation="vertical" >

        <!-- 这里是tab选项卡的内容 ,宽度要填满,高度自动适应 -->
        <FrameLayout
            android:id="@android:id/tabcontent"
            android:layout_width="fill_parent"
            android:layout_height="0dip"
            android:layout_weight="1" >
        </FrameLayout>

        <!-- tabhost上面一条黑色分割 @drawable/line_shop -->
        <View
            android:id="@+id/view_2"
            android:layout_width="fill_parent"
            android:layout_height="0.1dip"
            android:background="#D1D1D1" >
        </View>

        <!-- 调换framelayout和tabwidget的前后顺序可以分别实现tab的top和在底下的效果 -->
        <TabWidget
            android:id="@android:id/tabs"
            android:layout_width="fill_parent"
            android:layout_height="wrap_content" >
        </TabWidget>
    </LinearLayout>

</android.support.v4.app.FragmentTabHost>
3.2 Tab按钮 tab_main_home.xml
<?xml version="1.0" encoding="utf-8"?>
<LinearLayout xmlns:android="http://schemas.android.com/apk/res/android"
    android:id="@+id/layout_back"
    android:layout_width="match_parent"
    android:layout_height="wrap_content"
    android:layout_gravity="center"
    android:gravity="center" >


    <TextView
        android:id="@+id/textView1"
        android:layout_width="wrap_content"
        android:layout_height="wrap_content"
        android:paddingTop="4dip"
        android:drawableTop="@drawable/selector_home"
        android:focusable="true"
        android:gravity="center_horizontal"
        android:text="首页"
        android:textColor="@drawable/tab_txt_sel"
        android:textSize="14sp" />

</LinearLayout>
3.3 selector_home.xml
<?xml version="1.0" encoding="utf-8"?>
<selector xmlns:android="http://schemas.android.com/apk/res/android">

    <!-- Non focused states -->
    <item android:drawable="@drawable/icon_1_n" android:state_focused="false" android:state_pressed="false" android:state_selected="false"/>
    <item android:drawable="@drawable/icon_1_d" android:state_focused="false" android:state_pressed="false" android:state_selected="true"/>
    <!-- Focused states -->
    <item android:drawable="@drawable/icon_1_d" android:state_focused="true" android:state_pressed="false" android:state_selected="false"/>
    <item android:drawable="@drawable/icon_1_d" android:state_focused="true" android:state_pressed="false" android:state_selected="true"/>
    <!-- Pressed -->
    <item android:drawable="@drawable/icon_1_d" android:state_pressed="true" android:state_selected="true"/>
    <item android:drawable="@drawable/icon_1_d" android:state_pressed="true"/>

</selector>
3.4 tab_txt_sel.xml
<?xml version="1.0" encoding="utf-8"?>
<selector xmlns:android="http://schemas.android.com/apk/res/android" >
	<!-- Non focused states -->
	<item android:state_focused="false" android:state_selected="false" android:state_pressed="false" android:color="#1CBB9D" />
	<item android:state_focused="false" android:state_selected="true" android:state_pressed="false" android:color="#32A5E7" />
	<!-- Focused states -->
	<item android:state_focused="true" android:state_selected="false" android:state_pressed="false" android:color="#32A5E7" />
	<item android:state_focused="true" android:state_selected="true" android:state_pressed="false" android:color="#32A5E7" />
	<!-- Pressed -->
	<item android:state_selected="true" android:state_pressed="true" android:color="#32A5E7" />
	<item android:state_pressed="true" android:color="#32A5E7" />
</selector>
3.5 fragment_home.xml
<RelativeLayout xmlns:android="http://schemas.android.com/apk/res/android"
    xmlns:tools="http://schemas.android.com/tools"
    android:layout_width="match_parent"
    android:layout_height="match_parent"
   >

    <TextView
        android:layout_centerInParent="true"
        android:layout_width="wrap_content"
        android:layout_height="wrap_content"
        android:textSize="25sp"
        android:text="Fragment Home" />

</RelativeLayout>
3.6 MainTab,太简单了,不作说明……
public class MainTab extends FragmentActivity {
	private String TAG = MainTab.class.getName();

	public FragmentTabHost mTabHost;
	// 标签
	private String[] TabTag = { "tab1", "tab2", "tab3" };
	// 自定义tab布局显示文本和顶部的图片
	private Integer[] ImgTab = { R.layout.tab_main_home,
			R.layout.tab_main_message, R.layout.tab_main_my };

	// tab 选中的activity
	private Class[] ClassTab = { FragmentHome.class, FragmentMessage.class,
			FragmentMy.class };

	// tab选中背景 drawable 样式图片 背景都是同一个,背景颜色都是 白色。。。
	private Integer[] StyleTab = { R.color.white, R.color.white, R.color.white,
			R.color.white };

	@Override
	protected void onCreate(Bundle savedInstanceState) {
		super.onCreate(savedInstanceState);
		requestWindowFeature(Window.FEATURE_NO_TITLE);
		setContentView(R.layout.maintabs);
		setupView();
		initValue();
		setLinstener();
		fillData();

	}

	private void setupView() {

		// 实例化framentTabHost
		mTabHost = (FragmentTabHost) findViewById(android.R.id.tabhost);
		mTabHost.setup(this, getSupportFragmentManager(),
				android.R.id.tabcontent);

	}

	private void initValue() {

		// 初始化tab选项卡
		InitTabView();
	}

	private void setLinstener() {
		// imv_back.setOnClickListener(this);

	}

	private void fillData() {
		// TODO Auto-generated method stub

	}

	// 初始化 tab 自定义的选项卡 ///
	private void InitTabView() {

		// 可以传递参数 b;传递公共的userid,version,sid
		Bundle b = new Bundle();
		// 循环加入自定义的tab
		for (int i = 0; i < TabTag.length; i++) {
			// 封装的自定义的tab的样式
			View indicator = getIndicatorView(i);
			mTabHost.addTab(
					mTabHost.newTabSpec(TabTag[i]).setIndicator(indicator),
					ClassTab[i], b);// 传递公共参数

		}
		mTabHost.getTabWidget().setDividerDrawable(R.color.white);
	}

	// 设置tab自定义样式:注意 每一个tab xml子布局的linearlayout 的id必须一样
	private View getIndicatorView(int i) {
		// 找到tabhost的子tab的布局视图
		View v = getLayoutInflater().inflate(ImgTab[i], null);
		LinearLayout tv_lay = (LinearLayout) v.findViewById(R.id.layout_back);
		tv_lay.setBackgroundResource(StyleTab[i]);

		return v;
	}
}
Demo 下载地址:http://download.csdn.net/detail/yalinfendou/8538361


 315
315


 被折叠的 条评论
为什么被折叠?
被折叠的 条评论
为什么被折叠?
 到【灌水乐园】发言


