


 本文详细介绍Spring框架中依赖注入的各种方式,包括@Autowired、@Qualifier、@Resource等注解的使用方法,以及如何对集合类和延迟注入的支持。
使用@Autowired进行自动注入
Spring通过@Autowired注解实现Bean的依赖注入。
@Autowired默认按照类型(byType)匹配的方式在容器中查找匹配的Bean,当且仅有一个匹配的Bean时,Spring将其注入@Autowired标注的变量中。
import org.springframework.beans.factory.annotation.Autowired;
import org.springframework.stereotype.Component;

@Component
public class Pilot {

    @Autowired
    private Plane plane;

    public void drivePlane() {
        plane.fly();
    }
}
实例
POJO类
package com.xgj.ioc.configuration;

import org.springframework.beans.factory.annotation.Autowired;
import org.springframework.stereotype.Component;

@Component
public class Pilot {

    @Autowired
    private Plane plane;

    public void drivePlane() {
        plane.fly();
    }
}
@Component注解将Pilot标注为一个Bean,Spring会扫描加载并实例化该Bean。
通过@Autowired注入plan的Bean。
POJO类
package com.xgj.ioc.configuration;
import org.springframework.stereotype.Component;
@Component
public class Plane {
private String brand;
private String color;
private int speed;
public String getBrand() {
return brand;
}
public void setBrand(String brand) {
this.brand = brand;
}
public String getColor() {
return color;
}
public void setColor(String color) {
this.color = color;
}
public int getSpeed() {
return speed;
}
public void setSpeed(int speed) {
this.speed = speed;
}
public void introduce() {
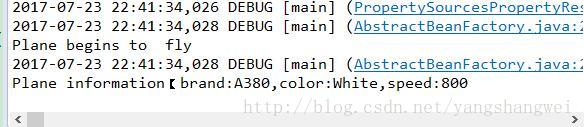
System.out.println("Plane information【 brand:" + brand + ",color:"
+ color + ",speed:" + speed);
}
public void fly() {
System.out.println("Plane begins to fly");
}
}
配置文件
<?xml version="1.0" encoding="UTF-8"?>
<beans xmlns="http://www.springframework.org/schema/beans"
    xmlns:xsi="http://www.w3.org/2001/XMLSchema-instance" xmlns:context="http://www.springframework.org/schema/context"

    xsi:schemaLocation="http://www.springframework.org/schema/beans
            http://www.springframework.org/schema/beans/spring-beans.xsd

            http://www.springframework.org/schema/context
            http://www.springframework.org/schema/context/spring-context.xsd">


    <!-- (1)声明Context命名空间以及Schema文件   (2)扫描类包以及应用注解定义的bean -->
    <context:component-scan base-package="com.xgj.ioc.configuration"/>

</beans>
测试类
package com.xgj.ioc.configuration;

import org.springframework.context.ApplicationContext;
import org.springframework.context.support.ClassPathXmlApplicationContext;

public class ConfigBeanTest {

    public static void main(String[] args) {

        ApplicationContext ctx = new ClassPathXmlApplicationContext(
                "classpath:com/xgj/ioc/configuration/beans.xml");

        Pilot pilot = ctx.getBean("pilot", Pilot.class);
        pilot.drivePlane();

        Plane plane = ctx.getBean("plane", Plane.class);
        plane.setBrand("A380");
        plane.setColor("White");
        plane.setSpeed(800);

        plane.introduce();

    }
}
运行结果:
使用@Auotwired的required属性
如果容器中没有一个和标注变量类型匹配的Bean,那么Spring启动的时候会报NoSuchBeanDefinitionException异常。 如果希望Spring及时找不到匹配的Bean完成注入也不要抛出异常,那么就可以使用@Autowired(required=false)进行标注。
实例
还是以上面的例子为基础改造下,我们知道上面的扫描包配置的为
<context:component-scan base-package="com.xgj.ioc.configuration"/>
假设在com.xgj.ioc.configuration之外的包目录下 有个Tank类(com.xgj.ioc.inject.construct.type.Tank)
改造下Pilot类,引入Tank,设置自动注入
package com.xgj.ioc.configuration;

import org.springframework.beans.factory.annotation.Autowired;
import org.springframework.stereotype.Component;

import com.xgj.ioc.inject.construct.type.Tank;

@Component
public class Pilot {

    @Autowired
    private Plane plane;

    @Autowired
    private Tank tank;

    public void drivePlane() {
        plane.fly();
    }
}
@Autowired 默认 required =true
运行测试类:
No qualifying bean of type 'com.xgj.ioc.inject.construct.type.Tank' available: expected at least 1 bean which qualifies as autowire candidate. Dependency annotations: {@org.springframework.beans.factory.annotation.Autowired(required=true)}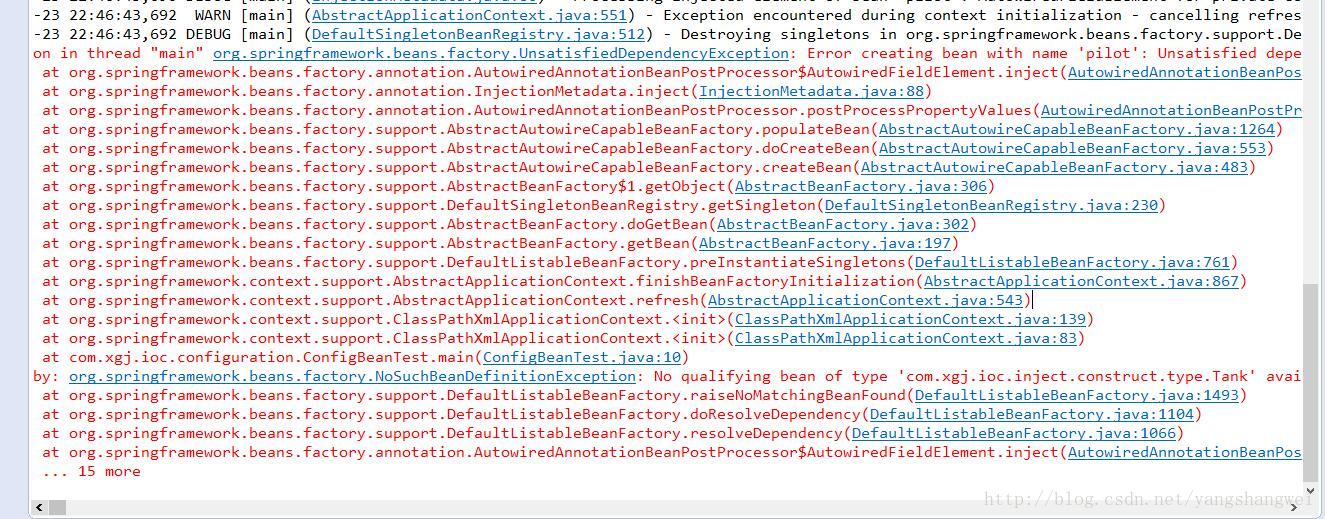
我们改造下@Autowired(required = false)
@Autowired(required = false)
private Tank tank;
再此运行: OK

使用@Qualifier指定注入Bean的名称
如果容器中有一个以上匹配的Bean时,则可以通过@Qualifier注解限定Bean的名称。
假设容器中有两个类型为Plane的Bean,一个名为plane,一个名为otherPlane. 因为@Autowired默认是按照类型匹配的方式在容器中查找,plane和otherPlane的类型都是Plane,怎么知道注入哪一个呢?
实例
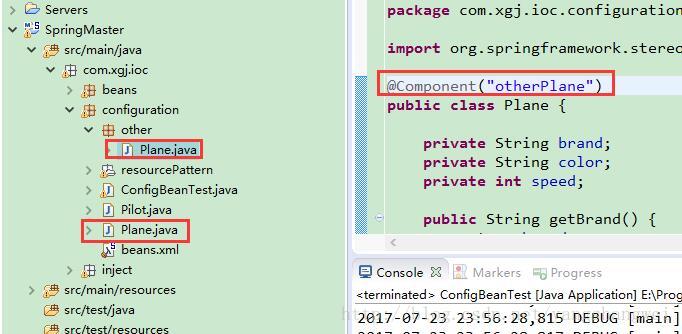
我们在扫描的基类包下增加个子包 other,包下新增同名Plane类,通过@Component(“otherPlane”)指定Bean的名称。
com.xgj.ioc.configuration.other.Plane代码如下:
package com.xgj.ioc.configuration.other;

import org.springframework.stereotype.Component;

@Component("otherPlane")
public class Plane {

    private String brand;
    private String color;
    private int speed;

    public String getBrand() {
        return brand;
    }

    public void setBrand(String brand) {
        this.brand = brand;
    }

    public String getColor() {
        return color;
    }

    public void setColor(String color) {
        this.color = color;
    }

    public int getSpeed() {
        return speed;
    }

    public void setSpeed(int speed) {
        this.speed = speed;
    }

    public void introduce() {
        System.out.println("OtherPlane information【 brand:" + brand + ",color:"
                + color + ",speed:" + speed);
    }

    public void fly() {
        System.out.println("OtherPlane begins to  fly");
    }
}
如果我们希望注入otherPlane呢?
我们来改造Pilot类
package com.xgj.ioc.configuration;

import org.springframework.beans.factory.annotation.Autowired;
import org.springframework.beans.factory.annotation.Qualifier;
import org.springframework.stereotype.Component;

// 1. 引入其他子包下的Plane
import com.xgj.ioc.configuration.other.Plane;
import com.xgj.ioc.inject.construct.type.Tank;

@Component
public class Pilot {

    @Autowired
    // 2 通过@Qualifier限定Bean的名称
    @Qualifier("otherPlane")
    private Plane plane;

    @Autowired(required = false)
    private Tank tank;

    public void drivePlane() {
        plane.fly();
    }
}
测试类中改动的地方
记得引入 other子包下的Plane
import com.xgj.ioc.configuration.other.Plane;
.....
Plane plane = ctx.getBean("otherPlane", Plane.class);
然后运行测试类:

对类方法进行标注
@Autowired可以对类成员变量以及方法的入参进行标注。
下面在类的方法上使用@Autowired注解。
实例
package com.xgj.ioc.configuration.method;

import org.springframework.beans.factory.annotation.Autowired;
import org.springframework.stereotype.Component;

@Component
public class Pilot {

    private Plane plane;

    // 自动将Plane类型传给方法入参
    @Autowired
    public void setPlane(Plane plane) {
        this.plane = plane;
    }


    public void drivePlane() {
        plane.fly();
    }

}
如果是下面这种写法
    // 自动将名为plane的Bean传给方法入参
    @Autowired
    @Qualifier("plane")
    public void setPlane(Plane plane) {
        this.plane = plane点内容**
如果一个方法拥有多个入参,在默认情况下,Spring将自动选择匹配入参类型的Bean进行注入。 Spring允许对方法入参标注@Qualifier以指定注入Bean的名称。
比如
@Autowired
    public void setPlane(Plane plane, @Qualifier("tank") Tank tank) {
        this.plane = plane;
    }
在这种情况下,Plane的入参注入为Plane类型的Bean,而Tank的入参注入的则为名称为tank的Bean.
实例代码如下:
Pilot POJO类
package com.xgj.ioc.configuration.method;

import org.springframework.beans.factory.annotation.Autowired;
import org.springframework.stereotype.Component;

@Component
public class Pilot {

    private Plane plane;

    // 自动将Plane类型传给方法入参
    @Autowired
    public void setPlane(Plane plane) {
        this.plane = plane;
    }

    public void drivePlane() {
        plane.fly();
    }
}
Plane POJO类
package com.xgj.ioc.configuration.method;

import org.springframework.stereotype.Component;

@Component // 通过注解标注为一个Bean,以便Spring扫描并实例化
public class Plane {

    public void fly() {
        System.out.println("Plane begins to  fly");
    }

}
配置文件
<?xml version="1.0" encoding="UTF-8"?>
<beans xmlns="http://www.springframework.org/schema/beans"
    xmlns:xsi="http://www.w3.org/2001/XMLSchema-instance" xmlns:context="http://www.springframework.org/schema/context"

    xsi:schemaLocation="http://www.springframework.org/schema/beans
            http://www.springframework.org/schema/beans/spring-beans.xsd

            http://www.springframework.org/schema/context
            http://www.springframework.org/schema/context/spring-context.xsd">


    <!-- (1)声明Context命名空间以及Schema文件   (2)扫描类包以及应用注解定义的bean -->
    <context:component-scan base-package="com.xgj.ioc.configuration.method"/>

</beans>
测试类
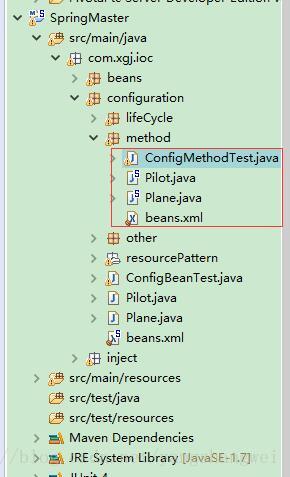
package com.xgj.ioc.configuration.method;

import org.springframework.context.ApplicationContext;
import org.springframework.context.support.ClassPathXmlApplicationContext;

public class ConfigMethodTest {

    public static void main(String[] args) {

        ApplicationContext ctx = new ClassPathXmlApplicationContext(
                "classpath:com/xgj/ioc/configuration/method/beans.xml");

        Pilot pilot = ctx.getBean("pilot", Pilot.class);

        pilot.drivePlane();

    }
}
运行结果
小结
一般情况下,Spring容器中大部分的Bean是单实例的,所以一般无需通过@Repository、@Service等注解的value属性指定Bean的名称,也无须使用@Qualifier注解按照名称进行注入。
虽然Spring支持在属性和方法上标注自动注入注解@Autowired,但在实际项目开发中建议采用在方法上标注@Autowired,因为这样更加“面向对象”,也方便单元测试的编写, 如果将注解标注在私有属性上,则在单元测试的时候就很难用编程的办法设置属性值。
对集合类进行标注
如果对类中集合类的变量或者方法入参进行@Autowired标注,那么Spring会将容器中类型所有匹配的Bean都自动注入进来。
实例
接口 Plugin
package com.xgj.ioc.configuration.lstmpSupport;

public interface Plugin {

}
POJO
package com.xgj.ioc.configuration.lstmpSupport;

import org.springframework.core.annotation.Order;
import org.springframework.stereotype.Component;

@Component
@Order(value = 1)
public class Plugin1 implements Plugin {
    /**
     *
     *
     * @Title:Plugin1
     *
     * @Description:构造函数
     */
    public Plugin1() {
        super();
        System.out.println("Pligin1 Init");
    }
}
POJO
package com.xgj.ioc.configuration.lstmpSupport;

import org.springframework.core.annotation.Order;
import org.springframework.stereotype.Component;

@Component
@Order(value = 2)
public class Plugin2 implements Plugin {
    /**
     *
     * @Title:Plugin2
     *
     * @Description:构造函数
     *
     * */
    public Plugin2() {
        super();
        System.out.println("Pligin2 Init");
    }

}
通过@Component标注为Bean,Spring会将 Plugin1和Plugin2这两个Bean都注入到plugins中。 在默认情况下,这两个bean的加载顺序是不确定,在Spring4.0中可以通过@Order注解或者实现Ordered接口来决定Bean加载的顺序,值越小,优先被加载。
POJO
package com.xgj.ioc.configuration.lstmpSupport;

import java.util.List;
import java.util.Map;

import org.springframework.beans.factory.annotation.Autowired;
import org.springframework.stereotype.Component;

@Component
public class MyComponent {

    private List<Plugin> plugins;

    private Map<String, Plugin> pluginMap;

    // Spring会将容器中所有类型为Plugin的Bean注入到这个变量中
    @Autowired(required = false)
    public void setPlugins(List<Plugin> plugins) {
        this.plugins = plugins;
    }

    // 将Plugin类型的Bean注入到Map中
    @Autowired
    public void setPluginMap(Map<String, Plugin> pluginMap) {
        this.pluginMap = pluginMap;
    }

    /**
     *
     *
     * @Title: getPlugins
     *
     * @Description: 获取Plugins
     *
     * @return
     *
     * @return: List<Plugin>
     */
    public List<Plugin> getPlugins() {
        return plugins;
    }

    /**
     *
     *
     * @Title: getPluginMap
     *
     * @Description: 获取Map
     *
     * @return
     *
     * @return: Map<String,Plugin>
     */
    public Map<String, Plugin> getPluginMap() {
        return pluginMap;
    }

}
Spring如果发现变量是一个List和一个Map的集合类,则它会将容器中匹配集合元素类型的所有Bean都注入进来。
private Map
<?xml version="1.0" encoding="UTF-8"?>
<beans xmlns="http://www.springframework.org/schema/beans"
    xmlns:xsi="http://www.w3.org/2001/XMLSchema-instance" xmlns:context="http://www.springframework.org/schema/context"

    xsi:schemaLocation="http://www.springframework.org/schema/beans
            http://www.springframework.org/schema/beans/spring-beans.xsd

            http://www.springframework.org/schema/context
            http://www.springframework.org/schema/context/spring-context.xsd">


    <!-- (1)声明Context命名空间以及Schema文件   (2)扫描类包以及应用注解定义的bean -->
    <context:component-scan base-package="com.xgj.ioc.configuration.lstmpSupport"/>

</beans>
测试类:
package com.xgj.ioc.configuration.lstmpSupport;
import java.util.List;
import java.util.Map;
import java.util.Map.Entry;
import org.springframework.context.ApplicationContext;
import org.springframework.context.support.ClassPathXmlApplicationContext;
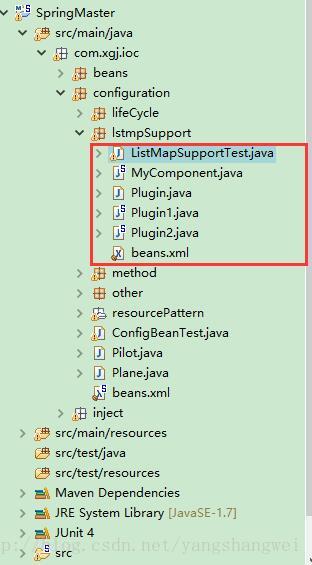
public class ListMapSupportTest {
public static void main(String[] args) {
ApplicationContext ctx = new ClassPathXmlApplicationContext(
"classpath:com/xgj/ioc/configuration/lstmpSupport/beans.xml");
// 从容器中获取bean
MyComponent myComponent = ctx.getBean("myComponent", MyComponent.class);
// 获取Map集合
Map<String, Plugin> map = myComponent.getPluginMap();
// Map遍历key和value
for (Entry<String, Plugin> entry : map.entrySet()) {
System.out.println("key:" + entry.getKey());
System.out.println("value:" + entry.getValue());
}
// 获取list集合
List<Plugin> list = myComponent.getPlugins();
// 遍历list
for (int i = 0; i < list.size(); i++) {
System.out.println("list中的元素" + i + "为" + list.get(i));
}
}
}
运行结果:
对延迟依赖注入的支持
Spring4.0支持延迟依赖注入,即在Spring容器的时候,对已在Bean上标注了@Lazy和@Autowired注解的属性,不会立即注入属性值。 而是延迟到调用此属性的时候才会注入属性值。
对于Bean实施延迟依赖注入,要注意@Lazy注解必须同时标注在属性及目标Bean上,二者缺一不可,否则延迟注入无效。
实例
package com.xgj.ioc.configuration.lazyLoad;

import org.springframework.beans.factory.annotation.Autowired;
import org.springframework.context.annotation.Lazy;
import org.springframework.stereotype.Component;

@Component
public class Pilot {

    private Plane plane;

    // 延迟注入
    @Lazy
    @Autowired(required = false)
    public void setPlane(Plane plane) {
        this.plane = plane;
    }

}
POJO
package com.xgj.ioc.configuration.lazyLoad;

import org.springframework.context.annotation.Lazy;
import org.springframework.stereotype.Component;

@Lazy
// @Lazy 目标Bean 延迟注入
@Component
// 通过注解标注为一个Bean,以便Spring扫描并实例化
public class Plane {

    /**
     *
     *
     * @Title:Plane
     *
     * @Description:无参构造函数
     */
    public Plane() {
        super();
        System.out.println("Plan init ");
    }

    public void fly() {
        System.out.println("Plane begins to  fly");
    }

}
配置文件:
<?xml version="1.0" encoding="UTF-8"?>
<beans xmlns="http://www.springframework.org/schema/beans"
    xmlns:xsi="http://www.w3.org/2001/XMLSchema-instance" xmlns:context="http://www.springframework.org/schema/context"

    xsi:schemaLocation="http://www.springframework.org/schema/beans
            http://www.springframework.org/schema/beans/spring-beans.xsd

            http://www.springframework.org/schema/context
            http://www.springframework.org/schema/context/spring-context.xsd">


    <!-- (1)声明Context命名空间以及Schema文件   (2)扫描类包以及应用注解定义的bean -->
    <context:component-scan base-package="com.xgj.ioc.configuration.lazyLoad"/>

</beans>
测试
package com.xgj.ioc.configuration.lazyLoad;

import org.springframework.context.ApplicationContext;
import org.springframework.context.support.ClassPathXmlApplicationContext;

public class LazyLoadTest {

    public static void main(String[] args) {
        // 初始化容器
        ApplicationContext ctx = new ClassPathXmlApplicationContext(
                "classpath:com/xgj/ioc/configuration/lazyLoad/beans.xml");
    }
}
运行结果:

我们可以看到,并没有实例化Plane这个Bean.
我们将@Lazy去掉,再次运行下

可以看到 启动容器的时候,Plane bean已经被加载实例化了。
对标准注解的支持
Spring还支持JSR-250中定义的@Resource和JSR-330中定义的@Inject注解,这两个标准注解和@Autowired注解的功能类似,都能对类变更及方法入参提供自动注入功能。
@Resource注解要求提供一个Bean名称的属性,如果属性为空,则自动采用标注处的变量名或者方法名作为Bean的名称。
实例
POJO
package com.xgj.ioc.configuration.standard;

import javax.annotation.Resource;

import org.springframework.stereotype.Component;

@Component
public class Pilot {

    private Plane plane;

    @Resource(name = "plane")
    public void setPlane(Plane plane) {
        this.plane = plane;
    }

    public void drivePlane() {
        plane.fly();
    }

}
POJO
package com.xgj.ioc.configuration.standard;

import org.springframework.stereotype.Component;

@Component
public class Plane {

    public void fly() {
        System.out.println("plane begins to fly");
    }

}
配置文件
<?xml version="1.0" encoding="UTF-8"?>
<beans xmlns="http://www.springframework.org/schema/beans"
    xmlns:xsi="http://www.w3.org/2001/XMLSchema-instance" xmlns:context="http://www.springframework.org/schema/context"

    xsi:schemaLocation="http://www.springframework.org/schema/beans
            http://www.springframework.org/schema/beans/spring-beans.xsd

            http://www.springframework.org/schema/context
            http://www.springframework.org/schema/context/spring-context.xsd">


    <!-- (1)声明Context命名空间以及Schema文件   (2)扫描类包以及应用注解定义的bean -->
    <context:component-scan base-package="com.xgj.ioc.configuration.standard"/>

</beans>
测试类
package com.xgj.ioc.configuration.standard;

import org.springframework.context.ApplicationContext;
import org.springframework.context.support.ClassPathXmlApplicationContext;

public class StandardTest {
    public static void main(String[] args) {
        ApplicationContext ctx = new ClassPathXmlApplicationContext(
                "classpath:com/xgj/ioc/configuration/standard/beans.xml");

        ctx.getBean("pilot", Pilot.class).drivePlane();
    }
}
运行结果

小结
如果@Resource未指定plane属性,则也可以根据属性方法得到需要注入的Bean名称。
@Autowired默认按照类型匹配注入bean, @Resource默认按照名称匹配注入Bean。而@Inject和@Autowired同样也是按照类型匹配注入Bean的,只不过它没有required属性。
可见不管是@Resource或者@Inject注解,其功能都没有@Autowired丰富,因此除非有不要,大可不必在乎这两个注解


 303
303

 被折叠的 条评论
为什么被折叠?
被折叠的 条评论
为什么被折叠?
 到【灌水乐园】发言


