


1.两张图合成为一张图
  UIImage * img =[UIImage imageNamed:@"icon"];
    CGSize sz = img.size;
    UIGraphicsBeginImageContextWithOptions(CGSizeMake(sz.width*2, sz.height), NO, 0);
    [img drawAtPoint:CGPointMake(0, 0)];
    [img drawAtPoint:CGPointMake(sz.width, 0)];
    UIImage *mergeImg = UIGraphicsGetImageFromCurrentImageContext();
    UIGraphicsEndImageContext();
    return mergeImg;
}
2.取一张图的两半,然后分开绘制,合成新的图
-(UIImage *)operateComponentsOfCGImage
{
    UIImage * img =[UIImage imageNamed:@"car.jpg"];
    CGSize sz = img.size;
    CGImageRef iconLeft  = CGImageCreateWithImageInRect([img CGImage],
                                                        CGRectMake(0, 0, sz.width/2, sz.height));
    CGImageRef iconRight = CGImageCreateWithImageInRect([img CGImage],
                                                        CGRectMake(sz.width/2.0, 0, sz.width/2.0, sz.height));
    // draw each CGImage to image context
    UIGraphicsBeginImageContextWithOptions(CGSizeMake(sz.width*1.5, sz.height), NO, 0);
    CGContextRef con = UIGraphicsGetCurrentContext();
    CGContextDrawImage(con,
                       CGRectMake(0, 0, sz.width/2.0, sz.height), iconLeft);
    CGContextDrawImage(con,
                       CGRectMake(sz.width, 0, sz.width/2.0, sz.height), iconRight);

    UIImage *im = UIGraphicsGetImageFromCurrentImageContext();
    UIGraphicsEndImageContext();
    CGImageRelease(iconLeft);
    CGImageRelease(iconRight);
    return im;
}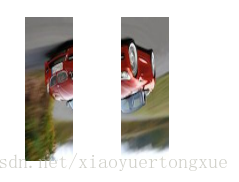
问题来了,绘制的图是上下颠倒的,原书上是这么说的:
This phenomenon can arise when you create a CGImage and then draw it with CGContextDrawImage,and is due to
a mismatch in the native coordinte systems of source and target contexts/
大致意思是,在创建一个CGImage对象并用CGContextDrawImage方法对图像进行绘制时会出现上面的情况,这是由于原生坐标系统中,源上下文和目标上下文的不一致导致的。
注意:还有一点,在高清屏下(二倍像素的设备上),绘制的大小也有问题。
如果我们的image file是二倍图(@2x.png),调用imageNamed:方法时,UIImage 会通过设置其scale的属性来补偿大小,而CGImage没有scale属性。
正确 方式一:
-(UIImage *)operateComponentsOfCGImage
{
    UIImage * img =[UIImage imageNamed:@"car.jpg"];
    CGSize sz = img.size;
    //Derive  CGImage and use its dimensions to extract its halves
    CGImageRef imgCG = [img CGImage];
    CGSize szCG = CGSizeMake(CGImageGetWidth(imgCG), CGImageGetHeight(imgCG));

    CGImageRef iconLeft  = CGImageCreateWithImageInRect([img CGImage],
                                                        CGRectMake(0, 0, szCG.width/2, szCG.height));
    CGImageRef iconRight = CGImageCreateWithImageInRect([img CGImage],
                                                        CGRectMake(szCG.width/2.0, 0, szCG.width/2.0, szCG.height));
    // draw each CGImage to image context
    UIGraphicsBeginImageContextWithOptions(CGSizeMake(sz.width*1.5, sz.height), NO, 0);
// The rest is as before,calling flip() to compensate for flipping
    CGContextRef con = UIGraphicsGetCurrentContext();

    CGContextDrawImage(con,
                      CGRectMake(0, 0, sz.width/2.0, sz.height), flip(iconLeft));
   CGContextDrawImage(con,
                      CGRectMake(sz.width, 0, sz.width/2.0, sz.height), flip(iconRight));

    UIImage *im = UIGraphicsGetImageFromCurrentImageContext();
    UIGraphicsEndImageContext();
    CGImageRelease(iconLeft);
    CGImageRelease(iconRight);
    return im;
}

//
CGImageRef flip(CGImageRef im){
    CGSize sz  = CGSizeMake(CGImageGetWidth(im), CGImageGetHeight(im));
    UIGraphicsBeginImageContextWithOptions(sz, NO, 0);
    CGContextDrawImage(UIGraphicsGetCurrentContext(), CGRectMake(0, 0, sz.width, sz.height), im);
    CGImageRef result = [UIGraphicsGetImageFromCurrentImageContext() CGImage];
    UIGraphicsEndImageContext();
    return result;

}
方式二:通过在UIImage中那个包含一个CGImage,绘制UIImage 而不是绘制CGImage。
UIImage 在通过CGImage生成UIImage的时候可以通过调用imageWithCGImage:scale:orientation:方法,来弥补scale的问题。而且通过绘制一个UIImage对象而不是CGImage对象,我们可以避免flipping的问题。
下面是解决flipping和scale问题的方法(不调用flip方法)
-(UIImage *)operateCGImage
{
    UIImage * img =[UIImage imageNamed:@"car.jpg"];
    CGSize sz = img.size;
    //Derive  CGImage and use its dimensions to extract its halves
    CGImageRef imgCG = [img CGImage];
    CGSize szCG = CGSizeMake(CGImageGetWidth(imgCG), CGImageGetHeight(imgCG));

    CGImageRef iconLeft  = CGImageCreateWithImageInRect([img CGImage],
                                                        CGRectMake(0, 0, szCG.width/2, szCG.height));
    CGImageRef iconRight = CGImageCreateWithImageInRect([img CGImage],
                                                        CGRectMake(szCG.width/2.0, 0, szCG.width/2.0, szCG.height));
    // draw each CGImage to image context
    UIGraphicsBeginImageContextWithOptions(CGSizeMake(sz.width*1.5, sz.height), NO, 0);
    [[UIImage imageWithCGImage:iconLeft
                         scale:img.scale
                   orientation:UIImageOrientationUp]
    drawAtPoint:CGPointMake(0, 0)];

    [[UIImage imageWithCGImage:iconRight
                         scale:img.scale
                   orientation:UIImageOrientationUp]
     drawAtPoint:CGPointMake(sz.width+100, 0)];


    UIImage *im = UIGraphicsGetImageFromCurrentImageContext();
    UIGraphicsEndImageContext();
    CGImageRelease(iconLeft);
    CGImageRelease(iconRight);
    return im;
}
#pragma mark ----   convertViewToImage
- (UIImage *)convertViewToImage{
    if (iOS7) {
        UIGraphicsBeginImageContextWithOptions(asycImageView.bounds.size, YES, 1);
        [asycImageView drawViewHierarchyInRect:asycImageView.bounds afterScreenUpdates:YES];
        UIImage *image = UIGraphicsGetImageFromCurrentImageContext();
        UIGraphicsEndImageContext();
        return image;
    }else
    {
        UIGraphicsBeginImageContextWithOptions(self.view.frame.size, YES, 0.0);
        [self.view.layer renderInContext:UIGraphicsGetCurrentContext()];
        UIImage *image = UIGraphicsGetImageFromCurrentImageContext();
        UIGraphicsEndImageContext();
        return image;
    }
    return nil;
}


 306
306


 被折叠的 条评论
为什么被折叠?
被折叠的 条评论
为什么被折叠?
 到【灌水乐园】发言


