


 本文介绍了一个自定义的颜色选择弹出窗口及颜色下拉框的设计过程,包括弹出窗口基类的实现、颜色展示及选择交互,以及自定义绘制的下拉框控件。
一、 设计一个弹出窗口基类。
1、通过继承窗体类创建基类。
 public class ColorCommonForm : System.Windows.Forms.Form
2、创建虚拟方法Show来指定窗体位置。

 /**//// <summary>
 /// 自己定义的show /// </summary>
 /// <param name="Ctl">要在那个控件附近show 出本窗口</param> public virtual void Show(Control Ctl) ...{ Rectangle rect = Ctl.RectangleToScreen(new Rectangle(0, 0, Ctl.Width, Ctl.Height)); this.Left = rect.Left; this.Top = rect.Top + Ctl.Height; Rectangle ScreenRect = Screen.PrimaryScreen.WorkingArea; if (this.Right > ScreenRect.Width || this.Bottom > ScreenRect.Height)
 ...{ this.Left = rect.Left - this.Width + Ctl.Width; this.Top = rect.Top - this.Height;
 } this.Show(); }
3、重写WndProc(窗体消息)
/**//// <summary> /// 重写 WndProc /// </summary> /// <param name="m"></param> protected override void WndProc(ref Message m) ...{ //如果整个程序失去就隐藏 if (m.Msg == SystemShell.WM_ACTIVATEAPP && m.WParam == IntPtr.Zero) ...{ this.Hide(); } base.WndProc(ref m); }
二、设计颜色弹出窗口,并把颜色绘制到窗口上。
1、定义需要绘制到窗体的颜色。
private static string[] colorList = ...{ "#000000","#973302","#343200","#013300","#003466","#000083","#313398","#333333","#810004", "#FD6802","#858200","#008002","#008081","#0201FF","#69669D","#80807E","#FE0002","#FE9B00", "#9ACB00","#339A65","#33CBCC","#3C62FF","#780179","#99999B","#FF00FE","#FFCB03","#FFFE01", "#00FF01","#01FFFF","#00CCFF","#993365","#C0C0C0","#FF99CB","#FFCA9B","#FFFE99","#CDFFCC", "#CDFFFF","#99CDFD","#C89CFB","#FFFFFF" };2、绘制颜色到窗体的画布
private void pictureBox1_Paint(object sender, PaintEventArgs e) ...{ int x = 5, y = 5, count = 1; using (SolidBrush MyBrush1 = new SolidBrush(Color.Black)) ...{ Rectangle r1 = new Rectangle(x, y, 130, 12); e.Graphics.DrawRectangle(new Pen(Color.FromArgb(172, 168, 153)), x, y, 12, 12); e.Graphics.FillRectangle(MyBrush1, x, y, 12, 12); Point p = new Point(x + 50, y - 1); Font drawFont = new Font("Arial", 8); e.Graphics.DrawString("自动", drawFont, MyBrush1, p); y += 20; for (int i = 0; i < colorList.Length; i++) ...{ if (count < 8) ...{ SolidBrush MyBrush = new SolidBrush(ColorTranslator.FromHtml(colorList[i].ToString())); e.Graphics.DrawRectangle(new Pen(Color.FromArgb(172, 168, 153)), x, y, 12, 12); Rectangle r = new Rectangle(x, y, 12, 12); count = i + 1; allRec.SetValue(r, i); e.Graphics.FillRectangle(MyBrush, x, y, 12, 12); x += 17; } else ...{ int row = count / 8 + 1; // if (count % 8 == 0) ...{ x = 5; if (row == 0) ...{ y = 43; } else ...{ y = 17 * row + 8; } } SolidBrush MyBrush = new SolidBrush(ColorTranslator.FromHtml(colorList[i].ToString())); Rectangle r = new Rectangle(x, y, 12, 12); e.Graphics.DrawRectangle(new Pen(Color.FromArgb(172, 168, 153)), r); count = i + 1; allRec.SetValue(r, i); e.Graphics.FillRectangle(MyBrush, x, y, 12, 12); x += 17; } } allRec.SetValue(r1, 40); } }3、定义鼠标移动选择颜色(移动到颜色上产生提示)
/**//// 如果鼠标进入 (更多) 的范围将label1背景改变 private void ColorSelectForm_MouseMove(object sender, MouseEventArgs e) ...{ Point pt = Control.MousePosition; Color cl = Color.FromArgb(247, 246, 241); if (!(pt.X > this.Right || pt.X < this.Left || pt.Y > this.Bottom || pt.Y < this.Top)) ...{ Rectangle rect = label1.RectangleToScreen(new Rectangle(0, 0, label1.Width, label1.Height)); if (!(pt.X > rect.Right || pt.X < rect.X || pt.Y > rect.Bottom || pt.Y < rect.Y)) ...{ cl = Color.FromArgb(214, 238, 252); } else ...{ using (Graphics g = this.pictureBox1.CreateGraphics()) ...{ Point p = new Point(e.X, e.Y); for (int i = 0; i < allRec.Length; i++) ...{ if (allRec[i].Contains(p)) ...{ this.pictureBox1.Cursor = Cursors.Arrow; if (i == 40) ...{ tempColor = ColorTranslator.FromHtml("#000000"); } else ...{ tempColor = ColorTranslator.FromHtml(colorList[i]); } g.DrawRectangle(pen, allRec[i]); return; } else ...{ if (i != 40) ...{ g.DrawRectangle(new Pen(Color.FromArgb(172, 168, 153)), allRec[i]); } else ...{ g.DrawRectangle(new Pen(Color.FromArgb(246, 246, 246)), 5, 5, 130, 12); } } } } } } label1.BackColor = cl; }4、鼠标按下选择颜色事件
/**//// 如果鼠标按下进行一系列处理 private void ColorSelectForm_MouseDown(object sender, MouseEventArgs e) ...{ this.Capture = false; //释放鼠标 Point pt = Control.MousePosition; Color cl = Color.Empty; while (true) ...{ if (!(pt.X > this.Right || pt.X < this.Left || pt.Y > this.Bottom || pt.Y < this.Top))//是否在窗口范围内 ...{ Rectangle rect = label1.RectangleToScreen(new Rectangle(0, 0, label1.Width, label1.Height)); if (!(pt.X > rect.Right || pt.X < rect.X || pt.Y > rect.Bottom || pt.Y < rect.Y))//如果鼠标点击在(更多)上弹出 colorDialog1 ...{ if (colorDialog1.ShowDialog() == DialogResult.OK) ...{ cl = colorDialog1.Color; } break; } rect = pictureBox1.RectangleToScreen(new Rectangle(0, 0, pictureBox1.Width, pictureBox1.Height)); if (!(pt.X > rect.Right || pt.X < rect.X || pt.Y > rect.Bottom || pt.Y < rect.Y))//判断鼠标是否点击到了 pictureBox1 ...{ if (this.Cursor == Cursors.Arrow) ...{ cl = tempColor; } } } break; } if (SelectColor != null && cl != Color.Empty) ...{ SelectColor(cl); } this.Dispose(); }三、通过继承ComboBox设计类似WORD下拉选框。
1、构造颜色下拉控件
this.Cursor = Cursors.Hand; this.ItemHeight = 16; this.BackColor = System.Drawing.Color.Green; this.DropDownHeight = 1; this.DropDownWidth = 1; this.DrawMode = DrawMode.OwnerDrawFixed; //指定控件元素为自定义绘制2、定义控件的单击事件,弹出颜色框
protected override void OnClick(EventArgs e) ...{ ColorBoxForm a = new ColorBoxForm(); a.SelectColor += new ColorBoxForm.MouseSelectColor(ColorForm_SelectColor); //代码中省略了命名空间 a.Show(this); base.OnClick(e); }3、自定义绘制下拉元素(可省略)
protected override void OnDrawItem(DrawItemEventArgs e) ...{ base.OnDrawItem(e); } 以上控件制作完成,得到效果如下: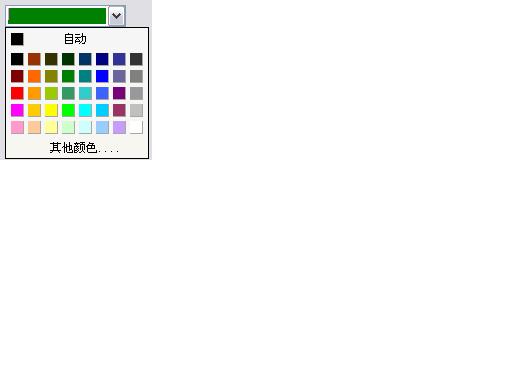


 217
217

 被折叠的 条评论
为什么被折叠?
被折叠的 条评论
为什么被折叠?
 到【灌水乐园】发言


