


一、编译
首先设置mex -setup,然后进行文件的编译,有现成的.m类似脚本的代码如下:
mex -g 命令开启在vs下可以调试,否则不能调试。
% This cppmake.m is for MATLAB
% Function: compile c++ files which rely on OpenCV for Matlab using mex
% Modified by Jessica
% Date    : 2014-9-10
% HomePage: http://www.cnblogs.com/lukylu/
% Email   : wanglu@innomotion.biz

% Matlab and C++ mixed programming(dependent on opencv library)
% First step(before exeuting this program): use "mex -setup" to choose your c/c++ compiler
clear all;

% Get the architecture of this computer
is_64bit = strcmp(computer,'MACI64') || strcmp(computer,'GLNXA64') || strcmp(computer,'PCWIN64');


%----------------------------------------------------------------------------------------------
%% The configuration of compiler
% You need to modify this configuration according to your own path of OpenCV
% Notice: if your system is 64bit, your OpenCV must be 64bit!
out_dir='./';
CPPFLAGS = ' -O -DNDEBUG -I.\ -IE:\opencv\build\include -IE:\opencv\build\include\opencv2 -IE:\opencv\build\include\opencv'; % your OpenCV "include" path
LDFLAGS = ' -LE:\opencv\build\x64\vc12\lib';                       % your OpenCV "lib" path
LIBS = ' -lopencv_calib3d249d -lopencv_contrib249d -lopencv_core249d -lopencv_features2d249d -lopencv_flann249d -lopencv_gpu249d -lopencv_highgui249d -lopencv_imgproc249d -lopencv_legacy249d -lopencv_ml249d -lopencv_nonfree249d -lopencv_objdetect249d -lopencv_photo249d -lopencv_stitching249d -lopencv_ts249d -lopencv_video249d -lopencv_videostab249d';
%LIBS = ' -lopencv_calib3d249 -lopencv_contrib249 -lopencvclear_core249 -lopencv_features2d249 -lopencv_flann249 -lopencv_gpu249 -lopencv_highgui249 -lopencv_imgproc249 -lopencv_legacy249 -lopencv_ml249 -lopencv_nonfree249 -lopencv_objdetect249 -lopencv_photo249 -lopencv_stitching249 -lopencv_ts249 -lopencv_video249 -lopencv_videostab249';
if is_64bit
    CPPFLAGS = [CPPFLAGS ' -largeArrayDims'];
end

% add your files here!!
compile_files = {
    %the list of your code files which need to be compiled
    '-g class_interface_mex.cpp codebook.cpp BGSub.cpp'
    };
%----------------------------------------------------------------------------------------------

%----------------------------------------------------------------------------------------------
%% compiling
for k = 1 : length(compile_files)
    str = compile_files{k};
    fprintf('compilation of: %s\n', str);
    str = [str ' -outdir ' out_dir CPPFLAGS LDFLAGS LIBS];
    args = regexp(str, '\s+', 'split');
    mex(args{:});
end
fprintf('Congratulations, compilation successful!!!\n');
%----------------------------------------------------------------------------------------------
最后形成的命令为:
>> mex -g class_interface_mex.cpp codebook.cpp BGSub.cpp -IE:\opencv\build\include -IE:\op-encv\build\include\opencv2 -IE:\opencv\build\include\opencv -LE:\opencv\build\x64\vc12\lib -lopencv_core249 -lopencv_imgproc249 -lopencv_highgui249-I为头文件的地址,-L为lib的地址,-l为需要的lib文件名字。
注意库文件一定要么都是32位的要么都是64位的,混合的话会报错。
2、mxarray与mat的转换
二种方法,法一:
由于matlab是由列先,而opencv是行先,且matlab数据会有不同,所以需要如下转换:
matlab中调用的函数
function [cv_img, dim, depth, width_step] = convert_to_cv(img)

% Exchange rows and columns (handles 3D cases as well)
img2 = permute( img(:,end:-1:1,:), [2 1 3] );

dim = [size(img2,1), size(img2,2)];

% Convert double precision to single precision if necessary
if( isa(img2, 'double') )
    img2 = single(img2);
end

% Determine image depth
if( ndims(img2) == 3 && size(img2,3) == 3 )
    depth = 3;
else
    depth = 1;
end

% Handle color images
if(depth == 3 )
    % Switch from RGB to BGR
    img2(:,:,[3 2 1]) = img2;

    % Interleave the colors
    img2 = reshape( permute(img2, [3 1 2]), [size(img2,1)*size(img2,3) size(img2,2)] );
end

% Pad the image
width_step = size(img2,1) + mod( size(img2,1), 4 );
img3 = uint8(zeros(width_step, size(img2,2)));
img3(1:size(img2,1), 1:size(img2,2)) = img2;

cv_img = img3;

% Output to openCV
%cv_display(cv_img, dim, depth, width_step);
上面函数开始的时候将row和col交换了,这样就使得其先为行再为列
c++的mexFunction中需要调用的函数
Mat mxarray2mat(const mxArray * in_image, const mxArray * in_dimensions, const mxArray * in_depth, const mxArray * in_width_step)
{
    bool intInput = true;


    if (mxIsUint8(in_image))
        intInput = true;
    else if (mxIsSingle(in_image))
        intInput = false;
    else
        mexErrMsgTxt("Input should be a matrix of uint8 or single precision floats.");

    if (mxGetNumberOfElements(in_dimensions) != 2)
        mexErrMsgTxt("Dimension vector should contain two elements: [width, height].");

    char *matlabImage = (char *)mxGetData(in_image);

    double *imgSize = mxGetPr(in_dimensions);
    size_t width = (size_t)imgSize[0];
    size_t height = (size_t)imgSize[1];

    size_t depth = (size_t)*mxGetPr(in_depth);
    size_t widthStep = (size_t)*mxGetPr(in_width_step) * (intInput ? sizeof(unsigned char) : sizeof(float));

    CvSize size;
    size.height = height;
    size.width = width;

    IplImage *iplImage = cvCreateImageHeader(size, intInput ? IPL_DEPTH_8U : IPL_DEPTH_32F, depth);
    iplImage->imageData = matlabImage;
    iplImage->widthStep = widthStep;
    iplImage->imageDataOrigin = iplImage->imageData;

    /* Show the openCV image */
    Mat img(iplImage);
    return img;
}
然后直接在mexFunction中使用:
#define IN_IMAGE prhs[2]
#define IN_DIMENSIONS prhs[3]
#define IN_DEPTH prhs[4]
#define IN_WIDTH_STEP prhs[5]

Mat img = mxarray2mat(IN_IMAGE, IN_DIMENSIONS, IN_DEPTH, IN_WIDTH_STEP);
法二:
利用MxArray类来实现,非常方便:
MxArray实现了从matlab的格式到opencv格式的转换,十分方便,其中只需要里面的src/MxArray.cpp和include/MxArray.hpp加入自己的工程即可。
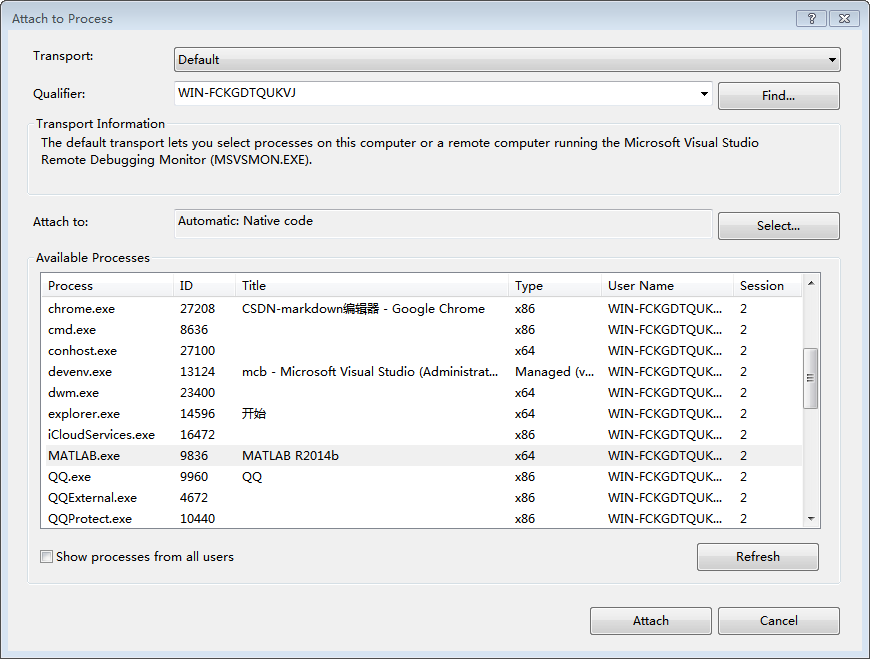
3、调试
打开matlab,然后打开vs,打开mexFunction所在的cpp文件,并在Debug->attach to process中选中matlab,然后在cpp中加上断点,在matlab中运行即可自动到达vs中进行调试。注意前面编译的时候mex一定要加-g参数。


 617
617

 被折叠的 条评论
为什么被折叠?
被折叠的 条评论
为什么被折叠?
 到【灌水乐园】发言


