


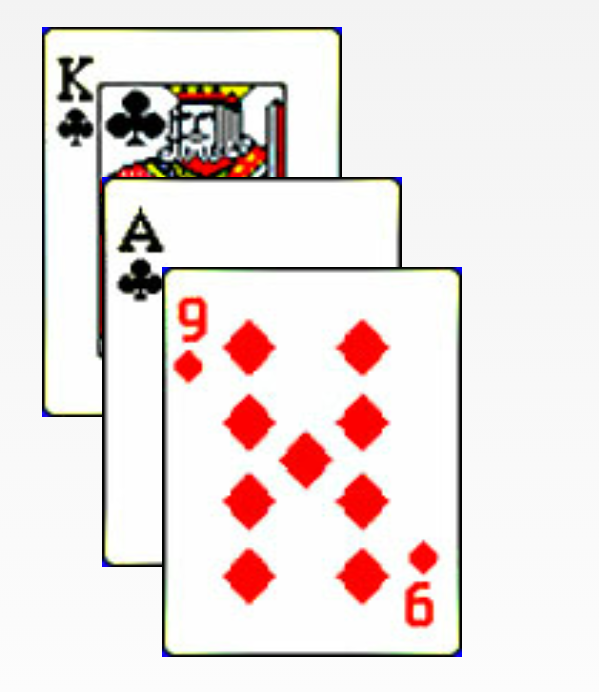
现在我们需要做一个扑克牌排列的布局,如下图:
可能最容易想到的布局方式就是使用relativelayout来完成,然后对其margin进行调整。但是这样一来,布局将显得非常繁琐。想想如果是一套扑克牌,54张呢?那得计算多少次啊!
这里就引出了本篇文章的主题,自定义ViewGroup,其实是有自定义的ViewGroup完全可以实现上面的功能,且可以对各个子View(即每张扑克牌)进行统一管理。
在实现自定义ViewGroup之前,我们先要了解一下其原理:
绘制布局由两个遍历组成,测量过程和布局过程,测量过程由measure函数完成,该方法会从上而下的遍历视图树,在递归遍历的过程中,每个视图都会向下传递尺寸和规格,当遍历完成,每个视图都保存了各自的尺寸;布局过程则由layout函数完成,该方法也会至上而下遍历,在遍历过程中,每个父视图通过测量过程的结果定位所有子视图的位置信息。
在自定义ViewGroup过程中,这两个过程分别在onMeasure和onLayout中完成。
下面来看代码,代码是最好的老师:
首先是布局文件
//定义命名空间,后面是程序的包名
    xmlns:daven="http://schemas.android.com/apk/res/com.example.hello"

     <com.example.hello.CascadeLayout
          android:layout_width="match_parent"
          android:layout_height="match_parent"
          android:layout_marginTop="20dp"
          daven:horizontal_spacing="20dp"
          daven:vertical_spacing="30dp">

         <View
             android:layout_width="100dp"
             android:layout_height="130dp"
             daven:layout_vertical_spacing="50dp"
             android:background="@drawable/poker_39"/>

         <View
             android:layout_width="100dp"
             android:layout_height="130dp"
             android:background="@drawable/poker_40"/>

         <View
             android:layout_width="100dp"
             android:layout_height="130dp"
             android:background="@drawable/poker_48"/>

     </com.example.hello.CascadeLayout>
自定义属性,首先需要在attr.xml中什么属性:
    <declare-styleable name="CascadeLayout">
        <attr name="horizontal_spacing" format="dimension"/>
        <attr name="vertical_spacing" format="dimension"/>
    </declare-styleable>

    <declare-styleable name="CascadeLayout_LayoutParams">
        <attr name="layout_vertical_spacing" format="dimension"/>
    </declare-styleable>
这些自定义属性可以在自定义ViewGroup的构造函数中通过context.obtainStyledAttributes(attrs, R.styleable.CascadeLayout)来获取。
然后下面就是完整的自定义ViewGroup的过程,这里我们当然是要继承ViewGroup来完成,我们将其命名为CascadeLayout,实际上我们常用的布局如relativelayout, linearlayout等都是继承ViewGroup完成的。
package com.example.hello;

import android.content.Context;
import android.content.res.TypedArray;
import android.util.AttributeSet;
import android.view.View;
import android.view.ViewGroup;

public class CascadeLayout extends ViewGroup {

    private int mHorizontalSpacing;
    private int mVerticalSpacing;

    public CascadeLayout(Context context) {
        super(context);
    }

    public CascadeLayout(Context context, AttributeSet attrs) {
        super(context, attrs);
        TypedArray a = context.obtainStyledAttributes(attrs, R.styleable.CascadeLayout);

        mHorizontalSpacing = a.getDimensionPixelSize(R.styleable.CascadeLayout_horizontal_spacing, 30);
        mVerticalSpacing = a.getDimensionPixelSize(R.styleable.CascadeLayout_vertical_spacing, 30);

        a.recycle();
    }

    public static class LayoutParams extends ViewGroup.LayoutParams{
        int top;
        int left;
        public int verticalSpacing;

        public LayoutParams(Context c, AttributeSet attrs) {
            super(c, attrs);
            TypedArray a = c.obtainStyledAttributes(attrs,R.styleable.CascadeLayout_LayoutParams);
            verticalSpacing = a.getDimensionPixelSize(R.styleable.CascadeLayout_LayoutParams_layout_vertical_spacing,-1);
            a.recycle();
        }

        public LayoutParams(int w, int h) {
            super(w, h);
        }
    }

    @Override
    protected boolean checkLayoutParams(ViewGroup.LayoutParams p){
        return p instanceof LayoutParams;
    }

    @Override
    protected LayoutParams generateDefaultLayoutParams(){
        return new LayoutParams(LayoutParams.WRAP_CONTENT,
                LayoutParams.WRAP_CONTENT);
    }

    @Override
    public LayoutParams generateLayoutParams(AttributeSet attrs){
        return new LayoutParams(getContext(), attrs);

    }


    @Override
    protected void onMeasure(int widthMeasureSpec, int heightMeasureSpec) {
        int width = getPaddingLeft();
        int height = getPaddingTop();
        int verticalSpacing;

        final int count = getChildCount();
        for( int i=0; i<count; i++){
            verticalSpacing = mVerticalSpacing;
            View child = getChildAt(i);
            measureChild(child, widthMeasureSpec, heightMeasureSpec);

            LayoutParams lp = (LayoutParams) child.getLayoutParams();
            width = getPaddingLeft() + mHorizontalSpacing * i;

            lp.top = width;
            lp.left = height;

            if( lp.verticalSpacing >= 0){
                verticalSpacing = lp.verticalSpacing;
            }

            width += child.getMeasuredWidth();
            height += verticalSpacing;
        }

        width += getPaddingRight();
        height += getChildAt(getChildCount() - 1).getMeasuredHeight()+ getPaddingBottom();

        setMeasuredDimension(resolveSize(width, widthMeasureSpec),
                resolveSize(height, heightMeasureSpec));
    }

    @Override
    protected void onLayout(boolean changed, int l, int t, int r, int b) {

        final int count = getChildCount();

        for ( int i = 0; i<count; i++){
            View child = getChildAt(i);
            LayoutParams lp = (LayoutParams) child.getLayoutParams();

            child.layout(lp.top, lp.left,
                    lp.top + child.getMeasuredWidth(),
                    lp.left + child.getMeasuredHeight());
        }
    }
}
需要注意的是,如果要使得自定义的LayoutParams,需要重写方法checkLayoutParams、generateDefaultLayoutParams以及generateLayoutParams,不过基本上写法都一样。
为什么要自定义ViewGroup?
1. 在不同的Activity中复用该视图,更容易维护
2. 开发者可以使用自定义属性来定制ViewGroup中子视图的位置
3. 布局文件更加简明,更容易理解
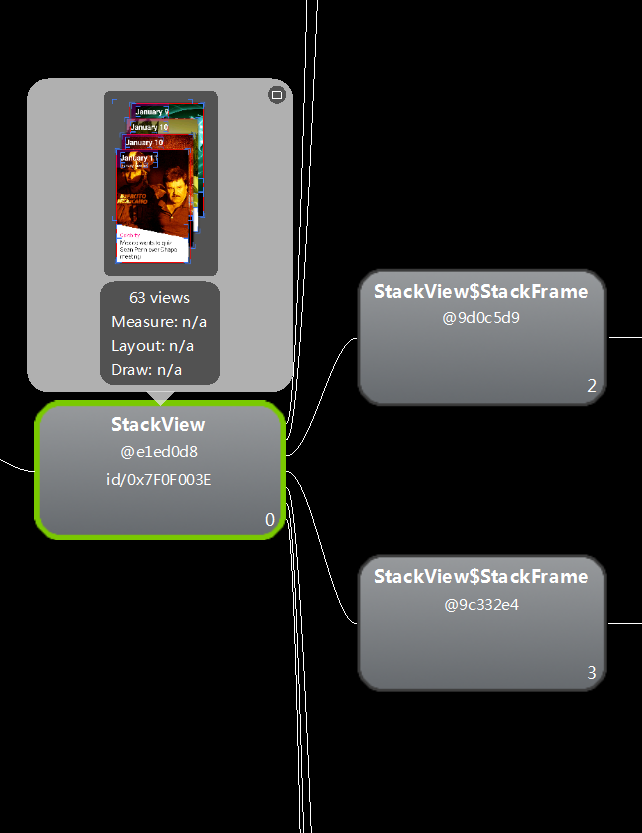
其实在应用“雅虎每日新闻News Digest”中完全有使用到类似的控件,只不过人家把名字改了!

该应用真的效果很不错,这个桌面wiget也是非常不错的。大家看看布局层次图,这里他取名字为StackView,实际上还是ViewGroup,不过他的功能比上面的CascadeLayout更加强大。
该博文参考了50 Android Hacks!


 647
647

 被折叠的 条评论
为什么被折叠?
被折叠的 条评论
为什么被折叠?
 到【灌水乐园】发言


