


问题的起源:
一个客户在做Dropship Sales Order 的时候, 首先创建了PO, 然后进行PO receipt; 完成之后系统自动把item issue 出去了; 这时候在MMT 表中应该有两条记录:

但是客户的MMT 里面只有PO Receipt 一条, 缺少Sales order issue 这一条.
检查过客户的MTI , MMTT 和MMT , 确实缺少这条记录, 这时我们需要为客户补一条MTI 的记录.
模拟测试:
按照dropship sales order的步骤, 自己做一次这样的流程. 在PO receipt 的时候拿到INV log (包含 RCV log).
我们可以发现给RTI MTI MMTT MMT MR 所加的trigger 记录下了这些表insert delete 的记录
Receiving Transaction Processor (RTP)
- YU_RTI_INSERT_DELETE: ...........INSERTING..........
- YU_MMTT_INSERT_DELETE: ...........INSERTING..........
- YU_MMT_INSERT_DELETE: ...........INSERTING..........
- YU_MR_INSERT_DELETE: ...........INSERTING..........
- YU_MTI_INSERT_DELETE: ...........INSERTING..........
- YU_MMTT_INSERT_DELETE: ...........DELETING..........
- YU_RTI_INSERT_DELETE: ...........DELETING..........
INV transaction manager
- YU_MMTT_INSERT_DELETE: ...........INSERTING..........
- YU_MR_INSERT_DELETE: ...........DELETING..........
- YU_MMT_INSERT_DELETE: ...........INSERTING..........
- YU_MMTT_INSERT_DELETE: ...........DELETING..........
- YU_MTI_INSERT_DELETE: ...........DELETING..........
在RTP 中首先插入了MMTT, 接着插入了MMT, 这是PO receipt 在给MMT 插入PO receipt 的记录.
接着又插入了一条MTI 的记录, 这条记录就是Sales Order Issue的记录了.
接下来INV transaction manager 就会去处理MTI 中的这条记录.
那么我们去看MTI 的这条记录里面所包含的内容, 除了包含常见的 item, transaction type 之类的, 还包含下面这样一个账目信息:
,DISTRIBUTION_ACCOUNT_ID = 12952
,DST_SEGMENT1 = 01
,DST_SEGMENT2 = 520
,DST_SEGMENT3 = 5110
,DST_SEGMENT4 = 0000
,DST_SEGMENT5 = 000
这个账目信息代表的是什么意思呢? 这个DISTRIBUTION_ACCOUNT_ID 又是怎么来的呢?
DISTRIBUTION_ACCOUNT_ID:
其实这个account id 是一个组合信息, 我们可以在Misc transaction form 看到这个组合信息的含义.
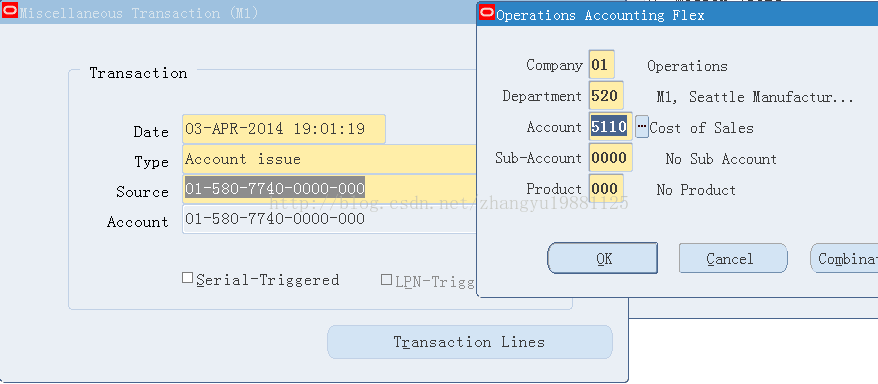
比如我在做sales order issue的时候, 账号信息是01-520-5110-0000-000, 我们就可以在这个form 上看到每一段所代表的含义.
这个账目是与OU, Org, Transaction Type 等等都有关系的.
这个账目是与OU, Org, Transaction Type 等等都有关系的.
而这5段信息就对应了插入MTI 里面的 DST_SEGMENT1 等等5个字段的数值.
在最后插入的MMT 中, 存储的是DISTRIBUTION_ACCOUNT_ID 这个字段, 而不是很长的一个字段组合. 那么DISTRIBUTION_ACCOUNT_ID 又是怎么得来的呢?
我们可以从form 上找出来: help -> Diagnostics -> Examine

这个value 的值代表的就是DISTRIBUTION_ACCOUNT_ID;
实际上, 这个DISTRIBUTION_ACCOUNT_ID = 12952 和Account = 01-520-5110-0000-000 是在一个view 里面定义的. 分别可以用下面的两条SQL 语句查出他们的关系:
SELECT
*
FROM
gl_code_combinations_kfv
WHERE
code_combination_id =
12952
;
SELECT
*
FROM
gl_code_combinations_kfv
WHERE
concatenated_segments
LIKE
(
'01-520-7740%'
);
在给客户提供脚本插入MTI 的时候, DISTRIBUTION_ACCOUNT_ID 这个字段是必需的, 但是需要客户自己去填. 因为客户的账目信息和我们测试环境上的不一样.


 460
460


 被折叠的 条评论
为什么被折叠?
被折叠的 条评论
为什么被折叠?
 到【灌水乐园】发言


