


由于某一些原因,我们需要开发一个浏览器插件来拯救世界,那么就开始吧。
这边我们选择的宇宙运行速度最快的FireFox= =Chrome用户靠边啦靠边。
获取SDK
开发插件最主要的是需要获取开发者工具,Mozilla官方推荐使用的叫做Add-OnSDK.以下内容均可在官方文档中查询到。
开发Add-on SDK,你需要
* Python2.x.需要注意的是在任何平台都不支持Python3.x
* FireFox浏览器
* SDK点击我下载SDK的最新稳定版本
另外,你也能从他的GitHub repository库中找到最新的开发版本
安装到Mac OS X/Linux
无论你选择哪个方式都要解压缩文件的内容作为根路径,并通过shell/命令提示符切换到SDK的根目录下。例如:
- tar -xf addon-sdk.tar.gz
- cd addon-sdk
如果你是一个Bash1用户,继续运行(大多数情况下是的)
- source bin/activate
如果你是一个非bash用户
- bash bin/activate
现在你应该看见下面这个东西
- localhost:addon-sdk-1.17 wutianzhe$ source bin/activate
Welcome to the Add-on SDK. For the docs, visit https://addons.mozilla.org/en-US/developers/docs/sdk/latest/
并且命令提示符现在应该有一个包含SDK的根目录的新前缀
(addon-sdk-1.17)localhost:addon-sdk-1.17 wutianzhe$
安装到Windows
同样解压缩文件,并通过命令符进入到SDK根目录下,例如:
7z.exe x addon-sdk.zip
cd addon-sdk
接着运行激活命令:
bin\activate
同样可以看到命令提示符现在应该有一个包含SDK的根目录名称的新的前缀:
(C:\Users\mozilla\sdk\addon-sdk) C:\Users\Work\sdk\addon-sdk>
SDK的虚拟环境
当命令提示符出现新的前缀表明你的已经搭建好了SDK的运行环境,那么你就可以使用Add-on SDK来开发的命令行工具。
任何时候,你都可以通过运行 deactivate 命令停用虚拟环境.
配置好的虚拟环境是特定于这个特定的命令提示符。如果您关闭命令提示符, 它会关闭运行环境,你需要source bin/activate或 bin\activate 在一个新的命令提示符重新激活它。如果你打开一个新命令提示符,SDK将不会被激活在新的提示。
可以将SDK的多个副本拷贝在磁盘上的不同位置,并在它们之间切换,甚至可以让他们同时激活运行在不同的命令提示符。
当然你也可以不用每一次都手动激活它。
制作启动项
所有 activate 的作用是通过设置环境变量,使位于顶层 bin 目录下的脚本 位于当前命令符下,制作的启动项 ,通过永久环境中的这些变量设置,以便每一个新的命令提示符下都能读取它们。那么就不需要每次都去打开新的命令提示符来激活 activate 。
因为变量精确设置可能随SDK发布新版本的变化,所以最好是指激活脚本来确定哪些变量需要设置。激活使用不同的脚本设置bash环境不同的变量(Linux和MAC OS X和Windows环境)。
Windows
在Windows上,使用 bin\activate\activate.bat批处理脚本,也可以使用命令行setx工具或控制面板激活永久使用。
Linux/Mac OS X
在 Linux 和 Mac OS X,使用source bin/activate/activate bash 脚本, 你可以 ~/.bashrc ( Linux) 或~/.bashprofile (Mac OS X) 来激活。
检查完整性
使用提示符运行
- cfx
他会产生下面的信息(高能预警,大量使用信息可以直接跳过)
Usage: cfx [options] command [command-specific options]
Supported Commands:
init - create a sample addon in an empty directory
test - run tests
run - run program
xpi - generate an xpiInternal Commands:
testcfx - test the cfx tool
testex - test all example code
testpkgs - test all installed packages
testall - test whole environmentExperimental and internal commands and options are not supported and may be
changed or removed in the future.Options:
–version show program’s version number and exit
-h, –help show this help message and exit
-v, –verbose enable lots of outputSupported Command-Specific Options:
-b BINARY, –binary=BINARY
path to app binary (run, test, testall, testex,
testpkgs)
–binary-args=CMDARGS
additional arguments passed to the binary (run, test)
–dependencies include tests for all deps (test, testall, testex,
testpkgs)
–extra-packages=EXTRA_PACKAGES
extra packages to include, comma-separated. Default is
‘addon-sdk’. (run, test, testall, testcfx, testex,
testpkgs, xpi)
-f FILENAME[:TESTNAME], –filter=FILENAME[:TESTNAME]
only run tests whose filenames match FILENAME and
optionally match TESTNAME, both regexps (test,
testaddons, testall, testex, testpkgs)
-g CONFIG, –use-config=CONFIG
use named config from local.json (run, test, testall,
testex, testpkgs, xpi)
-p PROFILEDIR, –profiledir=PROFILEDIR
profile directory to pass to app (run, test, testall,
testex, testpkgs)
–package-path=PACKAGEPATH
extra directories for package search (run, test, xpi)
–parseable display test output in a parseable format (run, test,
testaddons, testall, testex, testpkgs)
–pkgdir=PKGDIR package dir containing package.json; default is
current directory (run, test, xpi)
–static-args=STATIC_ARGS
extra harness options as JSON (run, xpi)
–templatedir=TEMPLATEDIR
XULRunner app/ext. template (run, xpi)
–times=ITERATIONS number of times to run tests (test, testall, testex,
testpkgs)
–update-link=UPDATE_LINK
generate update.rdf (xpi)
–update-url=UPDATE_URL
update URL in install.rdf (xpi)Experimental Command-Specific Options:
-a APP, –app=APP app to run: firefox (default), fennec, fennec-on-
device, xulrunner or thunderbird (run, test, testall,
testex, testpkgs)
–abort-on-missing-module
Abort if required module is missing (run, test,
testpkgs, xpi)
–check-memory attempts to detect leaked compartments after a test
run (test, testaddons, testall, testpkgs)
–force-mobile Force compatibility with Firefox Mobile (run, test,
testall, xpi)
–force-use-bundled-sdk
When –strip-sdk isn’t passed, force using sdk modules
shipped in the xpi instead of firefox ones (run, test,
testall, testex, testpkgs, xpi)
–harness-option=KEY=VALUE
Extra properties added to harness-options.json (xpi)
–manifest-overload=MANIFEST_OVERLOAD
JSON file to overload package.json properties (xpi)
–mobile-app=MOBILE_APP_NAME
Name of your Android application to use. Possible
values: ‘firefox’, ‘firefox_beta’, ‘fennec_aurora’,
‘fennec’ (for nightly). (run, test, testall)
–no-run Instead of launching the application, just show the
command for doing so. Use this to launch the
application in a debugger like gdb. (run, test)
–no-strip-xpi retain unused modules in XPI (xpi)
-o, –overload-modules
Overload JS modules integrated into Firefox with the
one from your SDK repository (run, test, testall,
testex, testpkgs)
–output-file=OUTPUT_FILE
Where to put the finished .xpi (xpi)
–stop-on-error Stop running tests after the first failure (test,
testex, testpkgs)
–strip-sdk Do not ship SDK modules in the xpi (run, test,
testall, testex, testpkgs, xpi)Internal Command-Specific Options:
–addons=ADDONS paths of addons to install, comma-separated (run,
test, testall, testex, testpkgs)
–e10s enable out-of-process Jetpacks (run, test, testex,
testpkgs)
–keydir=KEYDIR obsolete, ignored (run, test, testall, testex,
testpkgs, xpi)
–logfile=LOGFILE log console output to file (run, test, testex,
testpkgs)
–profile-memory=PROFILEMEMORY
profile memory usage (default is false) (test,
testall, testex, testpkgs)
–test-runner-pkg=TEST_RUNNER_PKG
name of package containing test runner program
(default is test-harness) (test, testall, testex,
testpkgs)
这是 CFX命令行程序, 是主界面加载项的SDK,可以使用它来启动Firefox和测试插件,打包附加分发,查看文档和运行单元测试
走马观花
接下来将要展现如何使用SDK开发一个简单的扩展
初始化
在命令行窗口中船舰一个新的文件夹,并且使用cfx init指令
mkdir addon-test
cd addon-test
cfx init
应该会出现下面的东西
- lib directory created
- data directory created
- test directory created
- doc directory created
- README.md written
- package.json written
- test/test-main.js written
- lib/main.js written
- doc/main.md written
Your sample add-on is now ready for testing:
try “cfx test” and then “cfx run”. Have fun!”
竟然没有字符画,简直太让人伤心。最起码出现一只小狐狸
创建新的扩展
下面的扩展内容均基于firefox29.0版本之上。
打开上一步中创建好的文件夹“lib”中的main.js文件,键入如下代码
//require SDK
var buttons = require('sdk/ui/button/action');
var tabs = require("sdk/tabs");

//action button
var button = buttons.ActionButton({
    id: "bolg-link",
    label: "Visit MyBlog",
    icon: {
        "16": "./icon/icon-16.png",
        "32": "./icon/icon-32.png",
        "64": "./icon/icon-64.png"
    },
    onClick: handleClick
});

function handleClick(state) {
    tabs.open("http://www.mozilla.org/");
}
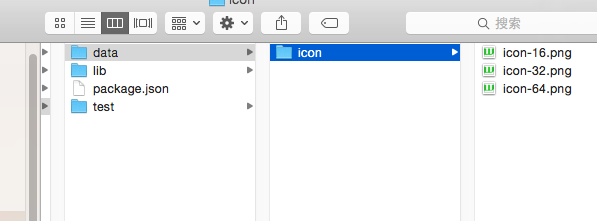
并且在你的data文件夹里新建一个icon文件夹,丢入三个图标
然后回到我们的命令行,输入以下指令
cfx run
这个 SDK 命令将会启动一个安装了您的扩展的 新的 Firefox 实例。在 Firefox 启动后,您将会在浏览器的右上角看到一个图标。点击此图标,将会打开一个新的标签,并载入http://www.mozilla.org/ 。
这就是这个扩展的功能。它使用了两个 SDK 模块: action button 模块,它可以让您在浏览器中添加按钮,以及 tabs 模块,它可以让您执行一些简单的标签操作。在这个实例中,我们创建了一个带有绿色W图标的按钮,并且添加了一个点击事件处理使得在新标签中加载 Mozilla 主页。
你也可以自行更改超链接,来实现其它页面的跳转
打包扩展
在您结束开发扩展并且准备分发它的时候,您将需要打包它为 XPI 文件。XPI 文件是 Firefox 扩展的安装文件格式。您可以自行分发 XPI 文件或者把它发布到 https://addons.mozilla.org 以便其他用户可以下载并且安装。
您可以在扩展所在的文件夹中执行 cfx xpi 以创建一个 XPI:
cfx xpi
----你会看见下面的消息
Exporting extension to addon-test.xpi
为了测试生成的 XPI 是否正常工作,您可以尝试在您的 Firefox 中安装此 XPI 文件。您可以在 Firefox 中使用快捷键 Ctrl+O (Mac上 Cmd+O ), 或者在 Firefox 的 “文件” 菜单中选择 “打开”菜单项。这将出现一个文件选择对话框:找到 “my-addon.xpi” 文件,打开它并且遵循出现的提示以便安装它。
回顾
今次,我们主要使用了三个命令,创建并且打包了一个扩展
- cfx init 初始化一个空的扩展模版
- cfx run 运行一个带有扩展的Firefox例子
- cfx xpi 打包成一个可发布的文件
-
好的,今天就到这里为止
- bash shell是最常用的一种shell, 是大多数Linux发行版默认的shell ↩


 2899
2899

 被折叠的 条评论
为什么被折叠?
被折叠的 条评论
为什么被折叠?
 到【灌水乐园】发言


