


小编也是忙里偷闲的学会java,用吃饭和睡觉前的时间看完了一个Mybatis的介绍,手痒痒的就练了练,学习的时间也不长,两天时间搭了一个框架,分享给大家。
MyBatis 是支持普通 SQL查询,存储过程和高级映射的优秀持久层框架。MyBatis 消除了几乎所有的JDBC代码和参数的手工设置以及结果集的检索。MyBatis 使用简单的 XML或注解用于配置和原始映射,将接口和 Java 的POJOs(Plain Old Java Objects,普通的 Java对象)映射成数据库中的记录。之前学过了Hibernate,最近抽空学习了一下Mybatis,在两者直接做了简单的对比。
【Hibernate与Mybatis简单对比】
1.从查询语句上的区别。
之前用Hibernate开发,都是用封装好的语句,完全没有sql的影子,都是调用的方法。但是如果是一些稍微复杂的sql,Mybatis会是一个好的选择。所以,从查询效率上来说,对于简单的查询,建议用Hibernate封装好的,这样 可以节省很多时间,如果你不建议会返回全部字段的话。。那么大一些的项目,或许会用到复杂的sql语句,Mybatis动手写还调整方便,看着也知道自己写的是个啥,不错的选择。
2.从对象管理机制角度考虑。
用Hibernate 是完整的对象/关系映射,它提供了对象状态管理,使开发者不再需要理会底层数据库系统的细节。这样就是面向对象的方法把数据持久化到数据库中,不用管数据库里面的字段之类的内容。Hibernate也可以自己写SQL来指定需要查询的字段,但这样就破坏了Hibernate开发的简洁性。而Mybatis的SQL是手动编写的,所以可以按需求指定查询的字段。
resultMap是MyBatis中最强大的元素,你可以比使用JDBC调用结果集省掉90%的代码。也可以让你做许多JDBC不支持的事。事实上,要写一个等同类似与交互的映射的复杂的语句。可能要上千行的代码。ResultMap的目的,就是这样简单的语句而不需要多余的结果映射。
3.缓存机制。
Hibernate中提供了两级Cache,第一级别的缓存是Session级别的缓存,它是属于事务范围的缓存。这一级别的缓存由hibernate管理的,一般情况下无需进行干预;第二级别的缓存是SessionFactory级别的缓存,它是属于进程范围或群集范围的缓存。这一级别的缓存可以进行配置和更改,并且可以动态加载和卸载,属于多事务级别,要防止事务并发性。缓存是以map的形式进行存储的(key-id,value-object)。
在Mybatis中,一级缓存是基于 PerpetualCache(mybatis自带)的 HashMap 本地缓存,作用范围为session,所以当session commit或close后,缓存就会被清空。二级缓存默认也是基于 PerpetualCache,但是可以为其制定存储源。一级缓存缓存的是SQL语句,而二级缓存缓存的是结果对象。
Hibernate的二级缓存配置在SessionFactory生成的配置文件中进行详细配置,然后再在具体的表-对象映射中配置是那种缓存。MyBatis的二级缓存配置都是在每个具体的表-对象映射中进行详细配置,这样针对不同的表可以自定义不同的缓存机制。
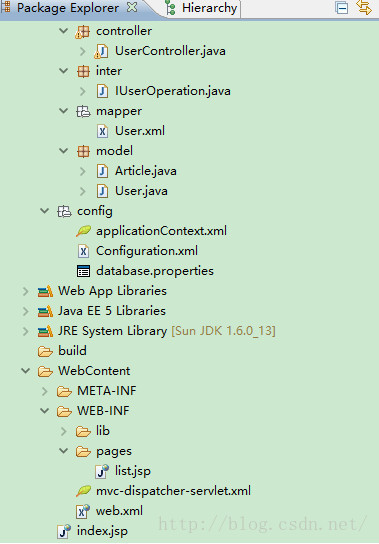
【JSP + Spring + Mybatis+Mysql 框架搭建】
1.建立一个web工程,引入需要的jar包,spring、mybatis和mysql
2.web.xml 配置
<span style="font-family:KaiTi_GB2312;font-size:18px;"><?xml version="1.0" encoding="UTF-8"?>
<web-app xmlns:xsi="http://www.w3.org/2001/XMLSchema-instance" xmlns="http://java.sun.com/xml/ns/javaee" xmlns:web="http://java.sun.com/xml/ns/javaee/web-app_2_5.xsd" xsi:schemaLocation="http://java.sun.com/xml/ns/javaee http://java.sun.com/xml/ns/javaee/web-app_2_5.xsd" id="WebApp_ID" version="2.5">
  <display-name>MyBatis_Spring3_Jsp</display-name>
  <welcome-file-list>
    <welcome-file>index.jsp</welcome-file>
  </welcome-file-list>
  <filter>
    <filter-name>encodingFilter</filter-name>
    <filter-class>org.springframework.web.filter.CharacterEncodingFilter</filter-class>
    <init-param>
      <param-name>encoding</param-name>
      <param-value>UTF-8</param-value>
    </init-param>
    <init-param>
      <param-name>forceEncoding</param-name>
      <param-value>true</param-value>
    </init-param>
  </filter>
  <filter-mapping>
    <filter-name>encodingFilter</filter-name>
    <url-pattern>/*</url-pattern>
  </filter-mapping>
  <context-param>
    <param-name>contextConfigLocation</param-name>
    <param-value>classpath*:config/applicationContext.xml</param-value>
  </context-param>
  <listener>
    <listener-class>org.springframework.web.context.ContextLoaderListener</listener-class>
  </listener>
  <listener>
    <listener-class>
			org.springframework.web.context.ContextCleanupListener</listener-class>
  </listener>
  <servlet>
    <servlet-name>mvc-dispatcher</servlet-name>
    <servlet-class>org.springframework.web.servlet.DispatcherServlet</servlet-class>
    <load-on-startup>1</load-on-startup>
  </servlet>
  <servlet-mapping>
    <servlet-name>mvc-dispatcher</servlet-name>
    <url-pattern>/</url-pattern>
  </servlet-mapping>

</web-app></span>
3. mvc-dispatcher-servlet.xml 文件配置
<span style="font-family:KaiTi_GB2312;font-size:18px;"><beans xmlns="http://www.springframework.org/schema/beans"
	xmlns:context="http://www.springframework.org/schema/context"
	xmlns:mvc="http://www.springframework.org/schema/mvc" xmlns:xsi="http://www.w3.org/2001/XMLSchema-instance"
	xsi:schemaLocation="
        http://www.springframework.org/schema/beans
        http://www.springframework.org/schema/beans/spring-beans-3.0.xsd
        http://www.springframework.org/schema/context
        http://www.springframework.org/schema/context/spring-context-3.0.xsd
        http://www.springframework.org/schema/mvc
        http://www.springframework.org/schema/mvc/spring-mvc-3.0.xsd">

	<context:component-scan base-package="com.yihaomen.controller" />
	<mvc:annotation-driven />

	<mvc:resources mapping="/static/**" location="/WEB-INF/static/"/>
    <mvc:default-servlet-handler/>

	<bean
		class="org.springframework.web.servlet.view.InternalResourceViewResolver">
		<property name="prefix">
			<value>/WEB-INF/pages/</value>
		</property>
		<property name="suffix">
			<value>.jsp</value>
		</property>
	</bean>

</beans>


</span>
4. spring applicationContext.XML文件配置
<span style="font-family:KaiTi_GB2312;font-size:18px;"><?xml version="1.0" encoding="utf-8"?>
<beans xmlns="http://www.springframework.org/schema/beans"
    xmlns:xsi="http://www.w3.org/2001/XMLSchema-instance"
    xmlns:aop="http://www.springframework.org/schema/aop"
    xmlns:tx="http://www.springframework.org/schema/tx"
    xmlns:context="http://www.springframework.org/schema/context"
    xmlns:p="http://www.springframework.org/schema/p"
    xsi:schemaLocation="
            http://www.springframework.org/schema/beans http://www.springframework.org/schema/beans/spring-beans-3.0.xsd
            http://www.springframework.org/schema/aop http://www.springframework.org/schema/aop/spring-aop-3.0.xsd
            http://www.springframework.org/schema/context http://www.springframework.org/schema/context/spring-context-3.0.xsd
            http://www.springframework.org/schema/jee http://www.springframework.org/schema/jee/spring-jee-3.0.xsd
            http://www.springframework.org/schema/tx http://www.springframework.org/schema/tx/spring-tx-3.0.xsd"
            default-autowire="byName" default-lazy-init="false">

 <!--本示例采用DBCP连接池,应预先把DBCP的jar包复制到工程的lib目录下。 -->
    <context:property-placeholder    location="classpath:/config/database.properties" />

    <bean id="dataSource" class="org.apache.commons.dbcp.BasicDataSource"
        destroy-method="close" p:driverClassName="com.mysql.jdbc.Driver"
        p:url="jdbc:mysql://127.0.0.1:3307/mybatis?characterEncoding=utf8"
        p:username="root" p:password="123456"
        p:maxActive="10" p:maxIdle="10">
    </bean>

    <bean id="transactionManager" class="org.springframework.jdbc.datasource.DataSourceTransactionManager">
      <property name="dataSource" ref="dataSource" />
    </bean>


  <bean id="sqlSessionFactory" class="org.mybatis.spring.SqlSessionFactoryBean">
     <!--dataSource属性指定要用到的连接池-->
     <property name="dataSource" ref="dataSource"/>
     <!--configLocation属性指定mybatis的核心配置文件-->
     <property name="configLocation" value="classpath:config/Configuration.xml" />
     <!-- 所有配置的mapper文件 -->
     <property name="mapperLocations" value="classpath*:com/yihaomen/mapper/*.xml" />
  </bean>

  <bean class="org.mybatis.spring.mapper.MapperScannerConfigurer">
     <property name="basePackage" value="com.yihaomen.inter" />
  </bean>
</beans> </span>
5. 添加Mybatis的配置文件configuration.xml
<span style="font-family:KaiTi_GB2312;font-size:18px;"><?xml version="1.0" encoding="UTF-8" ?>
<!DOCTYPE configuration PUBLIC "-//mybatis.org//DTD Config 3.0//EN"
"http://mybatis.org/dtd/mybatis-3-config.dtd">
<configuration>
    <typeAliases>
        <typeAlias alias="User" type="com.yihaomen.model.User"/>
        <typeAlias alias="Article" type="com.yihaomen.model.Article"/>
    </typeAliases>

	<mappers>
	    <mapper resource="com/yihaomen/mapper/User.xml"/>
	</mappers>


</configuration></span>
5. 编写controller 类,model类 等
UserController类:
<span style="font-family:KaiTi_GB2312;font-size:18px;">package com.yihaomen.controller;
import java.util.List;
import javax.servlet.http.HttpServletRequest;
import javax.servlet.http.HttpServletResponse;
import org.springframework.beans.factory.annotation.Autowired;
import org.springframework.stereotype.Controller;
import org.springframework.web.bind.annotation.RequestMapping;
import org.springframework.web.servlet.ModelAndView;
import com.yihaomen.inter.IUserOperation;
import com.yihaomen.model.Article;
import com.yihaomen.model.User;

@Controller
@RequestMapping("/article")
public class UserController {
    @Autowired
    IUserOperation userMapper;

    @RequestMapping("/list")
    public ModelAndView listall(HttpServletRequest request,HttpServletResponse response){
        List<Article> articles=userMapper.getUserArticles(1);
        ModelAndView mav=new ModelAndView("list");
        mav.addObject("articles",articles);
        return mav;
	}
}
</span>
<span style="font-family:KaiTi_GB2312;font-size:18px;">package com.yihaomen.inter;

import java.util.List;

import com.yihaomen.model.Article;
import com.yihaomen.model.User;

public interface IUserOperation {

	public User selectUserByID(int id);
	public List<User> selectUsers(String userName);
	public void addUser(User user);
	public void updateUser(User user);
	public void deleteUser(int id);

	public List<Article> getUserArticles(int id);

}
</span>
user.xml(sql写在这里)
<span style="font-family:KaiTi_GB2312;font-size:18px;"><?xml version="1.0" encoding="UTF-8" ?>
<!DOCTYPE mapper PUBLIC "-//mybatis.org//DTD Mapper 3.0//EN"
"http://mybatis.org/dtd/mybatis-3-mapper.dtd">

<mapper namespace="com.yihaomen.inter.IUserOperation">


	<!-- 为了返回list 类型而定义的returnMap -->
	<resultMap type="User" id="resultListUser">
        <id column="id" property="id" />
        <result column="userName" property="userName" />
        <result column="userAge" property="userAge" />
        <result column="userAddress" property="userAddress" />
    </resultMap>


	<select id="getUserArticles" parameterType="int" resultMap="resultUserArticleList">
	   select user.id,user.userName,user.userAddress,article.id aid,article.title,article.content from user,article
	          where user.id=article.userid and user.id=#{id}
	</select>


</mapper></span>
model类:
<span style="font-family:KaiTi_GB2312;font-size:18px;">package com.yihaomen.model;

public class Article {

	private int id;
	private User user;
	private String title;
	private String content;

	public int getId() {
		return id;
	}
	public void setId(int id) {
		this.id = id;
	}

	public User getUser() {
		return user;
	}
	public void setUser(User user) {
		this.user = user;
	}
	public String getTitle() {
		return title;
	}
	public void setTitle(String title) {
		this.title = title;
	}
	public String getContent() {
		return content;
	}
	public void setContent(String content) {
		this.content = content;
	}

}
</span>
6. JSP
<span style="font-family:KaiTi_GB2312;font-size:18px;"><%@ page language="java" contentType="text/html; charset=UTF-8"
pageEncoding="UTF-8"%>
<%@ taglib prefix="c" uri="http://java.sun.com/jsp/jstl/core"%>
<!DOCTYPE html PUBLIC "-//W3C//DTD HTML 4.01 Transitional//EN" "http://www.w3.org/TR/html4/loose.dtd">
<html>
<head>
<meta http-equiv="Content-Type" content="text/html; charset=UTF-8" />
<title>test</title>
</head>
<body>
<c:forEach items="${articles}" var="item">
${item.id }--${item.title }--${item.content }<br />
</c:forEach>
</body>
</html>
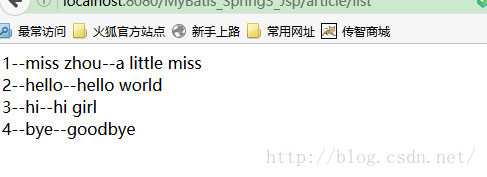
</span>运行效果:
【总结】
1)每个MyBatis应用程序主要都是使用SqlSessionFactory实例的,一个SqlSessionFactory实例可以通过SqlSessionFactoryBuilder获得。SqlSessionFactoryBuilder可以从一个xml配置文件或者一个预定义的配置类的实例获得。用xml文件构建SqlSessionFactory实例是非常简单的事情。
2)看再多的书,还是动手去做吧,这样理解的深刻。总有一天会熟悉它,时间的问题。


 572
572

 被折叠的 条评论
为什么被折叠?
被折叠的 条评论
为什么被折叠?
 到【灌水乐园】发言


