


 本文详细解读了Monkey事件源处理的整个流程,包括事件队列管理、事件翻译及事件源获取,揭示了如何将来自网络socket的命令转换为实际的Monkey事件,并通过实例分析了事件队列维护、事件翻译过程及事件源获取机制。
上一篇文章《Monkey源码分析之运行流程》给出了monkey运行的整个流程,让我们有一个概貌,那么往后的文章我们会尝试进一步的阐述相关的一些知识点。
这里先把整个monkey类的结构图给出来供大家参考,该图源自网上(我自己的backbook pro上没有安装OmniGraffle工具,55美金,不舍得,所以直接贴网上的)
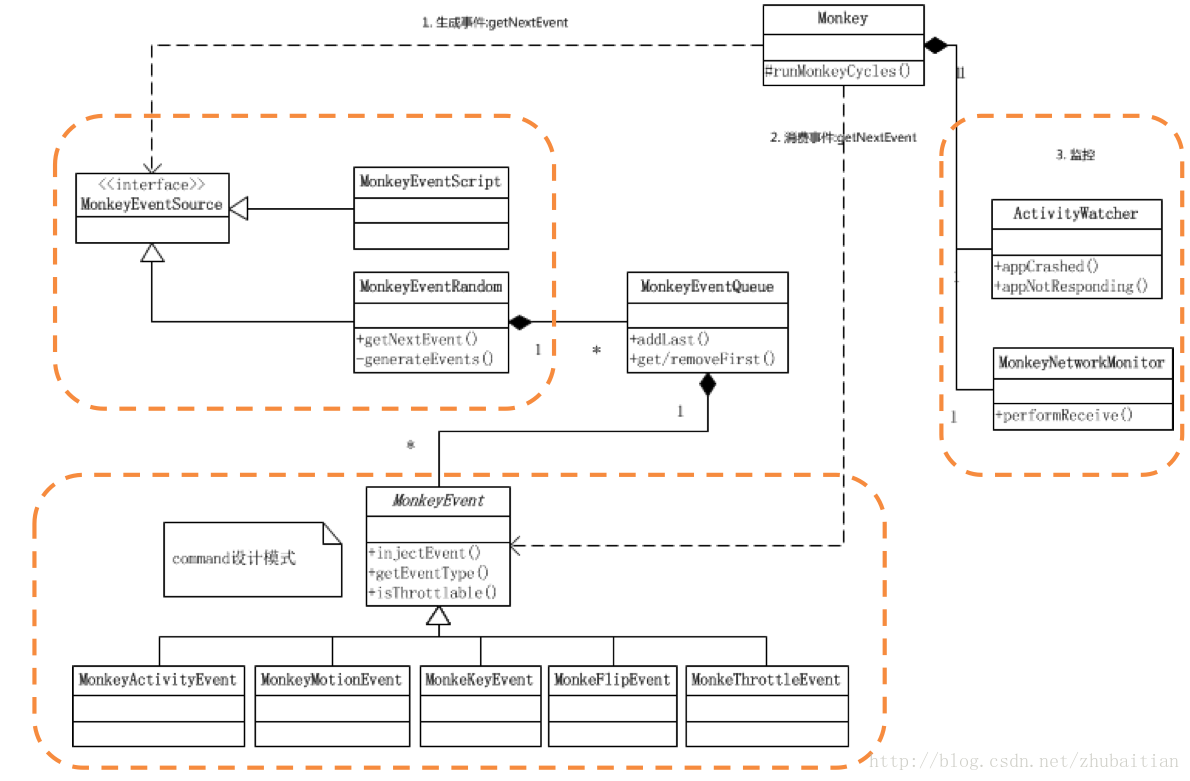
图中有几点需要注意下的:
- MonkeyEventScript应该是MonkeySourceScript
- MonkeyEventRandom应该是MonkeySourceRandom
- 这里没有列出其他源,比如我们今天描述的重点MonkeySourceNetwork,因为它不是由MonkeyEventQueque这个类维护的,但其维护的事件队列和MonkeyEventQueque一样都是继承于LinkedList的,所以大同小异
本文我们重点是以处理来来自网络sokcet也就是monkeyrunner的命令为例子来阐述事件源是怎么处理的,其他的源大同小异。
1. 事件队列维护者CommandQueque
在开始之前我们需要先去了解几个基础类,这样子我们才方便分析。
我们在获取了事件源之后,会把这些事件排队放入一个队列,然后其他地方就可以去把队列里面的事件取出来进一步进行处理了。那么这里我们先看下维护这个事件队列的相应代码:
    public static interface CommandQueue {
        /**
         * Enqueue an event to be returned later.  This allows a
         * command to return multiple events.  Commands using the
         * command queue still have to return a valid event from their
         * translateCommand method.  The returned command will be
         * executed before anything put into the queue.
         *
         * @param e the event to be enqueued.
         */
        public void enqueueEvent(MonkeyEvent e);
    };

    // Queue of Events to be processed.  This allows commands to push
    // multiple events into the queue to be processed.
    private static class CommandQueueImpl implements CommandQueue{
        private final Queue<MonkeyEvent> queuedEvents = new LinkedList<MonkeyEvent>();

        public void enqueueEvent(MonkeyEvent e) {
            queuedEvents.offer(e);
        }

        /**
         * Get the next queued event to excecute.
         *
         * @return the next event, or null if there aren't any more.
         */
        public MonkeyEvent getNextQueuedEvent() {
            return queuedEvents.poll();
        }
    };
接口CommandQueue只定义个了一个方法enqueueEvent,由实现类CommandQueueImpl来实现,而实现类维护了一个MonkeyEvent类型的由LinkedList实现的队列quequeEvents,然后实现了两个方法来分别往这个队列里面放和取事件。挺简单的实现,这里主要是要提醒大家queueEvents这个队列的重要性。这里要注意的是MonkeyEventScript和monkeyEventRandom这两个事件源维护队列的类稍微有些不一样,用的是MonkeyEventQueue这个类,但是其实这个类也是继承自上面描述的LinkedList的,所以原理是一样的。
最后创建和维护一个CommandQueueImple这个实现类的一个实例commandQueque来转被对里面的quequeEvents进行管理。
private final CommandQueueImpl commandQueue = new CommandQueueImpl();
2. 事件翻译员MonkeyCommand
下一个我们需要了解的基础内部类就是MonkeCommand。从数据源过来的命令都是一串字符串,我们需要把它转换成对应的monkey事件并存入到我们上面提到的由CommandQueque维护的事件队列quequeEvents里面。首先我们看下MonkeyCommand这个接口:
    /**
     * Interface that MonkeyCommands must implement.
     */
    public interface MonkeyCommand {
        /**
         * Translate the command line into a sequence of MonkeyEvents.
         *
         * @param command the command line.
         * @param queue the command queue.
         * @return MonkeyCommandReturn indicating what happened.
         */
        MonkeyCommandReturn translateCommand(List<String> command, CommandQueue queue);
    }
它只定义了一个实现类需要实现的方法translateCommand,从它的描述和接受的的参数可以知道,这个方法要做的事情就是把从事件源接受到的字符串命令转换成上面说的CommandQueue类型维护的那个eventQueues。以monkeyrunner发过来的press这个命令为例子,传过来给monkey的字串是"press KEY_COKDE"(请查看《MonkeyRunner源码分析之与Android设备通讯方式》)
针对每一个命令都会有一个对应的MonkeyCommand的实现类来做真正的字串到事件的翻译工作,以刚才提到的press这个命令为例子,我们看下它的实现代码:
    /**
     * Command to "press" a buttons (Sends an up and down key event.)
     */
    private static class PressCommand implements MonkeyCommand {
        // press keycode
        public MonkeyCommandReturn translateCommand(List<String> command,
                                                    CommandQueue queue) {
            if (command.size() == 2) {
                int keyCode = getKeyCode(command.get(1));
                if (keyCode < 0) {
                    // Ok, you gave us something bad.
                    Log.e(TAG, "Can't find keyname: " + command.get(1));
                    return EARG;
                }

                queue.enqueueEvent(new MonkeyKeyEvent(KeyEvent.ACTION_DOWN, keyCode));
                queue.enqueueEvent(new MonkeyKeyEvent(KeyEvent.ACTION_UP, keyCode));
                return OK;

            }
            return EARG;
        }
}- 从字串中得到第1个参数,也就是key_code
- 判断key_code是否有效
- 建立按下按键的MonkeyKeyEvent事件并存入到CommandQueque维护的quequeEvents
- 建立弹起按键的MonkeyKeyEvent事件并存入到CommandQueque维护的quequeEvents(press这个动作会出发按下和弹起按键两个动作)
private static final Map<String, MonkeyCommand> COMMAND_MAP = new HashMap<String, MonkeyCommand>();

    static {
        // Add in all the commands we support
        COMMAND_MAP.put("flip", new FlipCommand());
        COMMAND_MAP.put("touch", new TouchCommand());
        COMMAND_MAP.put("trackball", new TrackballCommand());
        COMMAND_MAP.put("key", new KeyCommand());
        COMMAND_MAP.put("sleep", new SleepCommand());
        COMMAND_MAP.put("wake", new WakeCommand());
        COMMAND_MAP.put("tap", new TapCommand());
        COMMAND_MAP.put("press", new PressCommand());
        COMMAND_MAP.put("type", new TypeCommand());
        COMMAND_MAP.put("listvar", new MonkeySourceNetworkVars.ListVarCommand());
        COMMAND_MAP.put("getvar", new MonkeySourceNetworkVars.GetVarCommand());
        COMMAND_MAP.put("listviews", new MonkeySourceNetworkViews.ListViewsCommand());
        COMMAND_MAP.put("queryview", new MonkeySourceNetworkViews.QueryViewCommand());
        COMMAND_MAP.put("getrootview", new MonkeySourceNetworkViews.GetRootViewCommand());
        COMMAND_MAP.put("getviewswithtext",
                        new MonkeySourceNetworkViews.GetViewsWithTextCommand());
        COMMAND_MAP.put("deferreturn", new DeferReturnCommand());
    }
3. 事件源获取者之getNextEvent
终于到了如何获取事件的分析了,我们继续以MonkeySourceNetwork这个处理monkeyrunner过来的网络命令为例子,看下它是如何处理monkeyrunner过来的命令的。我们先看下它实现的接口类MonkeyEventSource
/**
 * event source interface
 */
public interface MonkeyEventSource {
    /**
     * @return the next monkey event from the source
     */
    public MonkeyEvent getNextEvent();

    /**
     * set verbose to allow different level of log
     *
     * @param verbose output mode? 1= verbose, 2=very verbose
     */
    public void setVerbose(int verbose);

    /**
     * check whether precondition is satisfied
     *
     * @return false if something fails, e.g. factor failure in random source or
     *         file can not open from script source etc
     */
    public boolean validate();
}
这里我最关心的就是getNextEvent这个接口,因为就是它来从socket获得我们monkeyrunner过来的命令,然后通过上面描述的MonkeyCommand的实现类来把命令翻译成最上面的CommandQueque维护的quequeEvents队列的。往下我们会看它是怎么做到的,这里我们先看下接口实现类MonkeySourceNetwork的构造函数:
    public MonkeySourceNetwork(int port) throws IOException {
        // Only bind this to local host.  This means that you can only
        // talk to the monkey locally, or though adb port forwarding.
        serverSocket = new ServerSocket(port,
                                        0, // default backlog
                                        InetAddress.getLocalHost());
}这里只是实例化了一个socket,现在为止还没有真正启动起来的,也就是说还没有开始真正的启动对指定端口的监听的。真正开始监听是startServer这个方法触发的:
    /**
     * Start a network server listening on the specified port.  The
     * network protocol is a line oriented protocol, where each line
     * is a different command that can be run.
     *
     * @param port the port to listen on
     */
    private void startServer() throws IOException {
        clientSocket = serverSocket.accept();
        // At this point, we have a client connected.
        // Attach the accessibility listeners so that we can start receiving
        // view events. Do this before wake so we can catch the wake event
        // if possible.
        MonkeySourceNetworkViews.setup();
        // Wake the device up in preparation for doing some commands.
        wake();

        input = new BufferedReader(new InputStreamReader(clientSocket.getInputStream()));
        // auto-flush
        output = new PrintWriter(clientSocket.getOutputStream(), true);
}那么这个startServer开始监听数据的方法又是由谁调用的呢?这里终于就来到了我们这一章节,也是本文的核心getNextEvent了
    public MonkeyEvent getNextEvent() {
        if (!started) {
            try {
                startServer();
            } catch (IOException e) {
                Log.e(TAG, "Got IOException from server", e);
                return null;
            }
            started = true;
        }

        // Now, get the next command.  This call may block, but that's OK
        try {
            while (true) {
                // Check to see if we have any events queued up.  If
                // we do, use those until we have no more.  Then get
                // more input from the user.
                MonkeyEvent queuedEvent = commandQueue.getNextQueuedEvent();
                if (queuedEvent != null) {
                    // dispatch the event
                    return queuedEvent;
                }

                // Check to see if we have any returns that have been deferred. If so, now that
                // we've run the queued commands, wait for the given event to happen (or the timeout
                // to be reached), and handle the deferred MonkeyCommandReturn.
                if (deferredReturn != null) {
                    Log.d(TAG, "Waiting for event");
                    MonkeyCommandReturn ret = deferredReturn.waitForEvent();
                    deferredReturn = null;
                    handleReturn(ret);
                }

                String command = input.readLine();
                if (command == null) {
                    Log.d(TAG, "Connection dropped.");
                    // Treat this exactly the same as if the user had
                    // ended the session cleanly with a done commant.
                    command = DONE;
                }

                if (DONE.equals(command)) {
                    // stop the server so it can accept new connections
                    try {
                        stopServer();
                    } catch (IOException e) {
                        Log.e(TAG, "Got IOException shutting down!", e);
                        return null;
                    }
                    // return a noop event so we keep executing the main
                    // loop
                    return new MonkeyNoopEvent();
                }

                // Do quit checking here
                if (QUIT.equals(command)) {
                    // then we're done
                    Log.d(TAG, "Quit requested");
                    // let the host know the command ran OK
                    returnOk();
                    return null;
                }

                // Do comment checking here.  Comments aren't a
                // command, so we don't echo anything back to the
                // user.
                if (command.startsWith("#")) {
                    // keep going
                    continue;
                }

                // Translate the command line.  This will handle returning error/ok to the user
                translateCommand(command);
            }
        } catch (IOException e) {
            Log.e(TAG, "Exception: ", e);
            return null;
        }
}- 启动socket端口监听monkeyrunner过来的连接和数据
- 进入无限循环
- 调用最上面描述的commandQueque这个事件队列维护者实例来尝试来从队列获得一个事件
- 如果队列由事件的话就立刻返回给上一篇文章《MonkeyRunner源码分析之启动》描述的runMonkeyCles那个方法取调用执行
- 如果队列没有事件的话,调用上面描述的socket读写变量input来获得socket中monkeyrunner发过来的一行数据(也就是一个命令字串)
- 调用translateCommand这个私有方法来针对不同的命令调用不同的MonkeyCommand实现类接口的translateCommand把字串命令翻译成对应的事件并放到命令队列里面(这个命令上面还没有描述,往下我会分析下)
- 如果确实没有命令了或者收到信号要退出了等情况下就跳出循环,否则回到循环开始继续以上步骤
    /**
     * Translate the given command line into a MonkeyEvent.
     *
     * @param commandLine the full command line given.
     */
    private void translateCommand(String commandLine) {
        Log.d(TAG, "translateCommand: " + commandLine);
        List<String> parts = commandLineSplit(commandLine);
        if (parts.size() > 0) {
            MonkeyCommand command = COMMAND_MAP.get(parts.get(0));
            if (command != null) {
                MonkeyCommandReturn ret = command.translateCommand(parts, commandQueue);
                handleReturn(ret);
            }
        }
}COMMAND_MAP.put("press", new PressCommand());4.总结
- Monkey启动开始调用run方法
- ran方法根据输入的参数实例化指定的事件源,比如我们这里的MonkeySourceNetwork
- Monkey类中的runMonkeyCyles这个方法开始循环取事件执行
- 调用Monkey类维护的mEventSource的getNextEvent方法来获取一条事件,在本文实例中就是上面表述的MonkeySourceNetwork实例的getNextEvent方法
- getNextEvent方法从CommandQueueImpl实例commandQueque所维护的quequeEvents里面读取一条事件
- 如果事件存在则返回
- getNextEvent方法启动事件源读取监听,本文实例中就是上面的startServer方法来监听monkeyrunner过来的socket连接和命令数据
- getNextEvent方法从事件源读取一个命令
- getNextEvent方法通过调用对应的的MonkeyCommand接口实现类的translateCommand方法把字串命令翻译成对应的monkey事件然后保存到commandQueque维护的quequeEvents队列
- 执行返回event的injectEvent方法
- 调用Monkey类维护的mEventSource的getNextEvent方法来获取一条事件,在本文实例中就是上面表述的MonkeySourceNetwork实例的getNextEvent方法
| 作者 | 自主博客 | 微信 | CSDN |
| 天地会珠海分舵 | | 服务号:TechGoGoGo 扫描码: | http://blog.csdn.net/zhubaitian |


 2704
2704

 被折叠的 条评论
为什么被折叠?
被折叠的 条评论
为什么被折叠?
 到【灌水乐园】发言


