硬件:7620n,openwrt :BB版本
首先给出参考链接 :https://wiki.openwrt.org/doc/devel/gdb 点击打开链接
http://my.oschina.net/hevakelcj/blog/416394 点击打开链接
a,in menuconfig enable gdb
Advanced configuration options (for developers) → Toolchain Options → Build gdb
and gdbserver
Development → gdbserver
b,修改工具链makefile文件
yourdir/openwrt/toolchain/gdb# vi Makefile
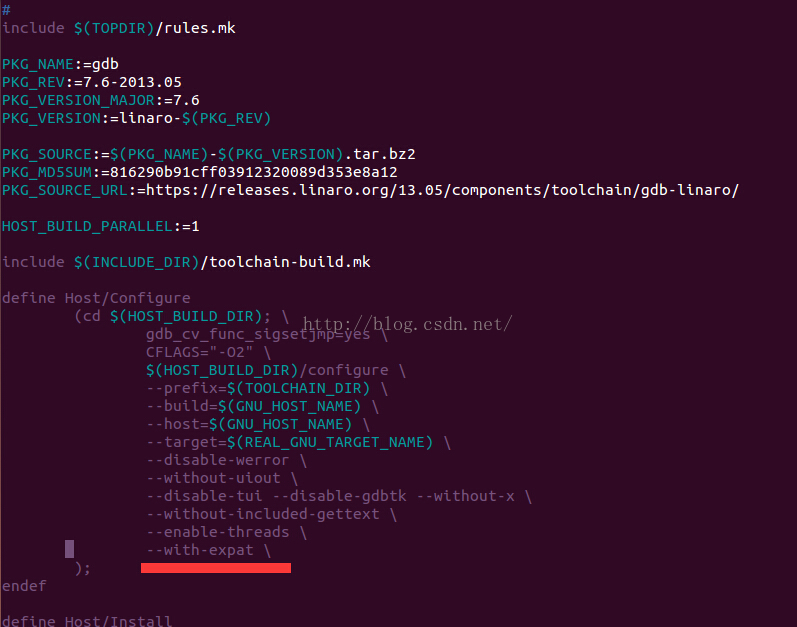
c,make V=99,如果已经编译过,则make toolchain/install 编译下gdb即可
在编译完成后,/yourdir/openwrt/staging_dir/toolchain-mipsel_24kec+dsp_gcc-4.8-linaro_uClibc-0.9.33.2/bin/mipsel-openwrt-linux-uclibc-gdb
是要使用的gdb可执行文件。
d,编译需要调试的可执行文件:7620n 控制一个IO口闪烁LED灯。当然也可以是最简单的helloworld程序。所以暂时将以下代码的可执行文件命名问helloworld。
下面给出代码
#include <stdio.h>
#include <stdlib.h>
#include <errno.h>
#include <string.h>
#include <sys/types.h>
#include <sys/stat.h>
#include <fcntl.h>
#define GPIO_VALUE "/sys/class/gpio/gpio19/value"
int main(void){
int fd;
int i=0;
fd=open(GPIO_VALUE,O_RDWR);
while(1){
i++;
if(5==i){
i=1;
printf("bug\n");
}
write(fd,"1",1);
usleep(200000);
write(fd,"0",1);
usleep(200000);
}
return 1;
}
注意:在makefile中添加 -g 和 -O0 (大写O和零),以保证可以进行GDB调试和不进行优化程序。
e ,将编译的出来的helloworld可执行文件和上述代码的helloworld.c下载到开发板和 上述C部分的路径下。(当然也可以在运行的时候添加路径或者设置指定路径)
e.1先在7620n运行
root@OpenWrt:~# gdbserver 172.16.2.37:3000 ./helloworld 敲击回车键
Process ./helloworld created; pid = 1475
Listening on port 3000
e.2 在pc机上运行
$ yourdir/ ./mipsel-openwrt-linux-gdb ./helloworld 敲击回车
GNU gdb (Linaro GDB) 7.6-2013.05
Copyright (C) 2013 Free Software Foundation, Inc.
License GPLv3+: GNU GPL version 3 or later <http://gnu.org/licenses/gpl.html>
This is free software: you are free to change and redistribute it.
There is NO WARRANTY, to the extent permitted by law. Type "show copying"
and "show warranty" for details.
This GDB was configured as "--host=i686-linux-gnu --target=mipsel-openwrt-linux-uclibc".
For bug reporting instructions, please see:
<http://bugs.launchpad.net/gdb-linaro/>...
Reading symbols from /home/ubuntu/helloworld...done.
(gdb) target remote 172.16.2.37:3000
Remote debugging using 172.16.2.37:3000
warning: Unable to find dynamic linker breakpoint function.
GDB will be unable to debug shared library initializers
and track explicitly loaded dynamic code.
0x77f6f1e0 in ?? ()
(gdb)
接下来就可以按照gdb正常调试了,但是不要使用run这个命令。以为开发板上已经运行你的程序了。
上述gdb中包含警告信息,也不用理会,就是告诉你它说使用的动态链接库不可以使用断点功能。
有问题欢迎指正,哪位工程师有办法去除警告,请不吝赐教。
谨以此文献给Hoowa同志,江湖人称“火神”。 —— 题记
转载地址http://storypku.com/2015/08/230/
Introduction
为调试Linux机器上的C/C++程序,我们通常使用GDB. 但要调试那些在路由器上跑的C/C++程序,GDB还能胜任么?毕竟,我们又不能直接把源码搁到路由器上编译,在Linux机器上编的话还牵扯到交叉编译(Cross Compiling)。
答案是Yes. 在本文中,我就将给大家介绍如何搭建GDB调试环境,如何调试一个比Hello world复杂那么一点点的C程序的方法。
由于我使用的是OpenWrt 14.07 (Barrier Breaker),因此,也假设你也使用的这个版本并对如何编译ipk软件包有一定的了解。Barrier Breaker的官方仓库在这儿:
|
|
$
git
clone
git
:
//git.openwrt.org/14.07/openwrt.git BarrierBreaker.git
|
Compiling GDB Tools
在make menuconfig的时候启用GDB
|
|
Advanced
configuration
options
(
for
developers
)
→
Toolchain
Options
→
Build
gdb
|
以及gdbserver
Solution to the “Remote ‘g’ packet reply is too long” problem
在你编译之前呢,我这儿有一个免费的patch送给你,可以避免你以后遇到像下面这样儿式的问题:
|
|
771
,
735
28
^
error
,
msg
=
"Remote 'g' packet reply is too long:
00000000f8ffffffecceea7740b4ff7701000000446eff7f4c6eff7f2067e17f0000000046b8000000408a860200
000000031c7fffffffff00000000c816e977226fff7f1c0b4000906dff7f0088e777f8208900fcce450000004400
1cdc450087040000ac8a4000fefcf87c00000000a003eb77c86cff7fc86cff7f4c17e97713a40001a07023002900
0000a0c1e47724008010bc8a4000ffffffffffffffffffffffffffffffffffffffffffffffffffffffffffffffff
ffffffffffffffffffffffffffffffffffffffffffffffffffffffffffffffffffffffffffffffffffffffffffff
ffffffffffffffffffffffffffffffffffffffffffffffffffffffffffffffffffffffffffffffffffffffffffff
ffffffff00000000000000000000000000000000000000000000000000000000000000000000000000000000"
|
700-FIX-REMOTE-G-PACKET-REPLY-TOO-LONG.PATCH
1
2
3
4
5
6
7
8
9
10
11
12
13
14
15
16
17
18
19
20
21
22
23
24
|
--- a/gdb/remote.c
+++ b/gdb/remote.c
@@ -6110,8 +6110,19 @@ process_g_packet (struct regcache *regca
buf_len = strlen (rs->buf);
/* Further sanity checks, with knowledge of the architecture. */
- if (buf_len > 2 * rsa->sizeof_g_packet)
- error (_("Remote 'g' packet reply is too long: %s"), rs->buf);
+ // if (buf_len > 2 * rsa->sizeof_g_packet)
+ // error (_("Remote 'g' packet reply is too long: %s"), rs->buf);
+ if (buf_len > 2 * rsa->sizeof_g_packet) {
+ rsa->sizeof_g_packet = buf_len;
+ for (i = 0; i < gdbarch_num_regs (gdbarch); i++) {
+ if (rsa->regs[i].pnum == -1)
+ continue;
+ if (rsa->regs[i].offset >= rsa->sizeof_g_packet)
+ rsa->regs[i].in_g_packet = 0;
+ else
+ rsa->regs[i].in_g_packet = 1;
+ }
+ }
/* Save the size of the packet sent to us by the target. It is used
as a heuristic when determining the max size of packets that the
|
编译TOOLCHAIN中的GDB和PACKAGE中的GDBSERVER
- 将700-fix-remote-g-packet-reply-too-long.patch搁到toolchain/gdb/patches/目录下
|
|
cp
/
path
/
to
/
700
-
fix
-
remote
-
g
-
packet
-
reply
-
too
-
long
.
patch
toolchain
/
gdb
/
patches
/
|
这时候, 你如果ls一下大约可以看到这些:
|
|
$
ls
toolchain
/
gdb
/
patches
/
100
-
ppc_compile_fix
.
patch
600
-
fix
-
compile
-
flag
-
mismatch
.
patch
110
-
no_extern_inline
.
patch
700
-
fix
-
remote
-
g
-
packet
-
reply
-
too
-
long
.
patch
|
|
|
make
toolchain
/
gdb
/
{
clean
,
compile
,
install
}
V
=
s
|
- 编译准备安装到OpenWRT上的gdbserver
|
|
package
/
gdbserver
/
{
clean
,
prepare
,
compile
}
V
=
s
|
将GDBSERVER扔到路由器上并安装上
|
|
scp
bin
/
ramips
/
packages
/
base
/
gdbserver_7
.
5
-
1_ramips_24kec.ipk
root
@
192.168.1.1
:
/
tmp
/
|
路由器上opkg怎么update,怎么装ipk包不用我说了吧?
Add debugging to a package
A more complex Hello world in C
FILE LISTINGS
|
|
$
tree
package
/
hello
package
/
hello
|
--
Makefile
`
--
src
|
--
hello
.
c
|
--
Makefile
|
--
mytest
.
c
`
--
mytest
.
h
|
hello/src/hello.c
1
2
3
4
5
6
7
8
9
10
11
12
13
14
15
16
17
18
|
#include
#include "mytest.h"
int
main
(
int
argc
,
char
*
argv
[
]
)
{
int
i
=
0
;
printf
(
"Command line: "
)
;
for
(
i
=
0
;
i
<
argc
;
i
++
)
{
printf
(
"%s "
,
argv
[
i
]
)
;
}
printf
(
"\n"
)
;
int
a
=
9
,
b
=
5
;
testfunc
(
a
,
b
)
;
printf
(
"Hello OpenWrt\n"
)
;
return
0
;
}
|
hello/src/mytest.h
|
|
#ifndef _MY_TEST_H_
#define _MY_TEST_H_
void
testfunc
(
int
a
,
int
b
)
;
#endif
|
hello/src/mytest.c
|
|
#include "mytest.h"
#include
void
testfunc
(
int
a
,
int
b
)
{
int
sum
=
a
+
b
;
int
mul
=
a
*
b
;
printf
(
"Sum of %d and %d is %d\n"
,
a
,
b
,
sum
)
;
printf
(
"%d * %d = %d\n"
,
a
,
b
,
mul
)
;
}
|
hello/src/Makefile
1
2
3
4
5
6
7
8
9
10
11
12
|
override
CFLAGS
+=
-
Wall
-
Os
-
Wextra
.PHONY
:
compile
clean
HELLO_OBJ
=
$
(
subst
.c
,
.o
,
$
(
wildcard
*
.c
)
)
HELLO_BIN
=
hello
compile
:
clean
$
(
HELLO_OBJ
)
$
(
CC
)
-
o
$
(
HELLO_BIN
)
$
(
HELLO_OBJ
)
$
(
LDFLAGS
)
%
.
o
:
%
.
c
mytest
.
h
$
(
CC
)
-
o
$
@
-
c
$
<
$
(
CFLAGS
)
clean
:
@
rm
-
r
hello
*
.o
2
>
/
dev
/
null
||
:
|
hello/Makefile
1
2
3
4
5
6
7
8
9
10
11
12
13
14
15
16
17
18
19
20
21
22
23
24
25
26
27
28
29
30
31
32
33
34
35
36
37
38
39
40
41
42
43
44
45
46
47
48
49
50
|
#
# Copyright (C) 2014-2015 Liu Jiaming <jmliu@smartecs.net>
#
# This is free software, licensed under the GPL 2 license.
#
include
$
(
TOPDIR
)
/
rules
.mk
PKG_NAME
:
=
hello
PKG_VERSION
:
=
0
PKG_RELEASE
:
=
1
PKG_BUILD_DIR
:
=
$
(
BUILD_DIR
)
/
$
(
PKG_NAME
)
include
$
(
INCLUDE_DIR
)
/
package
.mk
define
Package
/
hello
SECTION
:
=
utils
CATEGORY
:
=
Utilities
TITLE
:
=
Hello
World
MAINTAINER
:
=
Liu
Jiaming
<
jmliu
@
smartecs
.net
>
endef
define
Package
/
hello
/
description
Hello
world
example
for
OpenWrt
endef
define
Build
/
Prepare
mkdir
-
p
$
(
PKG_BUILD_DIR
)
$
(
CP
)
.
/
src
/
*
$
(
PKG_BUILD_DIR
)
/
endef
define
Build
/
Configure
endef
TARGET_CFLAGS
+=
\
-
I
$
(
STAGING_DIR
)
/
usr
/
include
\
-
D_GNU
_SOURCE
\
-
ggdb3
MAKE_FLAGS
+=
\
CFLAGS
=
"$(TARGET_CFLAGS)"
\
LDFLAGS
=
"$(TARGET_LDFLAGS)"
define
Package
/
hello
/
install
$
(
INSTALL_DIR
)
$
(
1
)
/
usr
/
bin
$
(
INSTALL_BIN
)
$
(
PKG_BUILD_DIR
)
/
hello
$
(
1
)
/
usr
/
bin
/
hello
endef
$
(
eval
$
(
call
BuildPackage
,
hello
)
)
|
Methods for adding debugging to a package
- 法1: Add CFLAGS to package Makefile and recompile it. # 推荐
正如上面hello/Makefile文件做的那样,为hello软件包的Makefile添加CFLAGS。并重新编译
- 法2: Recompile the package with CONFIG_DEBUG set # 设置CONFIG_DEBUG=y来编包
|
|
make
package
/
hello
/
{
clean
,
compile
}
V
=
99
CONFIG_DEBUG
=
y
|
- 法3: Enable debug info in menuconfig #在全局编译构造环境中启用调试开关
|
|
Global
build
settings
→
Compile
packages
with
debugging
info
|
这法2和法3是OpenWrt官方wiki上(http://wiki.openwrt.org/doc/devel/gdb )提到的方法,没试验过。
请将编译好的带调试信息的hello软件包扔到路由器上安装。
Starting GDB
Start gdbserver on target (router)
路由器(IP为192.168.1.1)的9000端口上跑gdbserver
|
|
[
root
@
MyRouter
:
/
tmp
]
# gdbserver :9000 /usr/bin/hello Adjustment BarrierBreaker Calmer
Process
/
usr
/
bin
/
hello
created
;
pid
=
411
Listening
on
port
9000
|
Start gdb on host (in compiling tree)
宿主系统(Host System,比如我的是Ubuntu最近的某个版本)上跑gdb
|
|
.
/
scripts
/
remote
-
gdb
192.168.1.1:
9000
.
/
build_dir
/
target_*
/
hello
/
hello
|
Now gdb shell is up. Set breakpoints, start program, backtrace etc.
这样gdb shell就起来了。设置断点, 启动程序,查看堆栈,就跟以前一样。
|
|
(
gdb
)
b
testfunc
Breakpoint
1
at
0x4007d0
:
file
mytest
.
c
,
line
5.
(
gdb
)
c
(
gdb
)
bt
#0 testfunc (a=a@entry=9, b=b@entry=5) at mytest.c:5
#1 0x00400600 in main (argc=4, argv=0x7fff6df4) at hello.c:14
|
Tips
- The output of hello got printed to the ROUTER console, rather than the Host system terminal.
注意,hello包的输出是打印到路由器的控制台(console/terminal)上的,而非宿主系统上。
- Always try to use “target remote 192.168.1.1:9000” on Host System
In the gdb shell on the Host system, please always use “target remote 192.168.1.1:9000” to reconnect when the Router process brought up by gdbserver exits and then restarts, as in this way, your previous settings of breakpoints, watchpoints are reserved.
当路由器上gdbserver带起的进程退出后重新带起的时候,请不要直接将宿主系统上的gdb shell退出重进。在原gdb shell中使用”target remote 192.168.1.1:9000″即可,这样做的好处是,你原先关于断点、监测点的设定都会保留住。
http://storypku.com/2015/08/230/
Introduction
为调试Linux机器上的C/C++程序,我们通常使用GDB. 但要调试那些在路由器上跑的C/C++程序,GDB还能胜任么?毕竟,我们又不能直接把源码搁到路由器上编译,在Linux机器上编的话还牵扯到交叉编译(Cross Compiling)。
答案是Yes. 在本文中,我就将给大家介绍如何搭建GDB调试环境,如何调试一个比Hello world复杂那么一点点的C程序的方法。
由于我使用的是OpenWrt 14.07 (Barrier Breaker),因此,也假设你也使用的这个版本并对如何编译ipk软件包有一定的了解。Barrier Breaker的官方仓库在这儿:
|
|
$
git
clone
git
:
//git.openwrt.org/14.07/openwrt.git BarrierBreaker.git
|
Compiling GDB Tools
在make menuconfig的时候启用GDB
|
|
Advanced
configuration
options
(
for
developers
)
→
Toolchain
Options
→
Build
gdb
|
以及gdbserver
Solution to the “Remote ‘g’ packet reply is too long” problem
在你编译之前呢,我这儿有一个免费的patch送给你,可以避免你以后遇到像下面这样儿式的问题:
|
|
771
,
735
28
^
error
,
msg
=
"Remote 'g' packet reply is too long:
00000000f8ffffffecceea7740b4ff7701000000446eff7f4c6eff7f2067e17f0000000046b8000000408a860200
000000031c7fffffffff00000000c816e977226fff7f1c0b4000906dff7f0088e777f8208900fcce450000004400
1cdc450087040000ac8a4000fefcf87c00000000a003eb77c86cff7fc86cff7f4c17e97713a40001a07023002900
0000a0c1e47724008010bc8a4000ffffffffffffffffffffffffffffffffffffffffffffffffffffffffffffffff
ffffffffffffffffffffffffffffffffffffffffffffffffffffffffffffffffffffffffffffffffffffffffffff
ffffffffffffffffffffffffffffffffffffffffffffffffffffffffffffffffffffffffffffffffffffffffffff
ffffffff00000000000000000000000000000000000000000000000000000000000000000000000000000000"
|
700-FIX-REMOTE-G-PACKET-REPLY-TOO-LONG.PATCH
1
2
3
4
5
6
7
8
9
10
11
12
13
14
15
16
17
18
19
20
21
22
23
24
|
--- a/gdb/remote.c
+++ b/gdb/remote.c
@@ -6110,8 +6110,19 @@ process_g_packet (struct regcache *regca
buf_len = strlen (rs->buf);
/* Further sanity checks, with knowledge of the architecture. */
- if (buf_len > 2 * rsa->sizeof_g_packet)
- error (_("Remote 'g' packet reply is too long: %s"), rs->buf);
+ // if (buf_len > 2 * rsa->sizeof_g_packet)
+ // error (_("Remote 'g' packet reply is too long: %s"), rs->buf);
+ if (buf_len > 2 * rsa->sizeof_g_packet) {
+ rsa->sizeof_g_packet = buf_len;
+ for (i = 0; i < gdbarch_num_regs (gdbarch); i++) {
+ if (rsa->regs[i].pnum == -1)
+ continue;
+ if (rsa->regs[i].offset >= rsa->sizeof_g_packet)
+ rsa->regs[i].in_g_packet = 0;
+ else
+ rsa->regs[i].in_g_packet = 1;
+ }
+ }
/* Save the size of the packet sent to us by the target. It is used
as a heuristic when determining the max size of packets that the
|
编译TOOLCHAIN中的GDB和PACKAGE中的GDBSERVER
- 将700-fix-remote-g-packet-reply-too-long.patch搁到toolchain/gdb/patches/目录下
|
|
cp
/
path
/
to
/
700
-
fix
-
remote
-
g
-
packet
-
reply
-
too
-
long
.
patch
toolchain
/
gdb
/
patches
/
|
这时候, 你如果ls一下大约可以看到这些:
|
|
$
ls
toolchain
/
gdb
/
patches
/
100
-
ppc_compile_fix
.
patch
600
-
fix
-
compile
-
flag
-
mismatch
.
patch
110
-
no_extern_inline
.
patch
700
-
fix
-
remote
-
g
-
packet
-
reply
-
too
-
long
.
patch
|
|
|
make
toolchain
/
gdb
/
{
clean
,
compile
,
install
}
V
=
s
|
- 编译准备安装到OpenWRT上的gdbserver
|
|
package
/
gdbserver
/
{
clean
,
prepare
,
compile
}
V
=
s
|
将GDBSERVER扔到路由器上并安装上
|
|
scp
bin
/
ramips
/
packages
/
base
/
gdbserver_7
.
5
-
1_ramips_24kec.ipk
root
@
192.168.1.1
:
/
tmp
/
|
路由器上opkg怎么update,怎么装ipk包不用我说了吧?
Add debugging to a package
A more complex Hello world in C
FILE LISTINGS
|
|
$
tree
package
/
hello
package
/
hello
|
--
Makefile
`
--
src
|
--
hello
.
c
|
--
Makefile
|
--
mytest
.
c
`
--
mytest
.
h
|
hello/src/hello.c
1
2
3
4
5
6
7
8
9
10
11
12
13
14
15
16
17
18
|
#include
#include "mytest.h"
int
main
(
int
argc
,
char
*
argv
[
]
)
{
int
i
=
0
;
printf
(
"Command line: "
)
;
for
(
i
=
0
;
i
<
argc
;
i
++
)
{
printf
(
"%s "
,
argv
[
i
]
)
;
}
printf
(
"\n"
)
;
int
a
=
9
,
b
=
5
;
testfunc
(
a
,
b
)
;
printf
(
"Hello OpenWrt\n"
)
;
return
0
;
}
|
hello/src/mytest.h
|
|
#ifndef _MY_TEST_H_
#define _MY_TEST_H_
void
testfunc
(
int
a
,
int
b
)
;
#endif
|
hello/src/mytest.c
|
|
#include "mytest.h"
#include
void
testfunc
(
int
a
,
int
b
)
{
int
sum
=
a
+
b
;
int
mul
=
a
*
b
;
printf
(
"Sum of %d and %d is %d\n"
,
a
,
b
,
sum
)
;
printf
(
"%d * %d = %d\n"
,
a
,
b
,
mul
)
;
}
|
hello/src/Makefile
1
2
3
4
5
6
7
8
9
10
11
12
|
override
CFLAGS
+=
-
Wall
-
Os
-
Wextra
.PHONY
:
compile
clean
HELLO_OBJ
=
$
(
subst
.c
,
.o
,
$
(
wildcard
*
.c
)
)
HELLO_BIN
=
hello
compile
:
clean
$
(
HELLO_OBJ
)
$
(
CC
)
-
o
$
(
HELLO_BIN
)
$
(
HELLO_OBJ
)
$
(
LDFLAGS
)
%
.
o
:
%
.
c
mytest
.
h
$
(
CC
)
-
o
$
@
-
c
$
<
$
(
CFLAGS
)
clean
:
@
rm
-
r
hello
*
.o
2
>
/
dev
/
null
||
:
|
hello/Makefile
1
2
3
4
5
6
7
8
9
10
11
12
13
14
15
16
17
18
19
20
21
22
23
24
25
26
27
28
29
30
31
32
33
34
35
36
37
38
39
40
41
42
43
44
45
46
47
48
49
50
|
#
# Copyright (C) 2014-2015 Liu Jiaming <jmliu@smartecs.net>
#
# This is free software, licensed under the GPL 2 license.
#
include
$
(
TOPDIR
)
/
rules
.mk
PKG_NAME
:
=
hello
PKG_VERSION
:
=
0
PKG_RELEASE
:
=
1
PKG_BUILD_DIR
:
=
$
(
BUILD_DIR
)
/
$
(
PKG_NAME
)
include
$
(
INCLUDE_DIR
)
/
package
.mk
define
Package
/
hello
SECTION
:
=
utils
CATEGORY
:
=
Utilities
TITLE
:
=
Hello
World
MAINTAINER
:
=
Liu
Jiaming
<
jmliu
@
smartecs
.net
>
endef
define
Package
/
hello
/
description
Hello
world
example
for
OpenWrt
endef
define
Build
/
Prepare
mkdir
-
p
$
(
PKG_BUILD_DIR
)
$
(
CP
)
.
/
src
/
*
$
(
PKG_BUILD_DIR
)
/
endef
define
Build
/
Configure
endef
TARGET_CFLAGS
+=
\
-
I
$
(
STAGING_DIR
)
/
usr
/
include
\
-
D_GNU
_SOURCE
\
-
ggdb3
MAKE_FLAGS
+=
\
CFLAGS
=
"$(TARGET_CFLAGS)"
\
LDFLAGS
=
"$(TARGET_LDFLAGS)"
define
Package
/
hello
/
install
$
(
INSTALL_DIR
)
$
(
1
)
/
usr
/
bin
$
(
INSTALL_BIN
)
$
(
PKG_BUILD_DIR
)
/
hello
$
(
1
)
/
usr
/
bin
/
hello
endef
$
(
eval
$
(
call
BuildPackage
,
hello
)
)
|
Methods for adding debugging to a package
- 法1: Add CFLAGS to package Makefile and recompile it. # 推荐
正如上面hello/Makefile文件做的那样,为hello软件包的Makefile添加CFLAGS。并重新编译
- 法2: Recompile the package with CONFIG_DEBUG set # 设置CONFIG_DEBUG=y来编包
|
|
make
package
/
hello
/
{
clean
,
compile
}
V
=
99
CONFIG_DEBUG
=
y
|
- 法3: Enable debug info in menuconfig #在全局编译构造环境中启用调试开关
|
|
Global
build
settings
→
Compile
packages
with
debugging
info
|
这法2和法3是OpenWrt官方wiki上(http://wiki.openwrt.org/doc/devel/gdb )提到的方法,没试验过。
请将编译好的带调试信息的hello软件包扔到路由器上安装。
Starting GDB
Start gdbserver on target (router)
路由器(IP为192.168.1.1)的9000端口上跑gdbserver
|
|
[
root
@
MyRouter
:
/
tmp
]
# gdbserver :9000 /usr/bin/hello Adjustment BarrierBreaker Calmer
Process
/
usr
/
bin
/
hello
created
;
pid
=
411
Listening
on
port
9000
|
Start gdb on host (in compiling tree)
宿主系统(Host System,比如我的是Ubuntu最近的某个版本)上跑gdb
|
|
.
/
scripts
/
remote
-
gdb
192.168.1.1:
9000
.
/
build_dir
/
target_*
/
hello
/
hello
|
Now gdb shell is up. Set breakpoints, start program, backtrace etc.
这样gdb shell就起来了。设置断点, 启动程序,查看堆栈,就跟以前一样。
|
|
(
gdb
)
b
testfunc
Breakpoint
1
at
0x4007d0
:
file
mytest
.
c
,
line
5.
(
gdb
)
c
(
gdb
)
bt
#0 testfunc (a=a@entry=9, b=b@entry=5) at mytest.c:5
#1 0x00400600 in main (argc=4, argv=0x7fff6df4) at hello.c:14
|
Tips
- The output of hello got printed to the ROUTER console, rather than the Host system terminal.
注意,hello包的输出是打印到路由器的控制台(console/terminal)上的,而非宿主系统上。
- Always try to use “target remote 192.168.1.1:9000” on Host System
In the gdb shell on the Host system, please always use “target remote 192.168.1.1:9000” to reconnect when the Router process brought up by gdbserver exits and then restarts, as in this way, your previous settings of breakpoints, watchpoints are reserved.
当路由器上gdbserver带起的进程退出后重新带起的时候,请不要直接将宿主系统上的gdb shell退出重进。在原gdb shell中使用”target remote 192.168.1.1:9000″即可,这样做的好处是,你原先关于断点、监测点的设定都会保留住。


 881
881


 被折叠的 条评论
为什么被折叠?
被折叠的 条评论
为什么被折叠?
 到【灌水乐园】发言


