


教程总目录: http://blog.csdn.net/zqiang_55/article/details/50878524
Libgdx共享资源
因为Libgdx可以在多平台上运行,因此理论上资源应该放在core目录下,因为Android和桌面版都包含主目录。但是Android对于如何存放这些文件有严格的规则,我们必须把资源放在固定的目录下。因此如果创建的工程需要在Android设备下运行的话,必须把资源放在Android项目自动创建的资源目录下。如果只是练习的可以放在core工程下面。
SpriteBatch的使用一
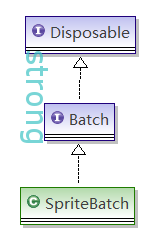
从上面涂可以看出SpriteBatch继承在Disposable,因此在游戏的最后必须调用dispose方法来释放内存。
SpriteBatch使用屏幕坐标(关于坐标可以看上一节的内容),原点在屏幕左下角,x轴向右,y轴向上。origin也在屏幕左下角。
All drawing commands of the Batch operate in screen coordinates. The screen coordinate system has an x-axis pointing to the right, an y-axis pointing upwards and the origin is in the lower left corner of the screen
从代码可以指定SpriteBatch最多可以绘制5460个对象,否则程序会抛出异常
// 32767 is max index, so 32767 / 6 - (32767 / 6 % 3) = 5460.
if (size > 5460) throw new IllegalArgumentException(“Can’t have more than 5460 sprites per batch: ” + size);
从目前知道的情况下SpriteBatch和Stage可以在屏幕上绘制图像资源,但是还有其它的方法比如Box2d等,但是那个离教程还很遥远。由于SpriteBatch是很消耗内存的对象,因此建议整个游戏中只有一个,在游戏结束时要调用dispose方法
要想绘制对象,首先要调用 begin()方法来告诉libgdx要准备绘制,绘制结束要调用end()方法来告诉libgdx绘制结束,准备收尾工作。这个过程是将要绘制的对象放到缓存中一起绘制,也可以先调用flush()来提前绘制对象
/** Draws a rectangle with the bottom left corner at x,y having the given width and height in pixels. The rectangle is offset by
     * originX, originY relative to the origin. Scale specifies the scaling factor by which the rectangle should be scaled around
     * originX, originY. Rotation specifies the angle of counter clockwise rotation of the rectangle around originX, originY. The
     * portion of the {@link Texture} given by srcX, srcY and srcWidth, srcHeight is used. These coordinates and sizes are given in
     * texels. FlipX and flipY specify whether the texture portion should be flipped horizontally or vertically.
     * @param x the x-coordinate in screen space
     * @param y the y-coordinate in screen space
     * @param originX the x-coordinate of the scaling and rotation origin relative to the screen space coordinates
     * @param originY the y-coordinate of the scaling and rotation origin relative to the screen space coordinates
     * @param width the width in pixels
     * @param height the height in pixels
     * @param scaleX the scale of the rectangle around originX/originY in x
     * @param scaleY the scale of the rectangle around originX/originY in y
     * @param rotation the angle of counter clockwise rotation of the rectangle around originX/originY
     * @param srcX the x-coordinate in texel space
     * @param srcY the y-coordinate in texel space
     * @param srcWidth the source with in texels
     * @param srcHeight the source height in texels
     * @param flipX whether to flip the sprite horizontally
     * @param flipY whether to flip the sprite vertically */
    public void draw (Texture texture, float x, float y, float originX, float originY, float width, float height, float scaleX,
        float scaleY, float rotation, int srcX, int srcY, int srcWidth, int srcHeight, boolean flipX, boolean flipY);
上面是SpriteBatch绘制Texture最全的一个方法了,了解这个方法,其余的方法就很容易理解。目前创建的app默认窗口是640*480,
public LwjglApplication (ApplicationListener listener) { this(listener, null, 640, 480);},也可以自己通过config修改。下面的代码注释有一个详细解释
    private static final String TAG = SpriteBatchTest1.class.getSimpleName();

    SpriteBatch batch;
    Texture img;
    int width, height;
    int screenWidth, screenHeight;
    float angle = 10f;

    @Override
    public void create() {
        batch = new SpriteBatch();
        img = new Texture("badlogic.jpg");

        // 图片资源的大小
        width = img.getWidth();
        height = img.getHeight();
        Gdx.app.log(TAG, "Texture widht="+ width + "  height="+height);

        screenWidth = Gdx.graphics.getWidth();
        screenHeight = Gdx.graphics.getHeight();
        Gdx.app.log(TAG, "screen width="+ screenWidth + " height="+ Gdx.graphics.getHeight());

    }

    @Override
    public void render() {
        Gdx.gl.glClearColor(1, 0, 0, 1);
        Gdx.gl.glClear(GL20.GL_COLOR_BUFFER_BIT);

        angle = (angle + 2) % 360;
        batch.begin();
        // 以默认Texture的大小来绘制图片
//      batch.draw(img, 0, 0);
        // 这个效果和上面的效果一样
        batch.draw(img, 0, 0, width * 0.5f, height * 0.5f, width, height,
                1.0f, 1.0f, 0.0f, 0, 0, width, height, false, false);
        // 从屏幕中心开始,以Texture的一半来绘制图像,这个相当于图像缩小了一半
        batch.draw(img, screenWidth * 0.5f, screenHeight * 0.5f, width *0.5f, height * 0.5f);
        // 在(350,0)这个位置以Texture的大小,但是只绘制纹理100*100
        batch.draw(img, 350, 0, width * 0.5f, height * 0.5f, width, height,
                1.0f, 1.0f, 0.0f, 0, 0, 100, 100, false, false);
        // 在(0,300)这个位置以100*100的大小绘制图片,同时origin大小也要换成100*0.5,同时图片以固定速度旋转
        batch.draw(img, 0, 300, 100 * 0.5f, 100 * 0.5f, 100, 100,
                    1.0f, 1.0f, angle, 0, 0, width, height, false, false);
        batch.end();
    }

    @Override
    public void dispose() {
        // 不用的资源要销毁,它们的共同点事implements Disposable
        batch.dispose();
        img.dispose();
    }
剩余代码可以自己补齐,最终效果如下图:

SpriteBatch的使用二
在我们参考其它人的代码实经常看见,在使用过程中camera于viewport相结合使用,因为在实际世界中我们使用的是一个千米千克,因此需要一个转化,如果我每小时跑10KM,转换一下就是2.77777778每秒(10 * 1000 / 3600)。下面代码就是对其过程的一个简单介绍
private static final String TAG = SpriteBatchTest2.class.getSimpleName();

    private static final float WORLD_TO_SCREEN = 1.0f / 100.0f;
    private static final float SCENE_WIDTH = 12.80f;
    private static final float SCENE_HEIGHT = 7.20f;

    SpriteBatch batch;
    Texture img;
    Viewport viewport;
    OrthographicCamera camera;
    int width;
    int height;
    float originX;
    float originY;
    float angle = 10f;

    @Override
    public void create () {
        Gdx.app.log(TAG, "create");
        batch = new SpriteBatch();
        img = new Texture("badlogic.jpg");

        camera = new OrthographicCamera();
        camera.position.set(SCENE_WIDTH / 2f,  SCENE_HEIGHT / 2f, 0.0f);
        camera.update();
        Gdx.app.log(TAG, "camera.x" + camera.position.x);
//      viewport = new FitViewport(SCENE_WIDTH, SCENE_HEIGHT, camera);
        // 为了方便观察效果,将FitViewport转换为StretchViewport
        viewport = new StretchViewport(SCENE_WIDTH, SCENE_HEIGHT, camera);

        width = img.getWidth();
        height = img.getHeight();
        originX = width * 0.5f;
        originY = height * 0.5f;

        Gdx.app.log(TAG, "width=" + width + " height="+height);
    }

    @Override
    public void render () {
        Gdx.gl.glClearColor(1, 0, 0, 1);
        Gdx.gl.glClear(GL20.GL_COLOR_BUFFER_BIT);

        angle = (angle + 2) % 360;
        batch.setProjectionMatrix(camera.combined);
        batch.begin();
//      batch.draw(img, 0, 0, width * WORLD_TO_SCREEN, height * WORLD_TO_SCREEN);
        // 上面和下面的语句效果是一样的
        batch.draw(img, 0, 0, originX * WORLD_TO_SCREEN, originY * WORLD_TO_SCREEN, width  * WORLD_TO_SCREEN,
                height * WORLD_TO_SCREEN, 1.0f, 1.0f, 0.0f, 0, 0, width, height, false, false);
//      batch.draw(img, 6.4f, 3.6f, width * WORLD_TO_SCREEN, height * WORLD_TO_SCREEN);
        // 上面和下面语句是一样的不过加了一个角度旋转图片,要想效果一样origin也需要*WORLD_TO_SCREEN,不过以固定角度旋转
        batch.draw(img, 6.4f, 3.6f, originX * WORLD_TO_SCREEN, originY * WORLD_TO_SCREEN, width  * WORLD_TO_SCREEN,
                height * WORLD_TO_SCREEN, 1.0f, 1.0f, angle, 0, 0, width, height, false, false);
        batch.draw(img, 0.0f, 7.2f - height * WORLD_TO_SCREEN, width * WORLD_TO_SCREEN, height * WORLD_TO_SCREEN);
        batch.end();
    }

    @Override
    public void resize(int width, int height) {
        viewport.update(width, height);
        Gdx.app.log(TAG, "resize");
    }

    @Override
    public void pause() {
        Gdx.app.log(TAG, "pause");
    }

    @Override
    public void resume() {
        Gdx.app.log(TAG, "resume");
    }

    @Override
    public void dispose() {
        img.dispose();
        batch.dispose();
        Gdx.app.log(TAG, "dispose");
    }
首先是一个将camera是采用正交投影来观看我们的游戏世界,为了方便绘图,将其进行一个移动,最开始的时候的坐标如下图
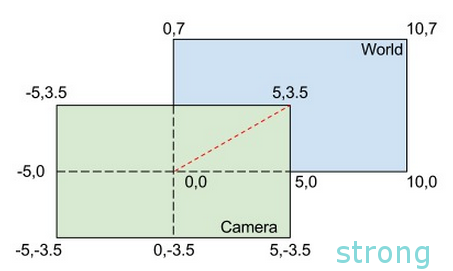
但是通过方法 进行了转换,这样camera的投影就正好和screen看的一样
camera.position.set(SCENE_WIDTH / 2f, SCENE_HEIGHT / 2f, 0.0f);
camera.update();
在SpriteBatch里面有个属性Blending,默认是可以使用的。这意为着在绘制一个图像时,该图像中透明的部分会直接与屏幕上已有的纹理重合,显示出屏幕上已有的图像。
如果关闭Blending,那么屏幕上原有的图像会被新的纹理替代,这样在绘制背景时会更有效率,在实际应用中,也要尽量可能关闭blending,除非你确认需要这个效果。
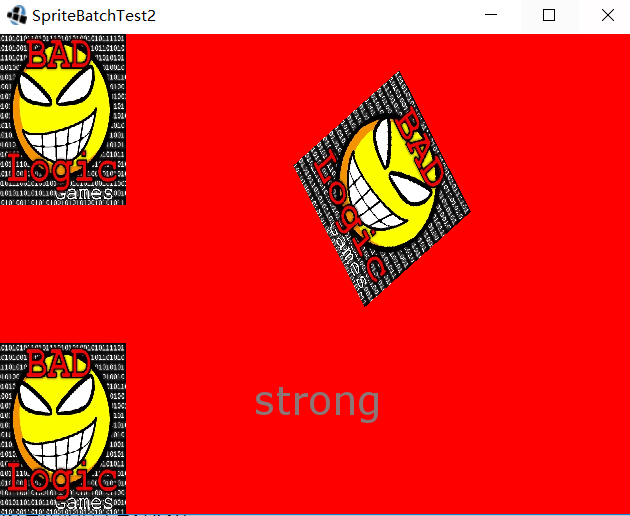
最终程序运行效果如下图


 2604
2604

 被折叠的 条评论
为什么被折叠?
被折叠的 条评论
为什么被折叠?
 到【灌水乐园】发言


