


概括:本文主要是我自己在进行 Python 项目开发过程中,该怎么样初始化创建一个 Python 的项目,该怎么对第三方包的安装管理方便移植到其他的系统上, 该怎么样最开始配置 Python 项目的目录结构的思考,下面依次会介绍以下内容,欢迎大家积极交流:
-
- 一个合适的 Python 的目录结构,怎么安装项目所需要的第三库,有什么注意内容.
-
- 介绍怎么用 VScode 联合 Pylance 和 autopep-8 配置我们的 Python 项目.
-
- 使用 Git 管理 Python 项目时候,最好怎么固定项目的文件结构.
-
- Python 项目的 Log 内容和配置模板.
本文全部内容的代码仓库:How_To_Create_A_Python_Project_By_VSCode
1. Python 项目目录以及运行第三方库的方法
1.1 Python 项目目录和下载第三方库
1.1.1 Python 项目的目录
项目其实没有固定格式的目录,完全按照各位项目实际需求进行配置,这里只是我个人的一点使用习惯.
我的个人习惯,在一个 Python 项目中包括以下文件夹和内容:
lua
复制代码
pldz@pldz-pc:/mnt/hgfs/VMware/Others/How_To_Create_A_Python_Project$ tree -L 3
.
├── app.py
├── build
├── config.yaml
├── references
├── resources
├── scripts
│   └── lib
│       ├── config.py
│       └── log.py
└── test
app.py文件:用于编写主要的 Python 项目启动逻辑,作为项目的入口函数,同样也是项目的路径位置(利用 Python 的__file__属性配置项目路径).build目录:用于存放 Python 项目用到的第三方库,也就是 pip 下载的包的位置,我们可以采用pip install <包名> --target=<当前的build文件夹的路径>,将第三方内容下载到我们的项目下,方便项目移植,后面会专门介绍.config.yaml文件:作为外部用户可以对项目内容修改的配置属性文件.references目录: 存放一下项目的参考资料,或者是历史记录等等.resources目录:存放项目的静态资源,如项目可能读写到的文件,web 项目的 dist 文件等等.scripts目录:存放 Python 的核心代码,里面可以再包括很多层级的目录完成需求,例如lib文件夹,存放一些不依赖任何库的脚本,用于配置项目,module文件夹用于存放一些自己写的模块等等.
1.1.2 Python 项目安装第三方安装包的方法
一般情况下,我们会使用
pip下载了依赖项,但是此时移植到新的设备环境下,又要重新pip3下载,但是有些场景是没有办法连接网络的,这个时候需要进行在项目中直接下载到这个包,接下来的内容,我们以flask包举例:
- 通过
pip3中的--target下载指定的包到项目目录下,例如这里下载flask并开辟一个web 服务器,可以看到的是下载完成包之后,并不影响我们的Python环境:pip3 install flask --target=<build目录的绝对路径>
shell
复制代码
D:\Workspace\VMware\Others\How_To_Create_A_Python_Project\code>pip3 list
Package               Version
--------------------- ---------
certifi               2022.9.24
charset-normalizer    2.1.1
distlib               0.3.6
docopt                0.6.2
filelock              3.8.0
idna                  3.4
numpy                 1.23.4
opencv-contrib-python 4.6.0.66
opencv-python         4.6.0.66
pip                   21.1.1
pipreqs               0.4.11
platformdirs          2.5.4
requests              2.28.1
setuptools            56.0.0
urllib3               1.26.12
virtualenv            20.16.7
virtualenvwrapper-win 1.2.7
yarg                  0.1.9
WARNING: You are using pip version 21.1.1; however, version 23.2.1 is available.
You should consider upgrading via the 'd:\python\python.exe -m pip install --upgrade pip' command.

D:\Workspace\VMware\Others\How_To_Create_A_Python_Project\code>pip3 install flask --target=D:\Workspace\VMware\Others\How_To_Create_A_Python_Project\code\build
Collecting flask
  Downloading Flask-2.3.2-py3-none-any.whl (96 kB)
     |████████████████████████████████| 96 kB 191 kB/s
... ...
importlib-metadata, click, blinker, flask
Successfully installed Jinja2-3.1.2 MarkupSafe-2.1.3 Werkzeug-2.3.6 blinker-1.6.2 click-8.1.6 colorama-0.4.6 flask-2.3.2 importlib-metadata-6.8.0 itsdangerous-2.1.2 zipp-3.16.2
WARNING: You are using pip version 21.1.1; however, version 23.2.1 is available.
You should consider upgrading via the 'd:\python\python.exe -m pip install --upgrade pip' command.

D:\Workspace\VMware\Others\How_To_Create_A_Python_Project\code>pip3 list
Package               Version
--------------------- ---------
certifi               2022.9.24
charset-normalizer    2.1.1
distlib               0.3.6
docopt                0.6.2
filelock              3.8.0
idna                  3.4
numpy                 1.23.4
opencv-contrib-python 4.6.0.66
opencv-python         4.6.0.66
pip                   21.1.1
pipreqs               0.4.11
platformdirs          2.5.4
requests              2.28.1
setuptools            56.0.0
urllib3               1.26.12
virtualenv            20.16.7
virtualenvwrapper-win 1.2.7
yarg                  0.1.9
WARNING: You are using pip version 21.1.1; however, version 23.2.1 is available.
You should consider upgrading via the 'd:\python\python.exe -m pip install --upgrade pip' command.
- 编写代码,查看错误:
- 2.1 代码如下:
py
复制代码
from build import flask

app = flask.Flask(__name__, template_folder="./resources",
            static_url_path="", static_folder="./resources")

@app.route('/')
def index():
    return "Hello World"

app.run(host="0.0.0.0", port=5000)
- 2.2 此时存在错误:
py
复制代码
Traceback (most recent call last):
  File "d:\Workspace\VMware\Others\How_To_Create_A_Python_Project\code\app.py", line 1, in <module>
    from build import flask
  File "d:\Workspace\VMware\Others\How_To_Create_A_Python_Project\code\build\flask__init__.py", line 1, in <module>
    from . import json as json
  File "d:\Workspace\VMware\Others\How_To_Create_A_Python_Project\code\build\flask\json__init__.py", line 6, in <module>
    from ..globals import current_app
  File "d:\Workspace\VMware\Others\How_To_Create_A_Python_Project\code\build\flask\globals.py", line 6, in <module>
    from werkzeug.local import LocalProxy
ModuleNotFoundError: No module named 'werkzeug'
这个该怎么操作呢?事实上我们可以优化我们的项目启动习惯,以此完成操作:
- 2.3 优化后的代码:
py
复制代码
import os
import sys
import platform
def main() -> None:
'''The main function of the project.
'''
# Get project directory.
projectPath = os.path.dirname(os.path.abspath(__file__))
platformInfo = platform.platform()
# Add the build path into python system environment.
if "Windows" in platformInfo:
# Be carefully! If you use append, it may not work!
sys.path.insert(0, projectPath+'/build')
print(sys.path)
runApp()
else:
print("[ ERROR ] The project doesn't support this platform")
exit(0)
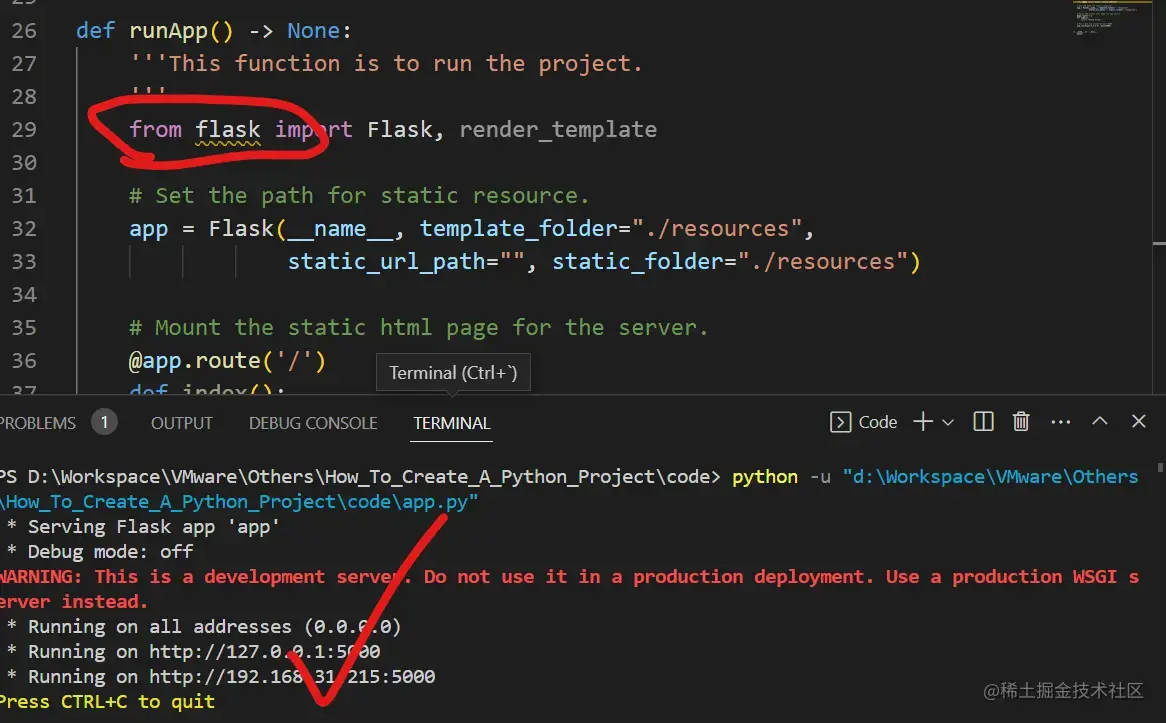
def runApp() -> None:
'''This function is to run the project.
'''
from flask import Flask, render_template
# Set the path for static resource.
app = Flask(__name__, template_folder="./resources",
static_url_path="", static_folder="./resources")
# Mount the static html page for the server.
@app.route('/')
def index():
return "Hello World!"
# Run flask web server on port 5000.
app.run(host="0.0.0.0", port=5000)
if __name__ == '__main__':
main()
此时可以看见,尽管vscode提示报错,但是代码却是可以运行起来的
1.2 Python项目配置第三方库的方法
这里主要对上面成功运行起来的Python项目进行解读
1.2.1 项目的路径变量__file__
__file__是一个内置变量,用于获取当前脚本文件的路径(包括文件名),它表示当前模块(或脚本)的文件名,也就是说,它与.py文件相绑定,如果你在python编辑器中想要获取__file__则会报错:
shell
复制代码
pldz@pldz-pc:~$ python3
Python 3.8.10 (default, Mar 13 2023, 10:26:41)
[GCC 9.4.0] on linux
Type "help", "copyright", "credits" or "license" for more information.
>>> __file__
Traceback (most recent call last):
  File "<stdin>", line 1, in <module>
NameError: name '__file__' is not defined
>>>
我们习惯通过__file__和os库去找寻一些与文件路径有关系的操作,如读取文件位置,或者也可以配置项目启动位置等等,例如:在Linux系统中,我们想配置开机自动运行app.py文件,这个时候编写的开机自启动脚本所找到的文件app.py是绝对路径的,因此采用__file__设置一些与文件位置有关的操作,就非常方便了
下面是__file__变量的一些常见用法:
- 获取当前脚本文件的绝对路径:
py
复制代码
import os
current_file = os.path.abspath(__file__)
print(current_file)
这将输出当前脚本文件的绝对路径,包括文件名
- 获取当前脚本文件所在的目录路径:
py
复制代码
import os

current_dir = os.path.dirname(os.path.abspath(__file__))
print(current_dir)
这将输出当前脚本文件所在的目录路径,不包括文件名。
- 构建其他文件的路径:
py
复制代码
import os

current_dir = os.path.dirname(os.path.abspath(__file__))
other_file = os.path.join(current_dir, 'other_file.txt')
print(other_file)
构建一个名为 other_file.txt 的文件的路径,该文件与当前脚本文件位于同一目录下。
1.2.2 sys.path模块
核心代码:
py
复制代码
sys.path.insert(0, projectPath+'/build')
sys.path模块是Python中的一个列表,即这个变量实质上是一个list对象,可以调用append(),insert(),extend()等方法.sys.path模块用于存储解释器在导入模块时查找模块的路径,它包含了一系列目录的路径,解释器会按照这个顺序在这些路径中查找要导入的模块,如果某些时候,你添加你本地的环境路径时,出现某些模块不匹配,但是你在本地的确是安装成功的情况,可能就是查询顺序时候,你的包的依赖项,在原生的site-package下存在,但是你的包的顺序低于它,Python定位的依赖项和你包的依赖项不匹配,此时可以采用insert(0,)的操作.sys.path的作用是告诉解释器在哪些目录中查找模块。当我们使用import语句导入一个模块时,解释器会按照sys.path中的路径顺序去查找对应的模块文件。如果找到了对应的模块文件,则导入成功;如果在所有路径中都没有找到对应的模块文件,则会抛出ImportError异常.- 再次强调:
sys.path的先后顺序非常重要,因为解释器会按照路径的顺序进行查找。当多个路径中存在同名的模块时,解释器会按照sys.path中的先后顺序找到的第一个模块进行导入。因此,如果我们希望导入自己编写的模块而不是系统默认提供的同名模块,就需要将自己编写的模块所在的路径放在sys.path的前面。
默认情况下,
sys.path中包含以下几个路径,按照顺序大概如此排列:
- 当前路径
- Python原生的库路径,也就是Python的安装目录下的一些基础库位置
- Python解释器安装目录下的site-packages目录
1.2.3 import顺序
核心代码:
py
复制代码
import os
import sys
import platform

def main() -> None:
  ... ...
        sys.path.insert(0, projectPath+'/build')
  ... ...
def runApp() -> None:
  ... ...
    from flask import Flask, render_template
  ... ...
可以看见,import flask这个第三方库的顺序,明显是在sys.path配置成功之后,此时才是生效的
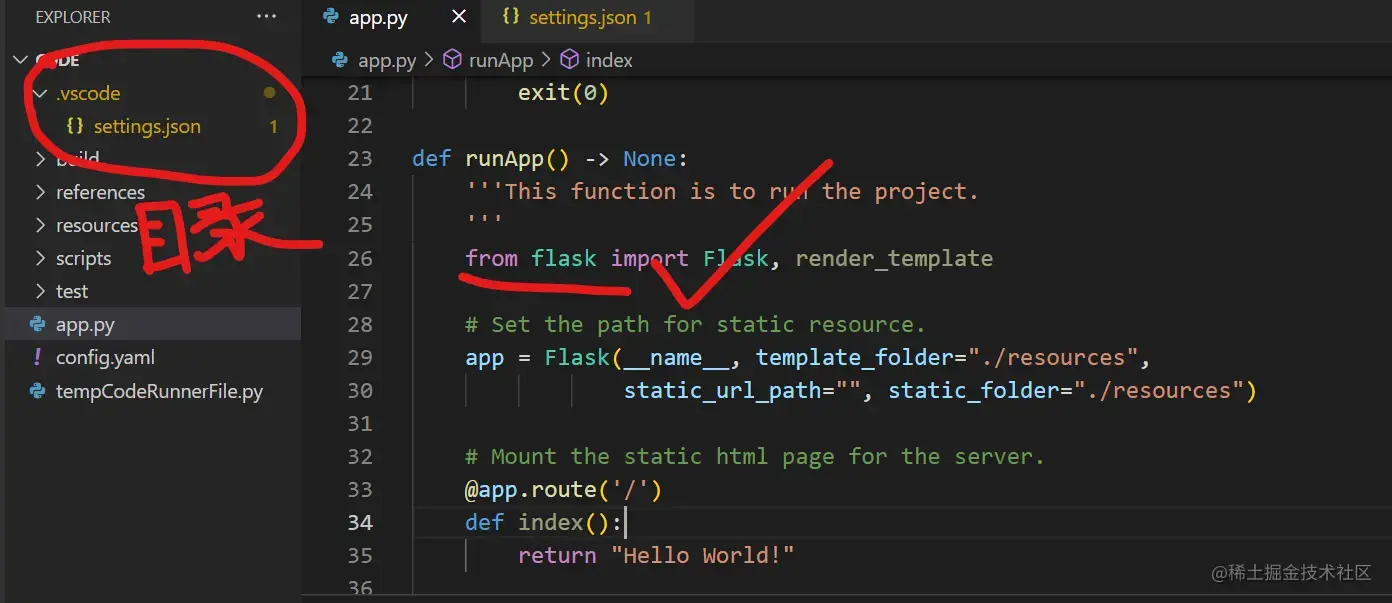
1.2.4 解决vscode提示问题
这个主要针对代码能够运行,但是vscode会提示警告的问题,这部分绘制第二节介绍,主要是将vscode的Python插件Pylance的路径添加一下,首先:
- 项目中创建
.vscode文件夹,并添加settings.json文件 - 配置
Pylance添加本地第三库的路径:
json
复制代码
{
    "python.analysis.extraPaths": [
        "./build"
    ]
}
- 重启vscode可以看到,警告提示已经消失了:
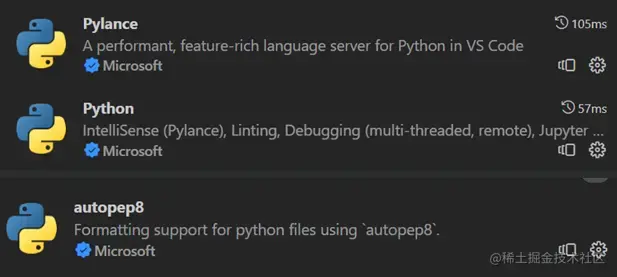
2. VScode 联合 Pylance 和 autopep-8 配置我们的 Python 项目
2.1 安装插件:Python, Pylance, autopep8
makefile
复制代码
Python插件:配置Python解释器
Pylance插件:配置Python代码在vscode的编程习惯和使用提示
autopep8插件: 用于格式化Python代码
2.2 配置VScode的Python插件:
json
复制代码
{
    // 消除vscode找不到第三方库的路径提示.
    "python.analysis.extraPaths": [
        "./build"
    ],
    // 设置pylance对Python代码要求的检查,这个开启能够提升你的编程素养,但是有些时候也不怎么智能化.
    "python.analysis.typeCheckingMode": "off",

    // 针对vscode的配置,在编译器中取消哪些文件的可视化,比方说__pycache__就可以不用看见~
    "files.exclude": {
        "**/.git": true,
        "**/.gitkeep": true,
        "**/__pycache__": true
    },

    // 针对vscode的放大镜在项目下全局搜索的配置,添加的元素是不会被搜索的路径
    "search.exclude": {
        "build": true,
        "resources": true,
        "reference": true
    },
    // 设置默认Python代码格式化的插件
    "[python]": {
        // 这个就是我们必须安装的autopep8插件
        "editor.defaultFormatter": "ms-python.autopep8"
    },
    "python.formatting.provider": "none",

    // 设置python文件保存时候格式化我们的代码
    "editor.formatOnType": true,
    "editor.formatOnSave": true
}
3. git操作下保证项目目录完整性
在执行git操作时候,对于空的文件夹,或者是被
.gitignore忽略上传之后的内容,是空的造成的移植git项目时候,缺少文件目录的情况,然后你Python项目又会操作到这些目录,此时则会出现OSError的不必要错误
整体来说,解决这个的办法,也就是先用一个readme.md或者其他文件,将我们的文件夹不为空的上传到云端仓库,然后再修改.gitignore目录,实现云端仓库有这个目录,且不为空,一般来说,这个文件可以是.gitkeep类型。
我们可以参考下面的几个内容,加深理解:
总结下来就是:空文件夹 -> 加入.gitkeep文件 -> push到云端 -> 修改.gitignore -> 再push到云端
4. Python 项目的 Log 内容和配置模板.
4.1 Log的模板:
py
复制代码
import os
import time
import logging
from logging.handlers import TimedRotatingFileHandler


class Log():
    '''
    The logging handling level int value:
     - CRITICAL = 50
     - FATAL = CRITICAL
     - ERROR = 40
     - WARNING = 30
     - WARN = WARNING
     - INFO = 20
     - DEBUG = 10
     - NOTSET = 0
    '''

    def __init__(self, consoleLevel=20, fileLevel=50, filePath="") -> None:
        '''Initialize the instance of Log.
         - (str) consoleLevel: The console outputs a log level, default value is 10.
         - (str) fileLevelL: The file output log level, the default value is 50.
         - (str) filePath: The log file directory, the default vaule is the current location.
        '''
        self.logger = logging.getLogger()
        self.logger.setLevel(logging.DEBUG)
        self.formatter = logging.Formatter(
            '[ %(levelname)s ] - <Your Project Name>: %(asctime)s - %(message)s')
        self.settingLog(consoleLevel, fileLevel, filePath)

    def settingLog(self, consoleLevel, fileLevel, filePath) -> None:
        '''The main function to set the logger handler.
         - (str) consoleLevel: The log level at which the information can be outputed on screen.
         - (str) fileLevel: The log level at which the file can be written.
         - (str) filePath: The log file path, If the path does not exist, one is created.
        '''
        self.setConsoleHandling(consoleLevel)
        self.setFileHanding(fileLevel, filePath)

    def setConsoleHandling(self, level) -> None:
        '''Set the log level at which the information can be outputed on screen.
         - (str) level: The log level at which the information can be outputed on screen.
        '''
        consoleHandling = logging.StreamHandler()
        # The handle to control if the logger can be output on terminal.
        consoleHandling = logging.StreamHandler()
        # If you want the INFO can be outputed on terminal, you can set the level in DEBUG
        consoleHandling.setLevel(level)
        consoleHandling.setFormatter(self.formatter)

        self.logger.addHandler(consoleHandling)

    def setFileHanding(self, level, filePath) -> None:
        '''Set the log file path and Set the log level at which the file can be written.
         - (str) level: The log level at which the file can be written.
         - (str) filePath: The log file path, If the path does not exist, one is created.
        '''
        # The handle of the files saved.
        logPath = os.getcwd() + filePath + "/"
        if not os.path.exists(logPath):
            try:
                os.mkdir(logPath)
            except OSError:
                print("Create the log file directory `{}`  failed!".format(logPath))
                return

        logName = time.strftime('%Y-%m-%d-%H-%M-%S.log', time.localtime())
        fileHandler = TimedRotatingFileHandler(
            logPath+logName, when='midnight', backupCount=3)
        fileHandler.setLevel(level)
        fileHandler.setFormatter(self.formatter)

        self.logger.addHandler(fileHandler)

    def info(self, message) -> None:
        self.logger.info(message)

    def debug(self, message) -> None:
        self.logger.debug(message)

    def warning(self, message) -> None:
        self.logger.warning(message)

    def error(self, message) -> None:
        self.logger.error(message)

    def critical(self, message) -> None:
        self.logger.critical(message)
4.2 配置文件的参考
py
复制代码
import os


class Configure():
    def __init__(self) -> None:
        '''
        config.py is Non-modifiable variable values stored inside the project.
        Using the define of class, it's easy for compiler to promote.

        - Note: For the description of the local path, the attribute name must start with 'local_',
        and the last character of the string of the path does not add '/',
        and all paths need to be used in conjunction with 'project path'.
        '''
        self.ID = '4'
        self.local_resource = '/resources'
        self.getAllLocalAbstractPath()

    def getAllLocalAbstractPath(self) -> None:
        '''Before using the configuration, the python should make all local paths absolute.
         We agree that variables for local paths must start with 'local_'.
        '''
        projectPath = os.path.abspath(__file__)

        # Get the projec
        for _ in range(3):
            projectPath = os.path.dirname(projectPath)

        for attr in self.__dict__:
            if 'local_' in attr:
                self.__dict__[attr] = projectPath + self.__dict__[attr]
如果你对Python感兴趣,想通过学习Python获取更高的薪资,那下面这套Python学习资料一定对你有用!
资料包括:Python安装包+激活码、Python web开发,Python爬虫,Python数据分析,人工智能、机器学习等学习教程。0基础小白也能听懂、看懂,跟着教程走,带你从零基础系统性地学好Python!
学习资源推荐
除了上述分享,如果你也喜欢编程,想通过学习Python获取更高薪资,这里给大家分享一份Python学习资料。
这里给大家展示一下我进的兼职群和最近接单的截图


😝朋友们如果有需要的话,可以V扫描下方二维码联系领取,也可以内推兼职群哦~
学好 Python 不论是就业还是做副业赚钱都不错,但要学会 Python 还是要有一个学习规划。最后大家分享一份全套的 Python 学习资料,给那些想学习 Python 的小伙伴们一点帮助!
 ### 1.Python学习路线


2.Python基础学习
01.开发工具

02.学习笔记

03.学习视频

3.Python小白必备手册

4.数据分析全套资源

5.Python面试集锦
01.面试资料


02.简历模板

因篇幅有限,仅展示部分资料,添加上方即可获取👆
------ 🙇♂️ 本文转自网络,如有侵权,请联系删除 🙇♂️ ------


 被折叠的 条评论
为什么被折叠?
被折叠的 条评论
为什么被折叠?
 到【灌水乐园】发言


