


1. Linux存储LVM管理
使用 Vmware软件和提供的 Centos-7-x86_64-DvD-1511.iso创建虚拟机,自
行配置好网络并多添加一块大小为20G的硬盘,使用 fdisk命令对该硬盘进形分
区,要求分出三个大小为5G的分区。使用这三个分区,创建名 xcloudvg的卷组。
然后创建名xcloudlv的逻辑卷,大小为12G,最后用xfs文件系统对逻辑卷进行格
式化并挂载到/mt目录下。
(1)配置IP地址
查看虚拟网络编辑器,查看本机NAT模式的网络信息,如图所示。
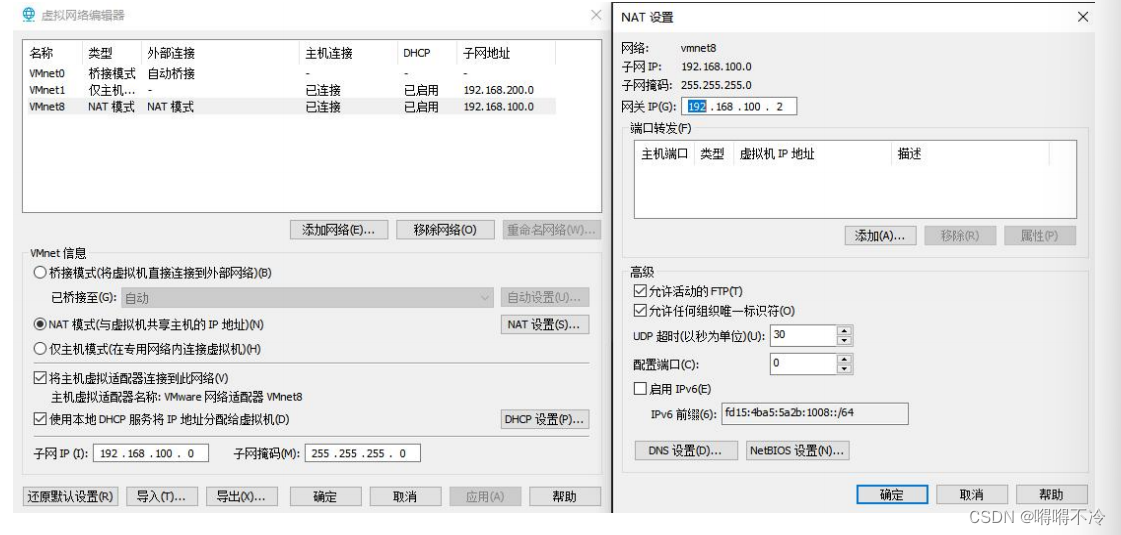
回到虚拟机界面,编辑网卡配置文件,将网络配置成 192.168.100.10,命
令如下:
[root@localhost ~]# vi /etc/sysconfig/network-scripts/ifcfg-eno16777736[root@localhost ~]# cat /etc/sysconfig/network-scripts/ifcfg-eno16777736TYPE=EthernetBOOTPROTO=staticDEFROUTE=yesPEERDNS=yesPEERROUTES=yesIPV4_FAILURE_FATAL=noIPV6INIT=yesIPV6_AUTOCONF=yesIPV6_PEERROUTES=yesIPV6_FAILURE_FATAL=noNAME=eno16777736UUID=25acd229-1851-4454-9219-8dcee56b798cDEVICE=eno16777736ONBOOT=yesIPADDR=192.168.100.10NETMASK=255.255.255.0GATEWAY=192.168.100.2
配置完成后,重启网络并查看IP,命令如下:
[root@localhost ~]# systemctl restart network[root@localhost ~]# ip a1: lo: <LOOPBACK , UP , LOWER_UP> mtu 65536 qdisc noqueue state UNKNOWNlink/loopback 00:00:00:00:00:00 brd 00:00:00:00:00:00inet 127.0.0.1/8 scope host lovalid_lft forever preferred_lft foreverinet6 ::1/128 scope hostvalid_lft forever preferred_lft forever2: eno16777736: <BROADCAST , MULTICAST , UP , LOWER_UP> mtu 1500 qdiscpfifo_fast state UP qlen 1000link/ether 00:0c:29:d6:48:b7 brd ff:ff:ff:ff:ff:ffinet 192.168.100.10/24 brd 192.168.200.255 scope global eno16777736valid_lft forever preferred_lft foreverinet6 fe80::20c:29ff:fed6:48b7/64 scope linkvalid_lft forever preferred_lft forever
配置完IP后,可以通过PC机的远程连接工具SecureCRT连接虚拟机。
(2)添加大小为20 GB的硬盘
[root@localhost ~]# lsblk
(3)创建物理卷
在创建物理卷之前,需要对磁盘进行分区。首先使用fdisk
命令对
sdb
进行分区操作, 分出三个大小为5 GB
的分区,命令如下:
[root@localhost ~]# fdisk /dev/sdbWelcome to fdisk (util-linux 2.23.2)..........Command (m for help): nPartition type:pprimary (0 primary , 0 extended , 4 free)eextendedSelect (default p): pPartition number (1-4 , default 1):First sector (2048-41943039 , default 2048):Using default value 2048Last sector , +sectors or +size{K , M , G} (2048-41943039 , default 41943039): +5GPartition 1 of type Linux and of size 5 GiB is setCommand (m for help): n重复三次上述操作Command (m for help): w[root@localhost ~]# lsblk
分完分区后,对这两个分区进行创建物理卷操作,命令如下:
(4)创建卷组
[root@localhost ~]# pvcreate /dev/sdb1 /dev/sdb2 /dev/sdb3Physical volume "/dev/sdb1" successfully createdPhysical volume "/dev/sdb2" successfully createdPhysical volume "/dev/sdb3" successfully created
使用刚才创建好的三个物理卷,创建名为
xcloudvg
的卷组,命令如下:
[root@localhost ~]# vgcreate xcloudvg /dev/sdb[1-3]Volume group "xcloudvg" successfully created
(5)创建逻辑卷
创建逻辑卷,名称为
xcloudlv
,大小为
12 GB
。命令如下:
[root@localhost ~]# lvcreate -L +12G -n xcloudvg xcloudlvLogical volume "xcloudlv" created.
(6)格式化
使用
xfs
文件系统格式化逻辑卷
xcloudlv
。命令如下:
[root@localhost ~]# mkfs.xfs /dev/mapper/xcloudvg-xcloudlv
(7)把逻辑卷mylv挂载到/mnt下并验证。
[root@localhost ~]# mount /dev/mapper/xcloudvg-xcloudlv /mnt/[root@localhost ~]# df -h
(8)删除
删除逻辑卷
[root@localhost ~]# lvremove /dev/xcloudvg/xcloudlv
删除卷组
[root@localhost ~]# vgremove xcloudvg
将卷组xcloudvg重命名为xcloudvg1
[root@localhost ~]# vgrename xcloudvg xcloudvg1
删除物理卷
[root@localhost ~]# pvremove /dev/sdb3
2. yum源管理
当前有一个
centos7.2-1511.iso
的镜像文件,使用这个文件配置
yum
源要求将这个镜
像文件挂载在
/opt/centos
目录。还存在一个
ftp
源,
ip
地址为
192.168.100.200
,
ftp
共享的
目录为
/opt
,
/opt
目录中存在一个
iaas
目录
(
该目录下存在一个
repodata
目录
)
请问如何配
置自己的
local.repo
文件,使得可以使用这两个地方的软件包,安装软件。
(1)修改主机名
在 xersver1 中修改主机名[root@localhost ~]# hostnamectl set-hostname xersver1[root@localhost ~]# bash // 刷新[root@mall ~]# hostnamectl在 xserver2 中修改主机名[root@localhost ~]# hostnamectl set-hostname xserver2[root@localhost ~]# bash // 刷新[root@mall ~]# hostnamectl
(2)修改映射文件
在 xserver1 中修改:[root@xserver1 ~]# vi /etc/hosts127.0.0.1localhost localhost.localdomain localhost4 localhost4.localdomain4::1localhost localhost.localdomain localhost6 localhost6.localdomain6192.168.100.10 xserver1192.168.100.20 xserver2在 xserver2 中修改:[root@xserver2 ~]# vi /etc/hosts127.0.0.1localhost localhost.localdomain localhost4 localhost4.localdomain4::1localhost localhost.localdomain localhost6 localhost6.localdomain6192.168.100.10 xserver1192.168.100.20 xserver2
(3)创建/opt/centos 目录
在 xserver1 中:[root@xserver1 ~]# mkdir /opt/centos[root@xserver1 ~]#
(4)挂载镜像
将
1511
镜像挂载到
/opt/centos
目录下
在 xserver1 中:[root@xserver1 ~]# mount -o loop CentOS-7-x86_64-DVD-1511.iso /opt/centos/mount: /dev/loop0 is write-protected , mounting read-only
(5)删除自带 yum 源
在 xserver1 中:[root@xserver1 ~]# rm -rvf /etc/yum.repos.d/*在 xserver2 中:[root@xserver2 ~]# rm -rvf /etc/yum.repos.d/*
(6)配置本地 yum 源
在 xserver1 中:[root@xserver1 ~]# vi /etc/yum.repos.d/local.repo[centos]name=centosbaseurl=file:///opt/centosgpgcheck=0enabled=1在考试时会有一个 ftp 源,需要在配置 ftp 源[iaas]name=iaasbaseurl=ftp://192.168.100.200/iaasgpgcheck=0enabled=1[root@xserver1 ~]# yum clean all[root@xserver1 ~]# yum repolist
使用 xserver1
虛拟机,安装
ftp
服务,并配置
ftp
的共享目录为
/opt
。使用
Vmware
软件继续启动提供的
xserver2
虛拟机
(
配置虚拟机
xserver.2
的
|P
为
192168.100.12
,主
机名为
xserver2)
,并创建该虚拟机的
yum
源文件
ftp.repo
使用
xserver1
的
tp
源
(
配置
文件中的
TP
地址使用主机名
)
。
注意:此题在上述(1
)—(
6
)基础上操作
(7)安装 vsftpd
[root@xserver1 ~]# yum -y install vsftpdInstalled:vsftpd.x86_64 0:3.0.2-25.el7Complete!
(8)配置/etc/vsftpd/vsftpd.conf
[root@xserver1 ~]# vi /etc/vsftpd/vsftpd.conf添加anon_root=/opt/
开启
vsftpd
并开启自启
[root@xserver1 ~]# systemctl start vsftpd && systemctl enable vsftpdCreated symlink from /etc/systemd/system/multi-user.target.wants/vsftpd.service to/usr/lib/systemd/system/vsftpd.service.
(9)在 xserver2 中配置 yum 源:
[root@xserver2 ~]# vi /etc/yum.repos.d/local.repo[centos]name=centosbaseurl=ftp://192.168.100.10/centosgpgcheck=0enabled=1在 xserver2 中列出 yum 源[root@xserver2 ~]# yum repolistLoaded plugins: fastestmirrorcentos | 3.6 kB 00:00(1/2): centos/group_gz | 155 kB 00:00(2/2): centos/primary_db | 2.8 MB 00:00Determining fastest mirrorsrepo id repo name statuscentos centos 3,723repolist: 3,723
当前有一个
opt
目录
,
该目录中的文件
ambari-2.6.0.0
、
base
使得可以使用这两个地
方的软件包
,
安装软件。
[root@xserver1 ~]# vi /etc/yum.repos.d/local.repo[centos]name=centosbaseurl=file://opt/ ambari-2.6.0.0gpgcheck=0enabled=1[iaas]name=iaasbaseurl=file://opt/basegpgcheck=0enabled=1
3. 数据库管理
使用 Vmware创建两台centos7系统的虚拟机,安装数据库服务,并将两台数据库配
置为主从数据库模式
( master
和
slave)
。配置完成后,在从节点,执行
show status slave\G
査看从节点的复制状态。将査看从节点服务状态的返回结果以文本形式提交到答题框。
(
数据库用户名
root
,密码
000000
关于数据库的命令均使用小写
)
以下操作在 2.yum
源管理(
1
)—(
9
)的基础上进行操作
(1)安装mariadb和mariadb-server
在 xserver1 中:[root@xserver1 ~]# yum -y install mariadb mariadb-serverInstalled:mariadb.x86_64 1:5.5.44-2.el7.centosmariadb-server.x86_64 1:5.5.44-2.el7.centosComplete!在 xserver2 中:[root@xserver2 ~]# yum -y install mariadb mariadb-serverInstalled:mariadb.x86_64 1:5.5.44-2.el7.centosmariadb-server.x86_64 1:5.5.44-2.el7.centosComplete!
(2)配置/etc/my.cnf
在 xserver1 中:[root@xserver1 ~]# vi /etc/my.cnf在 [mysqld] 下添加:log_bin = mysql_binbinlog_ignore_db = mysqlserver_id = 10在 xserver2 中:在 [mysqld] 下添加:log_bin = mysql_binbinlog_ignore_db = mysqlserver_id = 20
(3)重启mariadb
在 xserver1 中:[root@xserver1 ~]# systemctl restart mariadb在 xserver2 中:[root@xserver2 ~]# systemctl restart mariadb
(4)初始化mysql
在 xserver1 中:[root@xserver1 ~]# mysql_secure_installationY000000000000YNYY在 xserver2 中:[root@xserver2 ~]# mysql_secure_installationY000000000000YNY
(5)进入 mysql 修改权限
在 xserver1 中重启 mariadb :[root@xserver1 ~]# systemctl restart mariadb在 xserver2 中重启 mariadb :[root@xserver2 ~]# systemctl restart mariadb在 xserver1 中:[root@xserver1 ~]# mysql -u root -p000000MariaDB [(none)]> grant all privileges on *.* to 'root'@'%' identified by '000000';Query OK, 0 rows affected (0.00 sec)MariaDB [(none)]> grant replication slave on *.* to 'user'@'192.168.100.20' identified by'000000';Query OK, 0 rows affected (0.00 sec)在 xserver2 中:[root@xserver2 ~]# mysql -u root -p000000MariaDB [(none)]> change master to master_host="192.168.100.10", master_user="user",master_password="000000";Query OK, 0 rows affected (0.01 sec)
(6)启动 slave 并查看状态
在 xserver2 中:[root@xserver2 ~]# mysql -u root -p000000MariaDB [(none)]> start slave;Query OK, 0 rows affected (0.00 sec)MariaDB [(none)]> show slave status \G*************************** 1. row ***************************Slave_IO_State: Waiting for master to send eventMaster_Host: 192.168.100.10Master_User: userMaster_Port: 3306Connect_Retry: 60Master_Log_File: mysql_bin.000003Read_Master_Log_Pos: 1686Relay_Log_File: mariadb-relay-bin.000004Relay_Log_Pos: 1970Relay_Master_Log_File: mysql_bin.000003Slave_IO_Running: YesSlave_SQL_Running: Yes
使用 Vmware
软件和提供的
Centos-7-x8664-DVD-1511iso
创建虚拟机
,
自行配置好
网络和
YUM
源
,
安装
mariadb
数据库
,
安装完毕后登录数据库
,
查询当前系统的时间和用
户。
(
数据库用户名
root,
密码
000000
关于数据库的命令均使用小写
)
[root@xserver1 ~]# mysql -u root -p000000MariaDB [(none)]> select sysdate();+---------------------+| sysdate()|+---------------------+| 2022-11-21 14:03:04 |+---------------------+1 row in set (0.00 sec)MariaDB [(none)]> select user();+----------------+| user()|+----------------+| root@localhost |+----------------+1 row in set (0.00 sec)
4. Open Stack管理
安装 Open Stack平台
使用 Mware
创建两台
Centos7.2
的操作系统,自行配置网络与
P
,使用提供的软件
包,安装
Open Stack
平台。安装完成后,使用
cul
命令查询
http://192.168.100.10/dashbo
ard/auth/login/
将
cur
命令的查询结果以文本形式提交到答题框。
(1)在openstackonlyone虚拟机上操作,修改主机名
[root@localhost ~]# hostnamectl set-hostname controller[root@localhost ~]# bash[root@controller ~]#
(2)配置ip地址
[root@controller ~]# vi /etc/sysconfig/network-scripts/ifcfg-eno16777736TYPE=EthernetBOOTPROTO=dhcp 修改为 staticDEFROUTE=yesPEERDNS=yesPEERROUTES=yesIPV4_FAILURE_FATAL=noIPV6INIT=yesIPV6_AUTOCONF=yesIPV6_DEFROUTE=yesIPV6_PEERDNS=yesIPV6_PEERROUTES=yesIPV6_FAILURE_FATAL=noNAME=eno16777736UUID=751ec73f-6cff-486d-93cf-1ddf3d088180DEVICE=eno16777736ONBOOT=no修改为 yes添加 ip 地址,掩码,网关IPADDR=192.168.100.10PTEFIX=24GATEWAY=192.168.100.2
(3)修改映射
[root@controller ~]# vi /etc/hosts127.0.0.1localhost localhost.localdomain localhost4 localhost4.localdomain4::1localhost localhost.localdomain localhost6 localhost6.localdomain6192.168.100.10 controller重启网络[root@controller ~]# service network restartRestarting network (via systemctl): [ OK ]
(4)重启OpenStack的全部服务
重启 OpenStack 的全部服务[root@controller ~]# openstack-service restart使用此命令查询结果[root@controller ~]# curl http://192.168.100.10/dashboard/auth/login/<!DOCTYPE html><html><head><meta content='IE=edge' http-equiv='X-UA-Compatible' /><meta content='text/html; charset=utf-8' http-equiv='Content-Type' /><title>Login - XianDian Dashboard</title>..........<script>// Call init on DOM ready.$(document).ready(horizon.init);</script><div id="modal_wrapper"></div></body></html>
Cinder 服务
使用 Vmware软件启动提供的
opensatckallinone
镜像
,
自行检查
openstack
中各服务
的状态
,
若有问题自行排查。使用
Cinder
服务
,
创建名为
“lvm”
的卷类型
,
然后创建一块带
"lvm”
标识的云硬盘
,
名称为
BlockVloume,
大小为
2G,
查询该云硬盘详细信息。
(1)创建lvm的cinder类型
[root@controller ~]#source /etc/keystone/admin-openrc.sh[root@controller ~]#openstack volume type create lvm+---------------------------------+--------------------------------------+| Field| Value|+---------------------------------+--------------------------------------+| description| None|| id| 6859f1a8-b36e-4556-89d2-43802bdd1bc3 || is_public| True|| name| lvm|| os-volume-type-access:is_public | True|+---------------------------------+--------------------------------------+
( 2 )创建 lvm 类型的云硬盘 BlockVolume [root@controller ~]# openstack volume create --size 2 BlockVolume+---------------------+--------------------------------------+| Field| Value|+---------------------+--------------------------------------+| attachments| []|| availability_zone| nova|| bootable| false|| consistencygroup_id | None|| created_at| 2022-11-21T19:01:01.974752|| description| None|| encrypted| False|| id| 0a7277eb-ac56-46c5-beeb-2a4863442020 || migration_status| None|| multiattach| False|| name| BlockVolume|| properties||| replication_status | disabled|| size| 2|| snapshot_id| None|| source_volid| None|| status| creating|| type| None|| updated_at| None|| user_id| 0befa70f767848e39df8224107b71858|+---------------------+--------------------------------------+[root@controller ~]#cinder show BlockVolume记得提交运行结果
mycirros
使用 Vmware软件启动提供的
opensatckallinone
镜像
,
自行检查
openstack
中各服务
的 状 态
,
若 有 问 题 自 行 排 查 。 在
xserver1
节 点 的
/root
目 录 下 存 在 一 个
cerros-0.3.4-X86_64- disk. img
镜像
;
使用
glance
命令将镜像上传
,
并命名为
mycirros,
最后将
glance image.show id
命令的返回结果提交。
(1)上传cirros-0.3.4-x86_64-disk.img镜像
[root@controller ~]#source /etc/keystone/admin-openrc.sh[root@controller ~]# openstack image create --container-format bare --disk-formatqcow2 --file /root/cirros-0.3.4-x86_64-disk.img mycirros+------------------+------------------------------------------------------+| Field| Value|+------------------+------------------------------------------------------+ | checksum| ee1eca47dc88f4879d8a229cc70a07c6| container_format | bare| created_at| 2022-11-21T20:16:26Z|| disk_format| qcow2|| file| /v2/images/1217cac1-49ea-43e6-a2c3-7e82c3a9b025/file|| id| 1217cac1-49ea-43e6-a2c3-7e82c3a9b025|| min_disk| 0|| min_ram| 0|| name| mycirros|| owner| f9ff39ba9daa4e5a8fee1fc50e2d2b34|| protected| False|| schema| /v2/schemas/image|| size| 13287936|| status| active|| tags||| updated_at| 2022-11-21T20:16:27Z|| virtual_size| None|| visibility| private|
(2)查看镜像详情
[root@controller ~]# glance image-show 1217cac1-49ea-43e6-a2c3-7e82c3a9b025+------------------+--------------------------------------+| Property| Value|+------------------+--------------------------------------+| checksum| ee1eca47dc88f4879d8a229cc70a07c6|| container_format | bare|| created_at| 2022-11-21T20:16:26Z|| disk_format| qcow2|| id| 1217cac1-49ea-43e6-a2c3-7e82c3a9b025 || min_disk| 0|| min_ram| 0|| name| mycirros|| owner| f9ff39ba9daa4e5a8fee1fc50e2d2b34|| protected| False|| size| 13287936|| status| active|| tags| []|| updated_at| 2022-11-21T20:16:27Z|| virtual_size| None|| visibility| private|+------------------+--------------------------------------+
使用 Vmware
软件启动提供的
opensatckallinone
镜像
,
自行检查
openstack
中各服务的状态,
若有问题自行排查。在
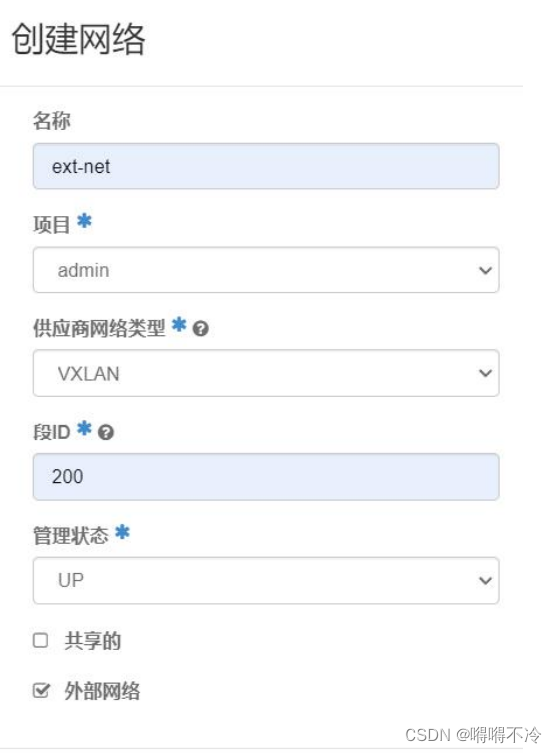
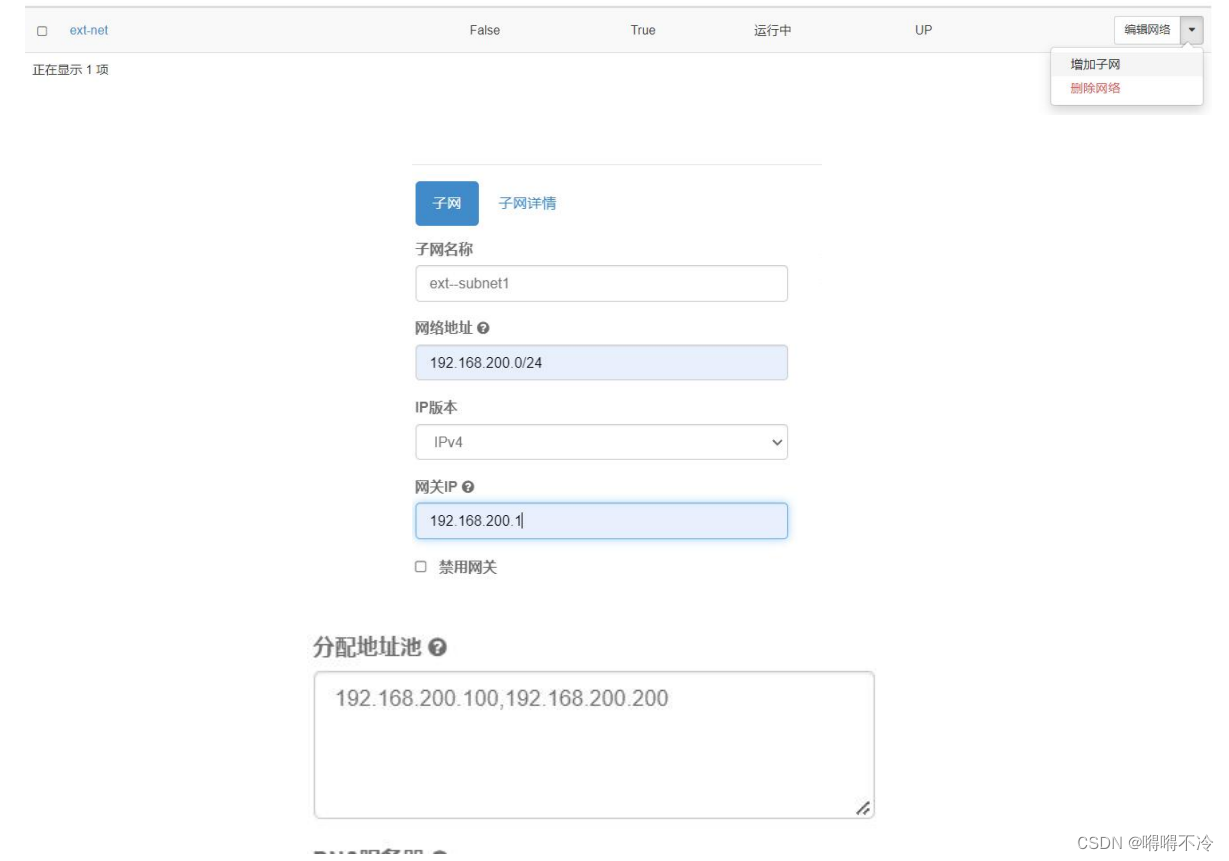
dashboard
界面创建云主机外部网络
ext-net,
子网为
ext- subnet, 云 主 机 浮 动
lP
可 用 网 段 为
192.168.200.100~192.168.200.200,
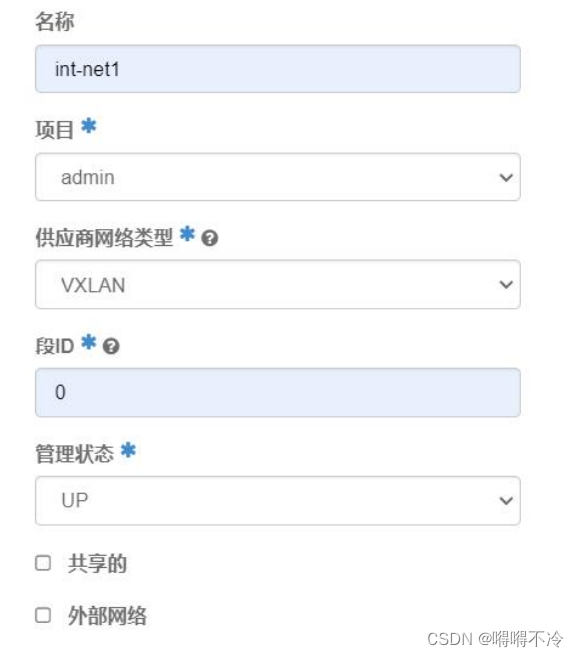
网 关 为 192.168.200.1。创建云主机内部网络
int-net1,
子网为
int- subnet1,
云主机子网
IP
可用网 段为 10.0.0.100~10.0.0.200,
网关为
10.0.0.1
。添加名为
ext- router
的路由器
,
添加网关在 ext-net 网络
,
添加内部端口到
int-net1
网络
,
完成内部网络
int-net1
和外部网络的连通。将 执行 neutron router-show ext-router
命令所返回的结果以文本形式提交到答题框。
在浏览器中搜索
http://192.168.100.10/dashboard
登录:域:
xiandian
用户:
admin
密码:
000000
管理员》》网络》》创建网络
创建成功:

创建子网:
项目》》网络》》网络:
创建内网:
创建子网:
项目》》网络》》网络:


项目》》网络》》路由
点击路由名称》》接口
增加接口
查看详情
使用 glance命令
登录
Open Stack
的
controller
节点
,
使用
cr
的传输工具将提供的
cerros0.34-x86_64 disk.img镜像上传至"iaas-all"
节点的
/root
目录下
;
使用
glance
命令将镜像上传
,
并命名为 mirros,最后使用
glance
命令查看该镜像的详细信息。
(1)上传cirros-0.3.4-x86_64-disk.img镜像
[root@controller ~]#source /etc/keystone/admin-openrc.sh[root@controller ~]# glancek image-create --name mycirros --disk-format qcow2--container-format bare --progress < cirros-0.3.4-x86_64-disk.img+------------------+------------------------------------------------------+| Field| Value|+------------------+------------------------------------------------------+| checksum| ee1eca47dc88f4879d8a229cc70a07c6| container_format | bare| created_at| 2022-11-21T20:16:26Z|| disk_format| qcow2|| file| /v2/images/1217cac1-49ea-43e6-a2c3-7e82c3a9b025/file|| id| 1217cac1-49ea-43e6-a2c3-7e82c3a9b025|| min_disk| 0|| min_ram| 0|| name| mycirros|| owner| f9ff39ba9daa4e5a8fee1fc50e2d2b34|| protected| False|| schema| /v2/schemas/image|| size| 13287936|| status| active|| tags||| updated_at| 2022-11-21T20:16:27Z|| virtual_size| None|| visibility| private
(
3
)查看镜像详情
[root@controller ~]# glance image-show 1217cac1-49ea-43e6-a2c3-7e82c3a9b025+------------------+--------------------------------------+| Property| Value|+------------------+--------------------------------------+| checksum| ee1eca47dc88f4879d8a229cc70a07c6|| container_format | bare|| created_at| 2022-11-21T20:16:26Z|| disk_format| qcow2|| id| 1217cac1-49ea-43e6-a2c3-7e82c3a9b025 || min_disk| 0|| min_ram| 0|| name| mycirros|| owner| f9ff39ba9daa4e5a8fee1fc50e2d2b34|| protected| False
使用提供的
"all-in-one"
虚拟机
,
进入数据库。
(1)
创建本地用户
examuser,
密码为
00000;
(2)
查询
mysq
据库中的
user
表的
host, user,password
字段
;
(3)
赋予这个用户对所有数据库拥有
"
查询
~"
删除
“
更新
”
创建
"
的本地权限。
(1)进入mysql数据库
[root@controller ~]# mysql -u root -p000000MariaDB [(none)]>
(2)创建本地用户
MariaDB [(none)]> insert into mysql.user(host,user,Password) values("localhost","examuser",Password("000000"));Query OK, 1 row affected, 4 warnings (0.00 sec)
(3)选择 mysql 库
MariaDB [(none)]> use mysql;Reading table information for completion of table and column namesYou can turn off this feature to get a quicker startup with -ADatabase changedMariaDB [mysql]>
(4)查询 user 表
MariaDB [mysql]> select host,user,Password from user;+------------+----------+-------------------------------------------+| host| user| Password|+------------+----------+-------------------------------------------+| localhost | root| *032197AE5731D4664921A6CCAC7CFCE6A0698693 || controller | root| *032197AE5731D4664921A6CCAC7CFCE6A0698693 |..........
(5)赋予这个用户增删改查的权限
MariaDB [mysql]> grant select,delete ,update,create on *.* to examuser@"localhost"identified by '000000';Query OK, 0 rows affected (0.00 sec)
使用提供的
all-in-one
虚拟机
,
创建用户
testuser,
密码为
xiadian,
将
testuser
用户分配给
admin
项目
,
赋予用户
admin
的权限。
[root@controller ~]# openstack user create --domain xiandian --password xiandiantestuser+-----------+----------------------------------+| Field| Value|+-----------+----------------------------------+| domain_id | 9321f21a94ef4f85993e92a228892418 || enabled| True|| id| bab4788fdb174dc6bc252b87f8ef8ad4 || name| testuser|+-----------+----------------------------------+[root@controller ~]# openstack role add --project admin --user testuser admin
使用提供的
"all-in-one
虚拟机
,
通过
nova
的相关命令创建名为
exam,ID
为
1234,
内存为
1
024M,
硬盘为
20G,
虚拟内核数量为
2
的云主机类型
,
查看
exam
的详细信息。
[root@controller ~]# openstack flavor create --id 1234 --ram 1024 --disk 20 --vcpu 2exam+----------------------------+-------+| Field| Value |+----------------------------+-------+| OS-FLV-DISABLED:disabled| False || OS-FLV-EXT-DATA:ephemeral | 0|| disk| 20|| id| 1234 || name| exam || os-flavor-access:is_public | True || ram| 1024 || rxtx_factor| 1.0|| swap||| vcpus| 2|+----------------------------+-------+
或者用以下命令
[root@controller ~]# nova flavor-create exam 1234 1024 20 2[root@controller ~]# nova flavor-show 1234
5. Docker管理
mysql
假设当前存在
docker
镜像
mysql: latest
,将该镜像上传至本地,然后将该镜像推送
至本地仓库
(
假设仓库地址为
192.168.100.100:5000)
,从私有仓库中拉取
mariadb v10.31
8
镜像。运行
mysq
镜像,要求将内部
3306
端口映射到外部的
13306
端口,提供交互接口,
后台运行,容器名为
mysql
,最后将
mysq
像和创建的容器删除。
(1)解压Docker压缩包
[root@xserver1 ~]# tar -zxvf Docker.tar.gzimages/python_3.7-alpine.tarimages/redis_alpine.tarimages/registry_latest.tarimages/swarm_latest.tarjdk/jdk/jdk-8u141-linux-x64.tar.gz
(2)配置 yum 源
[root@xserver1 ~]# vi /etc/yum.repos.d/local.repo[docker]name=dockerbaseurl=file:///root/Dockergpgcheck=0enabled=1
(3)列出 yum 源
[root@xserver1 ~]# yum repolistLoaded plugins: fastestmirrordocker| 2.9 kB00:00docker/primary_db| 851 kB00:00Loading mirror speeds from cached hostfilerepo idrepo namestatusdockerdocker463repolist: 463
(4)安装 docker-ce
[root@xserver1 ~]# yum -y install docker-ceInstalled:docker-ce.x86_64 3:18.09.6-3.el7Complete!
(5)启动 dokcer
[root@xserver1 ~]# systemctl restart docker
(6)配置 daemon.json 文件
[root@xserver1 ~]# vi /etc/docker/daemon.json{"insecure-registries":["0.0.0.0/0"],"registry-mirrors":[ "https://a792fdebfe42418495a1b238ad6b0aa9.mirror.swr.myhuaweicloud.com" ]}
(7)重启 docker
[root@xserver1 ~]# systemctl restart docker
(8)将 images 目录下的 registry_latest.tar 镜像导入到 docker 中
[root@xserver1 images]# docker load -i registry_latest.tard9ff549177a9: Loading layer 4.671MB/4.671MBf641ef7a37ad: Loading layer 1.587MB/1.587MBd5974ddb5a45: Loading layer 20.08MB/20.08MB5bbc5831d696: Loading layer 3.584kB/3.584kB73d61bf022fd: Loading layer 2.048kB/2.048kBLoaded image: registry:latest
(9)启动一个私有仓库
[root@xserver1 images]# docker run -d -p 5000:5000 registry0fc7125947a6e8f218065735c0b36a56330a6d9d51c629538e5dd8c799124aa1
(10)将 mysql 镜像打标签
[root@xserver1 ~]# docker tag b3983abaa3fe 192.168.100.11:5000/mysql:latest
(11)因没有 mariadb、mysql 镜像需要去外网拉取,修改网卡
[root@xserver1 ~]# vi /etc/sysconfig/network-scripts/ifcfg-eno16777736最后添加 DNS1=8.8.8.8重启网络:[root@xserver1 ~]# service network restartRestarting network (via systemctl): [ OK ]
(12)拉取一个 mysql 镜像
[root@xserver1 ~]# docker pull mysqlUsing default tag: latestlatest: Pulling from library/mysql45b42c59be33: Pull completeb4f790bd91da: Pull complete
(13)拉取 mariadb:10.3.18 镜像
[root@xserver1 ~]# docker pull mariadb:10.3.1810.3.18: Pulling from library/mariadb7ddbc47eeb70: Pull completec1bbdc448b72: Pull complete8c3b70e39044: Pull complete
(14)把打上标签的 mysql 镜像上传至私有仓库
[root@xserver1 ~]# docker push 192.168.100.11:5000/mysql:latestThe push refers to repository [192.168.100.11:5000/mysql]......latest: digest: sha256:6c761cdf21524223001c1ffa24f9189564a86ec75a39c3 size: 2621
(15)查看容器是否启动
[root@xserver1 images]# docker psCONTAINER IDIMAGECOMMANDCREATEDSTATUSPORTSNAMES0fc7125947a6registry"/entrypoint.sh /etc 鈥4 seconds agoUp 3 seconds0.0.0.0:5000->5000/tcpaffectionate_fermi[root@xserver1 images]#
(16)启动一个 mysql 容器,并查看
[root@xserver1 ~]# docker run --name xmysql -itd -p 13306:3306 mysql:latest/bin/bashf137f5e071bca4cd6fae26c7c52f4aa2ad850844e257998269c7f4e26ea0c66b[root@xserver1 ~]# docker psCONTAINER IDIMAGECOMMANDCREATEDSTATUSPORTSNAMESf137f5e071bcmysql:latest"docker-entrypoint.s6 seconds agoUp 4 seconds33060/tcp, 0.0.0.0:13306->3306/tcpxmysql[root@xserver1 ~]#
(17)删除容器
[root@xserver1 ~]# docker rm -f f137f5e071bcf137f5e071bc
(18)删除镜像
[root@xserver1 ~]# docker rmi -f mysql:latestuntagged: mysql:latest
nginx
Untagged:
使用
xserver1
节点
,
上传
nginx_latest.tar
到
xserver1
节点中
,
然后将该镜像打标签
,
上
传至私有仓库。使用
xserver2
节点
,
自行安装
docker
服务
,
配置
xserver2
节点使用
xserver
1
的私有仓库
,
配置完毕后
,
在
xserver2
节点拉取
nginx_latest.tar
镜像。最后将在
xserver2
上执行
docker images
命令返回的结果以文本形式提交到答题框。
(1)将 Docker.tar.gz 传到 xserver2
在 xserver1:[root@xserver1 ~]# scp Docker.tar.gz 192.168.100.20:/root/The authenticity of host '192.168.100.20 (192.168.100.20)' can't be established.ECDSA key fingerprint is 14:57:da:84:0b:98:67:83:88:d7:c4:62:bf:87:60:f6.Are you sure you want to continue connecting (yes/no)? yesWarning: Permanently added '192.168.100.20' (ECDSA) to the list of known hosts.root@192.168.100.20's password:Docker.tar.gz100% 1072MB 97.4MB/s00:11
(2)解压 xserver2 节点的 Docker.tar.gz
在 xserver2:[root@xserver2 ~]# tar -zxvf Docker.tar.gzimages/swarm_latest.tarjdk/jdk/jdk-8u141-linux-x64.tar.gz
(3)配置 xserver2 的 yum 源
在 xserver2:[root@xserver2 ~]# vi /etc/yum.repos.d/local.repo[docker]name=dockerbaseurl=file:///root/Dockergpgcheck=0enabled=1
(4)列出 yum 源
在 xserver2:[root@xserver2 ~]# yum repolistLoaded plugins: fastestmirrorcentos| 2.9 kB00:00centos/primary_db| 851 kB00:00Determining fastest mirrorsrepo idrepo namestatuscentoscentos463repolist: 463
(5)安装 docker
在xserver2:[root@xserver2 ~]# yum -y install docker-ceInstalled:docker-ce.x86_64 3:18.09.6-3.el7
(6)配置 daemon.json 文件
[root@xserver2 ~]# vi /etc/docker/daemon.json{"insecure-registries":["0.0.0.0/0"],"registry-mirrors":[ "https://a792fdebfe42418495a1b238ad6b0aa9.mirror.swr.myhuaweicloud.com" ]}
(7)重启 docker
[root@xserver2 ~]# systemctl restart docker[root@xserver2 ~]#
(8)在 xserver1 中打标签
[root@xserver1 images]# docker tag nginx:latest 192.168.100.11:5000 /nginx
(9)查看打标签的镜像
[root@xserver1 images]# docker imagesREPOSITORYTAGIMAGE IDCREATEDSIZE192.168.100.11:5000/mysqllatest540a289bab6c3years ago126MB192.168.100.11:5000/nginxlatest540a289bab6c3 years ago
(10)上传到私有仓库
[root@xserver1 images]# docker push 192.168.100.11:5000/nginxThe push refers to repository [192.168.100.11:5000/nginx]a89b8f05da3a: Pushed........latest: digest:sha256:f56b43e9913cef097f246d65119df4eda1d61670f7f2ab720831a01f66f6ff9csize: 948[root@xserver1 images]#
(11)在 xserver2 中拉取 nginx 镜像
[root@xserver2 ~]# docker pull 192.168.100.11:5000/nginxUsing default tag: latestlatest: Pulling from nginx8d691f585fa8: Pull complete5b07f4e08ad0: Pull completeabc291867bca: Pull completeDigest:sha256:f56b43e9913cef097f246d65119df4eda1d61670f7f2ab720831a01f66f6ff9cStatus: Downloaded newer image for 192.168.100.11:5000/nginx:latest
(12)查看镜像
[root@xserver2 ~]# docker imagesREPOSITORYTAGIMAGE IDCREATEDSIZE192.168.100.11:5000/nginxlatest540a289bab6c3 years ago126MB[root@xserver2 ~]#
tomcat
假设当前存在 docke镜像
tomcat: latest,
现在将
toma
镜像导出
,
导出名称为
tomca
t_images.tar,
放在
media
目录下。
(1)拉取 tomcat 镜像
[root@xserver1 ~]# docker pull tomcatUsing default tag: latestlatest: Pulling from library/tomcat0ecb575e629c: Pull complete7467d1831b69: Pull complete
(2)导出 tomcat 镜像为
[root@xserver1 ~]# docker save tomcat:latest >> /media/tomcat_images.tar[root@xserver1 ~]#
(3)查看 media 目录下
[root@xserver1 ~]# ll /media/total 663344-rw-r--r-- 1 root root 679261696 Nov 22 05:10 tomcat_images.tar[root@xserver1 ~]#
registry_latest.tar
使用 xserver1节点
,
自行配置
YUM
源
,
安装
docker
服务
(
需要用到的包为
xserver1
节点/root
目录下的
Docker. tar.gz),
安装完服务后
,
将
registry_latest.tar
上传到
xserver1
节点 中并配置为私有仓库。要求启动registry
容器时
,
将内部保存文件的目录映射到外部的
/opt/registry目录
,
将内部的
5000
端口映射到外部
5000
端口。依次将启动
registry
容器的命令及返回结果、执行 docker infor
命令的返回结果以文本形式提交到答题框。
(1)将 Docker.tar.gz 传到 xserver2
在 xserver1:[root@xserver1 ~]# scp Docker.tar.gz 192.168.100.20:/root/The authenticity of host '192.168.100.20 (192.168.100.20)' can't be established.ECDSA key fingerprint is 14:57:da:84:0b:98:67:83:88:d7:c4:62:bf:87:60:f6.Are you sure you want to continue connecting (yes/no)? yesWarning: Permanently added '192.168.100.20' (ECDSA) to the list of known hosts.root@192.168.100.20's password:Docker.tar.gz100% 1072MB 97.4MB/s00:11
(2)解压 xserver2 节点的 Docker.tar.gz
在 xserver2:[root@xserver2 ~]# tar -zxvf Docker.tar.gzimages/swarm_latest.tarjdk/jdk/jdk-8u141-linux-x64.tar.gz
(3)配置 xserver2 的 yum 源
在 xserver2:[root@xserver2 ~]# vi /etc/yum.repos.d/local.repo[docker]name=dockerbaseurl=file:///root/Dockergpgcheck=0enabled=1
(4)列出 yum 源
在 xserver2:[root@xserver2 ~]# yum repolistLoaded plugins: fastestmirrorcentos| 2.9 kB00:00centos/primary_db| 851 kB 00:00Determining fastest mirrorsrepo idrepo namestatuscentoscentos463repolist: 463
(5)安装 docker
在xserver2:[root@xserver2 ~]# yum -y install docker-ceInstalled:docker-ce.x86_64 3:18.09.6-3.el7
(6)配置 daemon.json 文件
[root@xserver2 ~]# vi /etc/docker/daemon.json{"insecure-registries":["0.0.0.0/0"],"registry-mirrors":[ "https://a792fdebfe42418495a1b238ad6b0aa9.mirror.swr.myhuaweicloud.com" ]}
(7)重启 docker
[root@xserver2 ~]# systemctl restart docker
(8)启动 registry 容器
[root@xserver1 ~]# docker run -d -v /opt/registry:/var/lib/registry -p 5000:5000--restart=always --name registry registry:latest1056397ad6ecd75cc0dfc12d56787e8d7c353e0230ff92b5c4a909983f7b749f[root@xserver1 ~]#
(9)查看 docker 详细信息
[root@xserver1 ~]# docker infoContainers: 2Running: 1Paused: 0Stopped: 1Images: 5......Metadata file: /dev/loop1Data loop file: /var/lib/docker/devicemapper/devicemapper/dataMetadata loop file: /var/lib/docker/devicemapper/devicemapper/metadataData Space Used: 1.483GB
6. Wordpress应用系统
LNMP
使用提供的软件包和 vmware提供的
centos7.2
操作系统,完成
LNMP+ Word Press
部署。部署完成后,进行登录,最后提交
Word Press
首页和后台管理界面。
(
设置
Wor
dpress
名称为自己的姓名
+BLOG
,例如张三,则
Word Press
首页显示张三
BLoG
,答案的
截图需体现这点
)
以下操作在“
7.LNMP
环境部署”(
1
)
-
(
10
)基础上操作
(11)下载压缩工具unzip 使用unzip 解压工具解压/root/目录下的wordpress-4.7.3-zh_CN.zip
[root@xserver1 ~]# yum -y install unzip[root@xserver1 ~]# unzip wordpress-4.7.3-zh_CN.zip
(12)修改nginx下default.conf配置文件,在location / 里的index.htm 后增加index.php
[root@xserver1 ~]# vi /etc/nginx/conf.d/default.conflocation / {root/usr/share/nginx/html;index index.html index.htm index.php;}
(13)修改 nginx 下 nginx.conf 配置文件
#
把
location ~ \.php$
那几行
#
注释删除,
fastcgi_param
那行
$
符号前面改为
/usr/share/nginx/html
[root@xserver1 ~]# vi /etc/nginx/conf/nginx.conf……location ~ \.php$ {roothtml;fastcgi_pass127.0.0.1:9000;fastcgi_index index.php;fastcgi_param SCRIPT_FILENAME/usr/share/nginx/html$fastcgi_script_name;[root@xserver1 ~]# systemctl restart nginx 重启 nginx 服务
(14)mariadb 数据库配置
进入数据库 mariadb
创建数据库,配置权限
[root@xserver1 ~]# systemctl restart mariadb[root@xserver1 ~]# mysql_secure_installation ##初始化数据库 并进行一系列配置配置顺序如下回车 输入新密码 再次数据新密码键入 y键入 y键入 n键入 y键入 y[root@xserver1 ~]# mysql -u root -p000000创建数据库MariaDB [(none)]> create database lnmp;授权所有用户MariaDB [(none)]> grant all privileges on *.* to root@'%' identified by '000000' ;MariaDB [(none)]> exit;
(15)php 并修改配置文件
[root@xserver1 ~]# vi /etc/php-fpm.d/www.conf# 找到 user= 和 group= , 把它们改成 user=nginx , group=nginxgroup = nginxuser = nginx[root@xserver1 ~]# systemctl restart php-fpm 重启 fpm
(16)配置 wordpress
[root@xserver1 ~]# rm -rf /usr/share/nginx/html/*[root@xserver1 ~]# cp -rvf wordpress/* /usr/share/nginx/html/[root@xserver1 ~]# chown -R nginx:nginx /usr/share/nginx/html/[root@xserver1 ~]# cd /usr/share/nginx/html/[root@xserver1 html]# vi wp-config-sample.php/ ** MySQL 设置 - 具体信息来自您正在使用的主机 ** //define('DB_NAME', 'lnmp');# 数据库名称改为 lnmp (上面配置 mariadb 时创建的数据库)/** MySQL 数据库用户名 */define('DB_USER', 'root');/** MySQL 数据库密码 */define('DB_PASSWORD', '000000');
(17)打开浏览器访问 IP 地址,配置题目要求的站点标题,配置完成
Swarm
使用 xserver1、 xserver2 节点,自行配置好网络,安装好 docker-ce。部署 Swarm集群,并安装 Portainer 图形化管理工具,部署完成后,使用浏览器登录 ip:9000 界面,
进入 Swarm 控制台。将 curl swarm ip:9000 返回的结果以文本形式提交到答题框。
(1)启动 docker
[root@xserver1 images]# systemctl start docker
(2)初始化 swarm 集群
[root@xserver1 images]# docker swarm initSwarm initialized: current node (uw3q9lmtglwy3plvcjqv3gunm) is now a manager.To add a worker to this swarm, run the following command:dockerswarmjoin--tokenSWMTKN-1-3prq3kdlp21ugpkcfjyhnlqcylnnmavbcnqs23yd4dsswt1goh-94pemhtwn56pryweu4olkc7no 192.168.100.11:2377To add a manager to this swarm, run 'docker swarm join-token manager' and followthe instructions.
(3)使用给出的命令:
docker swarm join --token SWMTKN-1-3prq3kdlp21ugpkcfjyhnlqcylnnmavbcnqs23yd4dss
wt1goh-94pemhtwn56pryweu4olkc7no 192.168.100.11:2377
在
xserver2
中加入
[root@xserver2 images]# docker swarm join --token SWMTKN-1-3prq3kdlp21ugpkcfjyhnlqcylnnmavbcnqs23yd4dsswt1goh-94pemhtwn56pryweu4olkc7no 192.168.100.11:2377
(4)在/root/Docker/images 目录下导入镜像 portainer_portainer_latest.tar
[root@xserver1 images]# docker load -i portainer_portainer_latest.tardd4969f97241: Loading layer278kB/278kB8b156c0136c9: Loading layer 80.32MB/80.32MBLoaded image ID: sha256:4cda95efb0e455c3044d727988c36c5947a4287f77db96e799199b349b3d523c
(5)导入的镜像是一个 none 的镜像名,所以我们打个标签修改镜像名
[root@xserver1 images]# docker tag 4cda95efb0e4 portainer:latest
(6)使用 portainer 镜像启动一个容器
[root@xserver1 images]# docker run -d -p 9000:9000 --name portainer -v/var/run/docker.sock:/var/run/docker.sock portainer:latest
(7)查看容器是否启动
[root@xserver1 images]# docker psCONTAINER IDIMAGECOMMANDCREATEDSTATUSPORTSNAMES647ce8b484faportainer:latest"/portainer"11 minutes agoUp1second0.0.0.0:9000->9000/tcpportainer647ce8b484fad9cd26c949c247f348156385b8af030fec5b704ae7a879630f3a
(8)访问 swarm
[root@xserver1 ~]# curl 192.168.100.11:9000<!DOCTYPE html><html lang="en" ng-app="portainer"><head><meta charset="utf-8"><title>Portainer</title><meta name="description" content=""><meta name="author" content="Portainer.io"><!-- HTML5 shim, for IE6-8 support of HTML5 elements --><!--[if lt IE 9]><script src="//html5shim.googlecode.com/svn/trunk/html5.js"></script><![endif]-->
7. LNMP环境部署
使用 xserver1节点
,
安装单节点
lnmp
环境。安装
lnmp
环境需要用到的
YUM
源为
Cent
os-7-x86_64-DVD-1511.iso
和
lnmp
目录
(
均在
/roo
目录下
)
。安裝并配置完
lnmp
环境后。依
次查询数据库、
nginx
、
php
服务的状态
,
并使用
netstat -ntpl
命令查看端口开放情况。
(1)挂载 centos-1511 镜像到/opt/centos
[root@xserver1 ~]# mount -o loop CentOS-7-x86_64-DVD-1511.iso /opt/centos/mount: /dev/loop0 is write-protected, mounting read-only
(3)配置 yum 源
[root@xserver1 ~]# vi /etc/yum.repos.d/local.repo[lnmp]name=lnmpbaseurl=file:///root/lnmpgpgcheck=0enabled=1[centos]name=centosbaseurl=file:///opt/centosgpgcheck=0enabled=1
(3)安装mariadb
[root@xserver1 ~]# yum -y install mariadb mariadb-serverInstalled:mariadb.x86_64 1:5.5.44-2.el7.centosmariadb-server.x86_64 1:5.5.44-2.el7.centosComplete!
(4)重启mariadb
[root@xserver1 ~]# systemctl restart mariadb
(5)安装nginx
[root@xserver1 ~]# yum -y install nginxInstalled:nginx.x86_64 1:1.16.1-1.el7.ngxComplete!
(6)重启nginx
[root@xserver1 ~]# systemctl restart nginx
(7)注释centos源
[root@xserver1 ~]# vi /etc/yum.repos.d/local.repo[lnmp]name=lnmpbaseurl=file:///root/lnmpgpgcheck=0enabled=1#[centos]#name=centos#baseurl=file:///opt/centos#gpgcheck=0#enabled=1
(8)安装php服务
[root@xserver1 ~]# yum -y install php-*Installed:php.x86_64 0:5.4.16-46.1.el7_7php-cli.x86_64 0:5.4.16-46.1.el7_7php-common.x86_64 0:5.4.16-46.1.el7_7php-devel.x86_64 0:5.4.16-46.1.el7_7php-fpm.x86_64 0:5.4.16-46.1.el7_7php-mysql.x86_64 0:5.4.16-46.1.el7_7php-pdo.x86_64 0:5.4.16-46.1.el7_7Complete!
(9)启动php服务
[root@xserver1 ~]# systemctl restart php-fpm
(10)查看各服务状态
[root@xserver1 ~]# systemctl status php-fpm● php-fpm.service - The PHP FastCGI Process ManagerLoaded: loaded (/usr/lib/systemd/system/php-fpm.service; disabled; vendorpreset: disabled)Active: active (running) since Mon 2022-11-21 16:19:58 EST; 3min 41s agoMain PID: 3492 (php-fpm)Status: "Processes active: 0, idle: 5, Requests: 0, slow: 0, Traffic: 0req/sec"CGroup: /system.slice/php-fpm.service├─ 3492 php-fpm: master process (/etc/php-fpm.conf)├─ 3494 php-fpm: pool www├─ 3495 php-fpm: pool www├─ 3496 php-fpm: pool www├─ 3497 php-fpm: pool www└─ 3498 php-fpm: pool wwwNov 21 16:19:58 xserver1 systemd[1]: Starting The PHP FastCGI Process Manager...Nov 21 16:19:58 xserver1 systemd[1]: Started The PHP FastCGI Process Manager.
[root@xserver1 ~]# systemctl status nginx● nginx.service - nginx - high performance web serverLoaded: loaded (/usr/lib/systemd/system/nginx.service; disabled; vendor preset:disabled)Active: active (running) since Mon 2022-11-21 16:14:17 EST; 9min agoDocs: http://nginx.org/en/docs/Main PID: 3410 (nginx)CGroup: /system.slice/nginx.service├─ 3410 nginx: master process /usr/sbin/nginx -c /etc/nginx/nginx.conf└─ 3411 nginx: worker processNov 21 16:14:17 xserver1 systemd[1]: Starting nginx - high performance web server...Nov 21 16:14:17 xserver1 systemd[1]: Started nginx - high performance web server.
[root@xserver1 ~]# systemctl status mariadb● mariadb.service - MariaDB database serverLoaded: loaded (/usr/lib/systemd/system/mariadb.service; disabled; vendorpreset: disabled)Active: active (running) since Mon 2022-11-21 16:11:20 EST; 12min agoMain PID: 3099 (mysqld_safe)CGroup: /system.slice/mariadb.service├─ 3099 /bin/sh /usr/bin/mysqld_safe --basedir=/usr└─ 3292 /usr/libexec/mysqld --basedir=/usr --datadir=/var/lib/mysql--plugin-dir=/usr/lib64/mysql/plugin --log-error=/var/log/mariadb/mariadb.log--pid-file=/var/run/mariadb/mariadb.pid --socket=/var/lib/mysql/mysql.sockNov 21 16:11:18 xserver1 systemd[1]: Starting MariaDB database server...Nov 21 16:11:18 xserver1 mysqld_safe[3099]: 221121 16:11:18 mysqld_safe Loggingto '/var/log/mariadb/mariadb.log'.


 2243
2243


 被折叠的 条评论
为什么被折叠?
被折叠的 条评论
为什么被折叠?
 到【灌水乐园】发言


