


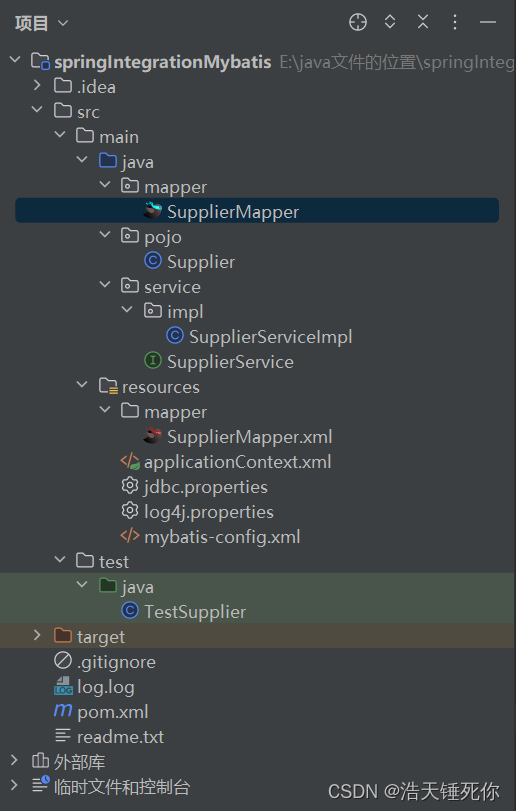
Spring框架与MyBatis整合是一种常见的Java开发技术组合,它可以将Spring的依赖注入和事务管理能力与MyBatis的持久化框架相结合,提供更方便的数据访问和管理。
一,Spring整合MyBatis的步骤
1. 导入 所需要的依赖
<?xml version="1.0" encoding="UTF-8"?>
<project xmlns="http://maven.apache.org/POM/4.0.0"
         xmlns:xsi="http://www.w3.org/2001/XMLSchema-instance"
         xsi:schemaLocation="http://maven.apache.org/POM/4.0.0 http://maven.apache.org/xsd/maven-4.0.0.xsd">
    <modelVersion>4.0.0</modelVersion>

    <groupId>com.cskt</groupId>
    <artifactId>springIntegrationMybatis</artifactId>
    <version>1.0-SNAPSHOT</version>

    <properties>
        <maven.compiler.source>17</maven.compiler.source>
        <maven.compiler.target>17</maven.compiler.target>
        <project.build.sourceEncoding>UTF-8</project.build.sourceEncoding>
    </properties>

    <dependencies>
        <!--spring jar 包-->
        <dependency>
            <groupId>org.springframework</groupId>
            <artifactId>spring-core</artifactId>
            <version>4.3.2.RELEASE</version>
        </dependency>
        <dependency>
            <groupId>org.springframework</groupId>
            <artifactId>spring-context</artifactId>
            <version>4.3.2.RELEASE</version>
        </dependency>
        <dependency>
            <groupId>org.springframework</groupId>
            <artifactId>spring-test</artifactId>
            <version>4.3.2.RELEASE</version>
        </dependency>
        <dependency>
            <groupId>org.springframework</groupId>
            <artifactId>spring-tx</artifactId>
            <version>4.3.2.RELEASE</version>
        </dependency>
        <dependency>
            <groupId>org.springframework</groupId>
            <artifactId>spring-beans</artifactId>
            <version>4.3.2.RELEASE</version>
        </dependency>
        <dependency>
            <groupId>org.springframework</groupId>
            <artifactId>spring-jdbc</artifactId>
            <version>4.3.2.RELEASE</version>
        </dependency>
        <!--mybatis jar 包-->
        <dependency>
            <groupId>org.mybatis</groupId>
            <artifactId>mybatis</artifactId>
            <version>3.2.8</version>
        </dependency>
        <dependency>
            <groupId>org.mybatis</groupId>
            <artifactId>mybatis-spring</artifactId>
            <version>1.3.0</version>
        </dependency>
        <!--mysql jar 包 -->
        <dependency>
            <groupId>com.mysql</groupId>
            <artifactId>mysql-connector-j</artifactId>
            <version>8.0.33</version>
        </dependency>
        <!--其他-->
        <dependency>
            <groupId>org.projectlombok</groupId>
            <artifactId>lombok</artifactId>
            <version>1.18.28</version>
        </dependency>
        <dependency>
            <groupId>junit</groupId>
            <artifactId>junit</artifactId>
            <version>4.13.2</version>
            <scope>test</scope>
        </dependency>
        <dependency>
            <groupId>commons-dbcp</groupId>
            <artifactId>commons-dbcp</artifactId>
            <version>1.4</version>
        </dependency>

        <dependency>
            <groupId>log4j</groupId>
            <artifactId>log4j</artifactId>
            <version>1.2.17</version>
        </dependency>

    </dependencies>
</project>
2.配置mybatis文件 mybatis-config mapper.xml
mybatis-config 不需要配置数据源 只需要取别名 引入映射文件
<?xml version="1.0" encoding="UTF-8" ?>
<!DOCTYPE configuration
        PUBLIC "-//mybatis.org//DTD Config 3.0//EN"
        "http://mybatis.org/dtd/mybatis-3-config.dtd">

<configuration>
    <settings>
        <setting name="autoMappingBehavior" value="FULL"/>
        <setting name="logImpl" value="LOG4J"/>
    </settings>
    <typeAliases>
        <!--类别名 ,在映射文件中不要写前缀pojo-->
        <package name="pojo"/>
    </typeAliases>
    <mappers>
        <!--不用写mapper下面的映射文件名了,但是要注意一定要要是xml文件的上级目录-->
        <package name="mapper"/>
    </mappers>
</configuration>
3.建立 pojo mapper service 写一个查询所有的接口
mapper接口
@Repository
public interface SupplierMapper {
    /**
     * 查询所有供货商信息
     * @return 供货商信息
     */
    List<Supplier> getSupplierAll();
}
pojo类
@Data
@AllArgsConstructor
@NoArgsConstructor
public class Supplier {

  private Integer id; //供货商ID
  private String supCode; //供货商编码
  private String supName; //供货商名称
  private String supDesc; //供货商描述
  private String supContact; //联系人
  private String supPhone; //联系电话
  private String supAddress; //地址
  private String supFax; //传真
  private Integer createdUserId; //创建人ID
  private Date createdTime; //创建时间
  private Integer updateUserId; //修改人ID
  private Date updatedTime; //修改时间
}
service接口以及实现类
public interface SupplierService {
    /**
     * 查询所有供货商信息
     * @return 供货商信息
     */
    List<Supplier> getSupplierAll();
}
@Service("SupplierService")
public class SupplierServiceImpl implements SupplierService {
    @Autowired
    private SupplierMapper supplierMapper;
    @Override
    public List<Supplier> getSupplierAll() {
        return supplierMapper.getSupplierAll();
    }
}
4.建立spring配置文件:applicationContext.xml
4.1 第一步 配置数据源
4.2 第二部 配置环境
4.3 第三步 整合mybatis SqlSessionFactory --》build -->sqlsession
MapperScannerConfigure
4.4 扫描包 service
<?xml version="1.0" encoding="UTF-8"?>
<beans xmlns="http://www.springframework.org/schema/beans"
       xmlns:xsi="http://www.w3.org/2001/XMLSchema-instance"
       xmlns:context="http://www.springframework.org/schema/context"
       xmlns:aop="http://www.springframework.org/schema/aop"
       xsi:schemaLocation="http://www.springframework.org/schema/beans
	http://www.springframework.org/schema/beans/spring-beans.xsd
	http://www.springframework.org/schema/context
	http://www.springframework.org/schema/context/spring-context.xsd http://www.springframework.org/schema/aop http://www.springframework.org/schema/aop/spring-aop.xsd">

    <!--1.配置数据源-->
    <context:property-placeholder location="database.properties"></context:property-placeholder>
    <!--2.配置环境 配置数据源-->
    <bean id="datasource" class="org.apache.commons.dbcp.BasicDataSource">
        <property name="driverClassName" value="${driver}"></property>
        <property name="url" value="${url}"></property>
        <property name="username" value="${jdbc.username}"></property>
        <property name="password" value="${jdbc.password}"></property>
    </bean>

    <!--配置 SqlSessionFactoryBean-->
    <bean id="sqlSession" class="org.mybatis.spring.SqlSessionFactoryBean">
        <property name="dataSource" ref="datasource"></property>
        <property name="configLocation" value="classpath:mybatis-config.xml"></property>
    </bean>

    <!--配置 MapperScannerConfigurer-->
    <bean class="org.mybatis.spring.mapper.MapperScannerConfigurer">
        <property name="basePackage" value="com.example.mapper"></property>
    </bean>

    <context:component-scan base-package="com.example.service"/>
</beans>
5.写测试类
public class TestSupplier{
    @Test
    public void getAll() {
        ClassPathXmlApplicationContext context = new ClassPathXmlApplicationContext("applicationContext.xml");
        SupplierService supplierService = (SupplierService) context.getBean("SupplierService");
        List<Supplier> supplierAll = supplierService.getSupplierAll();
        supplierAll.forEach(supplier -> System.out.println(supplier));
    }
}
输出结果为:Supplier(id=1, supCode=123123, supName=周锦鹏, supDesc=傻逼, supContact=他嗲嗲, supPhone=145646854564564, supAddress=湖南长沙, supFax=efwa, createdUserId=2, createdTime=2023-08-18, updateUserId=2, updatedTime=2023-08-18)
Supplier(id=2, supCode=111111, supName=杨俊豪, supDesc=不晓得是什么东西, supContact=lu2s1x9jDP, supPhone=13838389438, supAddress=5-19-14 Shinei 4 Jo, Kiyota Ward, supFax=ddbxRdUfhw, createdUserId=547, createdTime=2021-01-29, updateUserId=594, updatedTime=2004-04-06)
Supplier(id=4, supCode=444444, supName=江峰, supDesc=傻逼, supContact=他爹, supPhone=94383838438, supAddress=湖南醴陵, supFax=efwae, createdUserId=1, createdTime=2023-08-18, updateUserId=1, updatedTime=2023-08-18)
二、源码解析:SqlSessionFactoryBean+MapperScannerConfigurer+BasicDataSource
1.SqlSessionFactoryBean
配置:
<bean id="sqlSessionFactory" class="org.mybatis.spring.SqlSessionFactoryBean">
   <!-- mybatis全局配置文件 -->
   <property name="configLocation" value="classpath:mybatis-config.xml"></property>
   <!-- 数据源 -->
   <property name="dataSource" ref="pooledDataSource"></property>
   <!-- mapper文件 -->
   <property name="mapperLocations" value="classpath:mapper/*.xml"></property>
</bean>
SqlSessionFactoryBean 从名字就能看出来它是用来创建工厂类的,继承关系如下:
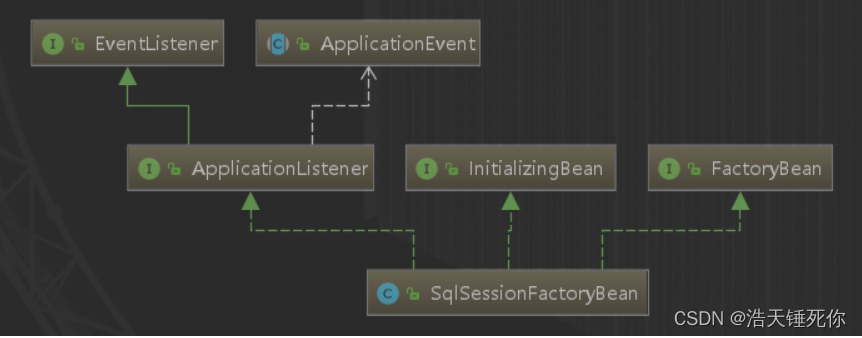
继承的接口:
InitializingBean:这个接口的作用是spring初始化的时候会执行实现了InitializingBean接口的afterPropertiesSet方法;具体怎么执行暂时就不说了;
ApplicationListener接口作用是在spring容器执行的各个阶段进行监听,SqlSessionFactoryBean实现这个接口是为了容器刷新的时候,更新sqlSessionFactory;可以自己看下onApplicationEvent方法实现;
FactoryBean:实现这个接口表示这个类是一个工厂bean,通常是为了给返回的类进行加工处理的,而且获取类返回的是通过getObj返回的;
看这个类就从入口开始看,通过这个方法afterPropertiesSet;
  @Override
  public void afterPropertiesSet() throws Exception {
    //dataSource是必须要配置的
    notNull(dataSource, "Property 'dataSource' is required");
    notNull(sqlSessionFactoryBuilder, "Property 'sqlSessionFactoryBuilder' is required");
    state((configuration == null && configLocation == null) || !(configuration != null && configLocation != null),
              "Property 'configuration' and 'configLocation' can not specified with together");

    //主要逻辑都在buildSqlSessionFactory方法,创建sqlSessionFactory,getObject就是返回的sqlSessionFactory
    this.sqlSessionFactory = buildSqlSessionFactory();
  }

  @Override
  public SqlSessionFactory getObject() throws Exception {
    if (this.sqlSessionFactory == null) {
      afterPropertiesSet();
    }

    return this.sqlSessionFactory;
  }
2.buildSqlSessionFactory方法
protected SqlSessionFactory buildSqlSessionFactory() throws IOException {
  // 定义了一个Configuration,叫做targetConfiguration。
  final Configuration targetConfiguration;

  XMLConfigBuilder xmlConfigBuilder = null;
  // 判断 Configuration 对象是否已经存在,也就是是否已经解析过。如果已经有对象,就覆盖一下属性
  if (this.configuration != null) {
    targetConfiguration = this.configuration;
    if (targetConfiguration.getVariables() == null) {
      targetConfiguration.setVariables(this.configurationProperties);
    } else if (this.configurationProperties != null) {
      targetConfiguration.getVariables().putAll(this.configurationProperties);
    }
    // 如果 Configuration 不存在,但是配置了 configLocation 属性,
    // 就根据mybatis-config.xml的文件路径,构建一个xmlConfigBuilder对象。
  } else if (this.configLocation != null) {
    xmlConfigBuilder = new XMLConfigBuilder(this.configLocation.getInputStream(), null, this.configurationProperties);
    targetConfiguration = xmlConfigBuilder.getConfiguration();
    // 否则,Configuration 对象不存在,configLocation 路径也没有,
    // 只能使用默认属性去构建去给configurationProperties赋值。
  } else {
    LOGGER.debug(() -> "Property 'configuration' or 'configLocation' not specified,using default MyBatis Configuration");
    targetConfiguration = new Configuration();
    Optional.ofNullable(this.configurationProperties).ifPresent(targetConfiguration::setVariables);
  }

  // 基于当前factory 对象里面已有的属性,对targetConfiguration对象里面属性的赋值。
  Optional.ofNullable(this.objectFactory).ifPresent(targetConfiguration::setObjectFactory);
  Optional.ofNullable(this.objectWrapperFactory).
                 ifPresent(targetConfiguration::setObjectWrapperFactory);
  Optional.ofNullable(this.vfs).ifPresent(targetConfiguration::setVfsImpl);

  if (hasLength(this.typeAliasesPackage)) {
    String[] typeAliasPackageArray = tokenizeToStringArray(this.typeAliasesPackage,
        ConfigurableApplicationContext.CONFIG_LOCATION_DELIMITERS);
    Stream.of(typeAliasPackageArray).forEach(packageToScan -> {
      targetConfiguration.getTypeAliasRegistry().registerAliases(packageToScan,
          typeAliasesSuperType == null ? Object.class : typeAliasesSuperType);
      LOGGER.debug(() -> "Scanned package: '" + packageToScan + "' for aliases");
    });
  }

  if (!isEmpty(this.typeAliases)) {
    Stream.of(this.typeAliases).forEach(typeAlias -> {
      targetConfiguration.getTypeAliasRegistry().registerAlias(typeAlias);
      LOGGER.debug(() -> "Registered type alias: '" + typeAlias + "'");
    });
  }

  if (!isEmpty(this.plugins)) {
    Stream.of(this.plugins).forEach(plugin -> {
      targetConfiguration.addInterceptor(plugin);
      LOGGER.debug(() -> "Registered plugin: '" + plugin + "'");
    });
  }

  if (hasLength(this.typeHandlersPackage)) {
    String[] typeHandlersPackageArray = tokenizeToStringArray(this.typeHandlersPackage,
        ConfigurableApplicationContext.CONFIG_LOCATION_DELIMITERS);
    Stream.of(typeHandlersPackageArray).forEach(packageToScan -> {
      targetConfiguration.getTypeHandlerRegistry().register(packageToScan);
      LOGGER.debug(() -> "Scanned package: '" + packageToScan + "' for type handlers");
    });
  }

  if (!isEmpty(this.typeHandlers)) {
    Stream.of(this.typeHandlers).forEach(typeHandler -> {
      targetConfiguration.getTypeHandlerRegistry().register(typeHandler);
      LOGGER.debug(() -> "Registered type handler: '" + typeHandler + "'");
    });
  }

  if (this.databaseIdProvider != null) {//fix #64 set databaseId before parse mapper xmls
    try {
      targetConfiguration.setDatabaseId(this.databaseIdProvider.getDatabaseId(this.dataSource));
    } catch (SQLException e) {
      throw new NestedIOException("Failed getting a databaseId", e);
    }
  }

  Optional.ofNullable(this.cache).ifPresent(targetConfiguration::addCache);
  // 如果xmlConfigBuilder 不为空,也就是上面的第二种情况,
  if (xmlConfigBuilder != null) {
    try {
      // 调用了xmlConfigBuilder.parse()去解析配置文件,最终会返回解析好的Configuration对象
      xmlConfigBuilder.parse();
      LOGGER.debug(() -> "Parsed configuration file: '" + this.configLocation + "'");
    } catch (Exception ex) {
      throw new NestedIOException("Failed to parse config resource: " + this.configLocation, ex);
    } finally {
      ErrorContext.instance().reset();
    }
  }

  // 如果没有明确指定事务工厂 ,默认使用pringManagedTransactionFactory。
  // 它创建的 SpringManagedTransaction 也有getConnection()和close()方法
  // <property name="transactionFactory" value="" />
  targetConfiguration.setEnvironment(new Environment(this.environment,
      this.transactionFactory == null ? new SpringManagedTransactionFactory() : this.transactionFactory,this.dataSource));

  if (!isEmpty(this.mapperLocations)) {
    for (Resource mapperLocation : this.mapperLocations) {
      if (mapperLocation == null) {
        continue;
      }

      try {
        XMLMapperBuilder xmlMapperBuilder = new XMLMapperBuilder(mapperLocation.getInputStream(),
         targetConfiguration, mapperLocation.toString(), targetConfiguration.getSqlFragments());
        // 调用xmlMapperBuilder.parse(),
        // 它的作用是把接口和对应的MapperProxyFactory 注册到MapperRegistry 中。
        xmlMapperBuilder.parse();
      } catch (Exception e) {
        throw new NestedIOException("Failed to parse mapping resource: '" + mapperLocation + e);
      } finally {
        ErrorContext.instance().reset();
      }
      LOGGER.debug(() -> "Parsed mapper file: '" + mapperLocation + "'");
    }
  } else {
    LOGGER.debug(() -> "Property 'mapperLocations' was not specified or no matching resources found");
  }

  // 最后调用 sqlSessionFactoryBuilder.build() 返回一个 DefaultSqlSessionFactory。
  return this.sqlSessionFactoryBuilder.build(targetConfiguration);
}
可以看到最终返回一个 SqlSessionFactory 的默认实现 DefaultSqlSessionFactory。
3.MapperScannerConfigurer
在spring-mybatis整合过程中,需要将mybatis注入到spring中,这就需要在配置文件中进行配置,这里讲一下org.mybatis.spring.mapper.MapperScannerConfigure的作用:
    <bean class="org.mybatis.spring.mapper.MapperScannerConfigurer">
        <!--扫描dao包,将mapper接口动态的实例化-->
		<property name="basePackage" value="cn.edu.ujn.ch10.dao" />
        <!--注入sqlSessionFactory-->
		<property name="sqlSessionFactoryBeanName" value="sqlSessionFactory" />
	</bean>
以上代码理解:
1、通过MapperScannerConfigurer来扫描Dao包里面的mapper接口,动态的将mapper接口进行实例化;
2、并将sqlSessionFactory注入到mapper实例中并自动创建sqlsession。
    <!--创建SqlSessionTemplate接口的实例sqlSession-->
    <bean id="sqlSession" class="org.mybatis.spring.SqlSessionTemplate">
        <!--构造方式将sqlSessionFactory注入到SqlSessionTemplate中-->
        <constructor-arg index="0" ref="sqlSessionFactory"/>
    </bean>


    <!--创建Mapper接口的实例MapperImpl-->
    <bean id="Mapper" class="dao.MapperImpl">
        <!--注入sqlSession-->
        <property name="sqlSession" ref="sqlSession"/>
    </bean>


 70
70


 被折叠的 条评论
为什么被折叠?
被折叠的 条评论
为什么被折叠?
 到【灌水乐园】发言


