


一.基础使用:
1.MyBatis日志配置
<settings>
  <!-- SLF4J 选择slf4j输出! -->
  <setting name="logImpl" value="SLF4J"/>
</settings>
2.数据输入
1)#{}和${}
#{key}:占位符+赋值 emp_id = ? ,? = 赋值
${key}:字符串拼接 emp_id = ""+id ?只能替代值的位置,不能替代容器名(列名,标签,关键字)
select * from 表 where 列名是动态的${columName} = 动态的值 #{columValue}
2)单个简单类型参数
单个简单类型参数,在#{}中可以随意命名,但是没有必要。通常还是使用和接口方法参数同名。
3)实体类类型参数
Mybatis会根据#{}中传入的数据,加工成getXxx()方法,通过反射在实体类对象中调用这个方法,从而获取到对应的数据。填充到#{}解析后的问号占位符这个位置。
4)零散的简单类型参数
int updateEmployee(@Param("empId") Integer empId,@Param("empSalary") Double empSalary);<update id="updateEmployee">
update t_emp set emp_salary=#{empSalary} where emp_id=#{empId}
</update>4)Map类型参数
#{}中写Map中的key
有很多零散的参数需要传递,但是没有对应的实体类类型可以使用。使用@Param注解一个一个传入又太麻烦了。所以都封装到Map中。
int updateEmployeeByMap(Map<String, Object> paramMap);<update id="updateEmployeeByMap">
update t_emp set emp_salary=#{empSalaryKey} where emp_id=#{empIdKey}
</update>3.数据输出
1).单个简单类型
Mybatis 内部给常用的数据类型设定了很多别名。 以 int 类型为例,可以写的名称有:int、integer、Integer、java.lang.Integer、Int、INT、INTEGER 等等。
int selectEmpCount();<select id="selectEmpCount" resultType="int">
select count(*) from t_emp
</select>2).返回实体类对象
1.通过给数据库表字段加别名,让查询结果的每一列都和Java实体类中属性对应起来。
2.增加全局配置自动识别对应关系(自动识别驼峰式命名规则)
3.使用resultMap
3).返回Map类型
如果没有对应的实体类,可以用实体类接收,key就是查询的的列,value就是查询的值
<select id="selectEmpNameAndMaxSalary" resultType="map">
        <!-- Map<String,Object> selectEmpNameAndMaxSalary(); -->
        <!-- 返回工资最高的员工的姓名和他的工资 -->
        SELECT
        emp_name 员工姓名,
        emp_salary 员工工资,
        (SELECT AVG(emp_salary) FROM t_emp) 部门平均工资
        FROM t_emp WHERE emp_salary=(
        SELECT MAX(emp_salary) FROM t_emp
        )
    </select>
4).返回List类型
返回值是集合,不需要指定集合类型,只需要指定泛型即可
selectList集合: selectOne(查询单个)调用selectList(查询集合)
5).返回主键值
自增长主键类型
在插入数据后,我们可能需要立即获取这个自动生成的主键值,以便进行后续的操作,如关联查询或日志记录。
useGeneratedKeys属性就是为了支持这一需求而设计的。
Mybatis是将自增主键的值设置到实体类对象中,即使这个类中没setter方法也能成功
 <!--
    主键回显 获取插入数据的主键
    useGeneratedKeys="true":想要数据库自动增强的主键值
    keyColumn="emp_id"主键列的值
    keyProperty="empId":接收主键列的属性,在原对象上接收
    -->
    <insert id="insertEmp" useGeneratedKeys="true" keyColumn="emp_id" keyProperty="empId">
        insert into t_emp(emp_name,emp_salary)
        values(#{empName},#{empSalary});
    </insert>
非自增主键维护
而对于不支持自增型主键的数据库(例如 Oracle)或者字符串类型主键,则可以使用 selectKey 子元素:selectKey 元素将会首先运行,id 会被设置,然后插入语句会被调用!
    <insert id="inserTeacher" >
        <!--
        插入之前,先指定一sql语句
        order="before|after" sql语句是在插入语句之前还是之后执行
        resultType = 返回值类型
        keyProperty = 查询结果给哪个属性赋值
        -->
        <selectKey order="BEFORE" resultType="string" keyProperty="tId">
            select  REPLACE(UUID(),'-','')
        </selectKey>
        insert into teacher(t_id,t_name) value(#{tId},#{tName});
    </insert>
6).实体类属性和数据库字段对应关系
方法一:取别名
用sql语句将字段的别名设置成和实体类属性一致。
resultType按照规则自动映射,只能映射一层,多表查询的时候结果无法映射比如雇员中如果依赖了其他对象
<!-- 编写具体的SQL语句,使用id属性唯一的标记一条SQL语句 -->
<!-- resultType属性:指定封装查询结果的Java实体类的全类名 -->
<select id="selectEmployee" resultType="com.atguigu.mybatis.entity.Employee">

  <!-- Mybatis负责把SQL语句中的#{}部分替换成“?”占位符 -->
  <!-- 给每一个字段设置一个别名,让别名和Java实体类中属性名一致 -->
  select emp_id empId,emp_name empName,emp_salary empSalary from t_emp where emp_id=#{maomi}

</select>
方法二:全局配置自动识别驼峰式命名规则
<!-- 使用settings对Mybatis全局进行设置 -->
<settings>

  <!-- 将xxx_xxx这样的列名自动映射到xxXxx这样驼峰式命名的属性名 -->
  <setting name="mapUnderscoreToCamelCase" value="true"/>

</settings>
方法三:使用resultMap
默认情况下,resultMap会自动映射单层的result标签(列名相同或者开启驼峰式)
    <!--resultMap标签,自己定义映射规则
      id标识 ->
      type ->具体的返回值类型全限定符/别名 集合只写泛型即可
        <id 主键映射关系
        <result 普通列的映射关系
    -->
    <resultMap id="tMap" type="teacher">
        <id column="t_id" property="tId"/>
        <result column="t_name" property="tName"/>
    </resultMap>

<select id="selectEmployeeByRM" resultMap="tMap">

  select t_id,t_name from teacher where t_id=#{tId}

</select>
二.多表查询
@Data
public class Order {
    private Integer orderId;
    private String orderName;
    private Integer customerId;
    private Customer customer;// 体现的是对一的关系

}
@Data
public class Customer {
private Integer customerId;
private String customerName;
private List<Order> orderList;// 体现的是对多的关系
}
1.一对一
根据id查询订单以及其订单关联的用户信息
   <resultMap id="orderMap" type="order">
        <!--第一层属性order-->
        <id column="order_id" property="orderId"/>
        <result column="order_name" property="orderName"/>
        <result column="customer_id" property="customerId"/>
        <!--第二层-->
        <association property="customer" javaType="customer">
            <id column="customer_id" property="customerId"/>
            <result column="customer_name" property="customerName"/>
        </association>
    </resultMap>

    <select id="queryOrderByID" resultMap="orderMap">
        select * from t_order tor join t_customer tur on order_id= #{id};
    </select>
2.多对多
查询客户以及客户对应的订单信息
  <resultMap id="customerMap" type="customer">
        <id column="customer_id" property="customerId"/>
        <result column="customer_name" property="customerName"/>
        <collection property="orderList" ofType="order">
            <id column="order_id" property="orderId"/>
            <result column="order_name" property="orderName"/>
        </collection>
    </resultMap>
    <select id="queryList" resultMap="customerMap">
        select * from t_order tor join t_customer tur
        on tor.customer_id = #{id};
    </select>
3.优化
setting属性:autoMappingBehavior
可选值:NONE, PARTIAL, FULL
默认:PARTIAL
作用:指定 MyBatis 应如何自动映射列到字段或属性。 NONE 表示关闭自动映射;PARTIAL 只会自动映射没有定义嵌套结果映射的字段。 FULL 会自动映射任何复杂的结果集(无论是否嵌套)。
<!--开启resultMap自动映射 -->
<setting name="autoMappingBehavior" value="FULL"/>
会自动帮我们映射result标签的属性和列
<resultMap id="teacherMap" type="teacher">
    <id property="tId" column="t_id" />
    <!-- 开启自动映射,并且开启驼峰式支持!可以省略 result!-->
<!--        <result property="tName" column="t_name" />-->
    <collection property="students" ofType="student" >
        <id property="sId" column="s_id" />
<!--            <result property="sName" column="s_name" />-->
    </collection>
</resultMap>
三.动态查询
1.if and where
   <!--
    如果传入属性,就判断相等,否则不加对应的条件
    where标签的作用有两个
    1.自动添加where关键字 where内部有任何一个if满足,自动添加where
    2.自动去掉多余的 and 和 or
    -->

    <select id="query" resultType="employee">
        select * from t_emp where
        <where>
            <if test="name !=null">
                emp_name=#{name}
            </if>
            <if test="salary!=null and salary > 100">
                and emp_salary = #{salary};
            </if>
        </where>
    </select>
2.set
set:1.自动去掉多余 ,
2.自动添加set关键字
3.必须保证至少一个if成立,否则报错
 <update id="update">
        update t_emp
        <set>
            <if test="empName != null">
                emp_name=#{empName},
            </if>
            <if test="empSalary != null">
                emp_salary=#{empSalary}
            </if>
        </set>
        where emp_id = #{empId}
    </update>
3.trim
prefix属性:指定要动态添加的前缀
suffix属性:指定要动态添加的后缀
prefixOverrides属性:指定要动态去掉的前缀,使用“|”分隔有可能的多个值
suffixOverrides属性:指定要动态去掉的后缀,使用“|”分隔有可能的多个值
<select id="query" resultType="employee">
        select * from t_emp
        <trim prefix="where" prefixOverrides="and | or">
            <if test="name !=null">
                emp_name=#{name}
            </if>
            <if test="salary!=null and salary > 100">
                and emp_salary = #{salary};
            </if>
        </trim>
    </select>
4.choose/when/otherwise
从上到下依次执行条件判断
遇到的第一个满足条件的分支会被采纳
被采纳分支后面的分支都将不被考虑
如果所有的when分支都不满足,那么就执行otherwise分支
根据两个条件查询,如果姓名不为Null,使用姓名查询,如果姓名不为null,使用薪水查询
<select id="queryChoose" resultType="employee">
        select * from t_emp where
        <choose>
            <when test="name !=null">
                emp_name=#{name}
            </when>
            <when test="salary!=null and salary > 100">
                emp_salary = #{salary};
            </when>
            <otherwise>1=1</otherwise>
        </choose>
    </select>
5.foreach
collection属性:要遍历的集合 item属性:遍历集合的过程中能得到每一个具体对象,在item属性中设置一个名字,将来通过这个名字引用遍历出来的对象
separator属性:指定当foreach标签的标签体重复拼接字符串时,各个标签体字符串之间的分隔符
open属性:指定整个循环把字符串拼好后,字符串整体的前面要添加的字符串 close属性:指定整个循环把字符串拼好后,字符串整体的后面要添加的字符串
index属性:这里起一个名字,便于后面引用 遍历List集合,这里能够得到List集合的索引值 遍历Map集合,这里能够得到Map集合的key
1).查询:
List<Employee> queryBatch(@Param("ids") List<Integer> ids); <select id="queryBatch" resultType="employee">
select * from t_emp
where emp_id in
<foreach collection="ids" open="(" separator="," close=")" item="id">
#{id}
</foreach>
</select>2).插入:
int insertBatch(@Param("list") List<Employee> employeeList); <insert id="insertBatch">
insert into t_emp(emp_name,emp_salary)
values
<foreach collection="list" separator="," item="employee">
(#{employee.empName},#{employee.empSalary})
</foreach>
</insert>3).更新:
一次性发送多条SQL语句让数据库执行。此时需要在数据库连接信息的URL地址中设置
xx.url=jdbc:mysql:///xxxxx?allowMultiQueries=true
<!-- int updateEmployeeBatch(@Param("empList") List<Employee> empList) -->
<update id="updateEmployeeBatch">
    <foreach collection="empList" item="emp" separator=";">
        update t_emp set emp_name=#{emp.empName} where emp_id=#{emp.empId}
    </foreach>
</update>
6.sql片段
<!-- 使用sql标签抽取重复出现的SQL片段 -->
<sql id="mySelectSql">
    select emp_id,emp_name,emp_age,emp_salary,emp_gender from t_emp
</sql>

<!-- 使用include标签引用声明的SQL片段 -->
<include refid="mySelectSql"/>
<sql id="selectSql">
insert into t_emp(emp_name,emp_salary) values
</sql>
<insert id="insertBatch">
<include refid="selectSql"/>
<foreach collection="list" separator="," item="employee">
(#{employee.empName},#{employee.empSalary})
</foreach>
</insert>四.高级拓展
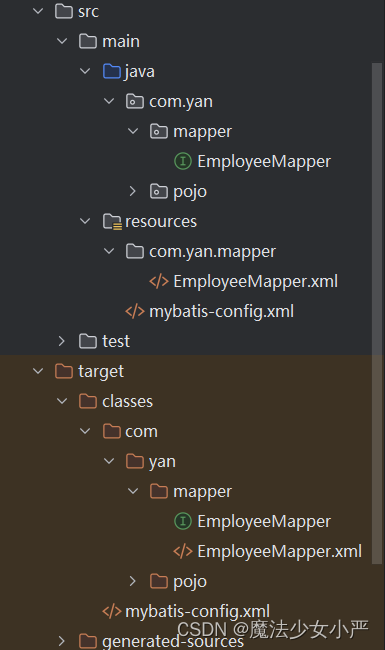
1.Mapper批量映射优化
Mapper 配置文件很多时,在全局配置文件中一个一个注册太麻烦,希望有一个办法能够一劳永逸。
此时这个包下的所有 Mapper 配置文件将被自动加载、注册,比较方便。
<mappers>
    <package name="com.yan.mapper"/>
</mappers>
要求:
1.Mapper 接口和 Mapper 配置文件名称一致
2.Mapper 配置文件放在 Mapper 接口所在的包内(可以在sources下创建mapper接口包一致的文件夹结构存放mapperxml文件)
2.插件机制和分页插件
pom.xml引入依赖
<dependency>
    <groupId>com.github.pagehelper</groupId>
    <artifactId>pagehelper</artifactId>
    <version>5.1.11</version>
</dependency>
mybatis-config.xml配置分页插件
<plugins>
    <plugin interceptor="com.github.pagehelper.PageInterceptor">
        <property name="helperDialect" value="mysql"/>
    </plugin>
</plugins>
 EmployeeMapper mapper = sqlSession.getMapper(EmployeeMapper.class);
        //调用之前,设置当前是第几页,每页显示多少个
        PageHelper.startPage(1, 2);
        List<Employee> emps = mapper.queryList();
        //将查询数据封装到一个PageInfo分页实体类(一共多少页,一共多少条)
        PageInfo<Employee> pageInfo = new PageInfo<>(emps);
        //当前页数据
        List<Employee> list1= pageInfo.getList();
        //当前页的数据
        int pages = pageInfo.getPages();
        //获取总条数
        long total = pageInfo.getTotal();
3.逆向工程
MyBatis 的逆向工程是一种自动化生成持久层代码和映射文件的工具,它可以根据数据库表结构和设置的参数生成对应的实体类、Mapper.xml 文件、Mapper 接口等代码文件,简化了开发者手动生成的过程。逆向工程使开发者可以快速地构建起 DAO 层,并快速上手进行业务开发。
逆向工程只能生成单表的crud操作,多表仍需要我们自己编写!
1).安装MyBatisX插件


 411
411

 被折叠的 条评论
为什么被折叠?
被折叠的 条评论
为什么被折叠?
 到【灌水乐园】发言


