


需求:
用户上传的头像、封面等图片需要符合一定的比例,网站需要帮助用户进行预处理,确保图片显示时不会变形。最后前端直传阿里
效果:
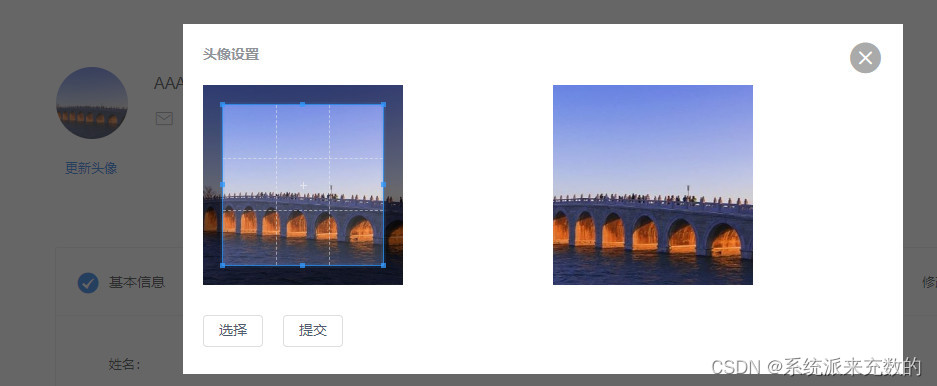
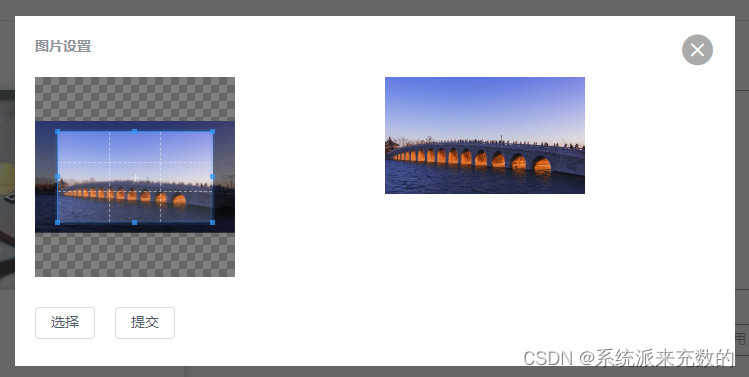
点击上传按钮选择文件后,出现裁剪弹窗。
如果原先就有图片,则点击修改时直接出现原图片,用户可点击【选择】重新上传再裁剪,也可直接裁剪原图片提交。
使用组件:
<!-- 裁剪头像 -->
      <AvatarCropper
        ref="cropper"
        :filePath="userHeadSculpture"
        :userId="userId"
        v-if="avatarWinShow"
        @boxClose="boxCloseAvatar"
      />
const cropper = ref(); // 组件
const userHeadSculpture = ref(""); // 图片地址
// 头像上传 获取文件
const avatarWinShow = ref(false); // 裁剪弹窗是否展示
// 关闭弹窗
const boxCloseAvatar = () => {
avatarWinShow.value = false;
};引入了 elementPlus 的 Upload 上传 | Element Plus 和裁剪图片的 指南 | Cropper.js
组件代码:
<!-- 裁剪头像弹窗 -->
<template>
  <div class="personal-authentica">
    <div class="context">
      <div class="text-box" v-loading="upLoading">
        <!-- 关闭按钮 -->
        <i @click="boxClose" class="iconfont iconguanbi2fill"></i>

        <!-- 内容 -->
        <div id="Box">
          <h3>头像设置</h3>
          <!--  预览的图片  -->
          <!-- <div class="before"></div> -->

          <!-- 裁剪+效果 -->
          <div class="box">
            <div class="box_1">
              <img :src="filePath" ref="image" />
            </div>

            <!--裁剪完的图片-->
            <div class="box_2">
              <!-- <img :src="afterImg" /> -->
              <div class="before"></div>
            </div>
          </div>

          <!--  裁剪按钮-->
          <div class="btn">
            <el-button style="margin-right: 20px">选择</el-button>
            <input
              class="upload"
              type="file"
              accept=".png, .jpg, .jpeg"
              @change="uploadImg"
            />

            <el-button @click="sureSava">提交</el-button>
          </div>
        </div>
      </div>
    </div>

    <div @click="boxClose" class="mark"></div>
  </div>
</template>

<script>
import { onMounted, reactive, toRefs, ref } from "vue";
//引入依赖
import Cropper from "cropperjs";
import "cropperjs/dist/cropper.css";
import { base64ToFile } from "@/utils/FileUtils";
import myaxios from "@/http/Myaxios";
import { ElMessage } from "element-plus";

export default {
  props: {
    filePath: {
      type: String,
    },
    aspectRatio: { // 裁剪比例,需要可传
      type: String,
      default: 1,
    },
    userId: {
      type: String,
    },
  },
  emits: ["boxClose"],
  setup(props, context) {
    const boxClose = () => {
      context.emit("boxClose", false);
      if (Shuju.myCropper) {
        Shuju.myCropper.destroy();
      }
    };

    // 原生上传的文件
    const uploadImg = (e) => {
      if (e.target.files && e.target.files[0]) {
        const file = e.target.files[0];
        Shuju.image.src = URL.createObjectURL(file);
        if (Shuju.myCropper) {
          Shuju.myCropper.destroy();
        }
        copper();

        // const reader = new FileReader();
        // reader.readAsDataURL(file);
        // reader.onload = (e) => {
        //   Shuju.image.src = e.target.result;
        // };
      }
    };

    const Shuju = reactive({
      // 裁剪后的图片
      afterImg: "",
      // 裁剪的图片
      image: null,
      // 进行裁剪
      myCropper: null,
    });

    // 实例化裁剪框
    const copper = () => {
      Shuju.myCropper = new Cropper(Shuju.image, {
        /*
        * viewMode 视图控制
          - 0 无限制
          - 1 限制裁剪框不能超出图片的范围
          - 2 限制裁剪框不能超出图片的范围 且图片填充模式为 cover 最长边填充
          - 3 限制裁剪框不能超出图片的范围 且图片填充模式为 contain 最短边填充
        * */
        viewMode: 1,
        // 设置图片是否可以拖拽功能
        /*
        * dragMode 拖拽图片模式
          - crop 形成新的裁剪框
          - move 图片可移动
          - none 什么也没有
        * */
        dragMode: "move",
        // 是否显示图片后面的网格背景,一般默认为true
        background: true,
        // 进行图片预览的效果
        preview: ".before",
        // 设置裁剪区域占图片的大小 值为 0-1 默认 0.8 表示 80%的区域
        autoCropArea: 0.8,
        // 设置图片是否可以进行收缩功能
        zoomOnWheel: true,
        // 是否显示 + 箭头
        center: true,
        // 设置裁剪框为固定的宽高比
        aspectRatio: props.aspectRatio,
      });
    };

    // 裁剪后
    const sureSava = () => {
      if (Shuju.myCropper) {
        let afterImg = {};
        // 拿到裁剪后的图片
        Shuju.afterImg = Shuju.myCropper
          .getCroppedCanvas({
            imageSmoothingQuality: "high",
          })
          .toDataURL("image/jpeg"); // 设置图片格式
        // console.log(Shuju.afterImg);
        afterImg = base64ToFile(Shuju.afterImg);
        getSignature(afterImg);
      } else {
        ElMessage({
          message: "请先选择图片",
          type: "warning",
        });
      }
    };

    // 获取上传文件签名
    const upLoading = ref(false);
    const getSignature = (afterImg) => {
      let url = "xxxxxxx";
      myaxios.get(url).then((res) => {
        let params = {
          key: res.data.data.dir + ".jpg", // 存储在 OSS 的文件路径
          OSSAccessKeyId: res.data.data.accessid, // accessKeyId
          policy: res.data.data.policy, // policy
          Signature: res.data.data.signature, // 签名
          file: afterImg,
          success_action_status: 200, // 成功后返回的操作码
        };

        upLoading.value = true;
        myaxios.upLoad(params).then((res) => {
          upLoading.value = false;
          // console.log(res);

          if (res.status == 200) {
            // ElMessage({
            //   message: "上传成功",
            //   type: "success",
            // });
            context.emit("boxClose");
            editAvatar(拼接的图片地址);
          }
        });
      });
    };

    // 保存新用户头像
    const editAvatar = (headSculpture) => {
      let url = "/home/business/zUser/editAvatar";
      myaxios.post(url, { headSculpture }).then((res) => {
        // console.log(res);
        if (res.data.code == 200) {
          ElMessage({
            message: "修改成功,页面即将刷新",
            type: "success",
          });
          setTimeout(() => {
            location.reload();
          }, 1000);
        }
      });
    };

    // 页面刷新自动执行
    onMounted(() => {
      if (props.filePath) {
        Shuju.image.src = props.filePath;
        copper();
      }
    });

    return {
      ...toRefs(Shuju),
      sureSava,
      getSignature,
      boxClose,
      uploadImg,
      upLoading,
    };
  },
};
</script>

<style lang="scss" scoped>
#Box {
  padding: 20px;
  margin-top: 20px;
  border-radius: 5px;
  height: 350px;
  > h3 {
  }
  > .box {
    display: flex;
    align-items: center;
    margin-top: 20px;
    > div {
      width: 200px;
      height: 200px;
      > img {
        display: block;
      }
    }
    > .box_2 {
      > .before {
        width: 200px;
        height: 200px;
        position: relative;
        left: 150px;
        overflow: hidden;
      }
    }
  }
  > .btn {
    position: relative;
    display: flex;
    > .upload {
      display: block;
      width: 60px;
      height: 32px;
      position: absolute;
      top: 0;
      left: 0;
      opacity: 0;
    }
    margin-top: 30px;
  }
}
.personal-authentica {
  position: fixed;
  top: 0;
  bottom: 0;
  left: 0;
  right: 0;
  z-index: 400;
  font-size: 12px;
  color: $color;
  > .context {
    position: absolute;
    z-index: 400;
    left: 50%;
    top: 30%;
    transform: translate(-50%, -50%);
    > .text-box {
      position: relative;
      // margin: 120px auto 0;
      width: 720px;
      height: 350px;
      background-color: #fff;
      > i {
        position: absolute;
        color: #aaa;
        right: 20px;
        top: 8px;
        font-size: 35px;
        cursor: pointer;
      }
    }
  }
  > .mark {
    position: fixed;
    width: 100vw;
    height: 100vh;
    background-color: rgba(43, 43, 43, 0.7215686275);
  }
}
</style>
这部分代码参考了在Vue3中使用cropperjs进行图片的裁剪_vue3 图片裁剪-CSDN博客
补充:
/**
* base64 转 File
* @param {String} base64
* @returns
*/
export function base64ToFile(base64) {
  let file = null;

  // 浏览器兼容
  if (window.File != undefined) {
    let parsedBase64 = parseBase64(base64);
    let u8arr = base64ToUint8Array(base64);
    file = new File([u8arr], parsedBase64.mime.replace("/", "."), {
      type: parsedBase64.mime,
    });
  } else {
    file = blobToFile(base64ToBlob(base64));
  }

  return file;
}


 3987
3987

 被折叠的 条评论
为什么被折叠?
被折叠的 条评论
为什么被折叠?
 到【灌水乐园】发言


