


 本文详细介绍了如何在RHEL系统中设置NFS服务器,共享目录并配置客户端自动挂载。包括启动NFS服务,设置exports,防火墙配置,以及通过autofs实现自动挂载的过程。
本章主要介绍NFS客户端的使用
- 创建NFS服务器并通过NFS共享一个目录
- 在客户端上访问NFS共享的目录
- 自动挂载的配置和使用
访问NFS存储
前面介绍了本地存储,本章就来介绍如何使用网络上的存储设备。NFS即网络文件系统, 所实现的是 Linux 和 Linux 之间的共享。
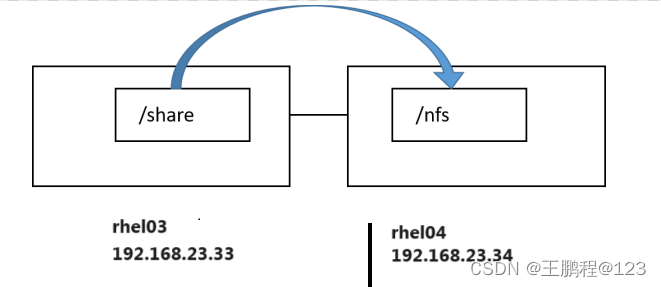
下面的练习我们将会在rhel03上创建一个文件夹/share,然后通过NFS把它共享,再在rhel04上把这个共享文件夹挂载到/nfs上,如下图所示。
首先在rhel03上启动nfs-server 服务并设置开启自动启动,命令如下。
[root@rhel03 ~]# systemctl enable nfs-server.service --now
Created symlink /etc/systemd/system/multi-user.target.wants/nfs-server.service → /usr/lib/systemd/system/nfs-server.service.
[root@rhel03 ~]#
创建准备共享的目录/share,命令如下。
[root@rhel03 ~]# mkdir /share
[root@rhel03 ~]#
在/etc/exports中把目录/share共享出去,命令如下。
[root@rhel03 ~]# cat /etc/exports
/share *(rw,no_root_squash)
[root@rhel03 ~]#
这里*的意思是表示任何客户端都可以访问/share目录。
让共享生效,命令如下。
[root@rhel03 ~]# exportfs -arv
exporting *:/share
[root@rhel03 ~]#
在server上配置防火墙放行NFS,命令如下。
[root@rhel03 ~]# firewall-cmd --add-service=nfs --permanent
success
[root@rhel03 ~]# firewall-cmd --add-service=rpc-bind --permanent
success
[root@rhel03 ~]# firewall-cmd --add-service=mountd --permanent
success
[root@rhel03 ~]# firewall-cmd --reload
success
[root@rhel03 ~]# firewall-cmd --list-services
cockpit dhcpv6-client mountd nfs rpc-bind ssh
[root@rhel03 ~]#
关于防火墙的配置,后续会有专门章节讲解。
在rhel04上访问这个共享文件夹,首先使用show mount命令查看服务器上共享的目录,命今如下。
[root@rhel04 ~]# showmount -e 192.168.23.33
Export list for 192.168.23.33:
/share *
[root@rhel04 ~]#
把服务器上共享的目录挂载到本地/nfs目录上,命令如下。
[root@rhel04 ~]# mkdir /nfs
[root@rhel04 ~]# mount 192.168.23.33:/share /nfs
[root@rhel04 ~]#
查看挂载情况,命令如下。
[root@rhel04 ~]# df -Th | grep nfs
192.168.23.33:/share nfs4       98G   12G   87G   12% /nfs
[root@rhel04 ~]#
可以看到,已经挂载好了。
如果希望开机能够自动挂载,则写入/etc/fstab中,命令如下。
[root@rhel04 ~]# tail -1 /etc/fstab
192.168.23.33:/share                      /nfs                    nfs     defaults        0 0
[root@rhel04 ~]#
自动挂载
自动挂载的意思是,把一个外部设备/dev/xx和某个目录/dir/yy关联起来。平时/dev/xx 是否挂载到了/dir/yy 上不需要考虑,但访问 /dir/yy时,系统就知道要访问 /dev/xx中的数据,这个时候系统会自动将/dev/xx挂载到/dir/yy上。
安装软件包的步骤如下。
- 挂载光盘,命令如下。
[root@rhel03 ~]# mount /dev/cdrom /mnt/
mount: /mnt: WARNING: device write-protected, mounted read-only.
[root@rhel03 ~]#
这里准备把光盘作为yum源。
- 编写repo文件,命令如下。
[root@rhel03 ~]# cat /etc/yum.repos.d/aa.repo
[aa]
name=aa
baseurl=file:///mnt/AppStream
enabled=1
gpgcheck=0


[bb]
name=bb
baseurl=file:///mnt/BaseOS
enabled=1
gpgcheck=0
[root@rhel03 ~]# - 开始安装autofs,命令如下。
[root@rhel03 ~]# yum -y install autofs
正在更新 Subscription Management 软件仓库。
无法读取客户身份

本系统尚未在权利服务器中注册。可使用 subscription-manager 进行注册。

上次元数据过期检查:0:02:16 前,执行于 2023年12月07日 星期四 06时16分07秒。
依赖关系解决。
======================================================================================================================================
 软件包                        架构                          版本                                     仓库                       大小
======================================================================================================================================
安装:
 autofs                        x86_64                        1:5.1.4-74.el8                           bb                        706 k

事务概要
======================================================================================================================================
安装  1 软件包

总计:706 k
安装大小:2.8 M
下载软件包:
运行事务检查
事务检查成功。
运行事务测试
事务测试成功。
运行事务
  准备中  :                                                                                                                       1/1
  安装    : autofs-1:5.1.4-74.el8.x86_64                                                                                          1/1
  运行脚本: autofs-1:5.1.4-74.el8.x86_64                                                                                          1/1
  验证    : autofs-1:5.1.4-74.el8.x86_64                                                                                          1/1
已更新安装的产品。

已安装:
  autofs-1:5.1.4-74.el8.x86_64

完毕!
[root@rhel03 ~]#
启动autofs并设置开机自动启动,命令如下。
[root@rhel03 ~]# systemctl enable autofs.service --now
Created symlink /etc/systemd/system/multi-user.target.wants/autofs.service → /usr/lib/systemd/system/autofs.service.
[root@rhel03 ~]#
下面练习把光盘自动挂载到/zz/dvd 上。先把/zz创建出来,命令如下。
[root@rhel03 ~]# mkdir /zz
[root@rhel03 ~]#
记住,这里不需要创建目录/zz/dvd,这个目录会自动创建。
在/etc/auto.master.d目录中创建一个后缀为 autofs的文件,后缀必须是autofs,这里创建的是aa.autofs,命令如下。
[root@rhel03 ~]# cat /etc/auto.master.d/aa.autofs
/zz /etc/auto.aa
[root@rhel03 ~]#
这里的意思是把哪个外部设备挂载到/zz的哪个子目录上由/etc/auto.aa决定,内容使用 【Tab】键进行分隔。下面创建/etc/auto.aa,命令如下。
[root@rhel03 ~]# cat /etc/auto.aa
dvd	-fstype=iso9660,ro	:/dev/cdrom
[root@rhel03 ~]#
注意:上面的命令中,dvd和-fstype之间有一个【Tab】键,ro和后面的冒号之间有一个【Tab】键。
这个文件的格式如下。
- 子目录 ‐fstype= 文件系统,选项1,选项2 :外部设备
这里外部设备如果是本地磁盘或光盘,冒号前面保持为空,但是冒号不能省略。如果是其他机器上共享的目录,则写远端的IP。
结合/etc/auto.master.d/aa.autofs整体的意思是,当访问/zz/dvd时,系统会自动把/dev/cdrom挂载到/zz/dvd 上。
重启autofs服务,让我们刚做的配置生效,命令如下。
[root@rhel03 ~]# systemctl restart autofs.service
[root@rhel03 ~]#
确认现在光盘是没有挂载到/zz/dvd 上的,而且/zz目录中也没有dvd目录,命令如下。
[root@rhel03 ~]# mount | grep -v auto | grep zz
[root@rhel03 ~]# ls /zz
[root@rhel03 ~]#
下面访问/zz/dvd,命令如下。
[root@rhel03 ~]# ls /zz/dvd
AppStream  EFI   extra_files.json  images    media.repo               RPM-GPG-KEY-redhat-release
BaseOS     EULA  GPL               isolinux  RPM-GPG-KEY-redhat-beta  TRANS.TBL
[root@rhel03 ~]#
因为访问这个目录时能触发自动挂载,系统自动创建/zz/dvd并把 /dev/cdrom挂载到这 个目录上,再次验证挂载情况,命令如下。
[root@rhel03 ~]# mount | grep -v auto | grep zz
/dev/sr0 on /zz/dvd type iso9660 (ro,relatime,nojoliet,check=s,map=n,blocksize=2048)
[root@rhel03 ~]#
可以看到,现在已经挂载上去了。
练习:下面练习自动挂载NFS共享文件夹,整个实验思路如下。
在rhel03上创建一个用户mary,家目录指定为/rhome/mary。在rhel04上也创建一个 用户mary,家目录也指定为/rhome/mary,但是rhel04上的mary并不把这个家目录创建出来,如下图所示。
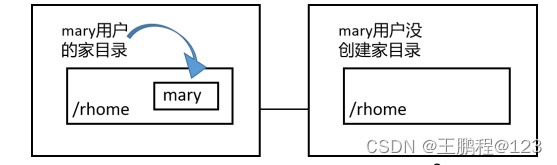 左边是rhel03-192.168.23.33,右边是rhel04-192.168.23.34
通过NFS把rhel03上的/rhome共享出去,在rhel04上配置 autofs,把192.168.23.33上 的/rhome/mary关联到rhel04上的/rhome/mary中。
当在rhel04上使用mary登录时会自动登录到/rhome/mary,就会触发autofs自动把 192.168.23.33:/rhome/mary挂载到rhel04上的/rhome/mary目录上,这样rhel04的mary也就有了家目录。
在rhel03上创建/rhome目录,然后创建用户mary,家目录设置为/rhome/mary,用户的uid设置为3001,命令如下。
[root@rhel03 ~]# mkdir /rhome
[root@rhel03 ~]# useradd -u 3001 -d /rhome/mary mary
[root@rhel03 ~]# echo cisco@123 | passwd --stdin mary
更改用户 mary 的密码 。
passwd:所有的身份验证令牌已经成功更新。
[root@rhel03 ~]# ls /rhome
mary
[root@rhel03 ~]#
此时在rhel03上mary用户就创建好了,且 mary的家目录也是存在的。
在rhel04上创建/rhome目录,然后创建用户mary,家目录设置为/rhome/mary。因为 指定了-M选项,这个目录并没有被创建,用户的uid设置为3001,记住必须和rhel03上的 mary具有相同的uid,命令如下。
[root@rhel04 ~]# mkdir /rhome
[root@rhel04 ~]# useradd -u 3001 -d /rhome/mary -M mary
[root@rhel04 ~]# echo cisco@123 | passwd --stdin mary
更改用户 mary 的密码 。
passwd:所有的身份验证令牌已经成功更新。
[root@rhel04 ~]# ls /rhome
[root@rhel04 ~]#
可以看到,mary的家目录/rhome/mary并没有被创建出来。在rhel04上切换到mary用 户,命令如下。
[root@rhel04 ~]# su - mary
su: 警告:无法更改到 /rhome/mary 目录: 没有那个文件或目录
[mary@rhel04 root]$ exit
注销
[root@rhel04 ~]#
在rhel04上因为mary没有家目录,所以会出现上述警告信息,输入“exit”退回到root 用户。
在rhel03上通过NFS把/rhome共享出去,编辑/etc/exports内容如下。
[root@rhel03 ~]# cat /etc/exports
/share *(rw,no_root_squash)
/rhome *(rw,no_root_squash)
[root@rhel03 ~]#
这样就把/rhome共享出去了,然后让此共享生效。
[root@rhel03 ~]# exportfs -arv
exporting *:/rhome
exporting *:/share
[root@rhel03 ~]#
切换到rhel04上开始配置autofs,创建/etc/auto.master.d/bb.autofs,内容如下。 (rhel04安装autofs根据前面内容安装即可)
[root@rhel04 ~]# cat /etc/auto.master.d/bb.autofs
/rhome	/etc/auto.bb
[root@rhel03 ~]#
到底把哪个外部设备挂载到/rhome的哪个子目录上由/etc/auto.bb决定。
下面创建/etc/auto.bb,内容如下。
[root@rhel04 ~]# cat /etc/auto.bb
mary	-fstype=nfs,rw	192.168.23.33:/rhome/mary
[root@rhel04 ~]#
结合/etc/auto.master.d/bb.autofs整体的意思是,当访问/rhome/mary时,系统会自动把192.168.23.33:/rhome/mary挂载到rhel04的/rhome/mary目录上。
重启autofs,命令如下。
[root@rhel04 ~]# systemctl restart autofs.service
[root@rhel04 ~]#
确认现在/rhome/mary是没有挂载任何东西的,命令如下。
[root@rhel04 ~]# mount | grep -v auto | grep rhome
[root@rhel04 ~]#
下面在rhel04上切换到mary,记住通过su - mary而不是通过su mary,命令如下。
[root@rhel04 ~]# su - mary
[mary@rhel04 ~]$ pwd
/rhome/mary
[mary@rhel04 ~]$ exit
注销
[root@rhel04 ~]#
我们知道su - mary,用户切换到mary的同时也会切换到mary的家目录,这样会触发 autofs,再次查看挂载情况,命令如下。
[root@rhel04 ~]# mount | grep -v auto | grep rhome
192.168.23.33:/rhome/mary on /rhome/mary type nfs4 (rw,relatime,vers=4.2,rsize=262144,wsize=262144,namlen=255,hard,proto=tcp,timeo=600,retrans=2,sec=sys,clientaddr=192.168.23.34,local_lock=none,addr=192.168.23.33)
[root@rhel04 ~]#
可以看到,已经成功挂载了。


 1978
1978

 被折叠的 条评论
为什么被折叠?
被折叠的 条评论
为什么被折叠?
 到【灌水乐园】发言


