


本章主要介绍在RHEL8中如何使用 SELinux。
- 了解什么是 SELinux
- 了解 SELinux 的上下文
- 配置端口上下文
- 了解SELinux的布尔值
- 了解SELinux的模式
在 Windows系统中安装了一些安全软件后,当执行某个命令时,如果安全软件认为这个命令对系统是一种危害,则会阻止这个命令继续运行。例如,在powershell中创建一个用户 net user tom /add,安全软件会认为这个操作是不安全的,然后会阻止,如下图所示。
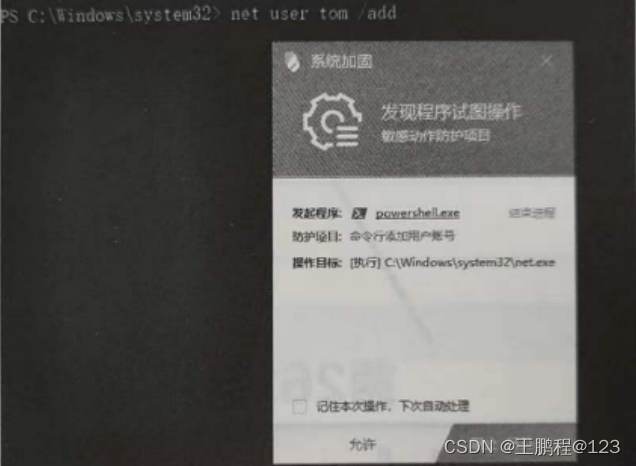
Windows上的安全软件保护系统
RHEL/CentOS 中的SELinux实现的是类似的功能,SELinux全称是Security-Enhanced Linux,目的是提高系统的安全性。当我们执行某个操作时,如果SELinux认为此操作有危险,则会拒绝进一步的访问。
了解上下文
在开启了SELinux 的情况下,SELinux 会为每个文件、每个进程都分配一个标签,这个标签我们称为上下文(context),后续说的标签和上下文是同一个概念,查看上下文时需要加上Z选项。例如,查看进程的上下文,命令如下。
[root@rhel03 ~]# ps -axZ | grep -v grep | grep httpd
system_u:system_r:httpd_t:s0       4166 ?        Ss     0:01 /usr/sbin/httpd -DFOREGROUND
system_u:system_r:httpd_t:s0       4170 ?        S      0:00 /usr/sbin/httpd -DFOREGROUND
system_u:system_r:httpd_t:s0       4171 ?        Sl     0:04 /usr/sbin/httpd -DFOREGROUND
system_u:system_r:httpd_t:s0       4172 ?        Sl     0:04 /usr/sbin/httpd -DFOREGROUND
system_u:system_r:httpd_t:s0       4173 ?        Sl     0:04 /usr/sbin/httpd -DFOREGROUND
system_u:system_r:httpd_t:s0       4471 ?        Sl     0:04 /usr/sbin/httpd -DFOREGROUND
[root@rhel03 ~]#
可以看到,httpd进程的上下文为httpd_t。
查看文件的上下文,命令如下。
[root@rhel03 ~]# ls -dZ /var/www/html/
system_u:object_r:httpd_sys_content_t:s0 /var/www/html/
[root@rhel03 ~]#
可以看到,/var/www/html的上下文为httpd_sys_content_t。
特定上下文的进程,只能访问特定上下文的文件,上下文为httpd_t的进程可以访问上下文为httpd_sys _content_t的文件或目录。
下面做一个测试。
在rhel03上创建目录/web,并写一些测试数据到/web/index.html中,命令如下。
[root@rhel03 ~]# mkdir /web
[root@rhel03 ~]# echo 5555 > /web/index.html
[root@rhel03 ~]#
查看/web 的上下文,命令如下。
[root@rhel03 ~]# ls -dZ /web/
unconfined_u:object_r:default_t:s0 /web/
[root@rhel03 ~]#
可以看到,/web 的上下文为 default_t。
把/web软链接到/var/www/html/www,命令如下。
[root@rhel03 ~]# ln -s /web /var/www/html/www
[root@rhel03 ~]#
查看/var/www/html中的内容,命令如下。
[root@rhel03 ~]# ls /var/www/html/
index.html  www
[root@rhel03 ~]#
这里的www是/web的软链接(快捷方式),当我们在地址栏中输 入“192.168.23.33/www"时,其实访问的是/web中的index.html。
确保httpd服务是运行的,命令如下。
[root@rhel03 ~]# systemctl restart httpd
[root@rhel03 ~]# systemctl is-active httpd
active
[root@rhel03 ~]#
确保防火墙放行了httpd服务,命令如下。
[root@rhel03 ~]# firewall-cmd --add-service=http
success
[root@rhel03 ~]#
在客户端上访问此内容,结果如下图所示。
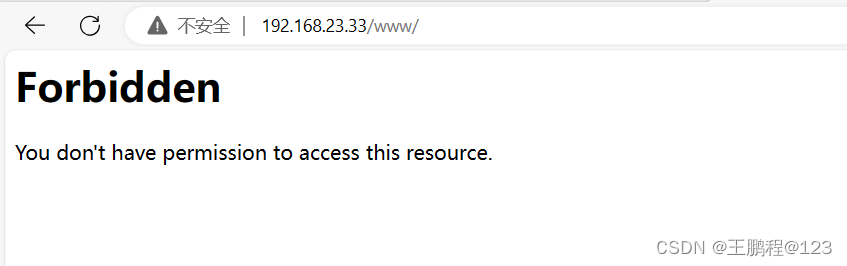
发现访问是被拒绝的,原因是当客户端在浏览器的地址栏中输 入“192.168.23.33/www"连接到服务器时,服务器会有一个httpd进程来“接待”这个客户端的连接请求,然后 httpd根据用户的请求去访问目录/web,如下图所示。
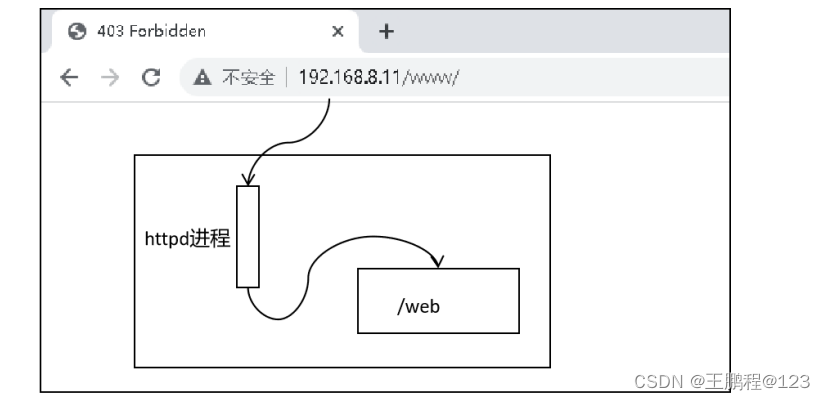 前面已经看到httpd进程的上下文是httpd_t,/web的上下文是default_t,这两个是不匹配 的,所以 httpd进程访问目录/web时被拒绝。
但是httpd进程是可以正常访问/var/www/html的(上下文为httpd_sys_content_t),考虑如果把/web的上下文改成 httpd sys content t是不是就可以使httpd进程能访问了呢?
改变上下文的命令如下。
- chcon ‐R ‐t 上下文 目录
这里-R选项的意思是递归。
把/web的上下文改成httpd_sys_content_t,命令如下。
[root@rhel03 ~]# chcon -R -t httpd_sys_content_t /web/
[root@rhel03 ~]#
再次查看/web的上下文,命令如下。
[root@rhel03 ~]# ls -dZ /web/
unconfined_u:object_r:httpd_sys_content_t:s0 /web/
[root@rhel03 ~]#
现在已经是 httpd_sys_content_t了,浏览器测 试结果如下图所示。
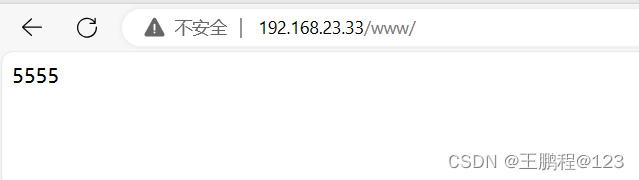
发现可以正常访问了。如果要恢复目录的默认上下文,可以用“restorecon -R 目录”命令。下面恢复/web的上下文,命令如下。
[root@rhel03 ~]# restorecon -R /web
[root@rhel03 ~]#
再次查看/web的上下文,命令如下。
[root@rhel03 ~]# ls -dZ /web
unconfined_u:object_r:default_t:s0 /web
[root@rhel03 ~]#
可以看到,/web的上下文又恢复成default t了,此时刷新浏览器之后又是被拒绝。
如果想修改默认上下文,可以用如下语法。
- semanage fcontext ‐a ‐t httpd_sys_content_t "/目录(/.*)?"
这里(/.*)?表示“/目录”本身及里面所有的内容。
下面修改/web 的默认上下文,命令如下。
[root@rhel03 ~]# semanage fcontext -a -t httpd_sys_content_t "/web(/.*)?"
[root@rhel03 ~]#
查看/web 的上下文,命令如下。
[root@rhel03 ~]# ls -dZ /web/
unconfined_u:object_r:default_t:s0 /web/
[root@rhel03 ~]#
可以看到,当前仍然是 default_t,说明semanage修改的只是默认值,并没有改变当前上下文,要改变当前上下文,仍然需要使用restorecon命令,命令如下。
[root@rhel03 ~]# restorecon -R /web/
[root@rhel03 ~]# ls -dZ /web/
unconfined_u:object_r:httpd_sys_content_t:s0 /web/
[root@rhel03 ~]#
可以看到,此时已经修改了默认上下文。
端口上下文
端口也是有上下文的,如果一个端口没有上下文或上下文和进程不匹配,则进程就无法访问此端口。
查看系统所有端口上下文的命令是semanage port -l(小写字母l,list的意思)。
练习:请通过如下命令把httpd端口改为808,命令如下。
[root@rhel03 ~]# sed -i '/^Listen/cListen 808' /etc/httpd/conf/httpd.conf
[root@rhel03 ~]#
然后重启 httpd服务,命令如下。
[root@rhel03 ~]# systemctl restart httpd
Job for httpd.service failed because the control process exited with error code.
See "systemctl status httpd.service" and "journalctl -xe" for details.
[root@rhel03 ~]#
发现启动服务失败,通过journalctl -xe l grep httpd查看日志,发现里面有一段话,如下所示。
[root@rhel03 ~]# journalctl -xe | grep httpd
12月 12 11:39:16 rhel03 useradd[2723]: new user: name=apache, UID=48, GID=48, home=/usr/share/httpd, shell=/sbin/nologin
-- Subject: httpd.service 单元已开始启动
-- httpd.service 单元已开始启动。
12月 12 11:39:46 rhel03 httpd[3333]: AH00558: httpd: Could not reliably determine the server's fully qualified domain name, using fe80::c272:7829:bfe2:5137. Set the 'ServerName' directive globally to suppress this message
-- Subject: httpd.service 单元已结束启动
-- httpd.service 单元已结束启动。
12月 12 11:39:56 rhel03 httpd[3333]: Server configured, listening on: port 80
-- Subject: httpd.service 单元已开始停止操作
-- httpd.service 单元已开始停止操作。
12月 12 11:49:06 rhel03 systemd[1]: httpd.service: Succeeded.
-- The unit httpd.service has successfully entered the 'dead' state.
-- Subject: httpd.service 单元已结束停止操作
-- httpd.service 单元已结束停止操作。
-- Subject: httpd.service 单元已开始启动
-- httpd.service 单元已开始启动。
12月 12 11:49:27 rhel03 httpd[3761]: AH00558: httpd: Could not reliably determine the server's fully qualified domain name, using fe80::c272:7829:bfe2:5137. Set the 'ServerName' directive globally to suppress this message
这里的意思是无法绑定端口808,这是因为端口808没有对应的上下文,命令如下。
[root@rhel03 ~]# semanage port -l | grep 'b808\b'
[root@rhel03 ~]#
这样httpd进程是访问不了端口808的。但是端口80是正常工作的,查看端口80的上下文, 命令如下。
[root@rhel03 ~]# semanage port -l | grep '\b80\b'
http_port_t                    tcp      80, 81, 443, 488, 8008, 8009, 8443, 9000
[root@rhel03 ~]#
可以看到,端口80的上下文是 http_port_t。如果把端口808的上下文改成和端口80一样不就可以了吗?试试修改端口808的上下文。
修改端口上下文的语法如下。
- semanage port ‐a ‐t 上下文 ‐p 协议 端口
如果要删除端口上下文,语法如下。
- semanage port ‐d ‐t 上下文 ‐p 协议 端口
下面把端口808的上下文改成http_port_t,命令如下。
[root@rhel03 ~]# semanage port -a -t http_port_t -p tcp 808
[root@rhel03 ~]#
这里的意思是把端口808的上下文改成http_port_t。
再次查看端口808的上下文,命令如下。
[root@rhel03 ~]# semanage port -l | grep '\b808\b'
http_port_t                    tcp      808, 80, 81, 443, 488, 8008, 8009, 8443, 9000
[root@rhel03 ~]#
再次重启httpd服务,命令如下。
[root@rhel03 ~]# systemctl restart httpd
[root@rhel03 ~]#
可以正常启动,查看端口监听情况,命令如下。
[root@rhel03 ~]# netstat -ntulp | grep 808
tcp6       0      0 :::808                  :::*                    LISTEN      7237/httpd
[root@rhel03 ~]#
端口808也正常运行了。
了解SELinux的布尔值
布尔值可以理解为一个功能开关,在没有SELinux的情况下,电灯亮不亮完全由开关控制,打开开关电灯亮,关闭开关电灯 灭。现在有了SELinux,情况如下图所示。
现在电灯亮还是不亮,不能完全由原来的开关A决定,这当中 SELinux也具有决定权。如果把开关A打开,但是 SELinux不允许打开,则电灯仍然是不亮的。

要查看系统中所有SELinux的布尔值可以使用getsebool -a命令。
下面看一个例子,在前面讲到yum时,已经在rhel03上启动了vsftpd并开启了匿名用户访问,匿名用户是ftp或anonymous。
下面开始测试匿名用户是否可以往ftp中写入内容。
(1)在rhel03上创建/var/ftp/incoming目录,并把所有者和所属组改为ftp,命令如下。
[root@rhel03 ~]# mkdir /var/ftp/incoming
[root@rhel03 ~]# chown ftp.ftp /var/ftp/incoming
[root@rhel03 ~]#
改所有者和所属组的目的是让匿名用户(ftp用户)有足够的权限去写
(2)修改配置文件/etc/vsftpd/vsftpd.conf,添加如下两行。
anon_upload_enable=YES
anon_mkdir_write_enable=YES
这两行的作用是设置允许匿名用户往ftp中写内容。这两行加在哪里都可以,原本配置文件中就有这两行,只是被注释掉了,所以直接找到这两行内容,把最前面的#去掉也可以。
然后重启vsftpd,命令如下。
[root@rhel03 ~]# systemctl restart vsftpd
[root@rhel03 ~]#
在rhel04上自行安装lftp,使用lftp登录并进入incoming目录中(如果不指定用户名,则是匿名用户登录)。
[root@rhel04 ~]# lftp 192.168.23.33/incoming
cd 成功, 当前目录=/incoming
lftp 192.168.23.33:/incoming> ls
lftp 192.168.23.33:/incoming>
可以看到,使用匿名用户是可以登录成功的(注意,如果想使用指定用户登录,则需要加上u选项),并且 incoming目录下没有任何文件。
(3)到rhel04上测试把/etc/hosts文件上传进去,命令如下。
[root@rhel04 ~]# lftp 192.168.23.33/incoming
cd 成功, 当前目录=/incoming
lftp 192.168.23.33:/incoming> put /etc/hosts
158 bytes transferred
lftp 192.168.23.33:/incoming>
这里显示已经上传上去了。
切换到rhel03上,开启相关布尔值。
先查看布尔值ftpd_full_access是否开启,命令如下。
[root@rhel03 ~]# getsebool -a | grep ftpd_full_access
ftpd_full_access --> on
[root@rhel03 ~]#
这里显示为on,说明已经开启了。这是我们在讲搭建yum源时开启的。
开启布尔值的语法如下。
- setsebool 布尔值 on 或
- setsebool 布尔值 1
关闭布尔值的语法如下。
- setsebool 布尔值 off 或
- setsebool 布尔值 0
setsebool可以加上P(大写)选项,表示永久生效,即重启系统之后也生效。
因为这里已经开启了布尔值 ftpd_full_access,所以下面先关闭这个布尔值,命令如下。
[root@rhel03 ~]# setsebool -P ftpd_full_access off
[root@rhel03 ~]#
再次切换到rhel04上上传一个文件,命令如下。
[root@rhel04 ~]# lftp 192.168.23.33/incoming
cd 成功, 当前目录=/incoming
lftp 192.168.23.33:/incoming> put /etc/hosts
put: /etc/hosts: 访问失败: 553 Could not create file. (hosts)
lftp 192.168.23.33:/incoming>
发现上传失败。
再次切换到rhel03上,执行如下命令。
[root@rhel03 ~]# setsebool -P ftpd_full_access on
[root@rhel03 ~]#
了解SELinux的模式
SELinux一共有以下两种模式。
- Enforcing:如果不满足SELinux条件,则SELinux 会阻止访问服务并提供警报。
- Permissive:如果不满足SELinux条件,则SELinux不会阻止访问,但是会警报。查看当前处于什么模式用getenforce命令,命令如下。
[root@rhel03 ~]# getenforce
Enforcing
[root@rhel03 ~]#
要是想切换模式,需要用setenforce命令。
setenforce 1:切换到Enforcing模式。
setenforce0:切换到Permissive模式。
[root@rhel03 ~]# setenforce 0
[root@rhel03 ~]# getenforce
Permissive
[root@rhel03 ~]# setenforce 1
[root@rhel03 ~]# getenforce
Enforcing
[root@rhel03 ~]#
但是使用setenforce命令切换也只是临时生效,重启系统之后又变成默认模式了。如果想修改默认模式,可以通过修改配置文件/etc/selinux/config或/etc/sysconfig/SELinux,后者是前者的快捷方式(软链接)。
使用vim打开/etc/selinux/config,如下图所示
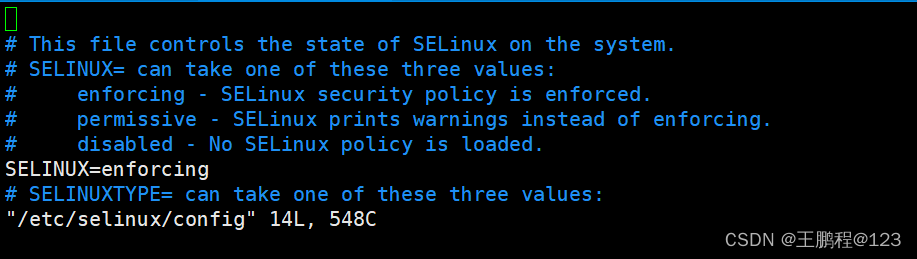
其中 SELINUX=后面的部分就是默认模式(记住不是 SELINUXTYPE那行)。如果想彻底关闭SELinux,只能在此配置文件中把内容改为SELINUX=disabled,且重启才能生效。


 4173
4173


 被折叠的 条评论
为什么被折叠?
被折叠的 条评论
为什么被折叠?
 到【灌水乐园】发言


