


本章主要介绍使用 podman 管理容器。
- 了解什么是容器,容器和镜像的关系
- 安装和配置podman
- 拉取和删除镜像
- 给镜像打标签
- 导出和导入镜像
- 创建和删除镜像
- 数据卷的使用
- 管理容器的命令
- 使用普通用户管理容器
对于初学者来说,不太容易理解什么是容器,这里举一个例子。想象一下,我们把系统安装在一个U盘中,此系统中安装好了MySQL。 然后我们把这个U盘插人一台正在运行的物理机上,这个物理机上并没有安装MySQL,如下图所示。
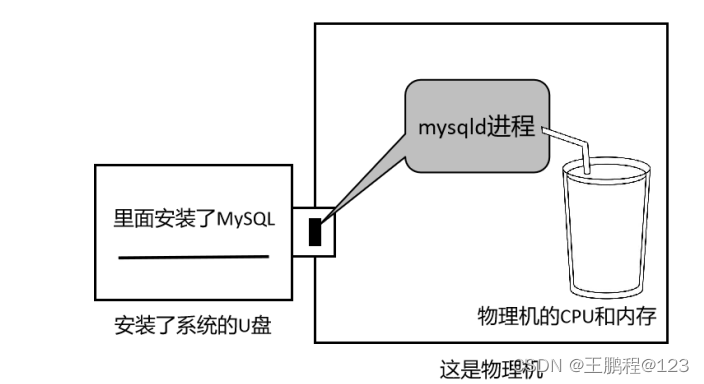 然后把U盘中的mysqld进程“曳”到物理机上运行。但是这个mysqld进程只能适应U盘中的系统,不一定能适应物理机上的系统。所 以,我们找一个类似气球的东西把 mysqld进程在物理机中包裹保护起来,这个mysqld进程依然适应U盘中的生态环境(系统),却可以从物理机上吸收CPU和内存作为维持mysqld进程运行的“养分”。
那么,这个类似气球的东西就是容器,U盘就是镜像。
在Linux中安装软件包时经常会遇到各种包依赖,或者有人不会在 Linux系统(如Ubuntu、CentOS)中安装软件包。这样以后我们就不 需要安装和配置MySQL了,直接把这个“U盘”插到电脑上,然后运行一个容器出来,这样就有MySQL这个服务了。
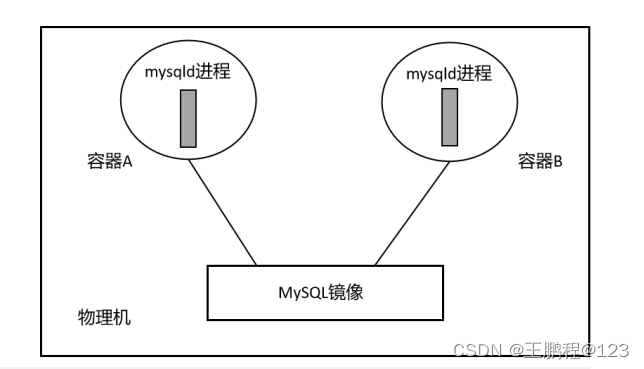
所谓镜像,就是安装了系统的硬盘文件,这个系统中安装了想要运行的程序,如 MySQL.Nginx,并规定好使用这个镜像所生成的容器 里面运行什么进程。这里假设有一个安装了MySQL的镜像,如下图所示。

在服务器上有一个MySQL 的镜像(已经安装好了MySQL),然后使用这个镜像生成一个容器。这个容器中只运行一个mysqld进程,容器 中的mysqld进程直接从物理机上吸收CPU和内存以维持它的正常运行。
以后需要什么应用,就直接拉取什么镜像下来,然后使用这个镜像生成容器。例如,需要对外提供 MySQL服务,那么就拉取一个MySQL镜像,然后生成一个MySQL容器。如果需要对外提供 Web服 务,那么就拉取一个Nginx镜像,然后生成一个Nginx容器。
一个镜像是可以生成很多个容器的,如下图所示。
安装及配置podman
前面已经配置了yum源,所以这里直接使用yum install podman -y命令安装,命令如下。
[root@rhel03 ~]# yum -y install podman
正在更新 Subscription Management 软件仓库。
无法读取客户身份

本系统尚未在权利服务器中注册。可使用 subscription-manager 进行注册。

上次元数据过期检查:0:48:13 前,执行于 2023年12月13日 星期三 10时03分49秒。
软件包 podman-3.3.1-9.module+el8.5.0+12697+018f24d7.x86_64 已安装。
依赖关系解决。
无需任何处理。
完毕!
[root@rhel03 ~]#
查看现在系统中有多少镜像,命令如下。
[root@rhel03 ~]# podman images
REPOSITORY  TAG         IMAGE ID    CREATED     SIZE
[root@rhel03 ~]#
没有任何输出,说明现在还没有镜像。
查看系统中有多少容器,命令如下。
[root@rhel03 ~]# podman ps -a
CONTAINER ID  IMAGE       COMMAND     CREATED     STATUS      PORTS       NAMES
[root@rhel03 ~]#
没有任何输出,说明当前没有容器。
如果要拉取镜像,一般是从国外网站的镜像仓库中拉取,速度会很慢。默认podman从以下仓库中拉取镜 像:registry.access.redhat.com、registry.redhat.io、docker.io。下面配置加速器,提高从docker.io中拉取镜像的速度。
登录阿里云控制台,找到容器镜像服务,单击镜像工具→镜像加速器,找到自己的加速器地址,这里使用的是 https://z1qbjqql.mirror.aliyuncs.com
修改 podman 的配置文件/etc/containers/registries.conf,修改内容如下。
[root@rhel03 ~]# tail -4 /etc/containers/registries.conf
unqualified-search-registries = ["docker.io"]
[[registry]]
prefix = "docker.io"
location = "z1qbjqql.mirror.aliyuncs.com"
[root@rhel03 ~]#
这里的意思是从 docker.io中拉取镜像时使用加速器z1qbjqql.mirror.aliyuncs.com,注意这里不需要加https,配置好之后不需要重启什么服务。
下面开始拉取docker.io/nginx镜像,命令如下。
[root@rhel03 ~]# podman pull docker.io/nginx
Trying to pull docker.io/library/nginx:latest...
Getting image source signatures
Copying blob a9edb18cadd1 done
Copying blob 589b7251471a done
Copying blob a0bcbecc962e done
Copying blob 186b1aaa4aa6 done
Copying blob b4df32aa5a72 done
Copying blob a2abf6c4d29d done
Copying config 605c77e624 done
Writing manifest to image destination
Storing signatures
605c77e624ddb75e6110f997c58876baa13f8754486b461117934b24a9dc3a85
[root@rhel03 ~]#
拉取MySQL镜像docker.io/mysql,命令如下。
[root@rhel03 ~]# podman pull mysql
Resolving "mysql" using unqualified-search registries (/etc/containers/registries.conf)
Trying to pull docker.io/library/mysql:latest...
Getting image source signatures
Copying blob 99da31dd6142 done
Copying blob 72a69066d2fe [==========>---------------------------] 7.7MiB / 25.9MiB
Copying blob 1c04857f594f done
Copying blob 4d7cfa90e6ea [======================================] 5.4KiB / 5.4KiB
Copying blob 99da31dd6142 done
Copying blob 00e060b6d11d [======>-------------------------------] 19.3MiB / 100.4MiB
Copying blob 1c04857f594f done
Writing manifest to image destination
Storing signatures
3218b38490cec8d31976a40b92e09d61377359eab878db49f025e5d464367f3b
[root@rhel03 ~]#
网易仓库地址是https://c.163yun.com/hub#/home,在浏览器中打开此界面需要登录,然后搜索需要的镜像即可。下面从网易仓库中拉取 CentOS镜像,命令如下。
[root@rhel03 ~]# podman pull hub.c.163.com/library/centos
Trying to pull hub.c.163.com/library/centos:latest...
Getting image source signatures
Copying blob a3ed95caeb02 done
Copying blob a3ed95caeb02 done
Copying blob 2409c3878ba1 done
Writing manifest to image destination
Storing signatures
328edcd84f1bbf868bc88e4ae37afe421ef19be71890f59b4b2d8ba48414b84d
[root@rhel03 ~]#
镜像管理
前面讲了要想创建容器必须有镜像,本节主要讲解镜像的管理。
(1)镜像的命名
一般情况下,镜像的命名格式如下。
- 服务器IP: 端口 /分类 /镜像名 :tag
如果不指定端口则默认为80,如果不指定 tag则默认为latest。
例如,192.168.26.101:5000/cka/centos:v2。
再如,hub.c.163.com/library/mysql:latest。
分类也是可以不写的,如docker.io/nginx:latest。
在把镜像上传(push)到仓库时,镜像必须按这种格式命名,因为仓库地址就是由镜像前面的IP决定的。如果只是在本机使用镜像,命名 可以随意。
查看当前系统有多少镜像,命令如下。
[root@rhel03 ~]# podman images
REPOSITORY                    TAG         IMAGE ID      CREATED        SIZE
docker.io/library/nginx       latest      605c77e624dd  23 months ago  146 MB
docker.io/library/mysql       latest      3218b38490ce  24 months ago  521 MB
hub.c.163.com/library/centos  latest      328edcd84f1b  6 years ago    200 MB
[root@rhel03 ~]#
(2)对镜像重新做标签
如果想给本地已经存在的镜像起一个新的名称,可以用tag来做,语法如下。
- podman tag 旧的镜像名 新的镜像名
tag之后,新的镜像名和旧的镜像名是同时存在的。
- 给镜像做新标签,命令如下。
[root@rhel03 ~]# podman tag docker.io/library/mysql 192.168.23.33/rhce/mysql:v2
[root@rhel03 ~]#
这里是为docker.io/library/mysql重新做个tag,名称为192.168.23.33/rhce/mysql,标签为2,这样命名的目的是让大家看到命名的 随意性,建议tag 可以设置为版本号、日期等有意义的字符。
- 再次查看镜像,命令如下。
[root@rhel03 ~]# podman images
REPOSITORY                    TAG         IMAGE ID      CREATED        SIZE
docker.io/library/nginx       latest      605c77e624dd  23 months ago  146 MB
docker.io/library/mysql       latest      3218b38490ce  24 months ago  521 MB
192.168.23.33/rhce/mysql      v2          3218b38490ce  24 months ago  521 MB
hub.c.163.com/library/centos  latest      328edcd84f1b  6 years ago    200 MB
[root@rhel03 ~]#
可以看到,对某镜像做了标签之后,看似是两个镜像,其实对应的是同一个(这类似于Linux中硬链接的概念,一个文件两个名称而已),镜像ID都是一样的。删除其中一个镜像,是不会删除存储在硬盘上的文件的,只有把 IMAGE ID所对应的所有名称全部删除,才会从硬盘上删除。
(3)删除镜像
如果要删除镜像,需要按如下语法来删除。
- podman rmi 镜像名:tag
例如,下面要把 docker.io/library/mysql:latest删除。
- 删除镜像,命令如下。
[root@rhel03 ~]# podman rmi docker.io/library/mysql:latest
Untagged: docker.io/library/mysql:latest
[root@rhel03 ~]#
可以看到,只是简单的一个Untagged操作,并没有任何Deleted操作。
- 查看镜像,命令如下。
[root@rhel03 ~]# podman images
REPOSITORY                    TAG         IMAGE ID      CREATED        SIZE
docker.io/library/nginx       latest      605c77e624dd  23 months ago  146 MB
192.168.23.33/rhce/mysql      v2          3218b38490ce  24 months ago  521 MB
hub.c.163.com/library/centos  latest      328edcd84f1b  6 years ago    200 MB
[root@rhel03 ~]#
可以看到,3218b38490ce对应的本地文件依然是存在的,因为它(ID为3218b38490ce)有两个名称,现在只是删除了一个名称而已,所 以在硬盘上仍然是存在的。
只有删除最后一个名称,本地文件才会被删除
- 删除镜像,命令如下。
[root@rhel03 ~]# podman rmi 192.168.23.33/rhce/mysql:v2
Untagged: 192.168.23.33/rhce/mysql:v2
Deleted: 3218b38490cec8d31976a40b92e09d61377359eab878db49f025e5d464367f3b
[root@rhel03 ~]# podman images
REPOSITORY                    TAG         IMAGE ID      CREATED        SIZE
docker.io/library/nginx       latest      605c77e624dd  23 months ago  146 MB
hub.c.163.com/library/centos  latest      328edcd84f1b  6 years ago    200 MB
[root@rhel03 ~]#
(4)查看镜像的层结构
虽然我们所用的镜像都是从网上下载下来的,但这些镜像在制作过程中都是一点点修改、一步步做出来的。如果我们要看某镜像的这些步骤,可以用podman history命令,语法如下。
- podman history镜像名
查看镜像的结构,命令如下。
[root@rhel03 ~]# podman history hub.c.163.com/library/centos
ID            CREATED      CREATED BY                                     SIZE        COMMENT
328edcd84f1b  6 years ago  /bin/sh -c #(nop)  CMD ["/bin/bash"]           0 B
<missing>     6 years ago  /bin/sh -c #(nop)  LABEL name=CentOS Base ...  0 B
<missing>     6 years ago  /bin/sh -c #(nop) ADD file:63492ba809361c5...  200 MB
[root@rhel03 ~]#
最上层的CMD,定义的是当使用这个镜像生成的容器时,运行的进程为/bin/bash。
(5)导出和导入镜像
一些服务器是无法连接到互联网的,所以无法从互联网上下载镜像。在还没有私有仓库的情况下,如何把现有的镜像传输到其他机器上呢?这里就需要把本地已经pull下来的镜像导出为一个本地文件,这样就可以很容易地传输到其他机器。导出镜像的语法如下。
- podman save 镜像名 > file.tar
- 把 docker.io/nginx:latest 导出为nginx.tar,命令如下。
[root@rhel03 ~]# podman save docker.io/library/nginx:latest > nginx.tar
[root@rhel03 ~]#
删除 Nginx这个镜像,命令如下。
[root@rhel03 ~]# podman rmi docker.io/library/nginx
Untagged: docker.io/library/nginx:latest
Deleted: 605c77e624ddb75e6110f997c58876baa13f8754486b461117934b24a9dc3a85
[root@rhel03 ~]# podman images
REPOSITORY                    TAG         IMAGE ID      CREATED      SIZE
hub.c.163.com/library/centos  latest      328edcd84f1b  6 years ago  200 MB
[root@rhel03 ~]#
既然上面已经把镜像导出为一个文件了,那么需要把这个文件导入,语法如下。
- podman load ‐i file.tar
- 把nginx.tar导入为镜像,命令如下。
[root@rhel03 ~]# podman load -i nginx.tar
Getting image source signatures
Copying blob d874fd2bc83b done
Copying blob 2edcec3590a4 done
Copying blob e379e8aedd4d done
Copying blob b8d6e692a25e done
Copying blob f1db227348d0 done
Copying blob 32ce5f6a5106 done
Copying config 605c77e624 done
Writing manifest to image destination
Storing signatures
Loaded image(s): docker.io/library/nginx:latest
[root@rhel03 ~]#
查看现有镜像,命令如下。
[root@rhel03 ~]# podman images
REPOSITORY                    TAG         IMAGE ID      CREATED        SIZE
docker.io/library/nginx       latest      605c77e624dd  23 months ago  146 MB
hub.c.163.com/library/centos  latest      328edcd84f1b  6 years ago    200 MB
[root@rhel03 ~]#
创建容器
容器就是镜像在宿主机上运行的一个实例,大家可以把容器理解为一个气球,气球中运行了一个进程,这个进程透过气球吸收物理机的 内存和 CPU 资源。
查看当前有多少正在运行的容器,命令如下。
[root@rhel03 ~]# podman ps
CONTAINER ID  IMAGE       COMMAND     CREATED     STATUS      PORTS       NAMES
[root@rhel03 ~]#
这个命令显示的仅仅是正在运行的容器,如果要查看不管是运行还是不运行的容器,需要加上-a选项,即 podman ps-a。
(1)创建一个简单的容器
运行一个最简单的容器,命令如下。
[root@rhel03 ~]# podman run hub.c.163.com/library/centos
[root@rhel03 ~]# podman ps
CONTAINER ID  IMAGE       COMMAND     CREATED     STATUS      PORTS       NAMES
[root@rhel03 ~]# podman ps -a
CONTAINER ID  IMAGE                                COMMAND     CREATED         STATUS                     PORTS       NAMES
8665c09b4ce6  hub.c.163.com/library/centos:latest  /bin/bash   20 seconds ago  Exited (0) 19 seconds ago              exciting_joliot
[root@rhel03 ~]#
可以看到,创建了一个容器,容器ID为8665c09b4ce6,容器名是随机产生的,名称为exciting_joliot,所使用的镜像是 hub.c.163.com/library/centos,容器中运行的进程为/bin/bash(也就是镜像中的CMD指定的)。
podman ps看不到,podman ps -a能看到,且状态为Exited,说明容器是关闭状态。容器运行的一瞬间就关闭了,为什么?
(2)容器的生命期
把容器理解为人的肉体,里面运行的进程理解为人的灵魂。如果人的灵魂宕机了,肉体也就宕机了,只有灵魂正常运行,肉体才能正常运行,如下图所示。

容器和进程之间的关系
同理,只有容器中的进程正常运行,容器才能正常运行,容器中的进程宕机了,容器也就宕机了。因为没有终端的存在,/bin/bash就像执行ls命令一样一下就执行完了,所以容器生命期也就到期了。
如果把这个bash附着到一个终端上,这个终端一直存在,bash就一直存在,那么是不是容器就能一直存活了 呢?
删除容器的语法如下。
- podman rm 容器ID/容器名
如果删除正在运行的容器,可以使用-f选项。
- podman rm ‐f 容器ID/容器名
- 删除刚才的容器,命令如下。
[root@rhel03 ~]# podman rm 8665c09b4ce6
8665c09b4ce60f6f1fad3bb4587655dd77efe62c063d0abb774b2495abe055d5
[root@rhel03 ~]#
重新创建新的容器,加上-i -t选项,可以写作-it或-i -t。
- -t:模拟一个终端。
- -i:可以让用户进行交互,否则用户看到一个提示符之后就卡住不动了。
- 创建一个容器,命令如下。
[root@rhel03 ~]# podman run -it hub.c.163.com/library/centos
[root@705f33bd48de /]#
[root@705f33bd48de /]# exit
exit
[root@rhel03 ~]#
创建好容器之后就自动进入容器中了,可以通过exit退出容器,命令如下。
[root@rhel03 ~]# podman ps -q
[root@rhel03 ~]#
[root@rhel03 ~]# podman ps -a -q
705f33bd48de
[root@rhel03 ~]#
‐q选项可以只显示容器ID,不会显示太多信息
但是一旦退出容器,容器就不再运行了。
- 删除此容器,命令如下。
[root@rhel03 ~]# podman rm 705f33bd48de
705f33bd48de910d34a576581aa6f8553ad57a68c9a72c6b4bc8785102f3d1b3
[root@rhel03 ~]#
如果希望创建好容器之后不自动进入容器中,可以加上-d选项。
- 再次创建一个容器,命令如下。
[root@rhel03 ~]# podman run -dit hub.c.163.com/library/centos
9ff4e5170c0fdcf308039a985283c443685ce56bfdc8f075b23fec69495574ea
[root@rhel03 ~]#
因为加了-d选项,所以创建好容器之后并没有自动进入容器中。进入此容器中,命令如下。
[root@rhel03 ~]# podman attach 9ff4e5170c0f
[root@9ff4e5170c0f /]#
[root@9ff4e5170c0f /]# exit
exit

[root@rhel03 ~]#
[root@rhel03 ~]# podman ps -q
[root@rhel03 ~]# podman ps -a -q
9ff4e5170c0f
[root@rhel03 ~]#
可以看到,只要退出来容器就会自动关闭。
- 删除此容器,命令如下。
[root@rhel03 ~]# podman rm 9ff4e5170c0f
9ff4e5170c0fdcf308039a985283c443685ce56bfdc8f075b23fec69495574ea
[root@rhel03 ~]#
在运行容器时加上--restart=always选项可以解决退出容器自动关闭的问题。
- 创建容器,增加--restart=always选项,命令如下。
[root@rhel03 ~]# podman run -dit --restart=always hub.c.163.com/library/centos
1d880e8a3a12acc476c94fbb5f42dadd11d380f8b2c07b5c3699534227f49e17
[root@rhel03 ~]#
进入容器并退出,命令如下。
[root@rhel03 ~]# podman ps -a -q
1d880e8a3a12
[root@rhel03 ~]# podman attach 1d880e8a3a12
[root@1d880e8a3a12 /]#
[root@1d880e8a3a12 /]# exit
exit


[root@rhel03 ~]# podman ps -a -q
1d880e8a3a12
[root@rhel03 ~]#
可以看到,容器依然是存活的。
- 删除此容器,因为容器是运行的,所以需要加上-f选项,命令如下。
[root@rhel03 ~]# podman rm -f 1d880e8a3a12
1d880e8a3a12acc476c94fbb5f42dadd11d380f8b2c07b5c3699534227f49e17
[root@rhel03 ~]#
每次删除容器时,都要使用容器ID,这种方式比较麻烦,在创建容器时可以使用--name选项指定容器名。
- 创建容器,使用--name 选项指定容器的名称。
[root@rhel03 ~]# podman run -dit --restart=always --name=c1 hub.c.163.com/library/centos
6c875d4a6609d843a72e5c82ea298880dab1ea1d38df6d26b9884aaac03bcae0
[root@rhel03 ~]#
这样容器的名称为c1,以后管理起来比较方便,如切换到容器,然后退出,命令如下。
[root@rhel03 ~]# podman attach c1
[root@6c875d4a6609 /]#
[root@6c875d4a6609 /]# exit
exit

[root@rhel03 ~]#- 删除此容器,命令如下。
[root@rhel03 ~]# podman rm -f c1
6c875d4a6609d843a72e5c82ea298880dab1ea1d38df6d26b9884aaac03bcae0
[root@rhel03 ~]# podman ps -a -q
[root@rhel03 ~]#
(3)创建临时容器
如果要临时创建一个测试容器,又怕用完忘记删除它,可以加上--rm选项。
创建临时容器,命令如下。
[root@rhel03 ~]# podman run -it --name=c1 --rm hub.c.163.com/library/centos
[root@90d28cf0e64f /]#
[root@90d28cf0e64f /]# exit
exit
[root@rhel03 ~]#
创建容器时加了 --rm选项,退出容器之后容器会被自动删除
[root@rhel03 ~]# podman ps -a -q
[root@rhel03 ~]#
可以看到,此容器被自动删除了,注意--rm和--restart=always选项不可以同时使用。
(4)指定容器中运行的命令
创建容器时,容器中运行的是什么进程,都是由镜像中的CMD指定的。如果想自定义容器中运行的进程,可以在创建容器的命令最后指 定,如下所示。
[root@rhel03 ~]# podman run -it --name=c1 --rm hub.c.163.com/library/centos sh
sh-4.2#
sh-4.2# exit
exit
[root@rhel03 ~]#
这里就是以sh的方式运行,而不是以 bash的方式运行。
(5)创建容器时使用变量
在利用一些镜像创建容器时需要传递变量,例如,使用MySQL 的镜像、WordPress的镜像创建容器时都需要通过变量来指定一些必备的信息。需要变量用-e选项来指定,可以多次使用-e选项来指定多个变量。
创建一个名称为c1的容器,里面传递两个变量,命令如下。
[root@rhel03 ~]# podman run -it --name=c1 -e aa=123 -e bb=456 hub.c.163.com/library/centos
[root@8e54ee01662e /]#
[root@8e54ee01662e /]# echo $aa
123
[root@8e54ee01662e /]# echo $bb
456
[root@8e54ee01662e /]# exit
exit
[root@rhel03 ~]#
在创建容器时,通过-e选项指定了两个变量aa和 bb,然后进入容器之后可以看到具有这两个变量。
(6)把容器的端口映射到物理机上
外部主机(本机之外的其他主机)是不能和容器进行通信的,如果希望外部主机能访问到容器的内容,就 需要使用-p选项将容器的端口映射到物理机上,以后访问物理机对应的端口就可以访问到容器了,如下图所示。

把容器的端口映射到物理机上
语法如下。
- -p N:物理机随机生成一个端口映射到容器的端口N上。
- -p M:N:把容器的端口N映射到物理机指定的端口M上。
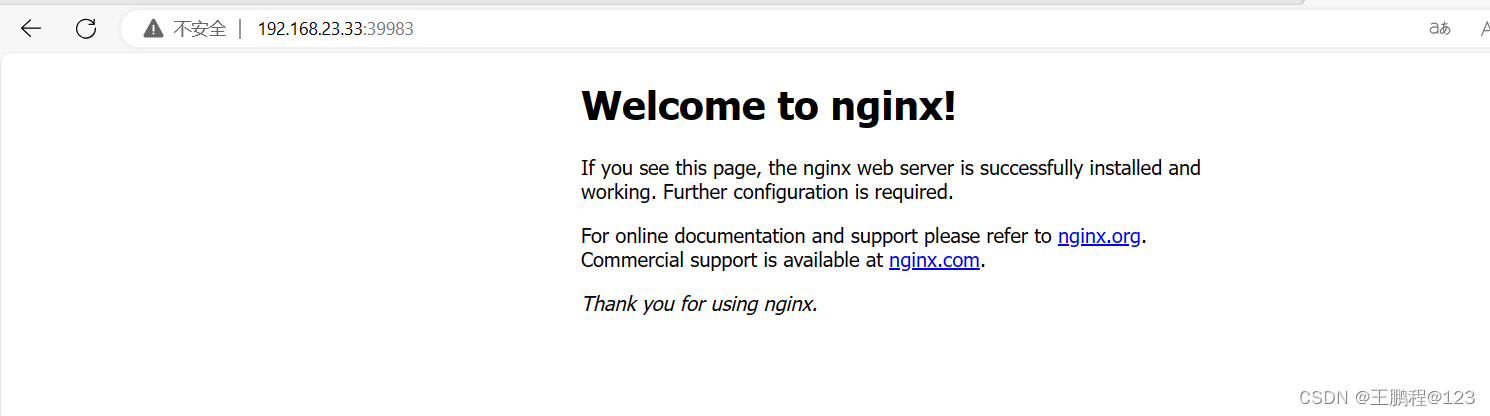
创建一个名称为web的容器,把容器的端口80映射到物理机的一个随机端口上,命令如下。
[root@rhel03 ~]# podman run -d --name=web --restart=always -p 80 docker.io/library/nginx
2501c712fd1547e7b3df00f67dbada89bec042e99b6cd2d51f859e66b5d06577
[root@rhel03 ~]#
这里把 web容器的端口80映射到物理机的随机端口上,这个端口号可以通过如下命令来查询。
[root@rhel03 ~]# podman ps
CONTAINER ID  IMAGE                           COMMAND               CREATED             STATUS                 PORTS                  NAMES
2501c712fd15  docker.io/library/nginx:latest  nginx -g daemon o...  About a minute ago  Up About a minute ago  0.0.0.0:39983->80/tcp  web
[root@rhel03 ~]#
可以看到,映射到物理机的39983上了,访问物理机的端口39983即可访问到web容器,结果如下图所示。
删除此容器,命令如下。
[root@rhel03 ~]# podman rm -f web
2501c712fd1547e7b3df00f67dbada89bec042e99b6cd2d51f859e66b5d06577
[root@rhel03 ~]#
如果想映射到物理机指定的端口上,命令如下。
[root@rhel03 ~]# podman run -d --name=web --restart=always -p 88:80 docker.io/library/nginx
a3c1a45b2b79100a8ecd7043e49af9adce0fa0532e8a0ce7fd74637d12ec5871
[root@rhel03 ~]#
这里把web容器的端口80映射到物理机的端口88上(可以自己指定端口,如 80),那么访问物理机的端口88即可访问到web容器的端口 80,结果如下图所示。
 删除此容器,命令如下。
[root@rhel03 ~]# podman rm -f web
a3c1a45b2b79100a8ecd7043e49af9adce0fa0532e8a0ce7fd74637d12ec5871
[root@rhel03 ~]#
实战练习——创建MySOL的容器
创建MySQL容器时不要使用从阿里云或Docker 官方仓库中下载的镜像,请拉取镜像hub.c.163.com/library/mysql。
在使用MySQL镜像时至少需要指定一个变量 MYSQL_ROOT_PASSWORD来指定root密码,其他变量如MYSQL_USER、 MYSQL_PASSWORD、MYSQL_DATABASE都是可选的。
[root@rhel03 ~]# podman history hub.c.163.com/library/mysql
ID            CREATED      CREATED BY                                     SIZE                        COMMENT
9e64176cd8a2  6 years ago  /bin/sh -c #(nop)  CMD ["mysqld"]              0 B
<missing>     6 years ago  /bin/sh -c #(nop)  EXPOSE 3306/tcp             0 B
<missing>     6 years ago  /bin/sh -c #(nop)  ENTRYPOINT ["docker-ent...  0 B
<missing>     6 years ago  /bin/sh -c ln -s usr/local/bin/docker-entr...  1.54 kB
<missing>     6 years ago  /bin/sh -c #(nop) COPY file:5453fdbdb142b2...  9.22 kB
<missing>     6 years ago  /bin/sh -c #(nop)  VOLUME [/var/lib/mysql]     0 B
<missing>     6 years ago  /bin/sh -c sed -Ei 's/^(bind-address|log)/...  6.14 kB
<missing>     6 years ago  /bin/sh -c {                                                               echo mysql-community-server...  241 MB
<missing>     6 years ago  /bin/sh -c echo "deb http://repo.mysql.com...  3.58 kB
<missing>     6 years ago  /bin/sh -c #(nop)  ENV MYSQL_VERSION=5.7.1...  0 B
<missing>     6 years ago  /bin/sh -c #(nop)  ENV MYSQL_MAJOR=5.7         0 B
<missing>     6 years ago  /bin/sh -c set -ex;                            key='A4A9406876FCBD3C...    25.1 kB
<missing>     6 years ago  /bin/sh -c apt-get update && apt-get insta...  39.7 MB
<missing>     6 years ago  /bin/sh -c mkdir /docker-entrypoint-initdb.d   1.54 kB
<missing>     6 years ago  /bin/sh -c set -x                              && apt-get update && ap...  4.66 MB
<missing>     6 years ago  /bin/sh -c #(nop)  ENV GOSU_VERSION=1.7        0 B
<missing>     6 years ago  /bin/sh -c groupadd -r mysql && useradd -r...  345 kB
<missing>     6 years ago  /bin/sh -c #(nop)  CMD ["/bin/bash"]           0 B
<missing>     6 years ago  /bin/sh -c #(nop) ADD file:712c48086043553...  129 MB
[root@rhel03 ~]#
可以看到,使用MySQL镜像创建出来的容器中运行的是mysqld。
- 创建容器,命令如下。
[root@rhel03 ~]# podman run -d --name=db --restart=always -e MYSQL_ROOT_PASSWORD=cisco@123 -e MYSQL_DATABASE=blog hub.c.163.com/library/mysql
bb5be42d3dc4eaabad0a710dd63245b291f67fa55b421b56c541cdc61d00451f
[root@rhel03 ~]#
这里使用MYSQL_ROOT_PASSWORD指定了MySQL root密码为cisco@123,通过MYSQLDATABASE在容器中创建了一个名称为blog的 数据库。
- 做连接测试。
查看db容器的IP,命令如下。
[root@rhel03 ~]# podman inspect db | grep -i ipaddr
            "IPAddress": "10.88.0.2",
                    "IPAddress": "10.88.0.2",
[root@rhel03 ~]#
在宿主机上用 yum命令安装MariaDB客户端(命令是yum -y install mariadb),然后连接容器,命令如下。
[root@rhel03 ~]# yum -y install mariadb
[root@rhel03 ~]# mysql -uroot -pcisco@123 -h10.88.0.2
Welcome to the MariaDB monitor.  Commands end with ; or \g.
Your MySQL connection id is 3
Server version: 5.7.18 MySQL Community Server (GPL)

Copyright (c) 2000, 2018, Oracle, MariaDB Corporation Ab and others.

Type 'help;' or '\h' for help. Type '\c' to clear the current input statement.

MySQL [(none)]> show databases;
+--------------------+
| Database           |
+--------------------+
| information_schema |
| blog               |
| mysql              |
| performance_schema |
| sys                |
+--------------------+
5 rows in set (0.001 sec)

MySQL [(none)]>
可以看到,用密码csico@123能正确地连接到容器中,并且也创建了一个名称为blog的库。
管理容器的命令
容器如同一台没有显示器的电脑,如何查看容器中的内容呢,又如何在容器中执行命令呢?可以使用 podman exec命令来实现,如下图所示。

(1)在容器中执行指定的命令
语法如下
- podman exec 容器名 命令
- 在db容器中执行 ip a | grep 'inet’ 命令,命令如下。
[root@rhel03 ~]# podman exec db ip ad | grep "inet "
    inet 127.0.0.1/8 scope host lo
    inet 10.88.0.2/16 brd 10.88.255.255 scope global eth0
[root@rhel03 ~]#
如果容器中没有要执行的命令,就会出现如下报错。
[root@rhel03 ~]# podman exec db ifconfig
Error: exec failed: container_linux.go:380: starting container process caused: exec: "ifconfig": executable file not found in $PATH: OCI runtime attempted to invoke a command that was not found
[root@rhel03 ~]#
如果想获取shell控制台,需要加上-it选项。
- 获取容器中的bash控制台,命令如下。
[root@rhel03 ~]# podman exec -it db bash
root@bb5be42d3dc4:/# exit
exit
[root@rhel03 ~]#
注意:有的镜像中不存在bash,可以使用sh替代。
(2)物理机和容器互相拷贝文件
有时我们需要让物理机和容器之间互相拷贝一些文件,拷贝文件的语法如下。
- podman cp /path/file 容器:/path2 把物理机中的/path/f1e拷贝到容器的/path2中
- podman cp 容器:/path2/file /path/ 把容器中的/path2/l1e拷贝到物理机的/path2中
- 把物理机中的/etc/hosts拷贝到容器的/opt中,命令如下。
[root@rhel03 ~]# podman exec db ls /opt/
[root@rhel03 ~]# podman cp /etc/hosts db:/opt/
[root@rhel03 ~]# podman exec db ls /opt/
hosts
[root@rhel03 ~]# - 把容器中的/etc/passwd拷贝到物理机的/opt中,命令如下。
[root@rhel03 ~]# rm -rf /opt/*
[root@rhel03 ~]# podman cp db:/etc/passwd /opt/
[root@rhel03 ~]# ls /opt/
passwd
[root@rhel03 ~]#
(3)关闭、启动、重启容器
一般情况下,在操作系统中重启某个服务,可以通过“systemctl restart服务名”来重启,容器中一般是无法使用systemctl命令的。如果 要重启容器中的程序,直接重启容器就可以了。下面演示如何关闭、启动、重启容器。
- 关闭、启动、重启容器,命令如下。
[root@rhel03 ~]# podman stop db
db
[root@rhel03 ~]# podman start db
db
[root@rhel03 ~]# podman restart db
bb5be42d3dc4eaabad0a710dd63245b291f67fa55b421b56c541cdc61d00451f
[root@rhel03 ~]# - 查看容器中运行的进程。
语法为“podman top 容器名”,这个类似于任务管理器,可以查看到容器中正在运行的进程,命令如下。
[root@rhel03 ~]# podman top db
USER        PID         PPID        %CPU        ELAPSED       TTY         TIME        COMMAND
mysql       1           0           0.000       49.54301623s  ?           0s          mysqld
[root@rhel03 ~]#
(4)查看容器中的输出
当容器无法正常运行时,需要查看容器中的输出来进行排错。如果要查看容器中的日志信息,可以通过如下命令来查看。
- podman logs 容器名
如果想不间断地查看输出,可以使用如下命令。
- podman logs ‐f 容器名
- 查看容器日志输出,命令如下。
[root@rhel03 ~]# podman logs db
Initializing database
2023-12-14T02:33:53.456792Z 0 [Warning] TIMESTAMP with implicit DEFAULT value is deprecated. Please use --explicit_defaults_for_timestamp server option (see documentation for more details).
2023-12-14T02:33:53.709315Z 0 [Warning] InnoDB: New log files created, LSN=45790
2023-12-14T02:33:53.757769Z 0 [Warning] InnoDB: Creating foreign key constraint system tables.
2023-12-14T02:33:53.819575Z 0 [Warning] No existing UUID has been found, so we assume that this is the first time that this server has been started. Generating a new UUID: 39260c35-9a29-11ee-84ac-866f35c0e022.
2023-12-14T02:33:53.821163Z 0 [Warning] Gtid table is not ready to be used. Table 'mysql.gtid_executed' cannot be opened.
2023-12-14T02:33:53.821783Z 1 [Warning] root@localhost is created with an empty password ! Please consider switching off the --initialize-insecure option.
2023-12-14T02:33:54.153592Z 1 [Warning] 'user' entry 'root@localhost' ignored in --skip-name-resolve mode.
2023-12-14T02:33:54.153633Z 1 [Warning] 'user' entry 'mysql.sys@localhost' ignored in --skip-name-resolve mode.
2023-12-14T02:33:54.153655Z 1 [Warning] 'db' entry 'sys mysql.sys@localhost' ignored in --skip-name-resolve mode.
2023-12-14T02:33:54.153670Z 1 [Warning] 'proxies_priv' entry '@ root@localhost' ignored in --skip-name-resolve mode.
2023-12-14T02:33:54.153704Z 1 [Warning] 'tables_priv' entry 'sys_config mysql.sys@localhost' ignored in --skip-name-resolve mode.
Database initialized
Initializing certificates
如果要查看容器的属性,可以使用“podman inspect容器名”命令。
查看db容器的属性,命令如下。
[root@rhel03 ~]# podman inspect db
[
    {
        "Id": "bb5be42d3dc4eaabad0a710dd63245b291f67fa55b421b56c541cdc61d00451f",
        "Created": "2023-12-14T10:33:51.950712519+08:00",
        "Path": "docker-entrypoint.sh",
        "Args": [
            "mysqld"
        ],
在这个输出中,可以查看到容器的各种信息,如数据卷、网络信息等。
(5)数据卷的使用
当容器创建出来之后,会映射到物理机的某个目录(这个目录叫作容器层)中,在容器中写的数据实 际都存储在容器层,所以只要容器不被删除,在容器中写的数据就会一直存在。但是一旦删除容器,对应的容器层也会被删除。
如果希望数据能永久保存,则需要配置数据卷,把容器中的指定目录挂载到物理机的某目录上,如 下图所示。
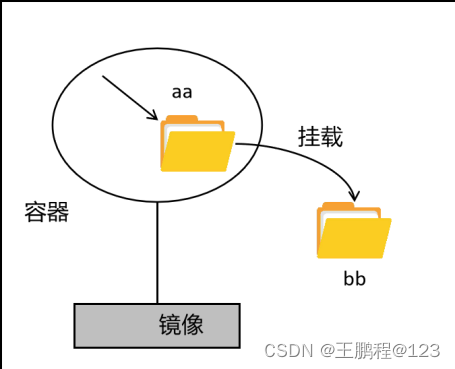
数据卷
这里把容器中的目录aa挂载到物理机的目录bb上,当往容器目录aa中写数据时,实际上是往物理 机的目录bb中写的。这样即使删除了容器,物理机目录bb中的数据仍然是存在的,就实现了数据的永久保留(除非手动删除)。
在创建容器时,用-v选项指定数据卷,用法如下。
- ‐v /dirl 把物理机的一个随机目录映射到容器的/dir1目录中
- ‐v /dir2:/dirl:Z 把物理机的指定目录/dir2映射到容器的/dir1目录中
记住,冒号左边的/dir2是物理机的目录,此目录需要提前创建出来;冒号右边的/dir1是容器中的目录,如果此目录不存在则会自动创 建。这里大写Z的意思是把物理机的目录/dir2的上下文改成container_file_t。
- 创建一个名称为c1的容器,把物理机的一个随机目录映射到容器的/data目录中,命令如下。
[root@rhel03 ~]# podman run -dit --name=c1 --restart=always -v /data/ hub.c.163.com/library/centos
f5609f0d7768ca4da2b48a9faec861542fdbfdd72f0d367b4960fc822a0226da
[root@rhel03 ~]#
在此命令中,v后面只指定了一个目录/data,指的是在容器中创建/data,挂载到物理机的一个随机目录上。
- 查看对应物理机是哪个目录,命令如下。
[root@rhel03 ~]# podman inspect c1 | grep -A5 Mounts
        "Mounts": [
            {
                "Type": "volume",
                "Name": "afd466c723026be80b83d048c03c299faff047db6e86d91f8b8982606a5adf7a",
                "Source": "/var/lib/containers/storage/volumes/afd466c723026be80b83d048c03c299faff047db6e86d91f8b8982606a5adf7a/_data",
                "Destination": "/data",
[root@rhel03 ~]#
上面有两个参数,其中 Destination指的是容器中的目录, Source指的是物理机对应的目录。得到的结论就是容器中的目录/data对应物理机的/var/lib/containers/storage/volumes/afd466c723026be80b83d048c03c299faff047db6e86d91f8b8982606a5adf7a/_data目录
先查看c1容器的目录/data中的数据和物理机对应目录的数据,命令如下。
[root@rhel03 ~]# podman exec c1 ls /data
[root@rhel03 ~]# ls /var/lib/containers/storage/volumes/afd466c723026be80b83d048c03c299faff047db6e86d91f8b8982606a5adf7a/_data/
[root@rhel03 ~]#
可以看到,目录是空的,如下所示。
[root@rhel03 ~]# podman cp /etc/hosts c1:/data/
[root@rhel03 ~]# podman exec c1 ls /data/
hosts
[root@rhel03 ~]# ls /var/lib/containers/storage/volumes/afd466c723026be80b83d048c03c299faff047db6e86d91f8b8982606a5adf7a/_data/
hosts
[root@rhel03 ~]#
往容器中拷贝数据,物理机中也会有这个数据了。
- 删除此容器,命令如下。
[root@rhel03 ~]# podman rm -f c1
f5609f0d7768ca4da2b48a9faec861542fdbfdd72f0d367b4960fc822a0226da
[root@rhel03 ~]#
如果想在物理机中也指定目录而非随机挂载目录,则使用-v /dd:/data,此处冒号左边是物理机的目录,冒号右边是容器中的目录,这里 要提前在物理机上把目录/xx创建出来。
- 创建一个名称为c1的容器,把物理机的目录/dd映射到容器的/data目录中,命令如下。
[root@rhel03 ~]# mkdir /dd
[root@rhel03 ~]#
[root@rhel03 ~]# podman run -dit --name=c1 --restart=always -v /dd:/data:Z hub.c.163.com/library/centos
f5a2067f9baeee05fa6b2b03133c57189d93ca90bb222034b1f146a9889c130f
[root@rhel03 ~]#
这里大写Z的意思是把物理机的目录/dd的上下文改成container_file_t。查看/dd的上下文,命令如下。
[root@rhel03 ~]# ls -dZ /dd/
system_u:object_r:container_file_t:s0:c459,c991 /dd/
[root@rhel03 ~]#
查看此容器的属性,命令如下。
[root@rhel03 ~]# podman inspect c1 | grep -A5 Mounts
        "Mounts": [
            {
                "Type": "bind",
                "Source": "/dd",
                "Destination": "/data",
                "Driver": "",
[root@rhel03 ~]#
拷贝一些测试文件过去并观察一下,命令如下。
[root@rhel03 ~]# podman exec c1 ls /data/
[root@rhel03 ~]# ls /dd/
[root@rhel03 ~]#
[root@rhel03 ~]# podman cp /etc/hosts c1:/data
[root@rhel03 ~]# podman exec c1 ls /data/
hosts
[root@rhel03 ~]# ls /dd/
hosts
[root@rhel03 ~]#- 删除此容器,命令如下。
[root@rhel03 ~]# podman rm -f c1
f5a2067f9baeee05fa6b2b03133c57189d93ca90bb222034b1f146a9889c130f
[root@rhel03 ~]#
在重启系统后,所创建的容器并不会随着系统自动运行,可把容器创建为一个服务,然后设置这个服务开机自动启动,那么这个容器也 就可以实现开机自动启动了。
下面使用blab 用户创建一个容器,然后实现开机自动启动。
使用普通用户对容器进行管理
使用blab用户通过ssh登录到rhel03,切记这里不能通过其他用户用su命令切换到blab用户。
不同用户对镜像和容器的管理都是独立的,所以root拉取的镜像并不能给blab用户使用。
[blab@rhel03 ~]$ podman images
REPOSITORY  TAG         IMAGE ID    CREATED     SIZE
[blab@rhel03 ~]$
可以看到,使用blab用户查询时是没有任何镜像的,所以先拉取Nginx镜像,命令如下。
[blab@rhel03 ~]$ podman pull docker.io/lobrary/nginx
查看现有镜像,命令如下。
[blab@rhel03 ~]$ podman images
REPOSITORY               TAG         IMAGE ID      CREATED        SIZE
docker.io/library/nginx  latest      605c77e624dd  23 months ago  146 MB
[blab@rhel03 ~]$
为了使用数据卷,先使用root用户创建一个目录/yy并把所有者和所属组改为blab,命令如下。
[root@rhel03 ~]# mkdir /yy
[root@rhel03 ~]# chown blab:blab /yy
[root@rhel03 ~]# ls -ld /yy
drwxr-xr-x. 2 blab blab 6 12月 14 11:20 /yy
[root@rhel03 ~]#
然后使用blab用户创建一个名称为web的容器,把物理机的目录/yy映射到容器的/data目录中,命令如下。
[blab@rhel03 ~]$ podman run -dit --name=web --restart=always -v /yy:/data/:Z docker.io/library/nginx
11faeb169662d0317b2bb8f761e0d56261689cdf7aa1f1c73246a7cdba99b8a0
[blab@rhel03 ~]$
现在容器创建好了,但是这个容器在系统重启时并不会随着系统一起启动,所以下面设置允许开机自动运行容器。要让容器跟着系统一 起启动,需要为这个容器创建一个服务。
首先设置blab用户创建的服务在系统启动时能自动启动,命令如下。
[blab@rhel03 ~]$ loginctl enable-linger blab
[blab@rhel03 ~]$
如果这里没有开启,或者通过loginctl disable-linger blab关闭了,那么系统启动之后blab用户创建的服务是不会自动启动的,只有blab用户通过ssh或控制台登录之后,服务才会启动起来。
这里设置了logincd enable-linger blab,当系统启动之后,blab用户即使没有通过ssh或控制台登录,blab用户创建的服务也会自动启动。是开启还是关闭可以通过loginctl show-user blab | grep Linger来查看。
因为要为容器创建出来一个服务,所以先创建存储服务文件的目录,命令如下。
[blab@rhel03 ~]$ mkdir -p ~/.config/systemd/user ; cd ~/.config/systemd/user
[blab@rhel03 user]$ ls
[blab@rhel03 user]$
为web容器生成一个服务文件,命令如下。
[blab@rhel03 user]$ podman generate systemd --name web --files --new
/home/blab/.config/systemd/user/container-web.service
[blab@rhel03 user]$ ls
container-web.service
[blab@rhel03 user]$
这里--new的意思是,即使现在把web容器删除,那么重启系统时也会自动创建这个容器。
其中--name可以简写为-n,--files可以简写为-f,--new可以省略,所以整个命令可以简写如下。
- podman generate systemd ‐n web ‐f
重新加载这个服务文件,这里要加上--user选项,命令如下。
[blab@rhel03 user]$ systemctl --user daemon-reload
[blab@rhel03 user]$
设置这个服务开机自动启动,命令如下。
[blab@rhel03 user]$ systemctl --user enable container-web.service
Created symlink /home/blab/.config/systemd/user/multi-user.target.wants/container-web.service → /home/blab/.config/systemd/user/container-web.service.
Unit /home/blab/.config/systemd/user/container-web.service is added as a dependency to a non-existent unit multi-user.target.
Created symlink /home/blab/.config/systemd/user/default.target.wants/container-web.service → /home/blab/.config/systemd/user/container-web.service.
[blab@rhel03 user]$ ls
container-web.service  default.target.wants  multi-user.target.wants
[blab@rhel03 user]$
然后重启操作系统进行验证,命令如下。
[blab@rhel03 ~]$ podman ps
CONTAINER ID  IMAGE                           COMMAND               CREATED        STATUS            PORTS       NAMES
11faeb169662  docker.io/library/nginx:latest  nginx -g daemon o...  8 minutes ago  Up 8 minutes ago              web
[blab@rhel03 ~]$
等系统启动之后发现 web容器跟着系统启动起来了。


 2477
2477


 被折叠的 条评论
为什么被折叠?
被折叠的 条评论
为什么被折叠?
 到【灌水乐园】发言


