


本章主要介绍在RHEL8中如何安装ansible 及 ansible 的基本使用。
- ansible是如何工作的
- 在 RHEL8中安装ansible
- 编写ansible.cfg和清单文件
- ansible 的基本用法
如果管理的服务器很多,如几十台甚至几百台,那么就需要一个自动化管理工具了, ansible就是这样的一种自动化管理工具。
ansible是通过ssh连接到被管理主机,然后执行相关操作的,如下图所示。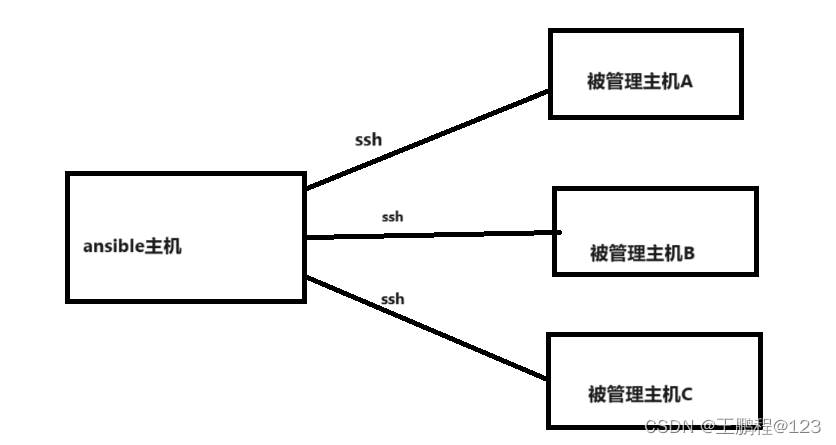
ansible主机通过ssh连接到被管理主机时,需要提前设置密钥登录,使得从ansible主机可以无密码登录到被管理主机。
本实验的拓扑图如下图所示。

![]()
这里server是 ansible主机,以bdqn用户登录。server2和server3是被管理主机,在这两台主机上创建bdqn用户并配置好sudo,使得这两台主机上的bdqn用户通过sudo-i可以无 密码切换到root,下面开始配置。
安装ansible
在server上安装ansible,命令如下。
先安装系统的开发工具
步骤1、挂载镜像
操作:略
配置本地yum源
操作:略
安装开发工具
[root@rhel01 ~]# yum -y groupinstall 开发工具RHEL8默认的Python版本为3.6,不符合项目的需求。现在升级到3.9
[root@rhel01 ~]# python3 --version
Python 3.6.8
[root@rhel01 ~]# - 下载Python3.9.5
[root@rhel01 ~]# wget https://www.python.org/ftp/python/3.9.5/Python-3.9.5.tgz
- 解压
[root@rhel01 ~]# ls | grep *.tgz
Python-3.9.9.tgz
[root@rhel01 ~]# tar zxvf Python-3.9.9.tgz
- 安装必须的包
[root@rhel01 ~]# yum -y install gcc zlib* libffi-devel
- 安装Python
[root@rhel01 Python-3.9.9]# ./configure --prefix=/usr/local/python3 --enable-optimizations
[root@rhel01 Python-3.9.9]# make
[root@rhel01 Python-3.9.9]# make install
- 删除原先的Python3和pip3
[root@rhel01 Python-3.9.9]# rm -rf /usr/bin/python3
[root@rhel01 Python-3.9.9]# ln -s /usr/local/python3/bin/python3 /usr/bin/python3
[root@rhel01 Python-3.9.9]# rm -rf /usr/bin/pip3
[root@rhel01 Python-3.9.9]# ln -s /usr/local/python3/bin/pip3 /usr/bin/pip3
[root@rhel01 Python-3.9.9]#
- 查看Python3和Pip3是否正确的被安装:
[root@rhel01 Python-3.9.9]# python3 --version
Python 3.9.9
[root@rhel01 Python-3.9.9]# pip3 --version
pip 21.2.4 from /usr/local/python3/lib/python3.9/site-packages/pip (python 3.9)
[root@rhel01 Python-3.9.9]#
- 安装ansible
[root@rhel01 ~]# ls | grep *.rpm
ansible-2.9.11-1.el8ae.noarch.rpm
[root@rhel01 ~]# rpm -ivh ansible-2.9.11-1.el8ae.noarch.rpm
警告:ansible-2.9.11-1.el8ae.noarch.rpm: 头V3 RSA/SHA256 Signature, 密钥 ID fd431d51: NOKEY
错误:依赖检测失败:
	python3-cryptography 被 ansible-2.9.11-1.el8ae.noarch 需要
	python3-jinja2 被 ansible-2.9.11-1.el8ae.noarch 需要
	sshpass 被 ansible-2.9.11-1.el8ae.noarch 需要
[root@rhel01 ~]#
- 需要解决依赖包问题 ,前面两个使用本地yum源就可以解决了
[root@rhel01 ~]# yum -y install python3-cryptography python3-jinja2
- sshpass在下面地址下载 ,然后上传到rhel01
Non-interactive ssh password auth - Browse Files at SourceForge.net
[root@rhel01 ~]# ls | grep ssh*
sshpass-1.06-3.el8ae.x86_64.rpm
[root@rhel01 ~]# rpm -ivh sshpass-1.06-3.el8ae.x86_64.rpm
Verifying...                          ################################# [100%]
准备中...                          ################################# [100%]
正在升级/安装...
   1:sshpass-1.06-3.el8ae             ################################# [100%]
[root@rhel01 ~]#
- 再次安装ansible
[root@rhel01 ~]# rpm -ivh ansible-2.9.11-1.el8ae.noarch.rpm
警告:ansible-2.9.11-1.el8ae.noarch.rpm: 头V3 RSA/SHA256 Signature, 密钥 ID fd431d51: NOKEY
Verifying...                          ################################# [100%]
准备中...                          ################################# [100%]
正在升级/安装...
   1:ansible-2.9.11-1.el8ae           ################################# [100%]
[root@rhel01 ~]#
- 使用命令检查ansible的安装结果
[root@rhel01 ~]# ansible --version
ansible 2.9.11
  config file = /etc/ansible/ansible.cfg
  configured module search path = ['/root/.ansible/plugins/modules', '/usr/share/ansible/plugins/modules']
  ansible python module location = /usr/lib/python3.6/site-packages/ansible
  executable location = /usr/bin/ansible
  python version = 3.6.8 (default, Sep  9 2021, 07:49:02) [GCC 8.5.0 20210514 (Red Hat 8.5.0-3)]
[root@rhel01 ~]#
这里安装的ansible的版本是2.9.11,同时也显示ansible的默认配置是 letc/ansible/ansible.cfgo还要确保ansible主机能够解析所有的被管理机器,这里通过配 置/etc/hosts 来实现,/etc/hosts的内容如下。
[root@rhel01 ~]# tail -3 /etc/hosts
192.168.23.31 rhel01 server
192.168.23.32 rhel02 server2
192.168.23.33 rhel03 server3
[root@rhel01 ~]#
在server2和 server3两台机器上确认已经创建好了bdqn用户,如果没有请自行创建,然 后配置好sudo,命令如下。
[root@rhel02 ~]# cat /etc/sudoers.d/bdqn
bdqn ALL=(root) NOPASSWD:ALL
[root@rhel02 ~]#
[root@rhel03 ~]# cat /etc/sudoers.d/bdqn
bdqn ALL=(root) NOPASSWD:ALL
[root@rhel03 ~]# 这样在这两台机器上,bdqn用户通过sudo-i可以无密码切换到root用户。
使用bdqn用户登录server,配置好ssh密钥登录,使得bdqn用户可以无密码登录到 server2和 server3,命令如下。
[bdqn@rhel01 ~]$ ssh-keygen -f ~/.ssh/id_rsa -N ""
[bdqn@rhel01 ~]$ ssh-copy-id bdqn@192.168.23.32
[bdqn@rhel01 ~]$ ssh bdqn@192.168.23.32
Activate the web console with: systemctl enable --now cockpit.socket

This system is not registered to Red Hat Insights. See https://cloud.redhat.com/
To register this system, run: insights-client --register

Last login: Fri Dec 15 16:49:39 2023
[bdqn@rhel02 ~]$
这里只演示配置到server2的秘钥登录,server3同样操作
编写ansible.cfg和清单文件
执行ansible或ansible-playbook命令时,优先使用当前目录中ansible.cfg的配置。如果当前目录中没有,则使用默认的/etc/ansible.cfg中的配置。
下面的操作都是server上的bdqn用户操作的,先在家目录下创建ansible.cfg,内容如下。
[bdqn@rhel01 ~]$ cat ansible.cfg
[defaults]
inventory = ./hosts

[privilege_escalation]
become=True
become_method=sudo
become_user=root
[bdqn@rhel01 ~]$
这里在[defaults]字段下只添加了一句inventory = ./hosts,表示把当前目录下名称为 hosts的文件当作清单文件(什么是清单文件马上就要讲到)。
在 [privilege_escalation]字段下定义了如何提升权限,因为是使用bdqn用户登录到被管 主机的,所以需要提升权限。这个字段下写了3条,分别如下。
- become=True:登录到被管理主机时要切换到其他用户。
- become_method=sudo:以 sudo的方式切换。
- become_user-root :切换到root用户。
这三句的意思是,当用ssh登录到被管理主机时,以 sudo的方式切换到root,这也是为 什么一开始要在被管理主机上配置好sudo的原因
所有的被管理机器都要写入清单文件中。在实验环境中有两台被管理主机,那么分别写在 hosts中,内容如下。
[bdqn@rhel01 ~]$ cat hosts
server2
server3
[bdqn@rhel01 ~]$
这里一行一台主机,我们在使用ansible或ansible-playbook命令时,指定的主机名必须 是这个名称才行。要确保能解析server2和server3,写成相应的IP也可以。
ansible的基本用法
ansible的基本用法如下。
- ansible 机器名 ‐m 模块× ‐a "模块的参数"
这里的机器名必须出现在清单文件中,整体的意思是在指定的机器上执行模块x。例如,在 server3上执行hostname命令,命令如下。
[bdqn@rhel01 ~]$ ansible server3 -m shell -a "hostname"
server3 | CHANGED | rc=0 >>
rhel03
[bdqn@rhel01 ~]$
shell模块用于执行操作系统命令,执行的命令就作为shell模块的参数,这里在-a中写要 执行的系统命令。所以,上面的命令就是在server3上执行hostname命令,显示的结果正是 rhel03
要完成不同的任务就需要调用不同的模块来实现,系统中存在的所有 ansible模块可以通 过ansible-doc -l来查看。
不同的模块有不同的参数,模块的参数及使用方法可以通过“ansible-doc模块名”来查 看。
我们将在第下一章中讲解常见的ansible模块。


 483
483


 被折叠的 条评论
为什么被折叠?
被折叠的 条评论
为什么被折叠?
 到【灌水乐园】发言


