


【新华三】IPv6 过渡技术 - 6to4隧道

实验要求
实验环境 : HCL
实验需求:
实现双方站点的IPv6网络 可以跨 IPv4 网络进行通信
实现思路
① IPv6网络用OSPFv3来实现互通
② IPv4网络用OSPF来实现互通
③ 使用6 to 4隧道实现Pv6网络 可以跨 IPv4 网络进行通信
隧道可以在原有的IPv6头部,再加上Pv4头部,就可以帮助IPv6跨IPv4网络进行通信了
6 to 4 特点
自动建立隧道,不需要向GRE 或者 IPv6 in IPv4 隧道一样,手动指定隧道目的 !
注意:不支持组播
有一个特定前缀:2002::/16 2002:IPv4:: /48
那这个嵌入的IPv4的地址,就是我出接口的IPv4地址
报文结构(基于IPv6 in IPv4 隧道) :IPv4 — IPv6
详情可以去查看该篇IPv6 in IPv4 隧道实验
链接: IPv6 in IPv4 隧道实验
注意点
① OSPFv3 只能通过接口下宣告,不能使用Network!!!
② IPv6 in IPv4隧道的 IPv6地址格式2002:IPv4:: /48
这个IPv4需要我们,手动将十进制换算成十六进制,所以推荐用计算机来换算会更快一些
IPv4 转 IPv6 格式小技巧
可以用计算器来进行进制转换:
HEX : 十六进制
DEC : 十进制
一个十进制 转换成 两个十六进制


配置

R1
基础配置
<H3C>system-view
[H3C]sysname R1

[R1]undo info-center enable
Information center is disabled.

[R1]int g0/0
[R1-GigabitEthernet0/0]ipv6 address 2001:12::1 64
[R1-GigabitEthernet0/0]quit

[R1]int LoopBack 1
[R1-LoopBack1]ipv6 address 2000:1:1::1 64
[R1-LoopBack1]quit

[R1]int LoopBack 2
[R1-LoopBack2]ipv6 address 2000:1:2::1 64
[R1-LoopBack2]quit

[R1]int LoopBack 3
[R1-LoopBack3]ipv6 address 2000:1:3::1 64
[R1-LoopBack3]quit


===================================   查看接口IPv6地址 =================================
[R1]dis ipv6 int brief
*down: administratively down
(s): spoofing
Interface                                 Physical Protocol IPv6 Address
GigabitEthernet0/0                        up       up       2001:12::1
GigabitEthernet0/1                        down     down     Unassigned
GigabitEthernet0/2                        down     down     Unassigned
GigabitEthernet5/0                        down     down     Unassigned
GigabitEthernet5/1                        down     down     Unassigned
GigabitEthernet6/0                        down     down     Unassigned
GigabitEthernet6/1                        down     down     Unassigned
LoopBack1                                 up       up(s)    2000:1:1::1
LoopBack2                                 up       up(s)    2000:1:2::1
LoopBack3                                 up       up(s)    2000:1:3::1
Serial1/0                                 down     down     Unassigned
Serial2/0                                 down     down     Unassigned
Serial3/0                                 down     down     Unassigned
Serial4/0                                 down     down     Unassigned
OSPFv3 局域网可达
## 进入OSPFv3 进程,设置RID为 1.1.1.1
[R1]ospfv3 1
[R1-ospfv3-1]router-id 1.1.1.1
[R1-ospfv3-1]quit


## 接口下宣告
[R1]int range g0/0 lo1 lo2 lo3
[R1-if-range]ospfv3 1 area 0
[R1-if-range]quit
R2
基础配置
<H3C>system-view
[H3C]sysname R2

[R2]undo info-center enable
Information center is disabled.

[R2]int g0/1
[R2-GigabitEthernet0/1]ipv6 address 2001:12::2 64
[R2-GigabitEthernet0/1]quit

[R2]int g0/0
[R2-GigabitEthernet0/0]ip address 172.16.23.2 24
[R2-GigabitEthernet0/0]quit
局域网环境(OSPFv3):IPv6 网络
## 进入OSPFv3 进程中,设置RID为 2.2.2.2
[R2]ospfv3 1
[R2-ospfv3-1]router-id 2.2.2.2
[R2-ospfv3-1]quit

## 接口下宣告
[R2]int g0/1
[R2-GigabitEthernet0/1]ospfv3 1 area 0
[R2-GigabitEthernet0/1]quit

=====================  查看 R2 与R1建立的OSPFv3的邻居关系  ============================
[R2]dispaly ospfv3 peer

               OSPFv3 Process 1 with Router ID 2.2.2.2

 Area: 0.0.0.0
-------------------------------------------------------------------------
 Router ID       Pri State             Dead-Time InstID Interface
 1.1.1.1         1   Full/DR           00:00:40  0      GE0/1

==============================   查看 R2 学到IPv6 路由条目  ============================
[R2]display ipv6 routing-table

Destinations : 8        Routes : 8

Destination: ::1/128                                     Protocol  : Direct
NextHop    : ::1                                         Preference: 0
Interface  : InLoop0                                     Cost      : 0

Destination: 2000:1:1::1/128                             Protocol  : O_INTRA
NextHop    : FE80::5C94:E5FF:FEB2:105                    Preference: 10
Interface  : GE0/1                                       Cost      : 1

Destination: 2000:1:2::1/128                             Protocol  : O_INTRA
NextHop    : FE80::5C94:E5FF:FEB2:105                    Preference: 10
Interface  : GE0/1                                       Cost      : 1

Destination: 2000:1:3::1/128                             Protocol  : O_INTRA
NextHop    : FE80::5C94:E5FF:FEB2:105                    Preference: 10
Interface  : GE0/1                                       Cost      : 1

Destination: 2001:12::/64                                Protocol  : Direct
NextHop    : ::                                          Preference: 0
Interface  : GE0/1                                       Cost      : 0

Destination: 2001:12::2/128                              Protocol  : Direct
NextHop    : ::1                                         Preference: 0
Interface  : InLoop0                                     Cost      : 0

Destination: FE80::/10                                   Protocol  : Direct
NextHop    : ::                                          Preference: 0
Interface  : InLoop0                                     Cost      : 0

Destination: FF00::/8                                    Protocol  : Direct
NextHop    : ::                                          Preference: 0
Interface  : NULL0                                       Cost      : 0
6 to 4 隧道
## 目的:IPv4网络内部互通
[R2]ospf 110 router-id 2.2.2.2
[R2-ospf-110]area 0
[R2-ospf-110-area-0.0.0.0]network 172.16.23.0 0.0.0.255
[R2-ospf-110-area-0.0.0.0]quit
[R2-ospf-110]quit

## 6 to 4 隧道,因为是自动建立
## 目的是为了和所有有需要的设备建立隧道通信
## 所以就不用指定隧道的目的了

## 建立 6to4 隧道

[R2]int tunnel 24 mode ipv6-ipv4 6to4             ## 将Tunnel模式改为 6to4
[R2-Tunnel24]source g0/0                          ## tunnel隧道的源
[R2-Tunnel24]ipv6 address 2002:AC10:1702::2 64    ## IPv6地址设置为规定样式
[R2-Tunnel24]quit

## 因为6to4隧道不支持组播
## 所以我们就写一条静态路由,去往R5的路由
[R2] ipv6 route-static 2000:5:: 32 Tunnel24 2002:AC10:2204::4

## 需要重分发进OSPFv3中,让R1学到R5的网络
[R2]ospfv3 1
[R2-ospfv3-1]import-route static    ## 将静态路由引入OSPFv3,让R1学到对方的路由
[R2-ospfv3-1]quit

==================================   查看到接口状态   ====================================
[R2]display ipv6 int brief
*down: administratively down
(s): spoofing
Interface                                 Physical Protocol IPv6 Address
GigabitEthernet0/0                        up       up       Unassigned
GigabitEthernet0/1                        up       up       2001:12::2
GigabitEthernet0/2                        down     down     Unassigned
GigabitEthernet5/0                        down     down     Unassigned
GigabitEthernet5/1                        down     down     Unassigned
GigabitEthernet6/0                        down     down     Unassigned
GigabitEthernet6/1                        down     down     Unassigned
Serial1/0                                 down     down     Unassigned
Serial2/0                                 down     down     Unassigned
Serial3/0                                 down     down     Unassigned
Serial4/0                                 down     down     Unassigned
Tunnel24                                  up       up       2002:AC10:1702::2
[R2]
R3
[R3]int g0/0
[R3-GigabitEthernet0/0]ip address 172.16.23.3 24
[R3-GigabitEthernet0/0]quit

[R3]int g0/1
[R3-GigabitEthernet0/1]ip address 172.16.34.3 24
[R3-GigabitEthernet0/1]quit

[R3]ospf 110 router-id 3.3.3.3
[R3-ospf-110]area 0
[R3-ospf-110-area-0.0.0.0]network 172.16.23.0 0.0.0.255
[R3-ospf-110-area-0.0.0.0]network 172.16.34.0 0.0.0.255
[R3-ospf-110-area-0.0.0.0]quit
[R3-ospf-110]quit
R4
基础配置
[R4]int g0/0
[R4-GigabitEthernet0/0]ip address 172.16.34.4 24
[R4-GigabitEthernet0/0]quit

[R4]int g0/1
[R4-GigabitEthernet0/1]ipv6 address 2001:45::4 64
[R4-GigabitEthernet0/1]quit
局域网环境(OSPFv3):IPv6 网络
## 进入OSPFv3进程中,设置RID为 4.4.4.4
[R4]ospfv3 1
[R4-ospfv3-1]router-id 4.4.4.4
[R4-ospfv3-1]quit

## 接口下宣告
[R4]int g0/1
[R4-GigabitEthernet0/1]ospfv3 1 area 0
[R4-GigabitEthernet0/1]quit

=================== 查看 R4与R5建立的OSPFv3的邻居关系 ============================
[R4]display ospfv3 peer

               OSPFv3 Process 1 with Router ID 4.4.4.4

 Area: 0.0.0.0
-------------------------------------------------------------------------
 Router ID       Pri State             Dead-Time InstID Interface
 5.5.5.5         1   Full/DR           00:00:34  0      GE0/1
[R4]
6 to 4 隧道
## 目的:IPv4网络内部互通
[R4]ospf 110 router-id 4.4.4.4
[R4-ospf-110]area 0
[R4-ospf-110-area-0.0.0.0]network 172.16.34.0 0.0.0.255
[R4-ospf-110-area-0.0.0.0]quit
[R4-ospf-110]quit

## 建立6to4 隧道
[R4]int tunnel 24 mode ipv6-ipv4 6to4
[R4-Tunnel24]source g0/0
[R4-Tunnel24]ipv6 address 2002:AC10:2204::4 64
[R4-Tunnel24]quit

## R4以静态路由方式学到目的网段
[R4] ipv6 route-static 2000:1:: 32 Tunnel24 2002:AC10:1702::2

[R4]ospfv3 1
[R4-ospfv3-1]import-route static
[R4-ospfv3-1]quit
R5
基础配置
[R5]int g0/0
[R5-GigabitEthernet0/0]ipv6 address 2001:45::5 64
[R5-GigabitEthernet0/0]quit

[R5]int LoopBack 1
[R5-LoopBack1]ipv6 address 2000:5:1::5 64
[R5-LoopBack1]quit
[R5]int LoopBack 2
[R5-LoopBack2]ipv6 address 2000:5:2::5 64
[R5-LoopBack2]quit
[R5]int LoopBack 3
[R5-LoopBack3]ipv6 address 2000:5:3::5 64
[R5-LoopBack3]quit


===================================   查看接口IPv6地址 =================================
[R5]display ipv6 int brief
*down: administratively down
(s): spoofing
Interface                                 Physical Protocol IPv6 Address
GigabitEthernet0/0                        up       up       2001:45::5
GigabitEthernet0/1                        down     down     Unassigned
GigabitEthernet0/2                        down     down     Unassigned
GigabitEthernet5/0                        down     down     Unassigned
GigabitEthernet5/1                        down     down     Unassigned
GigabitEthernet6/0                        down     down     Unassigned
GigabitEthernet6/1                        down     down     Unassigned
LoopBack1                                 up       up(s)    2000:5:1::5
LoopBack2                                 up       up(s)    2000:5:2::5
LoopBack3                                 up       up(s)    2000:5:3::5
Serial1/0                                 down     down     Unassigned
Serial2/0                                 down     down     Unassigned
Serial3/0                                 down     down     Unassigned
Serial4/0                                 down     down     Unassigned
[R5]
OSPFv3 局域网可达
## 进入OSPFv3 进程中,设置RID为 5.5.5.5
[R5]ospfv3 1
[R5-ospfv3-1]router-id 5.5.5.5
[R5-ospfv3-1]quit

## 接口下宣告
[R5]int range g0/0 lo1 lo2 lo3
[R5-if-range]ospfv3 1 area 0
[R5-if-range]quit
检查
R2的tunnel 接口状态

R4的tunnel 接口状态

R1 的路由表

R5 的路由表

R1 Ping R5
[R1]ping ipv6 -a 2000:1:1::1 2000:5:1::5

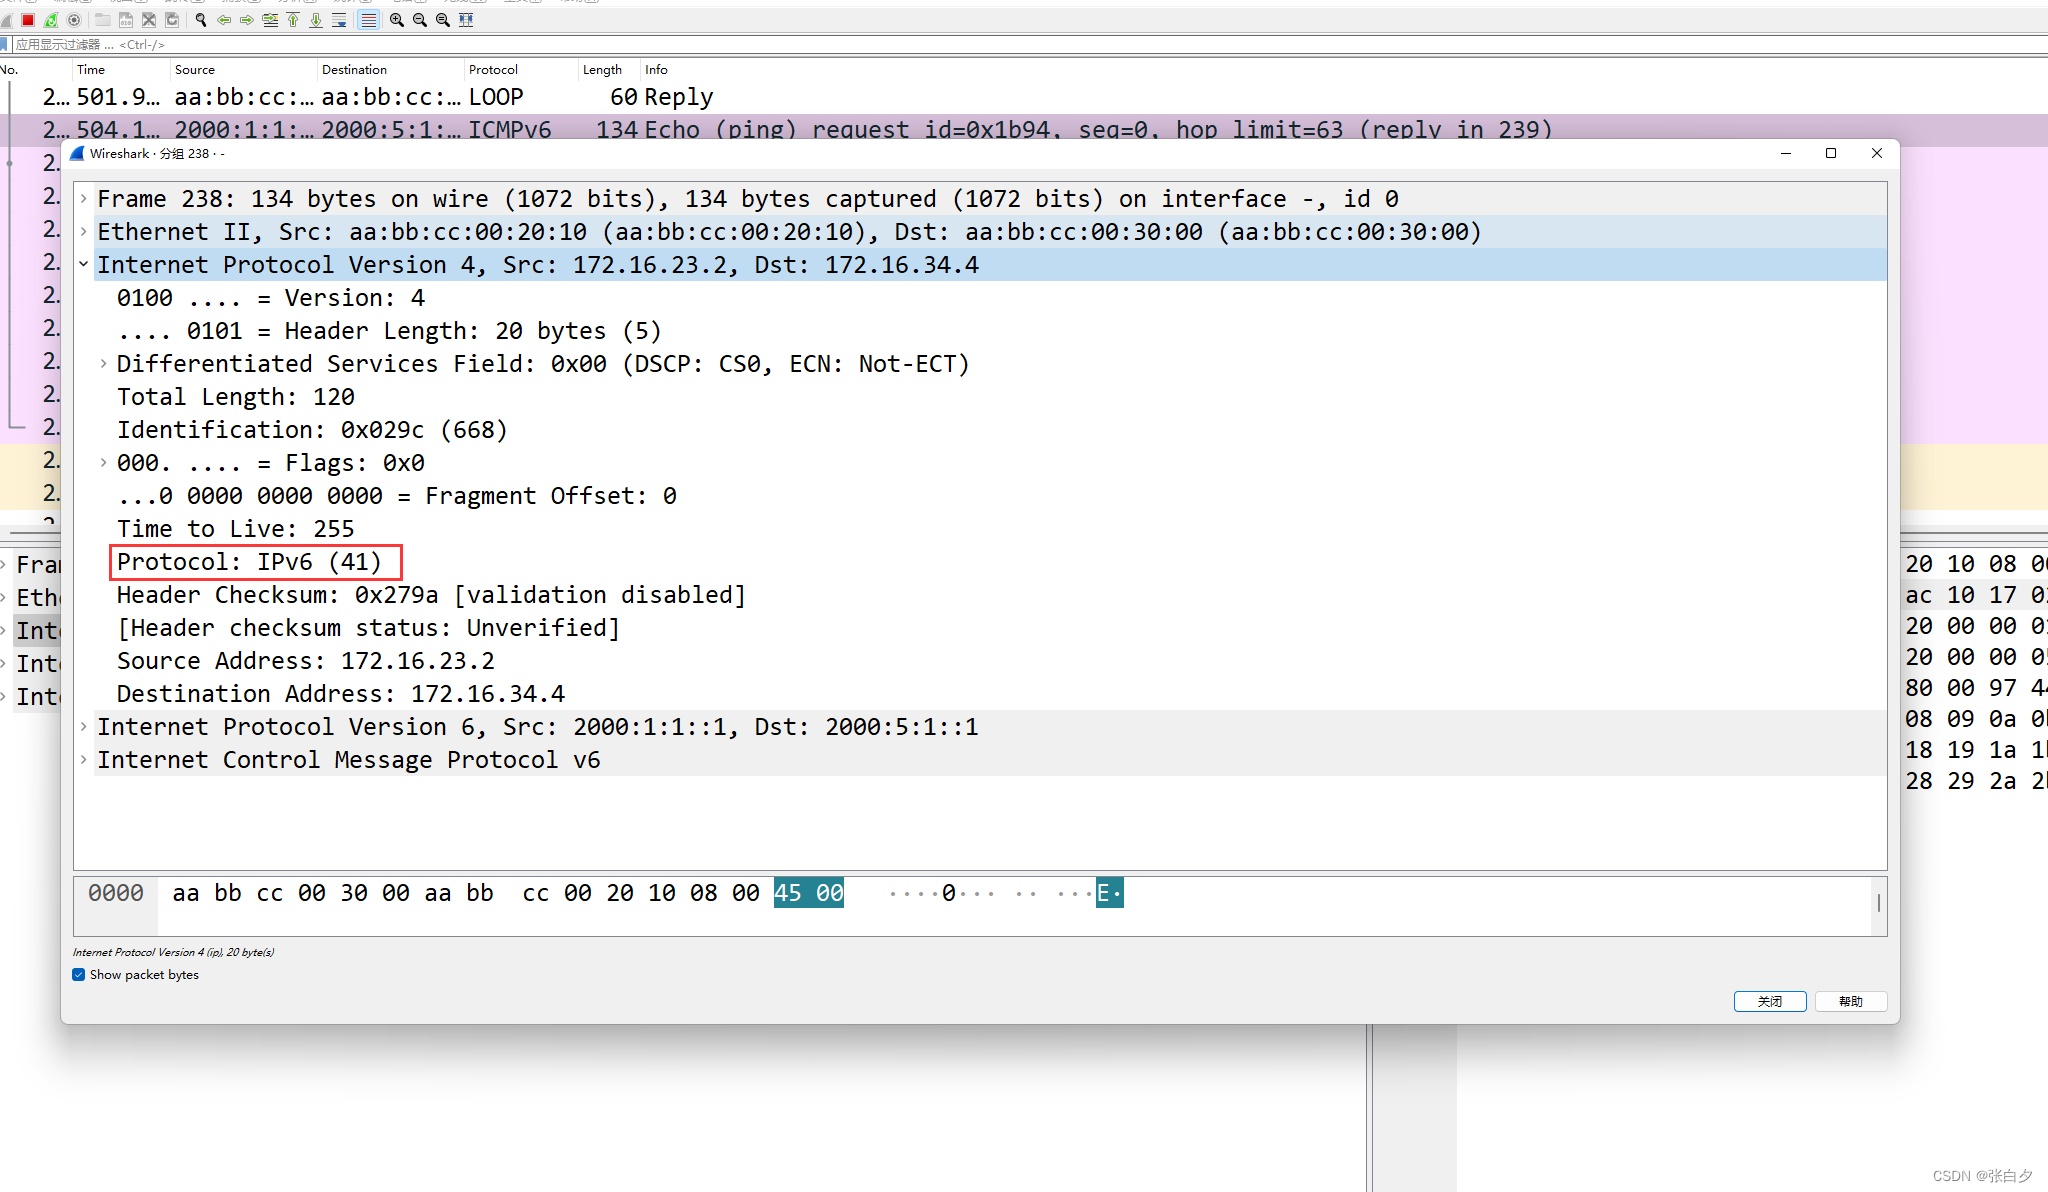
抓包分析
抓的是 R2的e0/1口
其实这个时候就可以看到,数据包发送的时候
此时就只新增了IPv4报文头这样子就比GRE少了一个封装字段,提高了传输效率


6to4是如何自动建立隧道?
① 报文的目的地址
当R1的内部想要去Ping R5的内部时
流量到达R2身上,这个时候是需要有目的IP地址的
但是他查看到了我是用6to4隧道,那么就没有去设置隧道目的,那这个时候是怎么传递的呢?
查看R2的路由表,看到我们写的那条静态路由
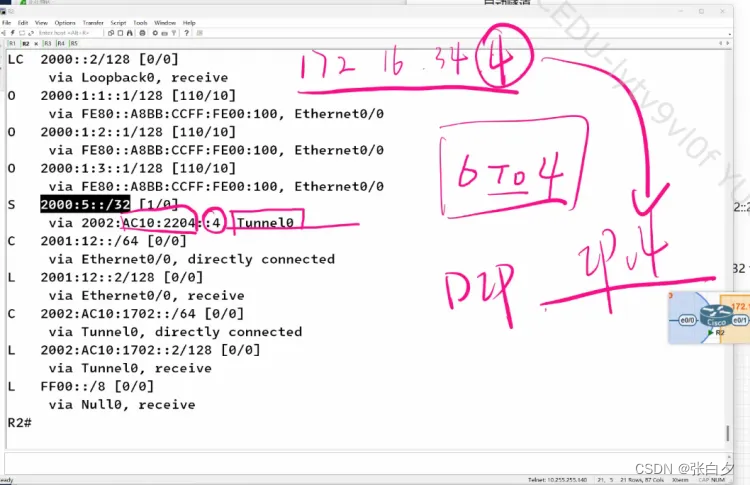
该条静态路由的下一跳是2002:AC10:2204::4 ,这下一条里面藏着一个IPv4地址,就是172.16.34.4
接上面的问题
那设备发现这是个6to4隧道,那么就会去路由表找静态路由,然后去提取该IPv4地址,作为我报文的目的地址。
② 那怎么自动建立呢?
其实就是提取我每一条静态路由的IPv4地址,作为我的隧道目的地址,这样子就OK啦
主要就是静态路由中,有下一跳有包含 IPv4 地址,这个就是我的目的地址,所以就可以自动去建立
当需要建立很多条隧道的时候,就不用那么麻烦的一条一条的去建立啦
配置文档
R1
#
 sysname R1
#
ospfv3 1
 router-id 1.1.1.1
#
#
interface LoopBack1
 ospfv3 1 area 0.0.0.0
 ipv6 address 2000:1:1::1/64
#
interface LoopBack2
 ospfv3 1 area 0.0.0.0
 ipv6 address 2000:1:2::1/64
#
interface LoopBack3
 ospfv3 1 area 0.0.0.0
 ipv6 address 2000:1:3::1/64
#
interface GigabitEthernet0/0
 ospfv3 1 area 0.0.0.0
 ipv6 address 2001:12::1/64
#
R2
#
 sysname R2
#
ospf 110 router-id 2.2.2.2
 area 0.0.0.0
  network 172.16.23.0 0.0.0.255
#
ospfv3 1
 router-id 2.2.2.2
 import-route static
#
interface GigabitEthernet0/0
 ip address 172.16.23.2 255.255.255.0
#
interface GigabitEthernet0/1
 ospfv3 1 area 0.0.0.0
 ipv6 address 2001:12::2/64
#
#
interface Tunnel24 mode ipv6-ipv4 6to4
 source GigabitEthernet0/0
 ipv6 address 2002:AC10:1702::2/64
#
#
ipv6 route-static 2000:5:: 32 Tunnel24 2002:AC10:2204::4
#
R3
#
 sysname R3
#
ospf 110 router-id 3.3.3.3
 area 0.0.0.0
  network 172.16.23.0 0.0.0.255
  network 172.16.34.0 0.0.0.255
#
interface GigabitEthernet0/0
 ip address 172.16.23.3 255.255.255.0
#
interface GigabitEthernet0/1
 ip address 172.16.34.3 255.255.255.0
#
R4
#
 sysname R4
#
ospf 110 router-id 4.4.4.4
 area 0.0.0.0
  network 172.16.34.0 0.0.0.255
#
ospfv3 1
 router-id 4.4.4.4
 import-route static
#
interface GigabitEthernet0/0
 ip address 172.16.34.4 255.255.255.0
#
interface GigabitEthernet0/1
 ospfv3 1 area 0.0.0.0
 ipv6 address 2001:45::4/64
#
interface Tunnel24 mode ipv6-ipv4 6to4
 source GigabitEthernet0/0
 ipv6 address 2002:AC10:2204::4/64
#
 ipv6 route-static 2000:1:: 32 Tunnel24 2002:AC10:1702::2
 #
R5
#
 sysname R5
#
ospfv3 1
 router-id 5.5.5.5
#
interface LoopBack1
 ospfv3 1 area 0.0.0.0
 ipv6 address 2000:5:1::5/64
#
interface LoopBack2
 ospfv3 1 area 0.0.0.0
 ipv6 address 2000:5:2::5/64
#
interface LoopBack3
 ospfv3 1 area 0.0.0.0
 ipv6 address 2000:5:3::5/64
#
interface GigabitEthernet0/0
 ospfv3 1 area 0.0.0.0
 ipv6 address 2001:45::5/64
#
配置文档没问题的!!!


 3987
3987


 被折叠的 条评论
为什么被折叠?
被折叠的 条评论
为什么被折叠?
 到【灌水乐园】发言


