


案例准备
1. 规划节点
节点规划见表1。
表1 节点规划
| IP | 主机名 | 节点 |
| 192.168.100.10 | Controller | 控制节点 |
| 192.168.100.20 | Compute | 计算节点 |
2. 基础准备
使用CentOS7.9镜像创建两个虚拟机,云主机类型为4vcpu、8G内存、100G磁盘;需要给虚拟机两个网络接口,网络接口1设置为内部网络(仅主机),作为云主机通信和管理使用,网络接口2设置为外部网络(NAT),主要为云主机提供一个网卡设备。
案例实施
1. 环境配置
(1)配置主机名
主机密码默认为000000,使用Linux命令修改节点主机名。
![]()
![]()
(2)配置域名解析
使用vi命令在controller节点与compute节点的/etc/hosts文件添加如下内容,添加完成后输入:wq保存文件内容退出。
[root@controller ~]# vi /etc/hosts
…
192.168.100.10 controller
192.168.100.20 compute
[root@compute ~]# vi /etc/hosts
…
192.168.100.10 controller
192.168.100.20 compute
(3)修改ip
controller:vi /etc/sysconfig/network-scripts/ifcfg-ens33

重启网卡:systemctl restart network
compute: vi /etc/sysconfig/network-scripts/ifcfg-ens33

重启网卡:systemctl restart network
(4)关闭防火墙controller、compute
[root@controller ~]# systemctl stop firewalld
[root@controller ~]# systemctl disable firewalld
Removed symlink /etc/systemd/system/multi-user.target.wants/firewalld.service.
Removed symlink /etc/systemd/system/dbus-org.fedoraproject.FirewallD1.service.
[root@controller yum.repos.d]# setenforce 0
[root@controller yum.repos.d]# vi /etc/selinux/config
# This file controls the state of SELinux on the system.
# SELINUX= can take one of these three values:
# enforcing - SELinux security policy is enforced.
# permissive - SELinux prints warnings instead of enforcing.
# disabled - No SELinux policy is loaded.
SELINUX=disabled
# SELINUXTYPE= can take one of three values:
# targeted - Targeted processes are protected,
# minimum - Modification of targeted policy. Only selected processes are protected.
# mls - Multi Level Security protection.
SELINUXTYPE=targeted
compute:
[root@compute ~]# systemctl stop firewalld
[root@compute ~]# systemctl disable firewalld
Removed symlink /etc/systemd/system/multi-user.target.wants/firewalld.service.
Removed symlink /etc/systemd/system/dbus-org.fedoraproject.FirewallD1.service.
[root@compute ~]# setenforce 0
[root@compute ~]# vi /etc/selinux/config
# This file controls the state of SELinux on the system.
# SELINUX= can take one of these three values:
# enforcing - SELinux security policy is enforced.
# permissive - SELinux prints warnings instead of enforcing.
# disabled - No SELinux policy is loaded.
SELINUX=disabled
# SELINUXTYPE= can take one of three values:
# targeted - Targeted processes are protected,
# minimum - Modification of targeted policy. Only selected processes are protected.
# mls - Multi Level Security protection.
SELINUXTYPE=targeted
使用SecureCRT连接两个虚拟机:
自行选择
(5)配置yum仓库
controller:本地
compute:ftp
打开SecureFX,将OpenStack云平台部署的iso文件通过上传到controller节点的/root目录下。
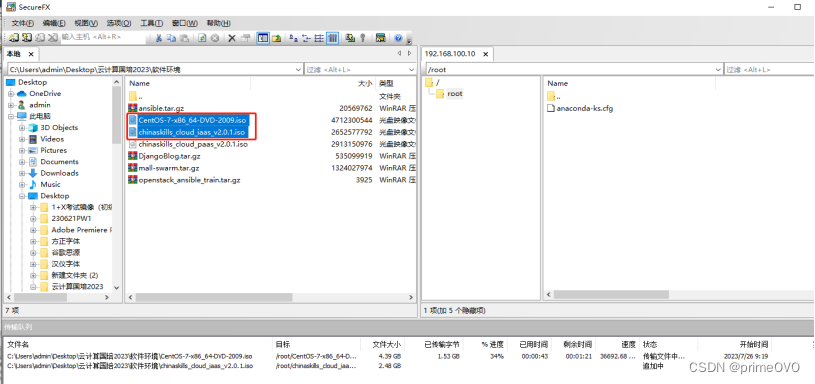
在controller节点的/opt目录下创建centos7-2009和iaas-train目录,将安装镜像分别挂载到centos7-2009和iaas-train目录中。
[root@controller ~]# mkdir /opt/{centos7-2009,iaas-train}
[root@controller ~]# mount /root/CentOS-7-x86_64-DVD-2009.iso /opt/centos7-2009
mount: /dev/loop0 is write-protected, mounting read-only
[root@controller ~]# mount /root/chinaskills_cloud_iaas_v2.0.1.iso /opt/iaas-train
mount: /dev/loop0 is write-protected, mounting read-only
配置controller节点的yum安装源文件yum.repo,指向本地文件目录路径。
[root@controller ~]# mv /etc/yum.repos.d/* /media/
[root@controller ~]# cat << EOF > /etc/yum.repos.d/yum.repo
[centos]
name=centos7-2009
baseurl=file:///opt/centos7-2009
gpgcheck=0
enabled=1
[openstack]
name=openstack-train
baseurl=file:///opt/iaas-train/iaas-repo
gpgcheck=0
enabled=1
EOF
[root@controller ~]# yum clean all && yum repolist
…
repo id repo name status
centos centos7-2009 4,070
openstack openstack-train 953
repolist: 5,023


(6)在controller节点使用yum安装vsftpd服务,并将/opt目录下的文件共享出去。
[root@controller ~]# yum install -y vsftpd
…
Installed:
vsftpd.x86_64 0:3.0.2-28.el7
Complete!
[root@controller ~]# echo "anon_root=/opt" >> /etc/vsftpd/vsftpd.conf
[root@controller ~]# systemctl start vsftpd
[root@controller ~]# systemctl enable vsftpd
anon_root=/opt:匿名用户访问ftp服务时,就直接进入该ftp服务器的/opt目录。
配置compute节点yum安装源文件yum.repo,指向controller节点的共享文件目录路径。
[root@compute ~]# mv /etc/yum.repos.d/* /media/
[root@compute ~]# cat << EOF > /etc/yum.repos.d/yum.repo
[centos]
name=centos7-2009
baseurl=ftp://controller/centos7-2009
gpgcheck=0
enabled=1
[openstack]
name=openstack-train
baseurl=ftp://controller/iaas-train/iaas-repo
gpgcheck=0
enabled=1
EOF
[root@compute ~]# yum clean all && yum repolist
…
repo id repo name status
centos centos7-2009 4,070
openstack openstack-train 953
repolist: 5,023
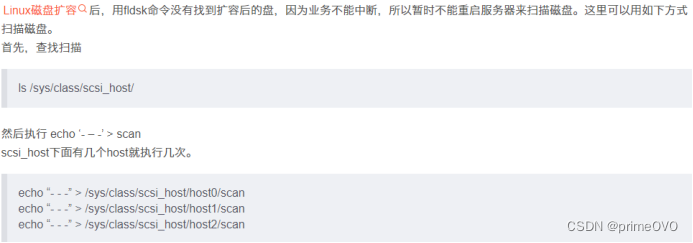
(4)划分分区
在compute节点上添加20G磁盘sdb并划分两个10G的分区。
[root@compute ~]# echo "- - -">/sys/class/scsi_host/host0/scan
[root@compute ~]# echo "- - -">/sys/class/scsi_host/host1/scan
[root@compute ~]# echo "- - -">/sys/class/scsi_host/host2/scan
[root@compute ~]# lsblk
NAME MAJ:MIN RM SIZE RO TYPE MOUNTPOINT
sda 8:0 0 100G 0 disk
├─sda1 8:1 0 1G 0 part /boot
├─sda2 8:2 0 2G 0 part
│ └─centos-swap 253:0 0 2G 0 lvm [SWAP]
└─sda3 8:3 0 93G 0 part /
sdb 8:16 0 20G 0 disk
sr0 11:0 1 4.4G 0 rom
[root@compute ~]# fdisk /dev/sdb
Welcome to fdisk (util-linux 2.23.2).
Changes will remain in memory only, until you decide to write them.
Be careful before using the write command.
Device does not contain a recognized partition table
Building a new DOS disklabel with disk identifier 0x4d741f33.
Command (m for help): n
Partition type:
p primary (0 primary, 0 extended, 4 free)
e extended
Select (default p): p
Partition number (1-4, default 1): 1
First sector (2048-41943039, default 2048):
Using default value 2048
Last sector, +sectors or +size{K,M,G} (2048-41943039, default 41943039): +10G
Partition 1 of type Linux and of size 10 GiB is set
Command (m for help): n
Partition type:
p primary (1 primary, 0 extended, 3 free)
e extended
Select (default p): p
Partition number (2-4, default 2): 2
First sector (20973568-41943039, default 20973568):
Using default value 20973568
Last sector, +sectors or +size{K,M,G} (20973568-41943039, default 41943039):
Using default value 41943039
Partition 2 of type Linux and of size 10 GiB is set
Command (m for help): p
Disk /dev/sdb: 21.5 GB, 21474836480 bytes, 41943040 sectors
Units = sectors of 1 * 512 = 512 bytes
Sector size (logical/physical): 512 bytes / 512 bytes
I/O size (minimum/optimal): 512 bytes / 512 bytes
Disk label type: dos
Disk identifier: 0x4d741f33
Device Boot Start End Blocks Id System
/dev/sdb1 2048 20973567 10485760 83 Linux
/dev/sdb2 20973568 41943039 10484736 83 Linux
Command (m for help): w
The partition table has been altered!
Calling ioctl() to re-read partition table.
Syncing disks.
[root@compute ~]# lsblk
NAME MAJ:MIN RM SIZE RO TYPE MOUNTPOINT
sda 8:0 0 100G 0 disk
├─sda1 8:1 0 1G 0 part /boot
├─sda2 8:2 0 2G 0 part
│ └─centos-swap 253:0 0 2G 0 lvm [SWAP]
└─sda3 8:3 0 93G 0 part /
sdb 8:16 0 20G 0 disk
├─sdb1 8:17 0 10G 0 part
└─sdb2 8:18 0 10G 0 part
sr0 11:0 1 4.4G 0 rom
2. OpenStack云平台部署
完成基础环境部署后,就可以开始部署安装OpenStack云平台。
(1)配置环境变量
在controller节点和compute节点安装OpenStack云平台的安装脚本软件包。
[root@controller ~]# yum install -y openstack-iaas
…
Installed:
openstack-train.x86_64 0:v1.0.2-1.el7
Complete!
[root@compute ~]# yum install -y openstack-iaas
…
Installed:
openstack-train.x86_64 0:v1.0.2-1.el7
Complete!
在controller节点和compute节点配置环境变量文件/etc/openstack/openrc.sh,按“i”键进入openrc.sh编辑模式:
[root@controller ~]# vi /etc/openstack/openrc.sh
脚本修改以下内容,配置完按ESC键输入:
:%s/^.\{1\}//或者:%s/#//
删除每行前1个字符,再按ESC键输入:wq保存退出 :
HOST_IP=192.168.100.10
HOST_PASS=000000 #controller节点root用户密码
HOST_NAME=controller
HOST_IP_NODE=192.168.100.20
HOST_PASS_NODE=000000 #compute节点root用户密码
HOST_NAME_NODE=compute
network_segment_IP=192.168.100.0/24
RABBIT_USER=openstack
RABBIT_PASS=000000
DB_PASS=000000
DOMAIN_NAME=demo
ADMIN_PASS=000000
DEMO_PASS=000000
KEYSTONE_DBPASS=000000
GLANCE_DBPASS=000000
GLANCE_PASS=000000
PLACEMENT_DBPASS=000000
PLACEMENT_PASS=000000
NOVA_DBPASS=000000
NOVA_PASS=000000
NEUTRON_DBPASS=000000
NEUTRON_PASS=000000
METADATA_SECRET=000000
INTERFACE_NAME=eth34 #云主机第二张网卡名称
Physical_NAME=provider
minvlan=1
maxvlan=1000
CINDER_DBPASS=000000
CINDER_PASS=000000
BLOCK_DISK=sdb1 #compute节点第一个分区名称
SWIFT_PASS=000000
OBJECT_DISK=sdb2 #compute节点第二个分区名称
STORAGE_LOCAL_NET_IP=192.168.100.20
(2)部署OpenStack云平台基础环境
在controller节点和compute节点都执行脚本iaas-pre-host.sh部署OpenStack云平台基础环境。完成后使用reboot命令重启虚拟机以生效配置。
[root@controller ~]# iaas-pre-host.sh
[root@compute ~]# iaas-pre-host.sh
(3)部署Mariadb数据库及Rabbit消息队列服务
在controller节点执行脚本部署Mariadb数据库及Rabbit消息队列服务。
[root@controller ~]# iaas-install-mysql.sh
(4)部署Keystone服务
在controller节点执行脚本部署Keystone服务。
[root@controller ~]# iaas-install-keystone.sh
(5)部署Glance服务
在controller节点执行脚本部署Glance服务。
[root@controller ~]# iaas-install-glance.sh
(6)部署Nova服务
在controller节点执行脚本部署Nova组件的控制服务。
从OpenStack(Stein版)开始,对系统资源的监控功能才从Nova中独立出来,成为一个独立的组件,该组件名为Placement
[root@controller ~]# iaas-install-placement.sh
[root@controller ~]# iaas-install-nova-controller.sh
执行完上面的脚本后,在compute节点执行脚本部署Nova组件的计算服务,这样就将compute节点的CPU、内存及磁盘资源添加到OpenStack云平台的资源池中了。
[root@compute ~]# iaas-install-nova-compute.sh
(7)部署Neutron服务
在controller节点执行脚本部署Neutron组件的控制服务。
[root@controller ~]# iaas-install-neutron-controller.sh
在compute节点执行脚本部署Neutron组件的计算服务。
[root@compute ~]# iaas-install-neutron-compute.sh
(8)部署Dashboard服务
在controller节点执行脚本部署Dashboard组件服务。
[root@controller ~]# iaas-install-dashboard.sh
安装完成后,使用Google浏览器访问OpenStack云平台,访问地址为:http://192.168.100.10/dashboard,domain为demo,用户名为admin,密码为000000。结果如图2和图3所示。
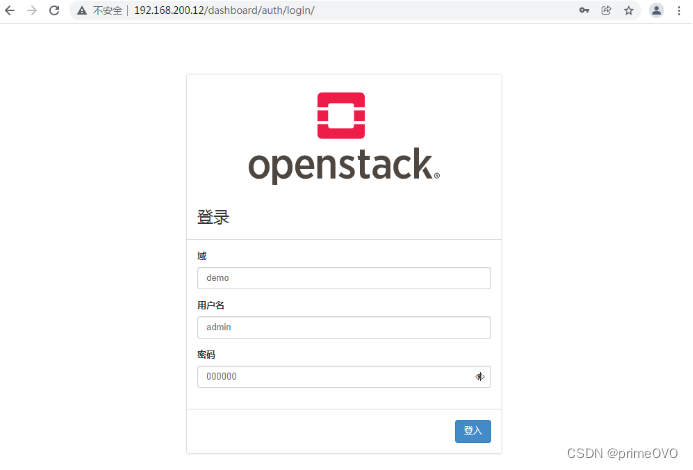
图2 OpenStack云平台dashboard访问1
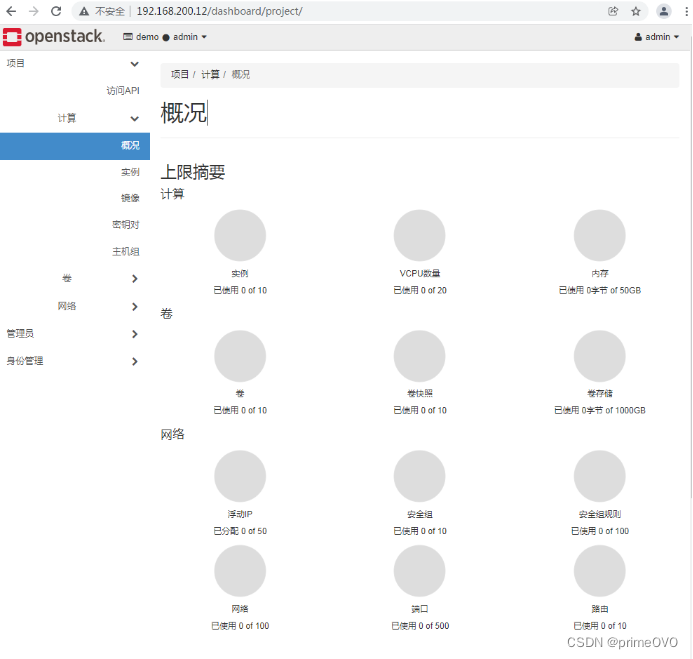
图3 OpenStack云平台dashboard访问2
(9)部署Cinder服务
在controller节点执行脚本部署Cinder组件的控制服务。
[root@controller ~]# iaas-install-cinder-controller.sh
controller节点脚本执行完成后,在compute节点执行脚本部署Cinder组件的计算服务。
[root@compute ~]# iaas-install-cinder-compute.sh
(10)部署Swift服务
在controller节点执行脚本部署Swift组件的控制服务。
[root@controller ~]# iaas-install-swift-controller.sh
controller节点脚本执行完成后,在compute节点执行脚本部署Swift组件的计算服务。
[root@compute ~]# iaas-install-swift-compute.sh
3. 创建cirros云主机
(1)上传镜像
在controller节点下载镜像并上传cirros镜像。
[root@controller ~]# source /etc/keystone/admin-openrc.sh
[root@controller ~]# glance image-create --name cirros --disk-format qcow2 --container-format bare < /opt/iaas/images/cirros-0.3.4-x86_64-disk.img
+------------------+--------------------------------------------------------------------+
| Property | Value |
+------------------+--------------------------------------------------------------------+
| checksum | ee1eca47dc88f4879d8a229cc70a07c6 |
| container_format | bare |
| created_at | 2022-02-16T02:58:23Z |
| disk_format | qcow2 |
| id | 76ce1b38-b1fa-465c-947f-288ea4760761 |
| min_disk | 0 |
| min_ram | 0 |
| name | cirros |
| os_hash_algo | sha512 |
| os_hash_value | 1b03ca1bc3fafe448b90583c12f367949f8b0e665685979d95b004e48574b953316799e23240f4f7 |
| | 39d1b5eb4c4ca24d38fdc6f4f9d8247a2bc64db25d6bbdb2 |
| os_hidden | False |
| owner | 1ac0739939db4dc78bf42802ba0205e9 |
| protected | False |
| size | 13287936 |
| status | active |
| tags | [] |
| updated_at | 2022-02-16T02:58:24Z |
| virtual_size | Not available |
| visibility | shared |
+------------------+--------------------------------------------------------------------+
(2)创建网络
在controller节点使用OpenStack相关命令创建一个net网络。
[root@controller ~]# source /etc/keystone/admin-openrc.sh
[root@controller ~]# openstack network create net --mtu 1350
[root@controller ~]# openstack subnet create --network net --subnet-range 10.0.0.0/24 --gateway 10.0.0.1 subnet
(3)创建云主机
登录Dashboard页面,在左侧菜单栏中选择“项目→计算→实例”,单击“创建实例”按钮,输入实例名称cirros,默认可用域为nova,数量为1,单击“下一步”按钮,创建步骤如图4所示。

图4虚拟机创建1
选择已共享的cirros镜像,选择不创建新卷,单击“下一步”按钮,创建步骤如图5所示。
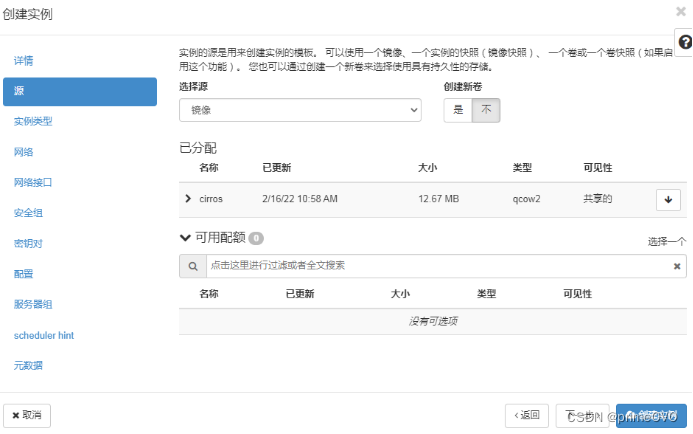
图5虚拟机创建2
选择m1.tiny实例类型,单击“下一步”按钮,创建步骤如图6所示。
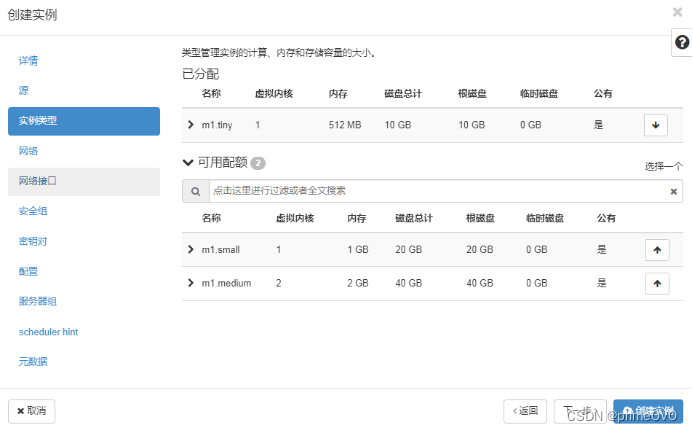
图6虚拟机创建3
选择net为虚拟机的网络,这样最后单击“创建实例”按钮就可以完成虚拟机创建,创建步骤如图7所示。

图7虚拟机创建4
等虚拟机创建完成后,可以看到虚拟机状态为“运行”,如图8所示。只要求创建cirros的云主机不报错,不要求创建后的cirros云主机可以使用CRT连接。
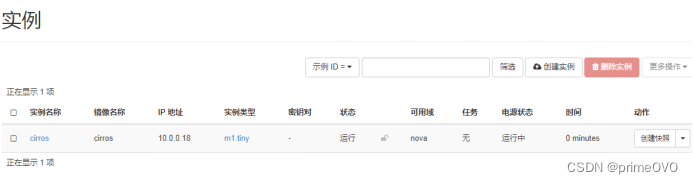
图8 cirros虚拟机运行
使用命令:
openstack server create --image b44c12c3-d6a1-4057-be48-d6c7e3da62f3 --flavor m1.tiny --network 0458d101-fb9e-4168-87ee-430d840812c6 VM1


 743
743

 被折叠的 条评论
为什么被折叠?
被折叠的 条评论
为什么被折叠?
 到【灌水乐园】发言


