


 本文详细介绍了Java中五种创建线程的方法:继承Thread并重写run,通过实现Runnable接口,使用匿名内部类,以及使用Lambda表达式。同时讲解了线程中断、等待和休眠的概念,以及如何获取线程实例。
1.线程创建
这里介绍线程创建常用的五种方法
1.继承Thread,重写run
class MyThread extends Thread{
public void run(){
//这里写的代码就是线程要完成的任务
while (true){
System.out.println("hello thread");
try {
Thread.sleep(1000);//线程会休眠一秒再执行,不休眠会执行得很快
} catch (InterruptedException e) {
throw new RuntimeException(e);
}
}
}
}
public class Demo1 {
public static void main(String[] args) {
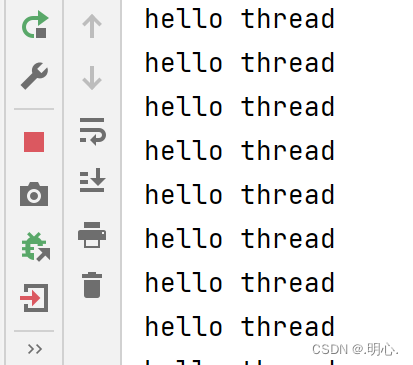
Thread t=new MyThread();
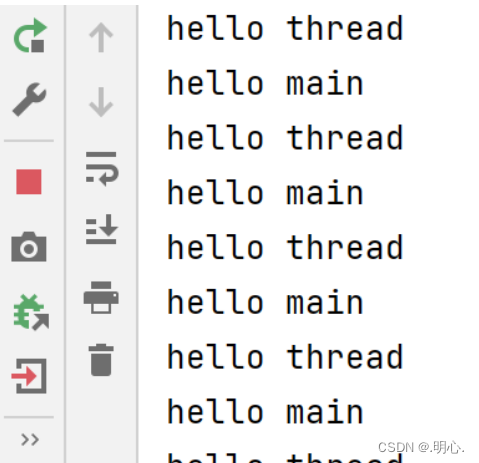
// 没有创建出新的线程, 就是在主线程中执行上述 run 中的循环打印.
//t.start();//hello thread 和 hello main 并发执行
t.run();//只有 hello thread
while(true){
System.out.println("hello main");
try {
Thread.sleep(1000);
} catch (InterruptedException e) {
throw new RuntimeException(e);
}
}
}
}start 和 run这两个方法的区别是什么呢?
作用功能不同:
- run方法的作用是描述线程具体要执行的任务;
- start方法的作用是真正的去申请系统线程
运行结果不同:
- run方法是一个类中的普通方法,主动调用和调用普通方法一样,会顺序执行一次;
- start调用方法后, start方法内部会调用Java 本地方法(封装了对系统底层的调用)真正的启动线程,并执行run方法中的代码,run 方法执行完成后线程进入销毁阶段。
调用start方法: 调用run方法:
2.重写Runnable方法,重写run,把Runnable实例传入到Thread中
class MyRunnable implements Runnable{
    public void run(){
        while (true){
            System.out.println("hello thread");

            try {
                Thread.sleep(1000);
            } catch (InterruptedException e) {
                throw new RuntimeException(e);
            }


        }

    }
}

public class Demo2 {
    public static void main(String[] args) {
        Thread t=new Thread(new MyRunnable());

        t.start();

        while (true){
            System.out.println("hello main");
            try {
                Thread.sleep(1000);
            } catch (InterruptedException e) {
                throw new RuntimeException(e);
            }

        }

    }
}
3.针对 1的变形,使用匿名内部类, 继承 Thread 并重写 run.
public class Demo3 {
    public static void main(String[] args) {
        Thread t=new Thread(){
            public void run(){
                while (true){
                    System.out.println("hello thread");

                    try {
                        Thread.sleep(1000);
                    } catch (InterruptedException e) {
                        throw new RuntimeException(e);
                    }

                }

            }

        };

        t.start();

        while (true){
            System.out.println("hello main");

            try {
                Thread.sleep(1000);
            } catch (InterruptedException e) {
                throw new RuntimeException(e);
            }

        }

    }

}
4.实现 Runnable, 重写 run, 使用匿名内部类
public class Demo4 {
    public static void main(String[] args) {
        Thread t=new Thread(new Runnable() {
            @Override
                public void run() {
                    while (true) {
                        System.out.println("hello thread");
                        try {
                            Thread.sleep(1000);
                        } catch (InterruptedException e) {
                            throw new RuntimeException(e);
                        }
                    }

                }
        });

        t.start();

        while (true){
            System.out.println("hello main");
            try {
                Thread.sleep(10000);
            } catch (InterruptedException e) {
                throw new RuntimeException(e);
            }
        }

    }
}
5.使用 lambda 表达式
public class Demo5 {
    public static void main(String[] args) {
        Thread t=new Thread(() -> {
            while (true){
                System.out.println("hello thread");
                try {
                    Thread.sleep(1000);
                } catch (InterruptedException e) {
                    throw new RuntimeException(e);
                }
            }

        });

        t.start();

        while (true){
            System.out.println("hello main");
            try {
                Thread.sleep(1000);
            } catch (InterruptedException e) {
                throw new RuntimeException(e);
            }
        }
    }

}
上述每种方法执行的结果都是大同小异,就是hello main和hello thread 并发执行,并且是抢占式执行,你也不知道hello thread 的下一句还是hello thread 或者是hello main。
2.线程中断
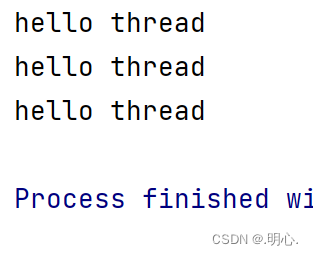
线程运行起来之后如果想要中断,就需要采用interrupt()方法来中断
public static void main(String[] args) {
        Thread t = new Thread(() -> {
            while (!Thread.currentThread().isInterrupted()) {
                System.out.println("hello thread");
                try {
                    Thread.sleep(1000);
                } catch (InterruptedException e) {
                    break;
                }

            }
        });

        t.start();

        try {
            Thread.sleep(3000);
        } catch (InterruptedException e) {
            throw new RuntimeException(e);
        }

        t.interrupt();
    }
3.线程等待
有时,我们需要等待⼀个线程完成它的⼯作后,才能进行自己的下⼀步⼯作。
    public static void main(String[] args) {
        Thread t = new Thread(new Runnable() {
            @Override
            public void run() {
                while (true){
                    System.out.println("1");

                }
            }
        });
        t.start();
        while(true){
            System.out.println("2");
        }
    }
由于上述代码中main 和 t线程 之间的结束顺序是不确定的,如果希望让代码里面的 t能够先结束main 后结束,就可以在 main 中使用线程等待(join)
这个方法有三种,每种功能不一样
| 方法 | 说明 |
| public void join() | 等待线程结束(死等) |
| public void join(long millis) | 等待线程结束,最多等 millis 毫秒 |
| public void join(long millis, int nanos) | 同理,但可以更高精度 |
  public static void main(String[] args) throws InterruptedException {
        Thread t = new Thread(new Runnable() {
            @Override
            public void run() {
                while (true){
                    System.out.println("1");

                }
            }
        });
        t.start();
        t.join();
        while(true){
            System.out.println("2");
        }
    }
main 中线程调用 t.join 就是让 main 线程被阻塞并等待t线程.
由于这个代码调用的是死等的那个join方法,就会导致main线程陷入无尽等待一直无法执行,只有t线程执行,结果就是一直只有1。
如果用其余两个方法,那么结果就是main线程会先等待t线程执行一段时间后再开始执行。
4.线程休眠
| 方法 | 说明 |
| public static void sleep(long millis) throws InterruptedException | 让当前线程休眠一定时间 |
| public static void sleep(long millis, int nanos) throws InterruptedException | 让线程休眠一定时间(时间精度更高) |
前面的代码执行的时候我们会发现线程执行的速度很快,让线程休眠可以更好地看到线程执行的过程。
public static void main(String[] args) throws InterruptedException {
   Thread t=new Thread(()->{
       while (true){
           System.out.println("tjc");
           try {
               Thread.sleep(2000);//t线程会休眠两秒再执行
           } catch (InterruptedException e) {
               throw new RuntimeException(e);
           }
       }
   });

   t.start();
   while (true){
       System.out.println("hs");
       Thread.sleep(2000);//main线程会休眠两秒执行
   }
}
5.获取线程实例
| 方法 | 说明 |
| public static Thread currentThread(); | 返回当前线程对象的引用 |
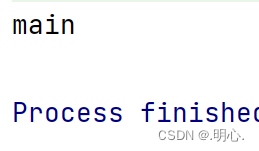
    public static void main(String[] args) {
        Thread thread = Thread.currentThread();
        System.out.println(thread.getName());
    }
得到的是main线程的实例


 1814
1814

 被折叠的 条评论
为什么被折叠?
被折叠的 条评论
为什么被折叠?
 到【灌水乐园】发言


