


 本文详细描述了在Linux中使用Namespace进行网络隔离,包括创建命名空间、配置网桥、内部端口设置、地址分配以及Neutron的基本操作,如修改网络模式、创建网络和子网、安全组的创建与规则管理。
1. NameSpace管理
(1)创建namespace1和namespace2
| [root@xiandian ~]# ip netns add namespace1 [root@xiandian ~]# ip netns add namespace2 [root@xiandian ~]# ip netns list |
结果图1所示:

图1创建命名空间
(2)创建网桥
| [root@xiandian ~]# ovs-vsctl add-br br-ns [root@xiandian ~]# ovs-vsctl list-br |
结果如图2所示:

图2 创建网桥
(3)创建内部通信端口
| [root@xiandian ~]# ovs-vsctl add-port br-ns tap1 -- set interface tap1 type=internal [root@xiandian ~]# ovs-vsctl add-port br-ns tap2 -- set interface tap2 type=internal |
注:这里的操作没有返回结果。
(4)将tap1和tap2分别加入命名空间
| [root@xiandian ~]# ip link set tap1 netns namespace1 [root@xiandian ~]# ip link set tap2 netns namespace2 |
注:这里的操作没有返回结果。
(5)配置命名空间地址
| [root@xiandian ~]# ip netns exec namespace1 ip addr add 10.24.2.20/23 dev tap1 [root@xiandian ~]# ip netns exec namespace1 ip link set tap1 up [root@xiandian ~]# ip netns exec namespace1 ip link set lo up |
注:这里的操作没有返回结果,IP是填写自己的虚拟机IP。
(6)检测网络通畅
| [root@xiandian ~]# ip netns exec namespace1 ping 10.24.2.20 -c 3 |
结果如图3所示:

图3 检测结果
(7)完成创建ovs输出并查看
效果如下:
| [root@xiandian ~]# ovs-vsctl show |
结果如图4:
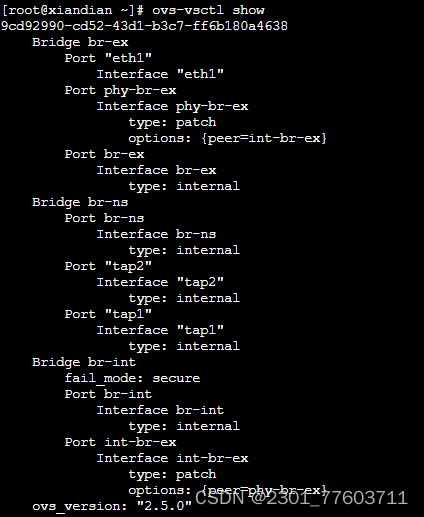
图4 执行结果
(8)查看namespace1的地址
| [root@xiandian ~]# ip netns exec namespace1 ip a |
结果如图5所示:

图5 地址信息
2. Neutron基础操作
(1)列出系统扩展命令
| [root@xiandian ~]# source /etc/keystone/admin-openrc.sh [root@xiandian ~]# neutron ext-list -c alias -c name |
结果如图6所示:
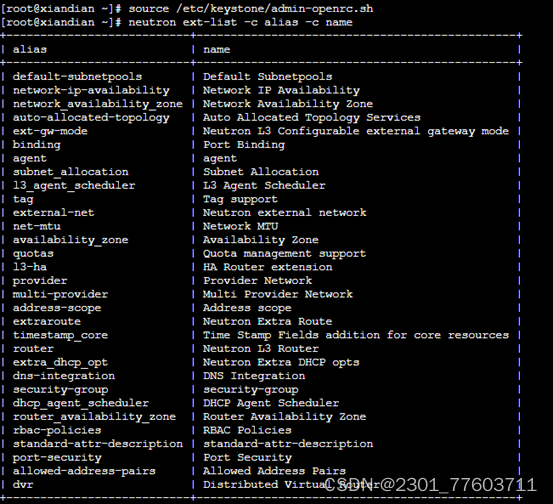
图6 扩展命令
(2)修改网络模式
| [root@xiandian ~]# sed -i '101s/flat/vxlan/g' /etc/neutron/plugins/ml2/ml2_conf.ini [root@xiandian ~]# crudini --set /etc/neutron/plugins/ml2/ml2_conf.ini ml2_type_vxlan vni_ranges 1:1000 [root@xiandian ~]# openstack-service restart |
注:这个操作没有返回结果,重启的服务较多,等待时间需要两分钟左右。
(3)创建网络
| [root@xiandian ~]# neutron net-create ext-net --shared --router:external=True |
结果如图7所示:
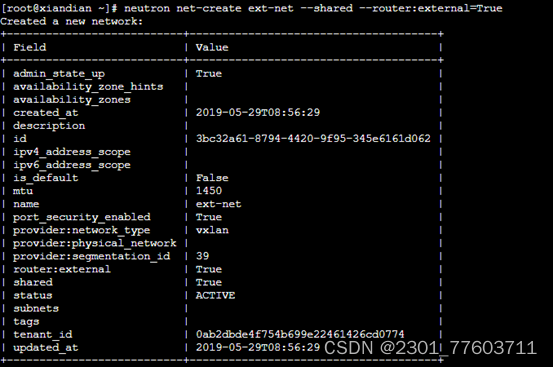
图7 创建网络
(4)创建子网
| [root@xiandian ~]# neutron subnet-create ext-net --name ext-subnet --allocation-pool start=172.24.7.100,end=172.24.7.200 --disable-dhcp --gateway 172.24.7.254 172.24.7.0/24 |
结果如图7-8所示:

图8 创建子网
(5)创建租户网络
| [root@xiandian ~]# neutron net-create demo-net |
结果如图9所示:

图9 创建租户网络
(6)创建用户子网
| [root@xiandian ~]# neutron subnet-create demo-net --name demo-subnet --gateway 10.0.0.1 10.0.0.0/24 |
结果如图7-10所示:

图7-10 创建租户子网
(7)创建路由
| [root@xiandian ~]# neutron router-create router1 |
结果如图11所示:
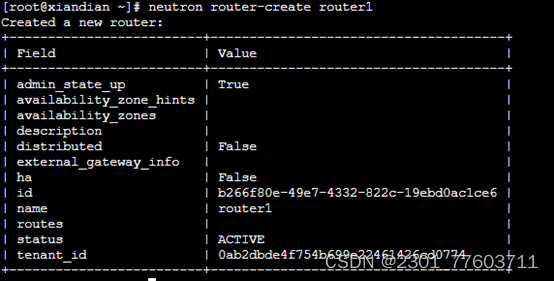
图11 创建路由
3. 网络隔离
(1)创建安全组
| [root@xiandian ~]# nova secgroup-create test "create a test secgroup" |
结果如图12所示:

图12 创建安全组
(3)安全组添加规则
| [root@xiandian ~]# nova secgroup-add-rule test ICMP -1 -1 172.24.4.0/24 [root@xiandian ~]# nova secgroup-add-rule test TCP 1 65535 172.24.4.0/24 [root@xiandian ~]# nova secgroup-add-rule test UDP 1 65535 172.24.4.0/24 [root@xiandian ~]# nova secgroup-add-rule test ICMP -1 -1 172.24.5.0/24 [root@xiandian ~]# nova secgroup-add-rule test TCP 1 65535 172.24.5.0/24 [root@xiandian ~]# nova secgroup-add-rule test UDP 1 65535 172.24.5.0/24 |
结果如图13所示:

图13 添加安全组规则
(3)查询安
1. NameSpace管理
(1)创建namespace1和namespace2
| [root@xiandian ~]# ip netns add namespace1 [root@xiandian ~]# ip netns add namespace2 [root@xiandian ~]# ip netns list |
结果图1所示:

图1创建命名空间
(2)创建网桥
| [root@xiandian ~]# ovs-vsctl add-br br-ns [root@xiandian ~]# ovs-vsctl list-br |
结果如图2所示:

图2 创建网桥
(3)创建内部通信端口
| [root@xiandian ~]# ovs-vsctl add-port br-ns tap1 -- set interface tap1 type=internal [root@xiandian ~]# ovs-vsctl add-port br-ns tap2 -- set interface tap2 type=internal |
注:这里的操作没有返回结果。
(4)将tap1和tap2分别加入命名空间
| [root@xiandian ~]# ip link set tap1 netns namespace1 [root@xiandian ~]# ip link set tap2 netns namespace2 |
注:这里的操作没有返回结果。
(5)配置命名空间地址
| [root@xiandian ~]# ip netns exec namespace1 ip addr add 10.24.2.20/23 dev tap1 [root@xiandian ~]# ip netns exec namespace1 ip link set tap1 up [root@xiandian ~]# ip netns exec namespace1 ip link set lo up |
注:这里的操作没有返回结果,IP是填写自己的虚拟机IP。
(6)检测网络通畅
| [root@xiandian ~]# ip netns exec namespace1 ping 10.24.2.20 -c 3 |
结果如图3所示:
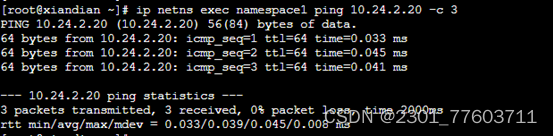
图3 检测结果
(7)完成创建ovs输出并查看
效果如下:
| [root@xiandian ~]# ovs-vsctl show |
结果如图4:

图4 执行结果
(8)查看namespace1的地址
| [root@xiandian ~]# ip netns exec namespace1 ip a |
结果如图5所示:
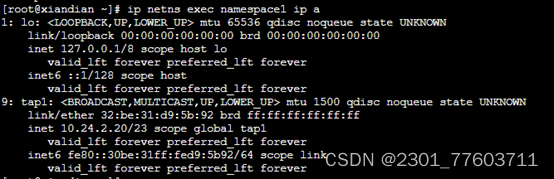
图5 地址信息
2. Neutron基础操作
(1)列出系统扩展命令
| [root@xiandian ~]# source /etc/keystone/admin-openrc.sh [root@xiandian ~]# neutron ext-list -c alias -c name |
结果如图6所示:

图6 扩展命令
(2)修改网络模式
| [root@xiandian ~]# sed -i '101s/flat/vxlan/g' /etc/neutron/plugins/ml2/ml2_conf.ini [root@xiandian ~]# crudini --set /etc/neutron/plugins/ml2/ml2_conf.ini ml2_type_vxlan vni_ranges 1:1000 [root@xiandian ~]# openstack-service restart |
注:这个操作没有返回结果,重启的服务较多,等待时间需要两分钟左右。
(3)创建网络
| [root@xiandian ~]# neutron net-create ext-net --shared --router:external=True |
结果如图7所示:

图7 创建网络
(4)创建子网
| [root@xiandian ~]# neutron subnet-create ext-net --name ext-subnet --allocation-pool start=172.24.7.100,end=172.24.7.200 --disable-dhcp --gateway 172.24.7.254 172.24.7.0/24 |
结果如图7-8所示:

图8 创建子网
(5)创建租户网络
| [root@xiandian ~]# neutron net-create demo-net |
结果如图9所示:

图9 创建租户网络
(6)创建用户子网
| [root@xiandian ~]# neutron subnet-create demo-net --name demo-subnet --gateway 10.0.0.1 10.0.0.0/24 |
结果如图7-10所示:
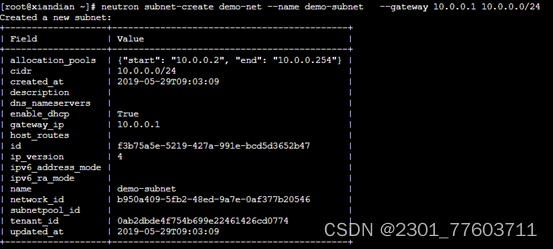
图7-10 创建租户子网
(7)创建路由
| [root@xiandian ~]# neutron router-create router1 |
结果如图11所示:

图11 创建路由
3. 网络隔离
(1)创建安全组
| [root@xiandian ~]# nova secgroup-create test "create a test secgroup" |
结果如图12所示:

图12 创建安全组
(3)安全组添加规则
| [root@xiandian ~]# nova secgroup-add-rule test ICMP -1 -1 172.24.4.0/24 [root@xiandian ~]# nova secgroup-add-rule test TCP 1 65535 172.24.4.0/24 [root@xiandian ~]# nova secgroup-add-rule test UDP 1 65535 172.24.4.0/24 [root@xiandian ~]# nova secgroup-add-rule test ICMP -1 -1 172.24.5.0/24 [root@xiandian ~]# nova secgroup-add-rule test TCP 1 65535 172.24.5.0/24 [root@xiandian ~]# nova secgroup-add-rule test UDP 1 65535 172.24.5.0/24 |
结果如图13所示:

图13 添加安全组规则
(3)查询安全组规则
| [root@xiandian ~]# nova secgroup-list-rules test |
结果如图14所示:
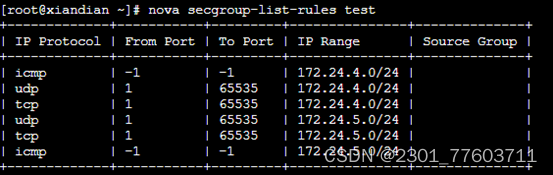
图14 规则列表
全组规则
| [root@xiandian ~]# nova secgroup-list-rules test |
结果如图14所示:

图14 规则列表


 1617
1617


 被折叠的 条评论
为什么被折叠?
被折叠的 条评论
为什么被折叠?
 到【灌水乐园】发言


