


作者:@黑眼圈ing
机电专业 工科男
CSDN@黑眼圈ing
每天进步一点点!
前言
线性表的存储除了常见的顺序存储外,链式存储也是一种常见的方式,后续我会依次介绍几种链式存储实现方式,如单链表、带头结点的单链表、双链表以及特殊的线性表——栈和队列的链式存储实现
先赞后看,养成习惯! ! ! ^ _ ^ ❤️ ❤️ ❤️
码字不易,大家的支持是我坚持的动力。点赞后不要忘了关注我哦!
一、什么是单链表?
单链表是线性表链式存储的一种形式,其中的结点一般包括有两个域,一个是存放数据信息的info域(数据域),另一个是指向该结点后继结点的next域(指针域)。一个单链表必须有一个首指针指向单链表的第一个结点
每个结点的存储形式:

单链表的描述:

二、单链表的实现
1.定义一个单链表:
typedef int SLTDataType;

typedef struct SListNode
{
	SLTDataType data;
	struct SListNode* next;
}SLTNode;
2.打印单链表
void SLTPrint(SLTNode* phead)
{
	SLTNode* cur = phead;
	//while (cur != NULL)
	while (cur)
	{
		printf("%d->", cur->data);
		cur = cur->next;
	}

	printf("NULL\n");
}
3.创建一个结点
SLTNode* BuySListNode(SLTDataType x)
{
	SLTNode* newnode = (SLTNode*)malloc(sizeof(SLTNode));
	if (newnode == NULL)
	{
		perror("malloc fail");
		exit(-1);
	}

	newnode->data = x;
	newnode->next = NULL;

	return newnode;
}
4.头插尾插
形参是实参的临时拷贝,形参的改变对实参没有影响,所以要改变结构体的指针要用二级指针;改变结构体,用结构体指针即可
//尾插
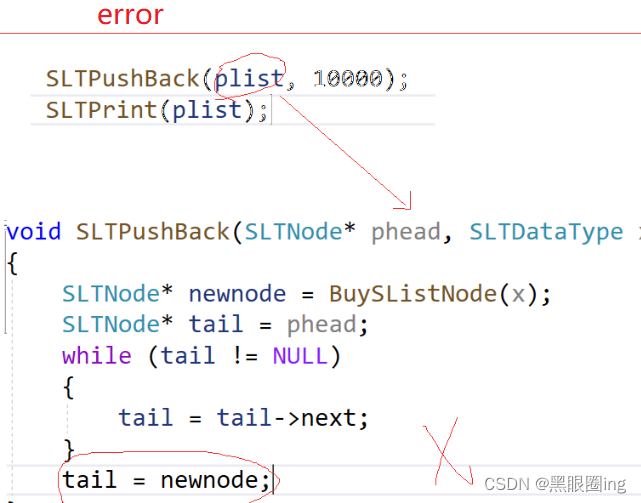
void SLTPushBack(SLTNode** pphead, SLTDataType x)
{
assert(pphead);
SLTNode* newnode = BuySListNode(x);
//链表为空
if (*pphead == NULL)
{
// 改变的结构体的指针,所以要用二级指针
*pphead = newnode;
}
//非空
else
{
SLTNode* tail = *pphead;
while (tail->next != NULL)
{
tail = tail->next;
}
// 改变的结构体,用结构体的指针即可
tail->next = newnode;
}
}
尾插有两种情况:1.链表为空,只需要头指针指向新结点即可 2.如果链表不为空,通过尾结点的next指向NULL找到尾结点,将尾结点指向新结点,完成尾插
//头插

void SLTPushFront(SLTNode** pphead, SLTDataType x)
{
	assert(pphead);

	SLTNode* newnode = BuySListNode(x);
	//方法一:
	newnode->next = *pphead;
	*pphead = newnode;
	//方法二:
	//SLTNode* OLdhead = *pphead;
	//*pphead = newnode;
	//newnode->next = OLdhead;


}
头插有两种方法:1.需要先将新结点指向头结点,接着将头指针指向新结点,如果先将头指针指向新结点的话,头结点的地址就会丢失 2.创建一个新结点保存旧的头结点
//头插尾插运行结果
void test1()
{
	SLTNode* plist = NULL;
	SLTPushBack(&plist, 1);
	SLTPushBack(&plist, 2);
	SLTPushBack(&plist, 3);
	SLTPushBack(&plist, 4);
	SLTPushBack(&plist, 5);
	SLTPrint(plist);
}

int main()
{
	test1();

	return 0;
}

5.头删尾删
void SLTPopFront(SLTNode** pphead)
{
	assert(pphead);

	// 空
	assert(*pphead);

	// 非空
	SLTNode* newhead = (*pphead)->next;
	free(*pphead);
	*pphead = newhead;
}
void SLTPopBack(SLTNode** pphead)
{
	assert(pphead);
	// 1、空
	assert(*pphead);

	// 2、一个节点
	// 3、一个以上节点
	if ((*pphead)->next == NULL)
	{
		free(*pphead);
		*pphead = NULL;
	}
	else
	{
		SLTNode* tail = *pphead;
		SLTNode* tailprev=NULL;
		while (tail->next)
		{	tailprev=tail;
			tail = tail->next;
		}

		free(tail);
		tailprev->next = NULL;
	}
}
void test1()
{
	SLTNode* plist = NULL;
	SLTPushBack(&plist, 1);
	SLTPushBack(&plist, 2);
	SLTPushBack(&plist, 3);
	SLTPushBack(&plist, 4);
	SLTPushBack(&plist, 5);
	SLTPrint(plist);
	//头删
	SLTPopFront(&plist, 1);
	SLTPopFront(&plist, 2);
	//尾删
	SLTPopBack(&plist, 4);
	SLTPopBack(&plist, 5);
	SLTPrint(plist);
}

int main()
{
	test1();

	return 0;
}

5.在pos位置之后插入(删除)
SLTNode* SLTFind(SLTNode* phead, SLTDataType x)
{
	SLTNode* cur = phead;
	while (cur)
	{
		if (cur->data == x)
		{
			return cur;
		}

		cur = cur->next;
	}

	return NULL;
}
在pos位置之后插入(删除)需要先定义一个SLTFind函数,通过遍历单链表找到了返回结构体指针,没找到返回空指针
// 在pos以后插入x
void SLTInsertAfter(SLTNode* pos, SLTDataType x)
{
	assert(pos);

	SLTNode* newnode = BuySListNode(x);
	SLTNode* node = pos->next;
	pos->next = newnode;
	newnode->next = node;
}
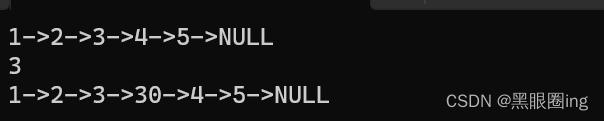
void test1()
{
	SLTNode* plist = NULL;
	SLTPushBack(&plist, 1);
	SLTPushBack(&plist, 2);
	SLTPushBack(&plist, 3);
	SLTPushBack(&plist, 4);
	SLTPushBack(&plist, 5);
	SLTPrint(plist);


	int x;
	scanf("%d", &x);
	SLTNode* pos = SLTFind(plist, x);
	if (pos)
	{
		SLTInsertAfter(pos, x * 10);
		pos=NULL;
	}
	SLTPrint(plist);
}

int main()
{
	test1();

	return 0;
}
// 删除pos的后一个位置
void SLTEraseAfter(SLTNode* pos)
{
	assert(pos);

	// 检查pos是否是尾节点
	assert(pos->next);

	SLTNode* posNext = pos->next;

	pos->next = posNext->next;

	free(posNext);
	posNext = NULL;
}
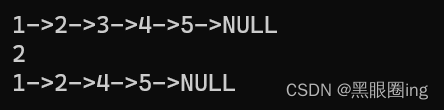
void test1()
{
	SLTNode* plist = NULL;
	SLTPushBack(&plist, 1);
	SLTPushBack(&plist, 2);
	SLTPushBack(&plist, 3);
	SLTPushBack(&plist, 4);
	SLTPushBack(&plist, 5);
	SLTPrint(plist);

	int x;
	scanf("%d", &x);
	SLTNode* pos = SLTFind(plist, x);
	if (pos)
	{

		SLTEraseAfter(pos);
		pos = NULL;
	}
	SLTPrint(plist);
}

int main()
{
	test1();

	return 0;
}
总结
以上便是数据结构之单链表,以上便是我对单链表的理解!!
欢迎各位大佬评论,如果有哪里有错误的地方,还请各位大佬指出,我会虚心接受的!!!
每天进步一点儿!!!
感谢大佬们的支持!!!感谢大佬们的支持!!!感谢大佬们的支持!!!


 2627
2627


 被折叠的 条评论
为什么被折叠?
被折叠的 条评论
为什么被折叠?
 到【灌水乐园】发言


