


redis 一主二从三哨兵
 Redis的主从模式
主从模式就是N个redis实例,可以是1主N从,也可以N主N从(N主N从则不是严格意义上的主从模式了,后续的集群模式会说到,N主N从就是N+N个redis实例。)主从模式的一个作用是备份数据,这样当一个节点损坏(指不可恢复的硬件损坏)时,数据因为有备份,可以方便恢复。另一个作用是负载均衡,所有客户端都访问一个节点肯定会影响Redis工作效率,有了主从以后,查询操作就可以通过查询从节点来完成。
既然主从复制,意味着master和slave的数据都是一样的,有数据冗余问题。在程序设计上,为了高可用性和高性能,是允许有冗余存在的。对于追求极致用户体验的产品,是绝对不允许有宕机存在的。
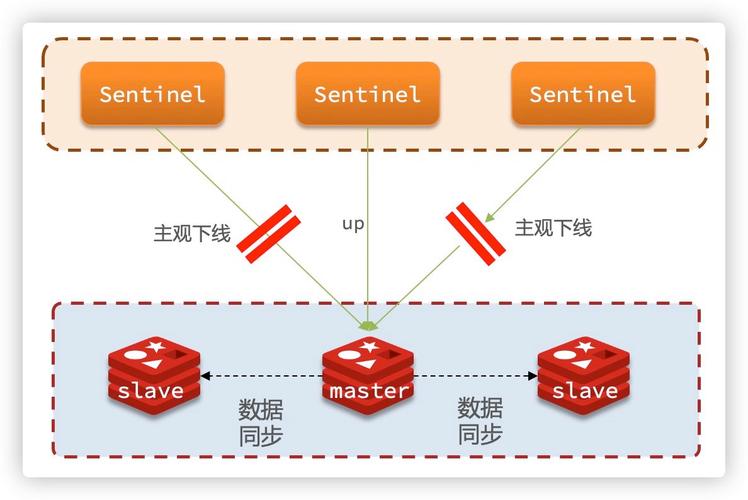
Redis哨兵模式
主从模式,当主节点宕机之后,从节点是可以作为主节点顶上来,继续提供服务的。但是有一个问题,主节点的IP已经变动了,此时应用服务还是拿着原主节点的地址去访问,此时就需要人工干预进行修改。哨兵恰恰就可以解决这个问题……
访问redis集群的数据都是通过哨兵集群的,哨兵监控整个redis集群。一旦发现redis集群出现了问题,比如主节点挂了,从节点会顶上来。但是主节点地址变了,这时候应用服务无感知,也不用更改访问地址,因为哨兵才是和应用服务做交互的。Sentinel 很好的解决了故障转移,在高可用方面又上升了一个台阶,当然Sentinel还有其他功能。比如 主节点存活检测、主从运行情况检测、主从切换。Redis的Sentinel最小配置是 一主一从。
设置主机名以及主机映射,关闭防火墙以及端口映射
| 主机设置 | 主机名 | IP |
| 第一台 | master | 192.168.1.100 |
| 第二台 | slave1 | 192.168.1.101 |
| 第三台 | slave2 | 192.168.1.102 |
1.修改主机名;
第一台:hostnamectl  set-hostname master

第二台:hostnamectl  set-hostname slave1

第三台:hostnamectl set-hostname slave22.设置主机映射,分别在三台主机;
[root@master ~]# vi /etc/hosts
127.0.0.1   localhost localhost.localdomain localhost4 localhost4.localdomain4
::1         localhost localhost.localdomain localhost6 localhost6.localdomain6
192.168.1.100 master
192.168.1.101 slave1
192.168.1.102 slave2

[root@slave1 ~]# vi /etc/hosts
127.0.0.1   localhost localhost.localdomain localhost4 localhost4.localdomain4
::1         localhost localhost.localdomain localhost6 localhost6.localdomain6
192.168.1.100 master
192.168.1.101 slave1
192.168.1.102 slave2

[root@slave2 ~]# vi /etc/hosts
127.0.0.1   localhost localhost.localdomain localhost4 localhost4.localdomain4
::1         localhost localhost.localdomain localhost6 localhost6.localdomain6
192.168.1.100 master
192.168.1.101 slave1
192.168.1.102 slave2
3.在三台主机上分别,临时关闭selinux安全机制,关闭防火墙;
临时关闭:setenforce 0
关闭防火墙:systemctl stop firewalld && systemctl disable firewalld
4.在三台主机上分别安装redis,采取网络源安装;
yum install -y epel-release #安装扩展包
yum install -y redis
5.修改redis配置文件参数;
#修改master

[root@master ~]# vi /etc/redis.conf

bind 0.0.0.0                       #修改监听网段

protected-mode no            #保护模式为no

requirepass 000000           #设置密码

masterauth 000000            #密码同步

[root@master ~]# systemctl restart redis            #重启redis


#修改slave1  slave2,redis.conf一样

bind 0.0.0.0                                #修改监听网段
protected-mode no                    #关闭保护模式
daemonize yes                          #开启守护进程
slaveof 192.168.1.100 6379     #配置主的ip和端口,master节点ip
requirepass  000000
masterauth  000000

[root@slave1 ~]# systemctl restart redis    #重启redis

[root@slave2 ~]# systemctl restart redis     #重启redis
6.验证主从
[root@master etc]# redis-cli
127.0.0.1:6379> auth 000000
OK
127.0.0.1:6379> info Replication
# Replication
role:master
connected_slaves:2
slave0:ip=192.168.1.101,port=6379,state=online,offset=113,lag=1
slave1:ip=192.168.1.102,port=6379,state=online,offset=113,lag=1
master_repl_offset:127
repl_backlog_active:1
repl_backlog_size:1048576
repl_backlog_first_byte_offset:2
repl_backlog_histlen:126
127.0.0.1:6379>
7.三哨兵配置
#修改redis-sentinel.conf 配置文件,在master,slave1,slave2节点 ,
vi /etc/redis-sentinel.conf

bind 0.0.0.0                                #修改监听网段
protected-mode no                    #关闭保护模式

#此处特别注意,这里的192.168.1.100是master地址,
#如果修改slave1的配置文件redis-sentinel.conf,请修改为192.168.1.101,
#slave2就是192.168.1.102

sentinel monitor mymaster 192.168.1.100 6379 2   #监控地址

sentinel auth-pass mymaster 000000                      #主数据库密码


#分别在 master,slave1,slave2节点,重启redis-sentinel

systemctl restart redis-sentinel
测试:
[root@master etc]# redis-cli -a  000000 -p 26379 info Sentinel
# Sentinel
sentinel_masters:1
sentinel_tilt:0
sentinel_running_scripts:0
sentinel_scripts_queue_length:0
sentinel_simulate_failure_flags:0
master0:name=mymaster,status=ok,address=192.168.1.100:6379,slaves=2,sentinels=3


 649
649


 被折叠的 条评论
为什么被折叠?
被折叠的 条评论
为什么被折叠?
 到【灌水乐园】发言


