


前言
随着近些年IT行业的发展,软件测试人才的需求越来越大,也有很多小伙伴在考虑入坑,而软件测试中,收入相对较高的就是自动化了,所以这次作者邀请了浩泰思特李老师为大家简单介绍下自动化测试的必备工具Selenium。
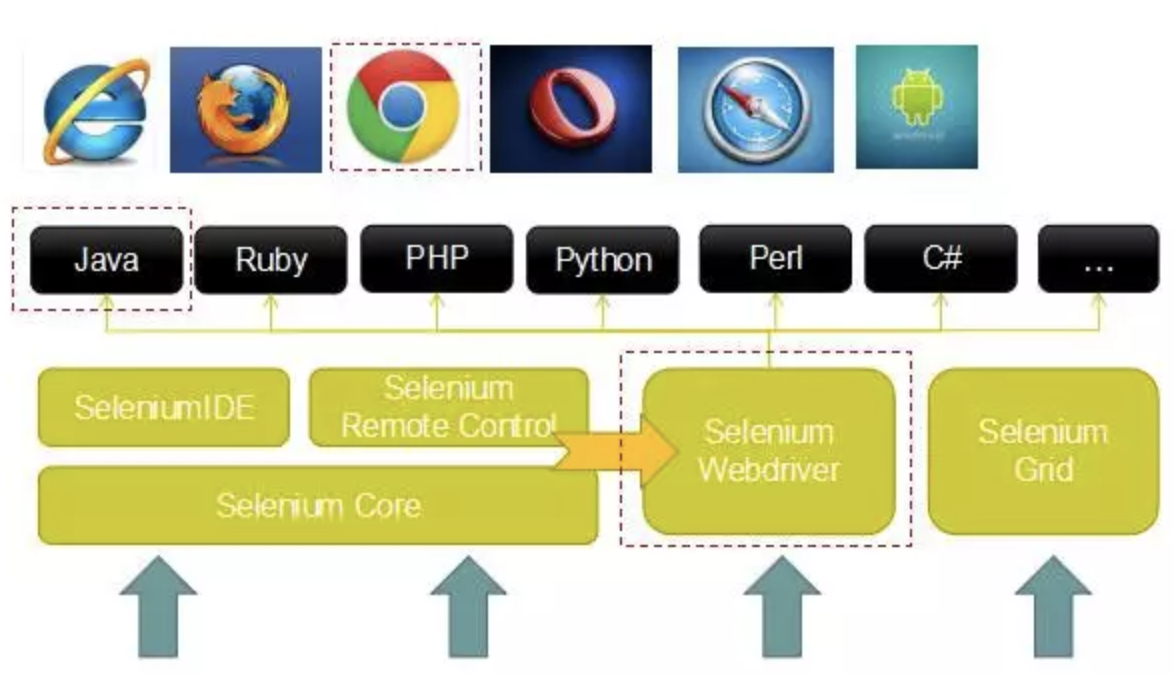
Selenium是一款基于Web应用程序的开源测试工具,直接运行在浏览器中,支持Firefox、IE、Chrome等浏览器。同时支持Java、Python等主流语言。
框架底层使用Java模拟真实用户对浏览器进行操作。测试脚本执行时,浏览器自动按照脚本代码做出点击,输入,打开,验证等操作,从终端用户的角度测试应用程序。并且Selenium测试直接在浏览器中运行,就像真实用户所做的一样。
一、selenium简介
Selenium是一个用于Web应用程序自动化测试工具。Selenium测试直接运行在浏览器中,就像真正的用户在操作一样。支持的浏览器包括IE(7, 8, 9, 10, 11),Mozilla Firefox,Safari,Google Chrome,Opera等。
主要功能包括:测试与浏览器的兼容性——测试你的应用程序看是否能够很好得工作在不同浏览器和操作系统之上。
测试系统功能——创建回归测试检验软件功能和用户需求。支持自动录制动作和自动生成 .Net、Java、Perl等不同语言的测试脚本(这里主要是针对selenium ide)
二、selenium历程
04年,诞生了Selenium Core,Selenium Core是基于浏览器并且采用JavaScript编程语言的测试工具,运行在浏览器的安全沙箱中,设计理念是将待测试产品、Selenium Core和测试脚本均部署到同一台服务器上来完成自动化测试的工作。
05年,Selenium RC诞生,就是selenium1 ,这个时候,Selenium Core其实是Selenium RC的核心。
Selenium RC让待测试产品、Selenium Core和测试脚本三者分散在不同的服务器上。(测试脚本只关心将HTTP请求发送到指定的URL上,selenium本身不需要关心HTTP请求由于什么程序编程语言编写而成)
Selenium RC包括两部分:一个是Selenium RC Server,一个是提供各种编程语言的客户端驱动来编写测试脚本
07年,Webdriver诞生,WebDriver的设计理念是将端到端测试与底层具体的测试工具分隔离,并采用设计模式Adapter适配器来达到目标。WebDriver的API组织更多的是面向对象。
08/09年,selenium2诞生,selenium2其实是selenium rc和webdriver的合并,合并的根本原因是相互补充各自的缺点
09年,selenium3诞生,这个版本剔除了selenium rc , 主要由 selenium webdriver和selenium Grid组成, 我们日常使用的其实就是selenium webdriver,至于selenium grid是一个分布式实现自动化测试的工具
那么今天我们就要说说selenium3(selenium webdriver)的工作原理,下面简称selenium(以上具体时间可能不太准确,我也是通过网络资料了解到的,抛砖引玉^-^)
三、selenium原理
我们使用Selenium实现自动化测试,主要需要3个东西
1.测试脚本,可以是python,java编写的脚本程序(也可以叫做client端)
2.浏览器驱动, 这个驱动是根据不同的浏览器开发的,不同的浏览器使用不同的webdriver驱动程序且需要对应相应的浏览器版本,比如:geckodriver.exe(chrome)
3.浏览器,目前selenium支持市面上大多数浏览器,如:火狐,谷歌,IE等
四、selenium脚本
先看一个简单的代码
"""

------------------------------------

@Time : 2019/6/29 8:16

@Auth : l

@File : seleniumWebdriver.py

@IDE : PyCharm

@Motto: Real warriors,dare to face the bleak warning,dare to face the incisive error!

@QQ : 28174043@qq.com

@GROUP: 878565760

------------------------------------

"""

from selenium import webdriver


dr = webdriver.Chrome() # 打开浏览器
执行上述代码,我们会发现程序打开了Chrome浏览器(前提:你已经正确配置了chrome的驱动和对应版本)
那么selenium是如何实现这个过程的呢?ok,我们今天就通过分析源码的方式来理解selenium的工作原理
五、源码分析
查看weddriver源码(按住Ctrl键,鼠标点击Chrome)
C:\Python36\Lib\site-packages\selenium\webdriver\chrome\webdriver.py
1 class WebDriver(RemoteWebDriver):

2 """

3 Controls the ChromeDriver and allows you to drive the browser.

4

5 You will need to download the ChromeDriver executable from

6 http://chromedriver.storage.googleapis.com/index.html

7 """

8

9 def __init__(self, executable_path="chromedriver", port=0,

10 options=None, service_args=None,

11 desired_capabilities=None, service_log_path=None,

12 chrome_options=None, keep_alive=True):

13 """

14 Creates a new instance of the chrome driver.

15

16 Starts the service and then creates new instance of chrome driver.

17

18 :Args:

19 - executable_path - path to the executable. If the default is used it assumes the executable is in the $PATH

20 - port - port you would like the service to run, if left as 0, a free port will be found.

21 - options - this takes an instance of ChromeOptions

22 - service_args - List of args to pass to the driver service

23 - desired_capabilities - Dictionary object with non-browser specific

24 capabilities only, such as "proxy" or "loggingPref".

25 - service_log_path - Where to log information from the driver.

26 - chrome_options - Deprecated argument for options

27 - keep_alive - Whether to configure ChromeRemoteConnection to use HTTP keep-alive.

28 """

29 if chrome_options:

30 warnings.warn('use options instead of chrome_options',

31 DeprecationWarning, stacklevel=2)

32 options = chrome_options

33

34 if options is None:

35 # desired_capabilities stays as passed in

36 if desired_capabilities is None:

37 desired_capabilities = self.create_options().to_capabilities()

38 else:

39 if desired_capabilities is None:

40 desired_capabilities = options.to_capabilities()

41 else:

42 desired_capabilities.update(options.to_capabilities())

43

44 self.service = Service(

45 executable_path,

46 port=port,

47 service_args=service_args,

48 log_path=service_log_path)

49 self.service.start()

50

51 try:

52 RemoteWebDriver.__init__(

53 self,

54 command_executor=ChromeRemoteConnection(

55 remote_server_addr=self.service.service_url,

56 keep_alive=keep_alive),

57 desired_capabilities=desired_capabilities)

58 except Exception:

59 self.quit()

60 raise

61 self._is_remote = False
通过源码中的44-49行发现,初始化了一个service对象,然后调用了start()方法,那么我们继续看下一49行的start()方法到底实现了什么功能?
C:\Python36\Lib\site-packages\selenium\webdriver\common\service.py
1 def start(self):

2 """

3 Starts the Service.

4

5 :Exceptions:

6 - WebDriverException : Raised either when it can't start the service

7 or when it can't connect to the service

8 """

9 try:

10 cmd = [self.path]

11 cmd.extend(self.command_line_args())

12 self.process = subprocess.Popen(cmd, env=self.env,

13 close_fds=platform.system() != 'Windows',

14 stdout=self.log_file,

15 stderr=self.log_file,

16 stdin=PIPE)

17 except TypeError:

18 raise

19 except OSError as err:

20 if err.errno == errno.ENOENT:

21 raise WebDriverException(

22 "'%s' executable needs to be in PATH. %s" % (

23 os.path.basename(self.path), self.start_error_message)

24 )

25 elif err.errno == errno.EACCES:

26 raise WebDriverException(

27 "'%s' executable may have wrong permissions. %s" % (

28 os.path.basename(self.path), self.start_error_message)

29 )

30 else:

31 raise

32 except Exception as e:

33 raise WebDriverException(

34 "The executable %s needs to be available in the path. %s\n%s" %

35 (os.path.basename(self.path), self.start_error_message, str(e)))

36 count = 0

37 while True:

38 self.assert_process_still_running()

39 if self.is_connectable():

40 break

41 count += 1

42 time.sleep(1)

43 if count == 30:

44 raise WebDriverException("Can not connect to the Service %s" % self.path)
我们发现9-16行其实就是执行了一个cmd命令,命令的作用就是启动了chromedriver.exeChrome浏览器的驱动程序
这里我们需要注意一点: 下载的浏览器驱动一定要配置到环境变量中,或者放到python的根目录下,便于程序在执行驱动的时候查找
这个过程和我们手动启动浏览器驱动是一样的效果,类似下面的结果

启动驱动程序后,绑定端口号9515,且只允许本地访问这个服务,其实我们可以查看一下我们本地电脑任务管理器,确实开启了一个服务进程程序

第一步工作我们已经知道了执行测试脚本webdriver.Chrome()会自动执行chromedriver.exe驱动程序,然后开启一个进程
六、如何打开浏览器
我们继续看源码 C:\Python36\Lib\site-packages\selenium\webdriver\chrome\webdriver.py 的51-57行代码,调用了父类RemoteWebDriver 的初始化方法,我们看这个方法做了什么事?
C:\Python36\Lib\site-packages\selenium\webdriver\remote\webdriver.py
1 class WebDriver(object):

2 """

3 Controls a browser by sending commands to a remote server.

4 This server is expected to be running the WebDriver wire protocol

5 as defined at

6 https://github.com/SeleniumHQ/selenium/wiki/JsonWireProtocol

7

8 :Attributes:

9 - session_id - String ID of the browser session started and controlled by this WebDriver.

10 - capabilities - Dictionaty of effective capabilities of this browser session as returned

11 by the remote server. See https://github.com/SeleniumHQ/selenium/wiki/DesiredCapabilities

12 - command_executor - remote_connection.RemoteConnection object used to execute commands.

13 - error_handler - errorhandler.ErrorHandler object used to handle errors.

14 """

15

16 _web_element_cls = WebElement

17

18 def __init__(self, command_executor='http://127.0.0.1:4444/wd/hub',

19 desired_capabilities=None, browser_profile=None, proxy=None,

20 keep_alive=False, file_detector=None, options=None):

21 """

22 Create a new driver that will issue commands using the wire protocol.

23

24 :Args:

25 - command_executor - Either a string representing URL of the remote server or a custom

26 remote_connection.RemoteConnection object. Defaults to 'http://127.0.0.1:4444/wd/hub'.

27 - desired_capabilities - A dictionary of capabilities to request when

28 starting the browser session. Required parameter.

29 - browser_profile - A selenium.webdriver.firefox.firefox_profile.FirefoxProfile object.

30 Only used if Firefox is requested. Optional.

31 - proxy - A selenium.webdriver.common.proxy.Proxy object. The browser session will

32 be started with given proxy settings, if possible. Optional.

33 - keep_alive - Whether to configure remote_connection.RemoteConnection to use

34 HTTP keep-alive. Defaults to False.

35 - file_detector - Pass custom file detector object during instantiation. If None,

36 then default LocalFileDetector() will be used.

37 - options - instance of a driver options.Options class

38 """

39 capabilities = {}

40 if options is not None:

41 capabilities = options.to_capabilities()

42 if desired_capabilities is not None:

43 if not isinstance(desired_capabilities, dict):

44 raise WebDriverException("Desired Capabilities must be a dictionary")

45 else:

46 capabilities.update(desired_capabilities)

47 if proxy is not None:

48 warnings.warn("Please use FirefoxOptions to set proxy",

49 DeprecationWarning, stacklevel=2)

50 proxy.add_to_capabilities(capabilities)

51 self.command_executor = command_executor

52 if type(self.command_executor) is bytes or isinstance(self.command_executor, str):

53 self.command_executor = RemoteConnection(command_executor, keep_alive=keep_alive)

54 self._is_remote = True

55 self.session_id = None

56 self.capabilities = {}

57 self.error_handler = ErrorHandler()

58 self.start_client()

59 if browser_profile is not None:

60 warnings.warn("Please use FirefoxOptions to set browser profile",

61 DeprecationWarning, stacklevel=2)

62 self.start_session(capabilities, browser_profile)

63 self._switch_to = SwitchTo(self)

64 self._mobile = Mobile(self)

65 self.file_detector = file_detector or LocalFileDetector()
这里有一行最重要的代码,62行self.start_session(capabilities, browser_profile) 这个方法,继续看一下这个方法的源码做了什么工作
1 def start_session(self, capabilities, browser_profile=None):

2 """

3 Creates a new session with the desired capabilities.

4

5 :Args:

6 - browser_name - The name of the browser to request.

7 - version - Which browser version to request.

8 - platform - Which platform to request the browser on.

9 - javascript_enabled - Whether the new session should support JavaScript.

10 - browser_profile - A selenium.webdriver.firefox.firefox_profile.FirefoxProfile object. Only used if Firefox is requested.

11 """

12 if not isinstance(capabilities, dict):

13 raise InvalidArgumentException("Capabilities must be a dictionary")

14 if browser_profile:

15 if "moz:firefoxOptions" in capabilities:

16 capabilities["moz:firefoxOptions"]["profile"] = browser_profile.encoded

17 else:

18 capabilities.update({'firefox_profile': browser_profile.encoded})

19 w3c_caps = _make_w3c_caps(capabilities)

20 parameters = {"capabilities": w3c_caps,

21 "desiredCapabilities": capabilities}

22 response = self.execute(Command.NEW_SESSION, parameters)

23 if 'sessionId' not in response:

24 response = response['value']

25 self.session_id = response['sessionId']

26 self.capabilities = response.get('value')

27

28 # if capabilities is none we are probably speaking to

29 # a W3C endpoint

30 if self.capabilities is None:

31 self.capabilities = response.get('capabilities')

32

33 # Double check to see if we have a W3C Compliant browser

34 self.w3c = response.get('status') is None

35 self.command_executor.w3c = self.w3c
分析这部分源码可以发现22行是向地址localhost:9515/session发送了一个post请求,参数是json格式的,然后返回特定的响应信息给程序(这里主要就是新建了一个sessionid),最终打开了浏览器
ok,打开浏览器的操作完成了
七、如何执行对应操作
查看C:\Python36\Lib\site-packages\selenium\webdriver\chrome\webdriver.py源码(第一个源码中的51-57行)
51 try:

52 RemoteWebDriver.__init__(

53 self,

54 command_executor=ChromeRemoteConnection(

55 remote_server_addr=self.service.service_url,

56 keep_alive=keep_alive),

57 desired_capabilities=desired_capabilities)
点击ChromeRemoteConnection查看一下源码
1 from selenium.webdriver.remote.remote_connection import RemoteConnection

2

3

4 class ChromeRemoteConnection(RemoteConnection):

5

6 def __init__(self, remote_server_addr, keep_alive=True):

7 RemoteConnection.__init__(self, remote_server_addr, keep_alive)

8 self._commands["launchApp"] = ('POST', '/session/$sessionId/chromium/launch_app')

9 self._commands["setNetworkConditions"] = ('POST', '/session/$sessionId/chromium/network_conditions')

10 self._commands["getNetworkConditions"] = ('GET', '/session/$sessionId/chromium/network_conditions')

11 self._commands['executeCdpCommand'] = ('POST', '/session/$sessionId/goog/cdp/execute')
第7行访问的是localhost:9515/session地址,第8-11行,定义了一些和我们使用的浏览器(chrome)特有的接口地址,我们再看一下父类RemoteConnection里面源码
C:\Python36\Lib\site-packages\selenium\webdriver\remote\remote_connection.py:RemoteConnection
1 self._commands = {

2 Command.STATUS: ('GET', '/status'),

3 Command.NEW_SESSION: ('POST', '/session'),

4 Command.GET_ALL_SESSIONS: ('GET', '/sessions'),

5 Command.QUIT: ('DELETE', '/session/$sessionId'),

6 Command.GET_CURRENT_WINDOW_HANDLE:

7 ('GET', '/session/$sessionId/window_handle'),

8 Command.W3C_GET_CURRENT_WINDOW_HANDLE:

9 ('GET', '/session/$sessionId/window'),

10 Command.GET_WINDOW_HANDLES:

11 ('GET', '/session/$sessionId/window_handles'),

12 Command.W3C_GET_WINDOW_HANDLES:

13 ('GET', '/session/$sessionId/window/handles'),

14 Command.GET: ('POST', '/session/$sessionId/url'),

15 Command.GO_FORWARD: ('POST', '/session/$sessionId/forward'),

16 Command.GO_BACK: ('POST', '/session/$sessionId/back'),

17 Command.REFRESH: ('POST', '/session/$sessionId/refresh'),

18 Command.EXECUTE_SCRIPT: ('POST', '/session/$sessionId/execute'),

19 Command.W3C_EXECUTE_SCRIPT:

20 ('POST', '/session/$sessionId/execute/sync'),

21 Command.W3C_EXECUTE_SCRIPT_ASYNC:

22 ('POST', '/session/$sessionId/execute/async'),

23 Command.GET_CURRENT_URL: ('GET', '/session/$sessionId/url'),

24 Command.GET_TITLE: ('GET', '/session/$sessionId/title'),

25 Command.GET_PAGE_SOURCE: ('GET', '/session/$sessionId/source'),

26 Command.SCREENSHOT: ('GET', '/session/$sessionId/screenshot'),

27 Command.ELEMENT_SCREENSHOT: ('GET', '/session/$sessionId/element/$id/screenshot'),

28 Command.FIND_ELEMENT: ('POST', '/session/$sessionId/element'),

29 Command.FIND_ELEMENTS: ('POST', '/session/$sessionId/elements'),

30 Command.W3C_GET_ACTIVE_ELEMENT: ('GET', '/session/$sessionId/element/active'),

31 Command.GET_ACTIVE_ELEMENT:

32 ('POST', '/session/$sessionId/element/active'),

33 Command.FIND_CHILD_ELEMENT:

34 ('POST', '/session/$sessionId/element/$id/element'),

35 Command.FIND_CHILD_ELEMENTS:

36 ('POST', '/session/$sessionId/element/$id/elements'),

37 Command.CLICK_ELEMENT: ('POST', '/session/$sessionId/element/$id/click'),

38 Command.CLEAR_ELEMENT: ('POST', '/session/$sessionId/element/$id/clear'),

39 Command.SUBMIT_ELEMENT: ('POST', '/session/$sessionId/element/$id/submit'),

40 Command.GET_ELEMENT_TEXT: ('GET', '/session/$sessionId/element/$id/text'),

41 Command.SEND_KEYS_TO_ELEMENT:

42 ('POST', '/session/$sessionId/element/$id/value'),

43 Command.SEND_KEYS_TO_ACTIVE_ELEMENT:

44 ('POST', '/session/$sessionId/keys'),

45 Command.UPLOAD_FILE: ('POST', "/session/$sessionId/file"),

46 Command.GET_ELEMENT_VALUE:

47 ('GET', '/session/$sessionId/element/$id/value'),

48 Command.GET_ELEMENT_TAG_NAME:

49 ('GET', '/session/$sessionId/element/$id/name'),

50 Command.IS_ELEMENT_SELECTED:

51 ('GET', '/session/$sessionId/element/$id/selected'),

52 Command.SET_ELEMENT_SELECTED:

53 ('POST', '/session/$sessionId/element/$id/selected'),

54 Command.IS_ELEMENT_ENABLED:

55 ('GET', '/session/$sessionId/element/$id/enabled'),

56 Command.IS_ELEMENT_DISPLAYED:

57 ('GET', '/session/$sessionId/element/$id/displayed'),

58 Command.GET_ELEMENT_LOCATION:

59 ('GET', '/session/$sessionId/element/$id/location'),

60 Command.GET_ELEMENT_LOCATION_ONCE_SCROLLED_INTO_VIEW:

61 ('GET', '/session/$sessionId/element/$id/location_in_view'),

62 Command.GET_ELEMENT_SIZE:

63 ('GET', '/session/$sessionId/element/$id/size'),

64 Command.GET_ELEMENT_RECT:

65 ('GET', '/session/$sessionId/element/$id/rect'),

66 Command.GET_ELEMENT_ATTRIBUTE:

67 ('GET', '/session/$sessionId/element/$id/attribute/$name'),

68 Command.GET_ELEMENT_PROPERTY:

69 ('GET', '/session/$sessionId/element/$id/property/$name'),

70 Command.GET_ALL_COOKIES: ('GET', '/session/$sessionId/cookie'),

71 Command.ADD_COOKIE: ('POST', '/session/$sessionId/cookie'),

72 Command.GET_COOKIE: ('GET', '/session/$sessionId/cookie/$name'),

73 Command.DELETE_ALL_COOKIES:

74 ('DELETE', '/session/$sessionId/cookie'),

75 Command.DELETE_COOKIE:

76 ('DELETE', '/session/$sessionId/cookie/$name'),

77 Command.SWITCH_TO_FRAME: ('POST', '/session/$sessionId/frame'),

78 Command.SWITCH_TO_PARENT_FRAME: ('POST', '/session/$sessionId/frame/parent'),

79 Command.SWITCH_TO_WINDOW: ('POST', '/session/$sessionId/window'),

80 Command.CLOSE: ('DELETE', '/session/$sessionId/window'),

81 Command.GET_ELEMENT_VALUE_OF_CSS_PROPERTY:

82 ('GET', '/session/$sessionId/element/$id/css/$propertyName'),

83 Command.IMPLICIT_WAIT:

84 ('POST', '/session/$sessionId/timeouts/implicit_wait'),

85 Command.EXECUTE_ASYNC_SCRIPT: ('POST', '/session/$sessionId/execute_async'),

86 Command.SET_SCRIPT_TIMEOUT:

87 ('POST', '/session/$sessionId/timeouts/async_script'),

88 Command.SET_TIMEOUTS:

89 ('POST', '/session/$sessionId/timeouts'),

90 Command.DISMISS_ALERT:

91 ('POST', '/session/$sessionId/dismiss_alert'),

92 Command.W3C_DISMISS_ALERT:

93 ('POST', '/session/$sessionId/alert/dismiss'),

94 Command.ACCEPT_ALERT:

95 ('POST', '/session/$sessionId/accept_alert'),

96 Command.W3C_ACCEPT_ALERT:

97 ('POST', '/session/$sessionId/alert/accept'),

98 Command.SET_ALERT_VALUE:

99 ('POST', '/session/$sessionId/alert_text'),

100 Command.W3C_SET_ALERT_VALUE:

101 ('POST', '/session/$sessionId/alert/text'),

102 Command.GET_ALERT_TEXT:

103 ('GET', '/session/$sessionId/alert_text'),

104 Command.W3C_GET_ALERT_TEXT:

105 ('GET', '/session/$sessionId/alert/text'),

106 Command.SET_ALERT_CREDENTIALS:

107 ('POST', '/session/$sessionId/alert/credentials'),

108 Command.CLICK:

109 ('POST', '/session/$sessionId/click'),

110 Command.W3C_ACTIONS:

111 ('POST', '/session/$sessionId/actions'),

112 Command.W3C_CLEAR_ACTIONS:

113 ('DELETE', '/session/$sessionId/actions'),

114 Command.DOUBLE_CLICK:

115 ('POST', '/session/$sessionId/doubleclick'),

116 Command.MOUSE_DOWN:

117 ('POST', '/session/$sessionId/buttondown'),

118 Command.MOUSE_UP:

119 ('POST', '/session/$sessionId/buttonup'),

120 Command.MOVE_TO:

121 ('POST', '/session/$sessionId/moveto'),

122 Command.GET_WINDOW_SIZE:

123 ('GET', '/session/$sessionId/window/$windowHandle/size'),

124 Command.SET_WINDOW_SIZE:

125 ('POST', '/session/$sessionId/window/$windowHandle/size'),

126 Command.GET_WINDOW_POSITION:

127 ('GET', '/session/$sessionId/window/$windowHandle/position'),

128 Command.SET_WINDOW_POSITION:

129 ('POST', '/session/$sessionId/window/$windowHandle/position'),

130 Command.SET_WINDOW_RECT:

131 ('POST', '/session/$sessionId/window/rect'),

132 Command.GET_WINDOW_RECT:

133 ('GET', '/session/$sessionId/window/rect'),

134 Command.MAXIMIZE_WINDOW:

135 ('POST', '/session/$sessionId/window/$windowHandle/maximize'),

136 Command.W3C_MAXIMIZE_WINDOW:

137 ('POST', '/session/$sessionId/window/maximize'),

138 Command.SET_SCREEN_ORIENTATION:

139 ('POST', '/session/$sessionId/orientation'),

140 Command.GET_SCREEN_ORIENTATION:

141 ('GET', '/session/$sessionId/orientation'),

142 Command.SINGLE_TAP:

143 ('POST', '/session/$sessionId/touch/click'),

144 Command.TOUCH_DOWN:

145 ('POST', '/session/$sessionId/touch/down'),

146 Command.TOUCH_UP:

147 ('POST', '/session/$sessionId/touch/up'),

148 Command.TOUCH_MOVE:

149 ('POST', '/session/$sessionId/touch/move'),

150 Command.TOUCH_SCROLL:

151 ('POST', '/session/$sessionId/touch/scroll'),

152 Command.DOUBLE_TAP:

153 ('POST', '/session/$sessionId/touch/doubleclick'),

154 Command.LONG_PRESS:

155 ('POST', '/session/$sessionId/touch/longclick'),

156 Command.FLICK:

157 ('POST', '/session/$sessionId/touch/flick'),

158 Command.EXECUTE_SQL:

159 ('POST', '/session/$sessionId/execute_sql'),

160 Command.GET_LOCATION:

161 ('GET', '/session/$sessionId/location'),

162 Command.SET_LOCATION:

163 ('POST', '/session/$sessionId/location'),

164 Command.GET_APP_CACHE:

165 ('GET', '/session/$sessionId/application_cache'),

166 Command.GET_APP_CACHE_STATUS:

167 ('GET', '/session/$sessionId/application_cache/status'),

168 Command.CLEAR_APP_CACHE:

169 ('DELETE', '/session/$sessionId/application_cache/clear'),

170 Command.GET_NETWORK_CONNECTION:

171 ('GET', '/session/$sessionId/network_connection'),

172 Command.SET_NETWORK_CONNECTION:

173 ('POST', '/session/$sessionId/network_connection'),

174 Command.GET_LOCAL_STORAGE_ITEM:

175 ('GET', '/session/$sessionId/local_storage/key/$key'),

176 Command.REMOVE_LOCAL_STORAGE_ITEM:

177 ('DELETE', '/session/$sessionId/local_storage/key/$key'),

178 Command.GET_LOCAL_STORAGE_KEYS:

179 ('GET', '/session/$sessionId/local_storage'),

180 Command.SET_LOCAL_STORAGE_ITEM:

181 ('POST', '/session/$sessionId/local_storage'),

182 Command.CLEAR_LOCAL_STORAGE:

183 ('DELETE', '/session/$sessionId/local_storage'),

184 Command.GET_LOCAL_STORAGE_SIZE:

185 ('GET', '/session/$sessionId/local_storage/size'),

186 Command.GET_SESSION_STORAGE_ITEM:

187 ('GET', '/session/$sessionId/session_storage/key/$key'),

188 Command.REMOVE_SESSION_STORAGE_ITEM:

189 ('DELETE', '/session/$sessionId/session_storage/key/$key'),

190 Command.GET_SESSION_STORAGE_KEYS:

191 ('GET', '/session/$sessionId/session_storage'),

192 Command.SET_SESSION_STORAGE_ITEM:

193 ('POST', '/session/$sessionId/session_storage'),

194 Command.CLEAR_SESSION_STORAGE:

195 ('DELETE', '/session/$sessionId/session_storage'),

196 Command.GET_SESSION_STORAGE_SIZE:

197 ('GET', '/session/$sessionId/session_storage/size'),

198 Command.GET_LOG:

199 ('POST', '/session/$sessionId/log'),

200 Command.GET_AVAILABLE_LOG_TYPES:

201 ('GET', '/session/$sessionId/log/types'),

202 Command.CURRENT_CONTEXT_HANDLE:

203 ('GET', '/session/$sessionId/context'),

204 Command.CONTEXT_HANDLES:

205 ('GET', '/session/$sessionId/contexts'),

206 Command.SWITCH_TO_CONTEXT:

207 ('POST', '/session/$sessionId/context'),

208 Command.FULLSCREEN_WINDOW:

209 ('POST', '/session/$sessionId/window/fullscreen'),

210 Command.MINIMIZE_WINDOW:

211 ('POST', '/session/$sessionId/window/minimize')

212 }
这个类里面定义了所有的selenium操作需要的接口地址(这些接口地址全部封装在浏览器驱动程序中),那么所有的浏览器操作就是通过访问这些接口来实现的
其中 Command.GET: ('POST', '/session/$sessionId/url') 这个地址就是实现访问一个网址的url ,我们先记录一下后面有用
ok,所有的操作对应接口地址我们知道了,那么又怎样执行这些接口来达到在浏览器上实现各种操作呢?继续看紧接着接口地址定义下面的源码
1 def execute(self, command, params):

2 """

3 Send a command to the remote server.

4

5 Any path subtitutions required for the URL mapped to the command should be

6 included in the command parameters.

7

8 :Args:

9 - command - A string specifying the command to execute.

10 - params - A dictionary of named parameters to send with the command as

11 its JSON payload.

12 """

13 command_info = self._commands[command]

14 assert command_info is not None, 'Unrecognised command %s' % command

15 path = string.Template(command_info[1]).substitute(params)

16 if hasattr(self, 'w3c') and self.w3c and isinstance(params, dict) and 'sessionId' in params:

17 del params['sessionId']

18 data = utils.dump_json(params)

19 url = '%s%s' % (self._url, path)

20 return self._request(command_info[0], url, body=data)

21

22 def _request(self, method, url, body=None):

23 """

24 Send an HTTP request to the remote server.

25

26 :Args:

27 - method - A string for the HTTP method to send the request with.

28 - url - A string for the URL to send the request to.

29 - body - A string for request body. Ignored unless method is POST or PUT.

30

31 :Returns:

32 A dictionary with the server's parsed JSON response.

33 """

34 LOGGER.debug('%s %s %s' % (method, url, body))

35

36 parsed_url = parse.urlparse(url)

37 headers = self.get_remote_connection_headers(parsed_url, self.keep_alive)

38 resp = None

39 if body and method != 'POST' and method != 'PUT':

40 body = None

41

42 if self.keep_alive:

43 resp = self._conn.request(method, url, body=body, headers=headers)

44

45 statuscode = resp.status

46 else:

47 http = urllib3.PoolManager(timeout=self._timeout)

48 resp = http.request(method, url, body=body, headers=headers)

49

50 statuscode = resp.status

51 if not hasattr(resp, 'getheader'):

52 if hasattr(resp.headers, 'getheader'):

53 resp.getheader = lambda x: resp.headers.getheader(x)

54 elif hasattr(resp.headers, 'get'):

55 resp.getheader = lambda x: resp.headers.get(x)

56

57 data = resp.data.decode('UTF-8')

58 try:

59 if 300 <= statuscode < 304:

60 return self._request('GET', resp.getheader('location'))

61 if 399 < statuscode <= 500:

62 return {'status': statuscode, 'value': data}

63 content_type = []

64 if resp.getheader('Content-Type') is not None:

65 content_type = resp.getheader('Content-Type').split(';')

66 if not any([x.startswith('image/png') for x in content_type]):

67

68 try:

69 data = utils.load_json(data.strip())

70 except ValueError:

71 if 199 < statuscode < 300:

72 status = ErrorCode.SUCCESS

73 else:

74 status = ErrorCode.UNKNOWN_ERROR

75 return {'status': status, 'value': data.strip()}

76

77 # Some of the drivers incorrectly return a response

78 # with no 'value' field when they should return null.

79 if 'value' not in data:

80 data['value'] = None

81 return data

82 else:

83 data = {'status': 0, 'value': data}

84 return data

85 finally:

86 LOGGER.debug("Finished Request")

87 resp.close()
可以看到主要是通过execute方法调用_request方法通过urilib3标准库向服务器发送对应操作请求地址,进而实现了浏览器各种操作
有人会问打开浏览器和操作浏览器实现各种动作是怎么关联的呢?
其实,打开浏览器也是发送请求,请求会返回一个sessionid,后面操作的各种接口地址,你也会发现接口地址中存在一个变量$sessionid,那么不难猜测打开浏览器和操作浏览器就是用过sessionid关联到一起,达到在同一个浏览器中做操作
第二步在浏览其上实现各种操作原理也完成了
八、模拟selenium
现在我们可以通过下面的一段代码查看一下打开浏览器和访问我的博客首页的请求参数是什么样子的
"""

------------------------------------

@Time : 2019/6/29 9:16

@Auth : l

@File : seleniumWebdriver.py

@IDE : PyCharm

@Motto: Real warriors,dare to face the bleak warning,dare to face the incisive error!

@QQ : 28174043@qq.com

@GROUP: 878565760

------------------------------------

"""

from selenium import webdriver

import logging


logging.basicConfig(level=logging.DEBUG) # 打印源码中的日志

dr = webdriver.Chrome() # 打开浏览器

driver.get("https://www.cnblogs.com/linuxchao/") # 访问我的博客首页
输出日志信息
DEBUG:selenium.webdriver.remote.remote_connection:POST http://127.0.0.1:55695/session

{"capabilities": {"firstMatch": [{}], "alwaysMatch": {"browserName": "chrome", "platformName": "any", "goog:chromeOptions":

{"extensions": [], "args": []}}}, "desiredCapabilities": {"browserName": "chrome", "version": "", "platform": "ANY",

"goog:chromeOptions": {"extensions": [], "args": []}}}

DEBUG:urllib3.connectionpool:Starting new HTTP connection (1): 127.0.0.1

DEBUG:urllib3.connectionpool:http://127.0.0.1:55695 "POST /session HTTP/1.1" 200 830

DEBUG:selenium.webdriver.remote.remote_connection:Finished Request

DEBUG:selenium.webdriver.remote.remote_connection:POST http://127.0.0.1:51006/session/09d52393b7dfcb45b8bb9101885ce206/url

{"url": "https://www.cnblogs.com/linuxchao/", "sessionId": "09d52393b7dfcb45b8bb9101885ce206"}

DEBUG:urllib3.connectionpool:http://127.0.0.1:51006 "POST /session/09d52393b7dfcb45b8bb9101885ce206/url HTTP/1.1" 200 72

DEBUG:selenium.webdriver.remote.remote_connection:Finished Request

Process finished with exit code 0
通过执行结果就很明显明白selenium执行的过程了,程序告诉RemoteWebDriver打开一个浏览器(发送post请求,带上请求参数),然后再向remote server发送执行浏览器动作的请求
那么为了更加深入理解selenium实现自动化测试的过程,我们可以自己编写程序模拟一下打开浏览器然后控制浏览器访问我的博客地址的操作过程
首先我们需要保持浏览器的驱动程序打开状态,然后编写如下代码并执行
"""

------------------------------------

@Time : 2019/6/28 8:52

@Auth : linux超

@File : test.py

@IDE : PyCharm

@Motto: Real warriors,dare to face the bleak warning,dare to face the incisive error!

@QQ : 28174043@qq.com

@GROUP: 878565760

------------------------------------

"""

import requests


# 请求地址(打开浏览器)

driver_url = 'http://localhost:9515/session'

# 打开浏览器的请求参数

driver_value = {"capabilities":

{"firstMatch": [{}],

"alwaysMatch":

{"browserName":

"chrome",

"platformName": "any",

"goog:chromeOptions":

{"extensions": [], "args": []}}},

"desiredCapabilities":

{"browserName":

"chrome",

"version": "",

"platform": "ANY",

"goog:chromeOptions": {"extensions": [],

"args": []}}}

# 发送求清

response_session = requests.post(driver_url, json = driver_value)

print(response_session.json())

# 访问我的博客的请求地址 (这个地址是我们上面记录的地址)

url = 'http://localhost:9515/session/'+response_session.json()['sessionId']+'/url'

# 访问我的博客的请求参数

value = {"url": "https://www.cnblogs.com/linuxchao/", "sessionId": response_session.json()['sessionId']}

response_blog = requests.post(url = url,json = value)

print(response_blog.json())
执行结果
{'sessionId': '25144efef880dcce53e4e6f60c342e9d', 'status': 0, 'value':

{'acceptInsecureCerts': False, 'acceptSslCerts': False, 'applicationCacheEnabled': False,

'browserConnectionEnabled': False, 'browserName': 'chrome', 'chrome':

{'chromedriverVersion': '2.39.562718 (9a2698cba08cf5a471a29d30c8b3e12becabb0e9)',

'userDataDir': 'C:\\Users\\v-xug\\AppData\\Local\\Temp\\scoped_dir9944_25238'},

'cssSelectorsEnabled': True, 'databaseEnabled': False, 'handlesAlerts': True,

'hasTouchScreen': False, 'javascriptEnabled': True, 'locationContextEnabled': True,

'mobileEmulationEnabled': False, 'nativeEvents': True, 'networkConnectionEnabled': False,

'pageLoadStrategy': 'normal', 'platform': 'Windows NT', 'rotatable': False, 'setWindowRect': True,

'takesHeapSnapshot': True, 'takesScreenshot': True, 'unexpectedAlertBehaviour': '', 'version': '75.0.3770.100', 'webStorageEnabled': True}}

{'sessionId': '25144efef880dcce53e4e6f60c342e9d', 'status': 0, 'value': None}


Process finished with exit code 0
上面的返回信息中最重要的信息是'sessionId': '25144efef880dcce53e4e6f60c342e9d',从代码中你也可以看到访问我的博客地址的url是使用这个参数拼接的,因为打开浏览器后,后面所有的操作都是基于这个sessionid的
你还会看到Chrome浏览器被打开,且打开了我的博客地址https://www.cnblogs.com/linuxchao/,这就是selenium原理的一个过程了
九、最后
前面的代码你看不懂,也没关系,我们再来叙述一下selenium工作的过程
1.selenium client(python等语言编写的自动化测试脚本)初始化一个service服务,通过Webdriver启动浏览器驱动程序chromedriver.exe
2.通过RemoteWebDriver向浏览器驱动程序发送HTTP请求,浏览器驱动程序解析请求,打开浏览器,并获得sessionid,如果再次对浏览器操作需携带此id
3.打开浏览器,绑定特定的端口,把启动后的浏览器作为webdriver的remote server
3.打开浏览器后,所有的selenium的操作(访问地址,查找元素等)均通过RemoteConnection链接到remote server,然后使用execute方法调用_request方法通过urlib3向remote server发送请求
4.浏览器通过请求的内容执行对应动作
5.浏览器再把执行的动作结果通过浏览器驱动程序返回给测试脚本
行动吧,在路上总比一直观望的要好,未来的你肯定会感 谢现在拼搏的自己!如果想学习提升找不到资料,没人答疑解惑时,请及时加入扣群:![]() ,里面有各种软件测试+开发资料和技术可以一起交流学习哦。
,里面有各种软件测试+开发资料和技术可以一起交流学习哦。
最后感谢每一个认真阅读我文章的人,礼尚往来总是要有的,虽然不是什么很值钱的东西,如果你用得到的话可以直接拿走:
这些资料,对于【软件测试】的朋友来说应该是最全面最完整的备战仓库,这个仓库也陪伴上万个测试工程师们走过最艰难的路程,希望也能帮助到你!


 13万+
13万+

 被折叠的 条评论
为什么被折叠?
被折叠的 条评论
为什么被折叠?
 到【灌水乐园】发言


