


 本文详细描述了一个Java程序中的障碍物类、BackGround类和敌对角色类的实现,包括构造方法、绘制、重置、移动逻辑以及与键盘事件的交互。通过实例展示了如何在游戏场景中创建并管理动态元素。
//构造方法
public Obstruction(int x,int y,int type,BackGround bg){
this.x = x;
this.y = y;
this.type = type;
this.starttype = type;
this.bg = bg;
setImage();
if(this.type == 11){
t.start();
}
}
//绘制
public void draw(Graphics g) {
g.drawImage(showImage,x,y,null);
}
//重置方法
public void reset(){
this.type = starttype;
this.setImage();
}
//根据状态改变显示图片
public void setImage(){
showImage = StaticValue.allObstructionImage.get(type);
}
public BufferedImage getShowImage() {
return showImage;
}
public int getX() {
return x;
}
public int getY() {
return y;
}
public int getType() {
return type;
}
public void setType(int type) {
this.type = type;
}
public void run() {
while(true){
if(this.bg.isOver()){
if(this.y < 420){
this.y += 5;
}else{
this.bg.setDown(true);
}
}
try {
Thread.sleep(50);
} catch (InterruptedException e) {
// TODO Auto-generated catch block
e.printStackTrace();
}
}
}
}
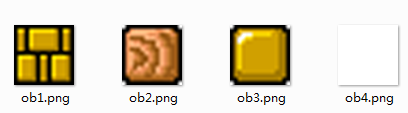
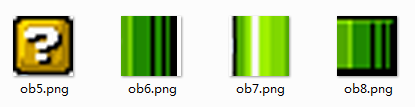
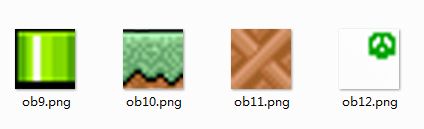
障碍物介绍
总共有12种障碍物,图片如下:
修改BackGround类
加入绘制障碍物的方法,比如第一个场景的 buildBackGround1()
注意点:
比如:this.allObstruction.add(new Obstruction(i * 60, 540, 9, this));
这里传入的是9,但其实取得是第10个障碍物
因为我们在StaticValue存障碍物的集合allObstructionImage,集合是从0开始的,所以这里传入9等于取到的是第10个障碍物,其他的一样的意思。
package main;
import java.awt.Graphics;
import java.awt.image.BufferedImage;
import java.util.ArrayList;
import java.util.List;
public class BackGround {
//当前场景图片
private BufferedImage bgImage = null;
//场景顺序
private int sort;
//是否为最后的场景
private boolean flag;
//游戏结束标记
private boolean isOver = false;
//定义降旗结束
private boolean isDown = false;
//用集合保存障碍物
private List allObstruction = new ArrayList();
//被消灭的障碍物
private List removeObstruction = new ArrayList();
//构造方法
public BackGround(int sort,boolean flag) {
this.sort = sort;
this.flag = flag;
if (flag) {//最后一个场景
bgImage = StaticValue.endImage;
} else {//1-6场景
bgImage = StaticValue.bgImage;
}
//根据场景来配置对应的背景
switch (sort){
case 1:
buildBackGround1();
break;
case 2:
buildBackGround2();
break;
case 3:
buildBackGround3();
break;
case 4:
buildBackGround4();
break;
case 5:
buildBackGround5();
break;
case 6:
buildBackGround6();
break;
case 7:
buildBackGround7();
break;
}
}
//第1个场景
void buildBackGround1() {
//绘制地面
for (int i = 0; i < 15; i++) {
this.allObstruction.add(new Obstruction(i * 60, 540, 9, this));
}
//绘制砖块和问号
this.allObstruction.add(new Obstruction(120, 360, 4, this));
this.allObstruction.add(new Obstruction(300, 360, 0, this));
this.allObstruction.add(new Obstruction(360, 360, 4, this));
this.allObstruction.add(new Obstruction(420, 360, 0, this));
this.allObstruction.add(new Obstruction(480, 360, 4, this));
this.allObstruction.add(new Obstruction(540, 360, 0, this));
this.allObstruction.add(new Obstruction(420, 180, 4, this));
//绘制水管
this.allObstruction.add(new Obstruction(660, 540, 6, this));
this.allObstruction.add(new Obstruction(720, 540, 5, this));
this.allObstruction.add(new Obstruction(660, 480, 8, this));
this.allObstruction.add(new Obstruction(720, 480, 7, this));
//隐藏砖块
this.allObstruction.add(new Obstruction(660, 300, 3, this));
}
void buildBackGround2(){}
void buildBackGround3(){}
void buildBackGround4(){}
void buildBackGround5(){}
void buildBackGround6(){}
void buildBackGround7(){}
//绘制背景
public void draw(Graphics g) {
g.drawImage(bgImage,0,0,null);
}
public boolean isFlag() {
return flag;
}
public boolean isOver() {
return isOver;
}
public void setOver(boolean isOver) {
this.isOver = isOver;
}
public boolean isDown() {
return isDown;
}
public void setDown(boolean isDown) {
this.isDown = isDown;
}
public int getSort() {
return sort;
}
public List getRemoveObstruction() {
return removeObstruction;
}
//返回所有的障碍物
public List getAllObstruction() {
return allObstruction;
}
}
绘制障碍物到窗口
//绘制障碍物
private void drawObstruction(Graphics g) {
//绘制障碍物
Obstruction ob = null;
Iterator iter = this.nowBG.getAllObstruction().iterator();
while(iter.hasNext()){
ob = iter.next();
ob.draw(g);
}
}
在paint方法中调用它
@Override
public void paint(Graphics g) {
super.paint(g);
//绘制背景
this.nowBG.draw(g);
//绘制障碍物
drawObstruction(g);
}
运行一下,第一个场景的障碍物就绘制出来了。 
定义敌人类
-
因为这里的敌人有两类,一类是蘑菇怪,一类是食人花,所以定义了2个构造,分别是创建不同类型的敌人。
-
线程先默认加好,因为敌人要运动的,待会在来具体写run方法。
package main;
import java.awt.Graphics;
import java.awt.image.BufferedImage;
public class Enemy implements Runnable{
//坐标
private int x;
private int y;
//初始坐标
private int startx;
private int starty;
//怪物类型
private int type;
//显示图片
private BufferedImage showImage;
//移动方向
private boolean isLeftOrUp = true;
//移动范围
private int upMax = 0;
private int downMax = 0;
//加入线程
private Thread t = null;
//定义图片变化
private int imageType = 0;
//定义所在场景
private BackGround bg ;
//存活状态
private boolean alive = false;
//蘑菇怪
public Enemy(int x,int y,boolean isLeft,int type,BackGround bg){
this.x = x;
this.y = y;
this.startx = x;
this.starty = y;
this.isLeftOrUp = isLeft;
this.type = type;
this.bg = bg;
if(type==1){
this.showImage = StaticValue.allTriangleImage.get(0);
}
this.t = new Thread(this);
t.start();
}
//食人花
public Enemy(int x,int y,boolean isUp,int type,int upMax,int downMax,BackGround bg){
this.x = x;
this.y = y;
this.startx = x;
this.starty = y;
this.isLeftOrUp = isUp;
this.type = type;
this.upMax = upMax;
this.downMax = downMax;
this.bg = bg;
if(type==2){
this.showImage = StaticValue.allFlowerImage.get(0);
}
this.t = new Thread(this);
t.start();
}
//绘制
public void draw(Graphics g){
g.drawImage(showImage,x,y,null);
}
//现场的run方法
public void run() {
while (true) {
if(alive){
}
try {
Thread.sleep(100);
} catch (InterruptedException e) {
// TODO Auto-generated catch block
e.printStackTrace();
}
}
}
public int getX() {
return x;
}
public int getY() {
return y;
}
public BufferedImage getShowImage() {
return showImage;
}
public void setBg(BackGround bg) {
this.bg = bg;
}
public int getType() {
return type;
}
public void startMove(){
alive = true;
}
}
场景中初始化敌人,修改buildBackGround1 方法,加入以下代码。
//绘制怪物
this.allEnemy.add(new Enemy(600, 480, true, 1,this));
//绘制食人花
this.allEnemy.add(new Enemy(690, 540, true, 2, 420, 540,this));
在GamePanel类中创建方法,并在paint中调用,绘制出敌人。
//绘制敌人
private void drawEnemy(Graphics g){
//绘制怪物敌人
Iterator iterEnemy = this.nowBG.getAllEnemy().iterator();
while(iterEnemy.hasNext()){
Enemy e = iterEnemy.next();
e.draw(g);
}
}
运行

让敌人运动起来
一、蘑菇怪运动
-
先向左运动,让其X坐标递减就行,到最左边后反过来向右运动,坐标依次递增,碰到障碍物反过来继续。
-
每次线程执行的时候,要切换图片哦。
修改Enemy类的run方法(同时把alive先默认设置为true,测试用)
if(alive){
//判断怪物类型
if (type == 1) {
//左右移动
if (this.isLeftOrUp) {
this.x -= 5;
} else {
this.x += 5;
}
//imageType的切换来达到图片的切换
if (imageType == 0) {
imageType = 1;
} else {
imageType = 0;
}
//定义标记
boolean canLeft = true;
boolean canRight = true;
for (int i = 0; i < this.bg.getAllObstruction().size(); i++) {
Obstruction ob = this.bg.getAllObstruction().get(i);
//不能向右移动
if (ob.getX() == this.x + 60 && (ob.getY() + 50 > this.y
&& ob.getY() - 50 < this.y)) {
canRight = false;
}
//不能向左移动
if (ob.getX() == this.x - 60 && (ob.getY() + 50 > this.y
&& ob.getY() - 50 < this.y)) {
canLeft = false;
}
}
if (!canLeft && this.isLeftOrUp || this.x == 0) {
this.isLeftOrUp = false;
} else if (!canRight && !this.isLeftOrUp || this.x == 840) {
this.isLeftOrUp = true;
}
this.showImage = StaticValue.allTriangleImage.get(imageType);
}
}
在GamePanel加入主线程代码。
private class RefreshThread implements Runnable {
@Override
public void run() {
while (true) {
if (!“end”.equals(gameFlag)) {
repaint();
}
try {
Thread.sleep(50);
} catch (InterruptedException e) {
e.printStackTrace();
}
}
}
}
构造函数里面调用此线程

运行效果:

二、食人花运动
-
向上运动在递减y坐标,向下运动递增y坐标。
-
每次切换图片
-
达到最高处,则反过来往下;达到最低处,反过来往上;
在Enemy类中的run方法加入以下代码:
if (type == 2) {
if (this.isLeftOrUp) {//向上运动
this.y -= 5;
} else {//向下运动
this.y += 5;
}
//imageType的切换来达到图片的切换
if (imageType == 0) {
imageType = 1;
} else {
imageType = 0;
}
//达到最高处,则反过来往下
if (this.isLeftOrUp && this.y == this.upMax) {
this.isLeftOrUp = false;
}
//达到最低处,则反过来往上
if (!this.isLeftOrUp && this.y == this.downMax) {
this.isLeftOrUp = true;
}
this.showImage = StaticValue.allFlowerImage.get(imageType);
}

加入马里奥
创建类
package main;
import java.awt.Graphics;
import java.awt.image.BufferedImage;
public class Mario implements Runnable {
//坐标
private int x;
private int y;
//定义玛丽奥所在场景
private BackGround bg;
//加入线程
private Thread t = null;
//移动速度e
private int xmove = 0;
//跳跃速度
private int ymove = 0;
private int speed = 5;
//状态
private String status;
//显示图片
private BufferedImage showImage;
//生命和分数
private int score;
private int life;
//当前移动中的图片
private int moving = 0;
//跳跃时间
private int upTime = 0;
//标记玛丽奥是否死亡
private boolean isDead = false;
//完成游戏,游戏结束
private boolean isClear = false;
//构造方法
public Mario(int x, int y) {
this.x = x;
this.y = y;
//初始化玛丽奥图片
this.showImage = StaticValue.allMarioImage.get(0);
this.score = 0;
this.life = 3;
this.t = new Thread(this);
t.start();
this.status = “right-standing”;
}
public void draw(Graphics g) {
g.drawImage(showImage, x, y, null);
}
public void run() {
while(true){
try {
Thread.sleep(50);
} catch (InterruptedException e) {
// TODO Auto-generated catch block
e.printStackTrace();
}
}
}
public void setBg(BackGround bg) {
this.bg = bg;
}
public void setX(int x) {
this.x = x;
}
public void setY(int y) {
this.y = y;
}
public boolean isDead() {
return isDead;
}
public int getScore() {
return score;
}
public void setScore(int score) {
this.score = score;
}
public int getLife() {
return life;
}
public void setLife(int life) {
this.life = life;
}
public boolean isClear() {
return isClear;
}
public void setClear(boolean isClear) {
this.isClear = isClear;
}
}
修改init方法,加入马里奥的初始化
//初始化
private void init() {
//图片初始化
StaticValue.init();
//创建全部场景
for (int i = 1; i <= 7; i++) {
//i==7?true:false 最后一个场景有点区别,有个结束的城堡
this.allBG.add(new BackGround(i, i == 7 ? true : false));
}
//将第一个场景设置为当前场景
this.nowBG = this.allBG.get(0);
//初始化玛丽奥
this.mario = new Mario(0, 480);
//将玛丽奥放入场景中
this.mario.setBg(nowBG);
}
paint方法中绘制马里奥

运动
移动代码
public void leftMove(){
//移动速度
xmove = -speed;
//改变状态
//如果当前已经是跳跃,应该保持原有状态,不能再改变
if(this.status.indexOf(“jumping”) != -1){
this.status = “left-jumping”;
}else{
this.status = “left-moving”;
}
}
public void rightMove(){
xmove = speed;
if(this.status.indexOf(“jumping”) != -1){
this.status = “right-jumping”;
}else{
this.status = “right-moving”;
}
}
public void leftStop(){
this.xmove = 0;
if(this.status.indexOf(“jumping”) != -1){
this.status = “left-jumping”;
}else{
this.status = “left-standing”;
}
}
public void rightStop(){
this.xmove = 0;
if(this.status.indexOf(“jumping”) != -1){
this.status = “right-jumping”;
}else{
this.status = “right-standing”;
}
}
跳跃和死亡方法
public void jump(){
if(this.status.indexOf(“jumping”) == -1){
if(this.status.indexOf(“left”) != -1){
this.status = “left-jumping”;
}else{
this.status = “right-jumping”;
}
ymove = -10;
upTime = 18;
}
}
//下落方法
public void down(){
if(this.status.indexOf(“left”) != -1){
this.status = “left-jumping”;
}else{
this.status = “right-jumping”;
}
ymove = 10;
}
//死亡方法
public void dead(){
this.life–;
if(this.life == 0){
this.isDead = true;
}else{
if(!isDead){
}
this.x = 0;
this.y = 480;
}
}
加入键盘事件
在GamePanel中加入键盘事件,并在构造方法在调用。
//添加键盘监听
private void createKeyListener() {
KeyAdapter l = new KeyAdapter() {
//按下
@Override
public void keyPressed(KeyEvent e) {
int key = e.getKeyCode();
if(“start”.equals(gameFlag)){
switch (key) {
//向上
case KeyEvent.VK_UP:
case KeyEvent.VK_W:
mario.jump();
break;
//向右
case KeyEvent.VK_RIGHT:
case KeyEvent.VK_D:
自我介绍一下,小编13年上海交大毕业,曾经在小公司待过,也去过华为、OPPO等大厂,18年进入阿里一直到现在。
深知大多数Java工程师,想要提升技能,往往是自己摸索成长或者是报班学习,但对于培训机构动则几千的学费,着实压力不小。自己不成体系的自学效果低效又漫长,而且极易碰到天花板技术停滞不前!
因此收集整理了一份《2024年Java开发全套学习资料》,初衷也很简单,就是希望能够帮助到想自学提升又不知道该从何学起的朋友,同时减轻大家的负担。


既有适合小白学习的零基础资料,也有适合3年以上经验的小伙伴深入学习提升的进阶课程,基本涵盖了95%以上Java开发知识点,真正体系化!
由于文件比较大,这里只是将部分目录大纲截图出来,每个节点里面都包含大厂面经、学习笔记、源码讲义、实战项目、讲解视频,并且后续会持续更新
如果你觉得这些内容对你有帮助,可以添加V获取:vip1024b (备注Java)

总结
在这里,由于面试中MySQL问的比较多,因此也就在此以MySQL为例为大家总结分享。但是你要学习的往往不止这一点,还有一些主流框架的使用,Spring源码的学习,Mybatis源码的学习等等都是需要掌握的,我也把这些知识点都整理起来了


(){
this.life–;
if(this.life == 0){
this.isDead = true;
}else{
if(!isDead){
}
this.x = 0;
this.y = 480;
}
}
加入键盘事件
在GamePanel中加入键盘事件,并在构造方法在调用。
//添加键盘监听
private void createKeyListener() {
KeyAdapter l = new KeyAdapter() {
//按下
@Override
public void keyPressed(KeyEvent e) {
int key = e.getKeyCode();
if(“start”.equals(gameFlag)){
switch (key) {
//向上
case KeyEvent.VK_UP:
case KeyEvent.VK_W:
mario.jump();
break;
//向右
case KeyEvent.VK_RIGHT:
case KeyEvent.VK_D:
自我介绍一下,小编13年上海交大毕业,曾经在小公司待过,也去过华为、OPPO等大厂,18年进入阿里一直到现在。
深知大多数Java工程师,想要提升技能,往往是自己摸索成长或者是报班学习,但对于培训机构动则几千的学费,着实压力不小。自己不成体系的自学效果低效又漫长,而且极易碰到天花板技术停滞不前!
因此收集整理了一份《2024年Java开发全套学习资料》,初衷也很简单,就是希望能够帮助到想自学提升又不知道该从何学起的朋友,同时减轻大家的负担。
[外链图片转存中…(img-9Q2POkHE-1711650704809)]
[外链图片转存中…(img-qXljNBXB-1711650704809)]
[外链图片转存中…(img-cxdh47Vt-1711650704810)]
[外链图片转存中…(img-nBq73tVe-1711650704810)]
[外链图片转存中…(img-SvsokSXI-1711650704810)]
[外链图片转存中…(img-y3e6reDO-1711650704811)]
既有适合小白学习的零基础资料,也有适合3年以上经验的小伙伴深入学习提升的进阶课程,基本涵盖了95%以上Java开发知识点,真正体系化!
由于文件比较大,这里只是将部分目录大纲截图出来,每个节点里面都包含大厂面经、学习笔记、源码讲义、实战项目、讲解视频,并且后续会持续更新
如果你觉得这些内容对你有帮助,可以添加V获取:vip1024b (备注Java)
[外链图片转存中…(img-iUI8IJOR-1711650704811)]
总结
在这里,由于面试中MySQL问的比较多,因此也就在此以MySQL为例为大家总结分享。但是你要学习的往往不止这一点,还有一些主流框架的使用,Spring源码的学习,Mybatis源码的学习等等都是需要掌握的,我也把这些知识点都整理起来了
[外链图片转存中…(img-GzCxWwV1-1711650704811)]
[外链图片转存中…(img-5hOVM9pJ-1711650704812)]


 1628
1628


 被折叠的 条评论
为什么被折叠?
被折叠的 条评论
为什么被折叠?
 到【灌水乐园】发言


