本篇将重点讲解vue中的多种组件通信方式,包括【父传子】【子传父】【兄弟组件通信】【依赖注入】等等,并提供具体案例来让小伙伴们加深理解、彻底掌握!喜欢的小伙伴们点赞收藏,持续关注哦~💕

💟 上一篇文章 史上最详细的Vue入门教程(六) --- 工程化开发和脚手架、组件注册
📝 系列专栏 vue从基础到起飞

目录
一、组件通信
1.什么是组件通信?
组件通信,就是指组件与组件之间的数据传递
-
组件的数据是独立的,无法直接访问其他组件的数据。
-
想使用其他组件的数据,就需要组件通信
2.组件关系分类
-
父子关系
-
非父子关系
-

3.通信解决方案

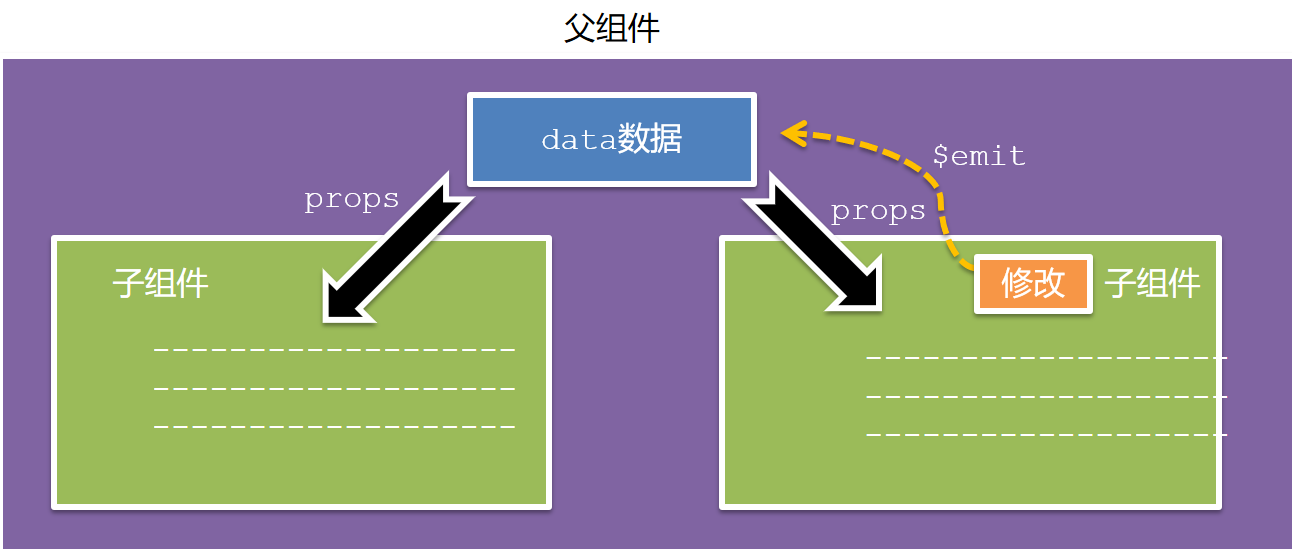
4.父子通信流程
-
父组件通过 props 将数据传递给子组件
-
子组件利用 $emit 通知父组件修改更新
5.父向子通信代码示例
父组件通过props将数据传递给子组件
父组件App.vue
<template>
  <div class="app" style="border: 3px solid #000; margin: 10px">
    我是APP组件
    <!-- 1.给组件标签,添加属性方式 赋值 -->
    <Son :title="myTitle"></Son>
  </div>
</template>

<script>
import Son from './components/Son.vue'
export default {
  name: 'App',
  data() {
    return {
      myTitle: '前端菜鸟的自我修养',
    }
  },
  components: {
    Son,
  },
}
</script>

<style>
</style>
子组件Son.vue
<template>
  <div class="son" style="border:3px solid #000;margin:10px">
    <!-- 3.直接使用props的值 -->
    我是Son组件 {{title}}
  </div>
</template>

<script>
export default {
  name: 'Son-Child',
  // 2.通过props来接受
  props:['title']
}
</script>

<style>

</style>
父向子传值步骤
-
给子组件以添加属性的方式传值
-
子组件内部通过props接收
-
模板中直接使用 props接收的值
6.子向父通信代码示例
子组件利用 $emit 通知父组件,进行修改更新
子组件Son.vue
<template>
  <div class="son" style="border: 3px solid #000; margin: 10px">
    我是Son组件 {{ title }}
    <button @click="changeFn">修改title</button>
  </div>
</template>

<script>
export default {
  name: 'Son-Child',
  props: ['title'],
  methods: {
    changeFn() {
      // 通过this.$emit() 向父组件发送通知
      this.$emit('changTitle','前端菜鸟的自我修养')
    },
  },
}
</script>

<style>
</style>
父组件App.vue
<template>
  <div class="app" style="border: 3px solid #000; margin: 10px">
    我是APP组件
    <!-- 2.父组件对子组件的消息进行监听 -->
    <Son :title="myTitle" @changTitle="handleChange"></Son>
  </div>
</template>

<script>
import Son from './components/Son.vue'
export default {
  name: 'App',
  data() {
    return {
      myTitle: '学前端',
    }
  },
  components: {
    Son,
  },
  methods: {
    // 3.提供处理函数,提供逻辑
    handleChange(newTitle) {
      this.myTitle = newTitle
    },
  },
}
</script>

<style>
</style>
子向父传值步骤
-
$emit触发事件,给父组件发送消息通知
-
父组件监听$emit触发的事件
-
提供处理函数,在函数的性参中获取传过来的参数
二、详解props
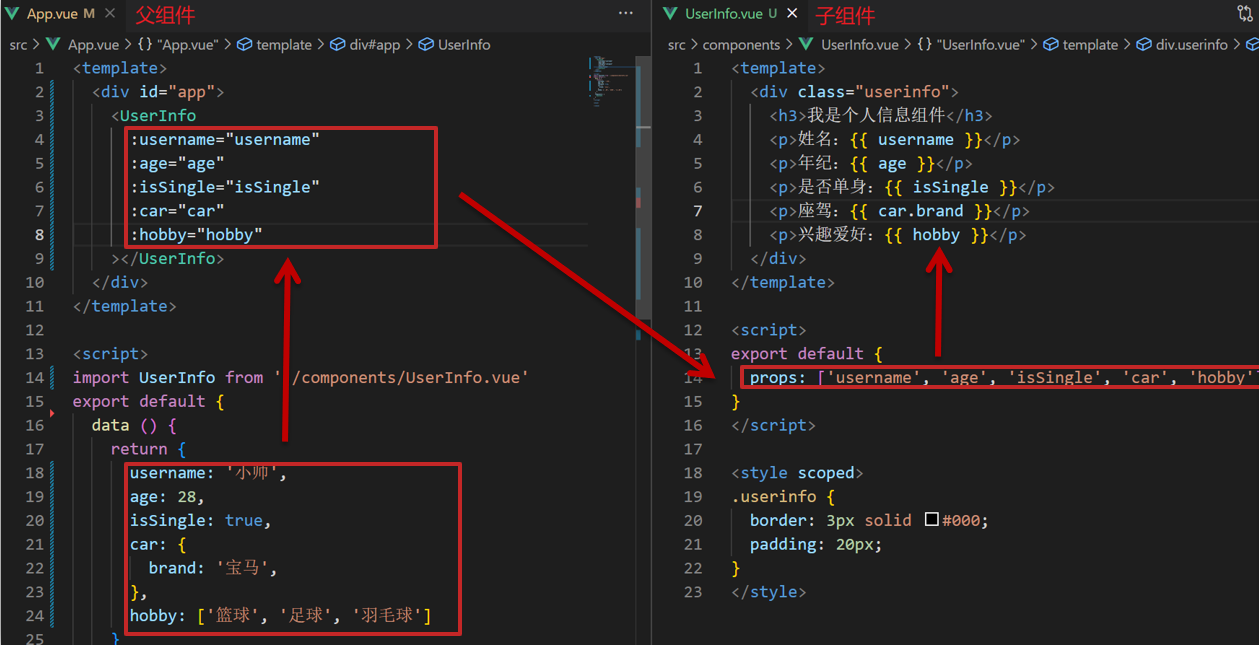
1.Props 定义
组件上 注册的一些 自定义属性
2.Props 作用
向子组件传递数据
3.特点
-
可以 传递 任意数量 的prop
-
可以 传递 任意类型 的prop
4.代码演示
父组件App.vue
<template>
  <div class="app">
    <UserInfo
      :username="username"
      :age="age"
      :isSingle="isSingle"
      :car="car"
      :hobby="hobby"
    ></UserInfo>
  </div>
</template>

<script>
import UserInfo from './components/UserInfo.vue'
export default {
  data() {
    return {
      username: '小帅',
      age: 28,
      isSingle: true,
      car: {
        brand: '宝马',
      },
      hobby: ['篮球', '足球', '羽毛球'],
    }
  },
  components: {
    UserInfo,
  },
}
</script>

<style>
</style>
子组件UserInfo.vue
<template>
  <div class="userinfo">
    <h3>我是个人信息组件</h3>
    <div>姓名:{{username}}</div>
    <div>年龄:{{age}}</div>
    <div>是否单身:{{isSingle}}</div>
    <div>座驾:{{car.brand}}</div>
    <div>兴趣爱好:{{hobby.join('、')}}</div>
  </div>
</template>

<script>
export default {
  props:['username','age','isSingle','car','hobby']
}
</script>

<style>
.userinfo {
  width: 300px;
  border: 3px solid #000;
  padding: 20px;
}
.userinfo > div {
  margin: 20px 10px;
}
</style>
三、props校验
1.思考
组件的props可以乱传吗?
2.作用
为组件的 prop 指定验证要求,不符合要求,控制台就会有错误提示 → 帮助开发者,快速发现错误
3.语法
-
类型校验
-
非空校验
-
默认值
-
自定义校验

4.代码演示
App.vue
<template>
  <div class="app">
    <BaseProgress :w="width"></BaseProgress>
  </div>
</template>

<script>
import BaseProgress from './components/BaseProgress.vue'
export default {
  data() {
    return {
      width: 50,
    }
  },
  components: {
    BaseProgress,
  },
}
</script>

<style>
</style>
子组件 BaseProgress.vue(写了一个简单的进度条组件)
<template>
  <div class="base-progress">
    <div class="inner" :style="{ width: w + '%' }">
      <span>{{ w }}%</span>
    </div>
  </div>
</template>

<script>
export default {
  props: {
    w: Number,
  },
}
</script>

<style scoped>
.base-progress {
  height: 26px;
  width: 400px;
  border-radius: 15px;
  background-color: #272425;
  border: 3px solid #272425;
  box-sizing: border-box;
  margin-bottom: 30px;
}
.inner {
  position: relative;
  background: #379bff;
  border-radius: 15px;
  height: 25px;
  box-sizing: border-box;
  left: -3px;
  top: -2px;
}
.inner span {
  position: absolute;
  right: 0;
  top: 26px;
}
</style>
实现了进度条显示50%的进度,效果图如下:

四、props校验完整写法
1.语法
props: {
校验的属性名: {
type: 类型, // Number String Boolean ......
required: true, // 是否必填
default: 默认值, // 默认值
validator (value) {
// 自定义校验逻辑
return 是否通过校验
}
}
},
2.代码实例
  <script>
  export default {
    // 完整写法(类型、默认值、非空、自定义校验)
    props: {
      w: {
        type: Number,
        required: true,
        default: 0,
        validator(val) {
          // console.log(val)
          if (val >= 100 || val <= 0) {
            console.error('传入的范围必须是0-100之间')
            return false
          } else {
            return true
          }
        },
      },
    },
  }
  </script>
3.注意
1.default和required一般不同时写(因为当时必填项时,肯定是有值的)
2.default后面如果是简单类型的值,可以直接写默认值。如果是复杂类型的值,则需要以函数的形式return一个默认值
五、props & data、单向数据流
1.共同点
都可以给组件提供数据
2.区别
-
data 的数据是自己的 → 随便改
-
prop 的数据是外部的 → 不能直接改,要遵循 单向数据流
3.单向数据流:
父级props 的数据更新,会向下流动,影响子组件。这个数据流动是单向的
4.代码演示
App.vue
<template>
  <div class="app">
    <BaseCount :count="count" @changeCount="handleChange"></BaseCount>
  </div>
</template>

<script>
import BaseCount from './components/BaseCount.vue'
export default {
  components:{
    BaseCount
  },
  data(){
    return {
      count:100
    }
  },
  methods:{
    handleChange(newVal){
      // console.log(newVal);
      this.count = newVal
    }
  }
}
</script>

<style>

</style>
BaseCount.vue
<template>
  <div class="base-count">
    <button @click="handleSub">-</button>
    <span>{{ count }}</span>
    <button @click="handleAdd">+</button>
  </div>
</template>

<script>
export default {
  // 1.自己的数据随便修改  (谁的数据 谁负责)
  // data () {
  //   return {
  //     count: 100,
  //   }
  // },
  // 2.外部传过来的数据 不能随便修改
  props: {
    count: {
      type: Number,
    },
  },
  methods: {
    handleSub() {
      this.$emit('changeCount', this.count - 1)
    },
    handleAdd() {
      this.$emit('changeCount', this.count + 1)
    },
  },
}
</script>

<style>
.base-count {
  margin: 20px;
}
</style>
5.口诀
谁的数据谁负责
六、非父子通信 -- event bus 事件总线
1.作用
非父子组件之间,进行简易消息传递。(复杂场景→ Vuex)
2.步骤
-
创建一个都能访问的事件总线 (空Vue实例)
  import Vue from 'vue'
  const Bus = new Vue()
  export default Bus
-
A组件(接受方),监听Bus的 $on事件
created () { Bus.$on('sendMsg', (msg) => { this.msg = msg }) } -
B组件(发送方),触发Bus的$emit事件
Bus.$emit('sendMsg', '这是一个消息')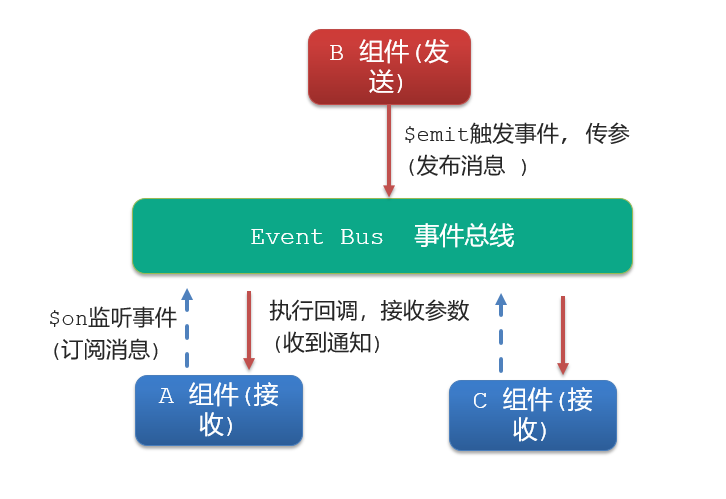
3.代码示例
新建EventBus.js,实例化一个新组件实例并向外暴露,作为兄弟组件传值的媒介
  import Vue from 'vue'
  const Bus  =  new Vue()
  export default Bus
BaseA.vue(接收方)
<template>
  <div class="base-a">
    我是A组件(接受方)
    <p>{{msg}}</p>
  </div>
</template>

<script>
import Bus from '../utils/EventBus'
export default {
  data() {
    return {
      msg: '',
    }
  },
  created() {
    Bus.$on('sendMsg', (msg) => {
      // console.log(msg)
      this.msg = msg
    })
  },
}
</script>

<style scoped>
.base-a {
  width: 200px;
  height: 200px;
  border: 3px solid #000;
  border-radius: 3px;
  margin: 10px;
}
</style>
BaseB.vue(发送方)
<template>
  <div class="base-b">
    <div>我是B组件(发布方)</div>
    <button @click="sendMsgFn">发送消息</button>
  </div>
</template>

<script>
import Bus from '../utils/EventBus'
export default {
  methods: {
    sendMsgFn() {
      Bus.$emit('sendMsg', '今天天气不错,适合旅游')
    },
  },
}
</script>

<style scoped>
.base-b {
  width: 200px;
  height: 200px;
  border: 3px solid #000;
  border-radius: 3px;
  margin: 10px;
}
</style>
App.vue
<template>
  <div class="app">
    <BaseA></BaseA>
    <BaseB></BaseB>
  </div>
</template>

<script>
import BaseA from './components/BaseA.vue'
import BaseB from './components/BaseB.vue'
export default {
  components:{
    BaseA,
    BaseB,
  }
}
</script>

<style>

</style>
七、非父子通信 -- provide&inject
1.作用
跨层级共享数据,不只是父子之间,也可以是祖父与孙子之间,曾祖父与重孙之间......
2.场景
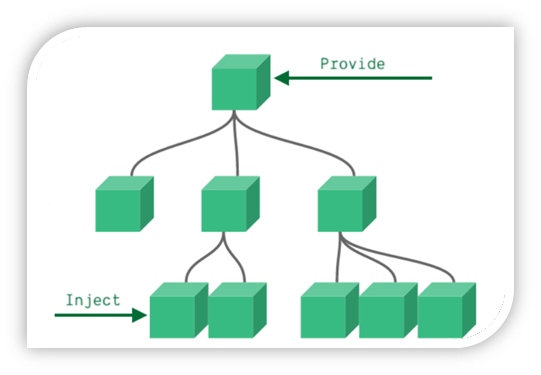
3.语法
-
父组件 provide提供数据
  export default {
    provide () {
      return {
         // 普通类型【非响应式】
         color: this.color,
         // 复杂类型【响应式】
         userInfo: this.userInfo,
      }
    }
  }
2.子/孙组件 inject获取数据
  export default {
    inject: ['color','userInfo'],
    created () {
      console.log(this.color, this.userInfo)
    }
  }
4.完整实例
爷组件
<template>
  <div>
    <button @click="changeMsg">祖组件触发</button>
    <h1>祖组件</h1>
    <parent></parent>
  </div>
</template>

<script>
import parent from './parent.vue';
export default {
  data(){
    return{
      obj:{
        name:'JavaScript',
      },
      developer:'布兰登·艾奇',
      year:1995,
      update:'2021年06月',
    }
  },
  provide(){
    return {
      obj: this.obj, // 方式1.传入一个可监听的对象
      developerFn:() => this.developer, // 方式2.通过 computed 来计算注入的值
      year: this.year, // 方式3.直接传值
      app: this, // 方式4. 提供祖先组件的实例 缺点:实例上挂载很多没有必要的东西 比如:props,methods。
    }
  },
  components: {
    parent,
  },
  methods:{
    changeMsg(){
      this.obj.name = 'Vue';
      this.developer = '尤雨溪';
      this.year = 2014;
      this.update = '2021年6月7日';
    },
  },
}
</script>
父组件
<template>
  <div class="wrap">
    <h4>子组件(只做中转)</h4>
    <child></child>
  </div>
</template>

<script>
import child from './child.vue';
export default {
  components:{
    child,
  },
}
</script>
孙组件
<template>
  <div>
    <h5>孙组件</h5>
    <span>名称:{{obj.name}}</span> |
    <span>作者:{{developer}}</span> |
    <span>诞生于:{{year}}</span> |
    <span>最后更新于:{{this.app.update}}</span>
  </div>
</template>

<script>
export default {
  computed:{
    developer(){
      return this.developerFn()
    }
  },
  inject:['obj','developerFn','year','app'],
}
</script>
实现效果如下图


对比一下前后差异:无论点击多少次,孙组件中的诞生于 year 字段永远都是1995 并不会发生变化,通过 方式1、方式2、方式4传值是可以响应的。
正如官网所提到的:provide 和 inject 绑定并不是可响应的。这是刻意为之的。然而,如果你传入了一个可监听的对象,那么其对象的 property 还是可响应的。
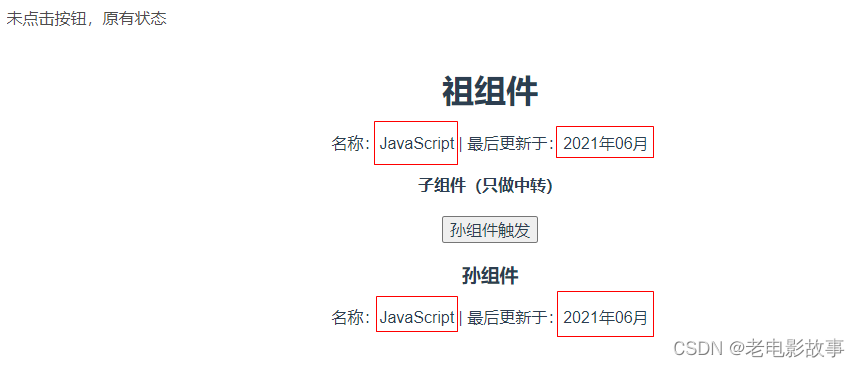
另一种情况:在孙组件中修改祖组件传递过来的值(方式1、方式4),发现对应的祖组件中的值也发生了变化:
爷组件
<template>
  <div>
    <h1>祖组件</h1>
    <span>名称:{{obj.name}}</span> |
    <span>最后更新于:{{update}}</span>
    <parent></parent>
  </div>
</template>

<script>
import parent from './parent.vue';
export default {
  data(){
    return{
      obj:{
        name:'JavaScript',
      },
      update:'2021年06月',
    }
  },
  provide(){
    return {
      obj: this.obj,
      app: this,
    }
  },
  components: {
    parent,
  },
}
</script>
父组件不变
孙组件
<template>
  <div>
    <button @click="changeMsg">孙组件触发</button>
    <h3>孙组件</h3>
    <span>名称:{{obj.name}}</span> |
    <span>最后更新于:{{this.app.update}}</span>
  </div>
</template>

<script>
export default {
  inject:['obj','app'],
  methods: {
    changeMsg(){
      this.obj.name = 'React';
      this.app.update = '2020年10月';
    }
  },
}
</script>

5. 总结
慎用 provide / inject
既然 provide/inject 如此好用,那么,为什么 Vue 官方还要推荐我们使用 Vuex,而不是用原生的 API 呢?
答: 前面提到过,Vuex 和 provide/inject 最大的区别:Vuex 中的全局状态的每次修改是可以追踪回溯的,而 provide/inject 中变量的修改是无法控制的。换句话说,不知道是哪个组件修改了这个全局状态。
Vue 的设计理念借鉴了 React 中的单向数据流原则(虽然有 sync 这种破坏单向数据流的家伙),而 provide/inject 明显破坏了单向数据流原则。试想,如果有多个后代组件同时依赖于一个祖先组件提供的状态,那么只要有一个组件修改了该状态,那么所有组件都会受到影响。这一方面增加了耦合度,另一方面,使得数据变化不可控。如果在多人协作开发中,这将成为一个噩梦。
在这里,总结了使用 provide/inject 做全局状态管理的原则:
多人协作时,做好作用域隔离;
尽量使用一次性数据作为全局状态
一层嵌套的父子组件可以使用props来传值,props本身就是有相应性的。
根据自身代码选择合适的传值方式,并不一定非要用provide/inject的传值。

🚀 个人简介:6年开发经验,现任职某国企前端负责人,分享前端相关技术与工作常见问题~
💟 作 者:前端菜鸟的自我修养❣️
📝 专 栏:vue从基础到起飞
🌈 若有帮助,还请关注➕点赞➕收藏,不行的话我再努努力💪💪💪
更多专栏订阅推荐:
👍 前端工程搭建
💕 JavaScript深入研究


 1万+
1万+


 被折叠的 条评论
为什么被折叠?


