


当前服务端虚拟机ip为:192.168.59.129
vsftp默认存放路径地址为:/var/ftp/pub然后在这个文件中继续创建文件夹或文件即可。
在这个路径下创建几个文件【file为文件夹,test为文件】
[root@centos76_2 ~]# cd /var/ftp/pub/
[root@centos76_2 pub]# ls
[root@centos76_2 pub]# mkdir file{1…3}
[root@centos76_2 pub]# touch test{1…3}
[root@centos76_2 pub]# ls
file1 file2 file3 test1 test2 test3
[root@centos76_2 pub]#
[root@centos76_2 pub]# echo cat << e > test1
test1
hello test1
e
[root@centos76_2 pub]# echo cat << e > test2
test2
god test2
e
[root@centos76_2 pub]#
打开就可以看到了哦【不要急打开方式这些,我后面会做说明,只是让你知道而已】

注:其实路径用/var/ftp就可以了,但因为pub是默认生成的,也代表了公共文件,所以一般默认放/var/ftp/pub里面了,也可以在/var/ftp里面创建文件,和pub一样作为基层文件使用的,如下图

服务检查
下面3项如果有问题,会导致ftp无法正常使用。
-
1、检查 vsftpd服务是不是正常开启
-
2、检查防火墙是否关闭【如果防火墙有放开策略了,关不关无所谓】
-
3、selinux是否关闭
[root@centos76_2 pub]# systemctl is-active vsftpd
active
[root@centos76_2 pub]# systemctl is-active fir
firewalld.service firstboot-graphical.service
[root@centos76_2 pub]# systemctl is-active fir
firewalld.service firstboot-graphical.service
[root@centos76_2 pub]# systemctl is-active firewalld.service
unknown
[root@centos76_2 pub]# getenforce
Permissive
[root@centos76_2 pub]#
对于所有用户默认生效一般也就能否上传和能否删除而已,其他就不多做说明了。
上传功能配置
未配置时是无法拷贝文件的

- 1、 修改配置文件
/etc/vsftpd/vsftpd.conf相关选项
[root@centos76_2 pub]# vim /etc/vsftpd/vsftpd.conf
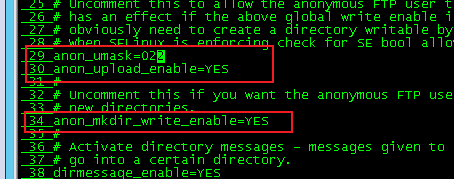
anon_umask=022 #增加
anon_upload_enable=YES #取消注释,在29行
anon_mkdir_write_enable=YES #取消注释,这33行
- 2、重启vsftpd服务
[root@centos76_2 pub]# systemctl restart vsftpd
- 3、修改目录
/var/ftp/pub权限,给目录写权限
[root@centos76_2 pub]# chmod 777 /var/ftp/pub/
- 4、上传文件测试
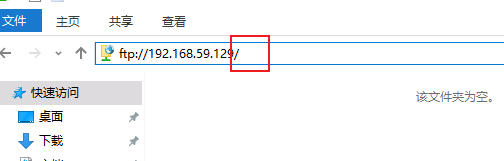
Windows打开我的电脑,文件路径处输入ftp://ip,进入pub目录底下上传【拷贝】文件

删除功能配置
配置前删除是会报错的

1、修改配置文件/etc/vsftpd/vsftpd.conf相关选项
[root@centos76_2 pub]# vim /etc/vsftpd/vsftpd.conf
#最后一行添加如下内容
anon_other_write_enable=YES
[root@centos76_2 pub]# tail -n 1 /etc/vsftpd/vsftpd.conf
anon_other_write_enable=YES
[root@centos76_2 pub]#
2、重启vsftpd服务测试
[root@centos76_2 pub]# systemctl restart vsftpd
3、删除文件测试
Windows打开我的电脑,文件路径处输入ftp://ip,进入pub目录底下删除文件

-
不知道有没有必要解释下本地用户生效的意思
-
就是说 下面功能仅对 服务端上的用户生效,不是服务端上的用户名,一律阻止【不允许访问】
-
查看本地用户,目录:
/etc/passwd
在服务端虚拟机上查看,这种就是普通用户
[root@centos76_2 pub]# tail -n 3 /etc/passwd
ccx❌1000:1000:ccx:/home/ccx:/bin/bash
ccx1❌1001:1001::/home/ccx1:/bin/bash
ccx2❌1002:1002::/home/ccx2:/bin/bash
[root@centos76_2 pub]#
创建本地ftp用户
-
useradd username -s /sbin/nologin# 创建 只允许ftp登陆的用户名 -
注: 查看路径为:
/etc/passwd,如下面ccx和ccx2用户编译器为:/sbin/nologin
[root@centos76_2 ccx]# tail -n 4 /etc/passwd
ccx❌1000:1000::/home/ccx:/sbin/nologin
ccx1❌1001:1001::/home/ccx1:/bin/bash
ccx2❌1002:1002::/home/ccx2:/sbin/nologin
ccx3❌1003:1003::/home/ccx3:/bin/bash
[root@centos76_2 ccx]#
- 如果无法通过/sbin/nologin用户登陆,一直报530认证失败,但普通用户却可以正常登陆
[root@centos76_1 ~]# ftp 192.168.59.129
Connected to 192.168.59.129 (192.168.59.129).
220 (vsFTPd 3.0.2)
Name (192.168.59.129:root): ccx
331 Please specify the password.
Password:
530 Login incorrect.
Login failed.
原因:vsftpd默认会检查用户的shell,如果用户的shell在/etc/shells没有记录,则无法登陆ftp
解决办法:在服务端的/etc/shells文件里面添加用户的shell(解释器)
vim /etc/shells #添加一行/sbin/nologin即可

关闭匿名登陆功能
- 1、修改主配置文件
/etc/vsftpd/vsftpd.conf开启本地用户权限(关闭匿名用户)
[root@centos76_2 pub]# vim /etc/vsftpd/vsftpd.conf
#将下面这个的YES改为NO
anonymous_enable=NO
上面配置文件中的YES改为NO重启vsftpd服务以后,再次访问就需要让登陆了(Windows访问)。

- 2、修改权限
如果你是能够链接到FTP 但是看不到文件 上传和下载都没有办法做出操作,再做下面操作
执行getsebool -a | grep ftp,可以看到下面红圈中2个为off状态
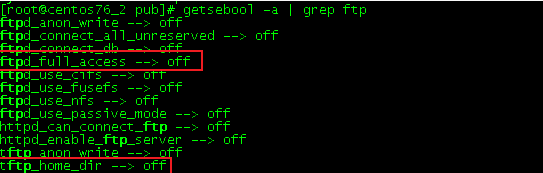
执行2个命令将她们开启:
[root@centos76_2 pub]# setsebool -P allow_ftpd_full_access on
[root@centos76_2 pub]# setsebool -P sftp_home_dir on
开启后状态就为on了

开启上传、下载、删除功能
[root@centos76_2 ccx]# vim /etc/vsftpd/vsftpd.conf
write_enable=YES
[root@centos76_2 ccx]# systemctl restart vsftpd
注:关闭匿名登陆以后,默认目录不在是/var/ftp/put了,而是 用户的目录【/home中,比如ccx用户,则默认目录就是/home/ccx】,关闭匿名登陆以后,访问方法是ftp://ip进去默认就是家目录,如果后面跟路径了,可能就回报550权限问题了【限windows】
测试
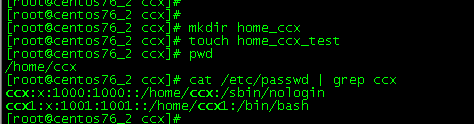
我先在ccx家目录中创建一些文件,可以看到ccx用户的编译器是nologin的哦。
打开windows,输入:ftp://ip,输入用户名和密码

登陆以后就可以看到了这些文件了

上传下载删除新建都是可以正常使用的
敲黑板,注意,我上面说过这段话,如果没注意看,可能就会产生下面错误了

我现在访问在位置栏输入:/ftp://ip/pub/访问就会报下面的550错误,这个是无法解决的!!!

修改默认家目录
如果不修改的话,我们通过不同用户登陆进去的,都是在这个用户的家目录里面【比如:/home/ccx, /home/ccx1, /home/ccx2】
但是修改了这个默认家目录以后,所有的用户登陆进去都在这个指定目录里面了。
这个不建议配置,除非你知道自己的在干什么。
一般情况都是不修改默认目录,但开启目录限制,就是每个用户登陆进去只能看到自己家目录的内容不能切换到其他目录【一般在linux上可以体现,linux可以cd切换目录,下面有说明】
新增行: local_root=/data/ccx #后面/data/ccx为路径
为路径根文件设置777权限,否则后面会无法操作:chmod 777 -R /data 【家目录不用是修改是因为家目录默认777权限】
[root@centos76_2 ccx]# vim /etc/vsftpd/vsftpd.conf
新增在任意位置即可
local_root=/data/ccx
allow_writeable_chroot=YES #2.3.5之后,如果用户被限定在了其主目录下,则该用户的主目录不能再具有写权限了,需新增此配置
[root@centos76_2 ccx]# mkdir -p /data/ccx #创建默认目录
[root@centos76_2 ccx]# chmod 777 -R /data
[root@centos76_2 ccx]#
[root@centos76_2 ccx]# touch /data/ccx/test{1…3} #创建几个默认文件夹测试用
[root@centos76_2 ccx]# ls /data/ccx/
test1 test2 test3
[root@centos76_2 ccx]#
[root@centos76_2 ccx]# systemctl restart vsftpd
测试
我使用ccx1这个用户测试,我先在这个家目录下创建几个文件,以便于后面区别是否配置成功
[root@centos76_2 ccx]# cd
[root@centos76_2 ~]# touch /home/ccx1/ccx1{1…3}
[root@centos76_2 ~]# ls /home/ccx1
ccx11 ccx12 ccx13
我们在地址栏把这个/去掉回车就可以重新登陆了哦【windows】
登陆 ccx1

登陆进来以后看到是test文件【如果不是可以尝试刷新一下当前页面】,修改成功,2个文件夹是刚才创建的【有操作权限】

如果不修改权限为777的话,就无法创建文件这些操作了【刚去把权限改为755了】

linux上也是正常查看的,只是目录变成/了
[root@centos76_1 ~]# ftp 192.168.59.129
Connected to 192.168.59.129 (192.168.59.129).
220 (vsFTPd 3.0.2)
Name (192.168.59.129:root): ccx1
331 Please specify the password.
Password:
230 Login successful.
Remote system type is UNIX.
Using binary mode to transfer files.
ftp> ls
227 Entering Passive Mode (192,168,59,129,199,12).
150 Here comes the directory listing.
-rw-r–r-- 1 0 0 0 May 06 04:03 test1
-rw-r–r-- 1 0 0 0 May 06 04:03 test2
-rw-r–r-- 1 0 0 0 May 06 04:03 test3
226 Directory send OK.
ftp> pwd
257 “/”
ftp>
目录限制配置
默认情况当前用户登陆ftp后可以来回切换文件系统,如果开启,就不能来回切换目录,只能查看编辑当前目录内容了。
这个需要用linux做测试了,未修改前如下,可以正常切换所有目录
[root@centos76_1 ~]# ftp 192.168.59.129 #登陆
Connected to 192.168.59.129 (192.168.59.129).
220 (vsFTPd 3.0.2)
Name (192.168.59.129:root): ccx # 输入用户名
331 Please specify the password.
Password: #输入密码
230 Login successful. #登陆成功提升
Remote system type is UNIX.
Using binary mode to transfer files.
ftp> pwd #默认家目录
257 “/home/ccx”
ftp> cd /var/ftp/ #可以切换目录
250 Directory successfully changed.
ftp> ls
227 Entering Passive Mode (192,168,59,129,56,40).
150 Here comes the directory listing.
drwxr-xr-x 2 0 0 6 Apr 30 04:04 file_test
drwxrwxrwx 5 0 0 84 Apr 30 09:31 pub
226 Directory send OK.
ftp> cd pub
250 Directory successfully changed.
ftp> ls
227 Entering Passive Mode (192,168,59,129,187,216).
150 Here comes the directory listing.
drwxr-xr-x 2 0 0 6 Apr 30 03:56 file1
drwxr-xr-x 2 0 0 6 Apr 30 03:56 file2
drwxr-xr-x 2 0 0 6 Apr 30 03:56 file3
-rw-r–r-- 1 0 0 34 Apr 30 09:03 test1
-rw-r–r-- 1 0 0 4 Apr 30 03:57 test2
-rw-r–r-- 1 0 0 0 Apr 30 03:56 test3
226 Directory send OK.
ftp> get test1 # 可以下载其他目录中的文件
local: test1 remote: test1
227 Entering Passive Mode (192,168,59,129,85,16).
150 Opening BINARY mode data connection for test1 (34 bytes).
226 Transfer complete.
34 bytes received in 0.000346 secs (98.27 Kbytes/sec)
ftp>
-
配置
-
增加内容为:开启chroot选项
allow_writeable_chroot=YES
- 取消注释 指定本地用户不能翻目录
chroot_local_user=YES
[root@centos76_2 ccx]# vim /etc/vsftpd/vsftpd.conf
#大概在102行,取消注释下列行内容,我是在取消注释前面添加的这个行呢
快速跳到102行的方法,vim进去以后,按102再按G即可,临时开启行号显示,:set nu
前面的102序号是行号,不要加啊!
102 allow_writeable_chroot=YES
103 chroot_local_user=YES
[root@centos76_2 ccx]# systemctl restart vsftpd
上面这样说这样能看懂吗? 如下图,102行是我新增的,103行是我取消注释的。

测试
上面步骤做完以后,我们再次使用ftp登陆该服务器,可以看到登陆进去以后,目录变成/了,而非家目录全程,并且再次切换目录就会报550错误呢,配置完成。
[root@centos76_1 ~]# ftp 192.168.59.129
Connected to 192.168.59.129 (192.168.59.129).
220 (vsFTPd 3.0.2)
Name (192.168.59.129:root): ccx
331 Please specify the password.
Password:
230 Login successful.
Remote system type is UNIX.
Using binary mode to transfer files.
ftp> pwd
257 “/”
ftp> ls
227 Entering Passive Mode (192,168,59,129,230,53).
150 Here comes the directory listing.
drwxr-xr-x 2 0 0 6 May 06 03:29 home_ccx
drwxr-xr-x 2 1000 1000 6 May 06 03:34 新文件夹
drwxr-xr-x 2 1000 1000 6 May 06 03:34 新文件夹 (2)
226 Directory send OK.
ftp> cd /etc/
550 Failed to change directory.
ftp>
注:上面新增的行,不要敲错代码了,如果敲错以后,登陆会变成如下样子,并且是无法做任何操作的。
[root@centos76_1 ~]# ftp 192.168.59.129
Connected to 192.168.59.129 (192.168.59.129).
220 (vsFTPd 3.0.2)
Name (192.168.59.129:root): ccx
331 Please specify the password.
Password:
500 OOPS: vsftpd: refusing to run with writable root inside chroot()
Login failed.
421 Service not available, remote server has closed connection
ftp>
ftp> ls
Not connected.
只允许用户列表中用户切换目录【白名单】
-
说明,这个功能不是说只允许列表中用户登陆ftp,而是说列表中的用户不受功能限制,比如下面限制了本地用户不能翻目录,但列表中的用户依然是可以翻目录的【其他用户只能登陆到家目录不能切换其他目录】,就是这样,之前我以为是这个只允许列表中用户登陆ftp,其他用户无法登陆,折腾了很久,发现是我理解错了。
-
chroot_list_enable=YES开启代表用户列表文件/etc/vsftpd/chroot_list中的用户可以访问【需要在/etc/vsftpd目录下创建文件chroot_list,在文件中写入用户名,一行一个用户】,未在文件中列出的用户不能访问 -
需要修改3处
-
首先开启chroot选项,添加:
allow_writeable_chroot=YES【已添加忽略】 -
取消注释 指定本地用户不能翻目录 ,
chroot_local_user=YES -
最后取消注释,指定用户列表文件的用户可以访问
chroot_list_enable=YES#和上面是配套使用的

[root@centos76_2 ~]# vim /etc/vsftpd/vsftpd.conf
103 allow_writeable_chroot=YES
104 chroot_local_user=YES
105 chroot_list_enable=YES
[root@centos76_2 ~]# systemctl restart vsftpd
[root@centos76_2 ~]# cd /etc/vsftpd/
[root@centos76_2 vsftpd]# ls
ftpusers user_list vsftpd.conf vsftpd_conf_migrate.sh
[root@centos76_2 vsftpd]# vim chroot_list # 创建允许登陆的用户
hero1
hero2
[root@centos76_2 vsftpd]# useradd -s /sbin/nologin hero1 #创建用户名和密码
[root@centos76_2 vsftpd]# useradd -s /sbin/nologin hero2
[root@centos76_2 vsftpd]# echo hero1|passwd --stdin hero1
Changing password for user hero1.
passwd: all authentication tokens updated successfully.
[root@centos76_2 vsftpd]# echo hero2|passwd --stdin hero2
Changing password for user hero2.
passwd: all authentication tokens updated successfully.
[root@centos76_2 vsftpd]#
测试
注意看命令中的说明
[root@centos76_1 ~]# ftp 192.168.59.129
Connected to 192.168.59.129 (192.168.59.129).
220 (vsFTPd 3.0.2)
Name (192.168.59.129:root): ccx #先登陆未在列表中的用户
331 Please specify the password.
Password:
230 Login successful.
Remote system type is UNIX.
Using binary mode to transfer files.
ftp> ls # 能进入到家目录【我设置默认目录了】
227 Entering Passive Mode (192,168,59,129,122,26).
150 Here comes the directory listing.
-rwxrwxrwx 1 0 0 0 May 06 04:03 test1
-rw-r–r-- 1 0 0 0 May 06 04:03 test2
-rw-r–r-- 1 0 0 0 May 06 04:03 test3
226 Directory send OK.
ftp> cd /var/ftp #切换路径会报错
550 Failed to change directory.
ftp> ls
227 Entering Passive Mode (192,168,59,129,244,220).
150 Here comes the directory listing.
-rwxrwxrwx 1 0 0 0 May 06 04:03 test1
-rw-r–r-- 1 0 0 0 May 06 04:03 test2
-rw-r–r-- 1 0 0 0 May 06 04:03 test3
226 Directory send OK.
ftp> 221 Goodbye.
[root@centos76_1 ~]# ftp 192.168.59.129
Connected to 192.168.59.129 (192.168.59.129).
220 (vsFTPd 3.0.2)
Name (192.168.59.129:root): hero1 # 登陆在列表中的用户
331 Please specify the password.
Password:
230 Login successful.
Remote system type is UNIX.
Using binary mode to transfer files.
ftp> ls #进入到默认路径了
227 Entering Passive Mode (192,168,59,129,56,190).
150 Here comes the directory listing.
-rwxrwxrwx 1 0 0 0 May 06 04:03 test1
-rw-r–r-- 1 0 0 0 May 06 04:03 test2
-rw-r–r-- 1 0 0 0 May 06 04:03 test3
226 Directory send OK.
ftp> cd /var/ftp # 能正常切换目录
250 Directory successfully changed.
ftp> ls
227 Entering Passive Mode (192,168,59,129,19,221).
150 Here comes the directory listing.
drwxr-xr-x 2 0 0 6 Apr 30 04:04 file_test
drwxrwxrwx 5 0 0 84 Apr 30 09:31 pub
226 Directory send OK.
ftp>
扩展说明
-
在默认配置下,本地用户登入FTP后可以使用cd命令切换到其他目录,这样会对系统带来安全隐患。可以通过以下三条配置文件来控制用户切换目录。
-
chroot_list_enable=YES/NO#设置是否启用chroot_list_file配置项指定的用户列表文件。默认值为NO。
用户名存放文件:/etc/vsftpd.chroot_list,一行一个白名单用户,用于指定用户列表文件,该文件用于控制哪些用户可以切换到用户家目录的上级目录。
-
chroot_local_user=YES/NO#用于指定用户列表文件中的用户是否允许切换到上级目录。默认值为NO。 -
通过搭配能实现以下几种效果:
-
①当
chroot_list_enable=YES,chroot_local_user=YES时,在/etc/vsftpd.chroot_list文件中列出的用户,可以切换到其他目录;未在文件中列出的用户,不能切换到其他目录。 -
②当
chroot_list_enable=YES,chroot_local_user=NO时,在/etc/vsftpd.chroot_list文件中列出的用户,不能切换到其他目录;未在文件中列出的用户,可以切换到其他目录。 -
③当
chroot_list_enable=NO,chroot_local_user=YES时,所有的用户均不能切换到其他目录。 -
④当
chroot_list_enable=NO,chroot_local_user=NO时,所有的用户均可以切换到其他目录。
禁止某些用户登陆
/etc/vsftpd/ftpusers这个是系统默认的黑名单,这里面的用户也是直接被拒绝的,但我们不用这种方法,用其他方法,继续往下看。
-
额,就是不想让某些用户访问ftp
-
命令说明
-
userlist_deny=YES/默认没有这一项,与下面这条参数:userlist_file=/etc/vsftpd/localuser_list结合使用。
userlist_file=/etc/vsftpd/localuser_list /默认没有这一项, 与上面参数:userlist_deny=YES结合使用此参数用,来改变存放可以登录或禁止登录的账号,suerlist_deny为YES时,这里面的用户则不能登录,当为NO时,这里面的用户可以登录,和/etc/vsftpd/user_list是一个意思
- 过程见下面,后面说明,不懂就认真看。
[root@centos76_2 userconfig]# vim /etc/vsftpd/vsftpd.conf
我是在最后添加的下面2行
userlist_deny=YES
userlist_file=/etc/vsftpd/localuser_list
[root@centos76_2 vsftpd]# systemctl restart vsftpd
[root@centos76_2 userconfig]# cd /etc/vsftpd/
[root@centos76_2 vsftpd]# vim localuser_list #创建不允许登陆的用户名,一行一个
ccx
superman1
测试
因为上面限制了ccx和superman1不能正常登陆,所以我登陆这2个用户直接连输密码的机会都不给我。
[root@centos76_1 ~]# ftp 192.168.59.129
Connected to 192.168.59.129 (192.168.59.129).
220 (vsFTPd 3.0.2)
Name (192.168.59.129:root): ccx #输入用户名就结束了
530 Permission denied.
Login failed.
ftp> ls
530 Please login with USER and PASS.
Passive mode refused.
ftp> 221 Goodbye.
[root@centos76_1 ~]# ftp 192.168.59.129
Connected to 192.168.59.129 (192.168.59.129).
220 (vsFTPd 3.0.2)
Name (192.168.59.129:root): superman1 #输入用户名就结束了
530 Permission denied.
Login failed.
ftp> ls
530 Please login with USER and PASS.
Passive mode refused.
ftp>
这放一个正常的康康
[root@centos76_1 ~]# ftp 192.168.59.129
Connected to 192.168.59.129 (192.168.59.129).
220 (vsFTPd 3.0.2)
Name (192.168.59.129:root): ccx1
331 Please specify the password.
Password:
230 Login successful.
Remote system type is UNIX.
Using binary mode to transfer files.
ftp> 221 Goodbye.
配置多用户登陆
-
这个功能可能有点鸡肋,就是为了不同用户登陆进去进入到不同的路径,和不指定默认家目录唯一不同的区别就是这个可以指定路径罢了。
-
注:我当前ftp已经配置了默认家目录
-
配置
命令:新增一行user_config_dir=/etc/vsftpd/userconfig#用户配置目录【多用户的时候,设置各个用户登录自己的目录】
mkdir创建/etc/vsftpd/userconfig文件夹,然后在文件夹中vim编辑需要配置的用户名,内容是:local_root=/file【口述的过程,看不懂不要紧,下面命令有详细过程 】
- 过程看命令介绍吧,跟着命令流程走
[root@centos76_2 vsftpd]# vim vsftpd.conf
我是在最后新增的下面行内容
user_config_dir=/etc/vsftpd/userconfig
[root@centos76_2 vsftpd]# systemctl restart vsftpd
[root@centos76_2 vsftpd]# cd /etc/vsftpd
[root@centos76_2 vsftpd]# mkdir userconfig
[root@centos76_2 vsftpd]# cd userconfig
[root@centos76_2 userconfig]# vim superman1 #superman1是用户名
#这个命令其实就是修改默认家目录的命令,后面是自定义路径
local_root=/ftp/superman1
[root@centos76_2 userconfig]# vim superman2 #superman2是用户名
#这个命令其实就是修改默认家目录的命令,后面是自定义路径
local_root=/ftp/superman2
[root@centos76_2 userconfig]# useradd -s /sbin/nologin superman1 #创建用户名
[root@centos76_2 userconfig]# useradd -s /sbin/nologin superman2 #创建用户名
[root@centos76_2 userconfig]# echo superman1 | passwd --stdin superman1 # 设置密码
Changing password for user superman1.
passwd: all authentication tokens updated successfully.
[root@centos76_2 userconfig]# echo superman2 | passwd --stdin superman2
Changing password for user superman2.
passwd: all authentication tokens updated successfully.
[root@centos76_2 userconfig]#
[root@centos76_2 userconfig]# mkdir -p /ftp/superman1 #创建路径文件
[root@centos76_2 userconfig]# mkdir -p /ftp/superman2 #创建路径文件
[root@centos76_2 userconfig]# touch /ftp/superman1/superman{1…3} #创建几个文件,便于测试是否成功
[root@centos76_2 userconfig]# touch /ftp/superman2/superman{4…6}
[root@centos76_2 userconfig]#
测试
登陆superman1

内容是刚创建的【如果内容没变,可以刷新该页面】,成功。

superman2我用linux登陆
[root@centos76_1 ~]# ftp 192.168.59.129
Connected to 192.168.59.129 (192.168.59.129).
220 (vsFTPd 3.0.2)
Name (192.168.59.129:root): superman2 # 登陆
331 Please specify the password.
Password:
230 Login successful.
Remote system type is UNIX.
Using binary mode to transfer files.
ftp> ls # 可以看到下面的文件确实是自定义里面的内容,成功
227 Entering Passive Mode (192,168,59,129,97,210).
150 Here comes the directory listing.
-rw-r–r-- 1 0 0 0 May 06 10:19 superman4
-rw-r–r-- 1 0 0 0 May 06 10:19 superman5
-rw-r–r-- 1 0 0 0 May 06 10:19 superman6
226 Directory send OK.
ftp> cd /etc/ # 这个是不能切换路径的,如果要切换路径,把这个用户名加到上面配置的白名单列表中哈
550 Failed to change directory.
ftp>
注:除了刚才创建的superman1和superman2用户,其他用户都是前面的默认家目录而非自定义目录呢,测试

登陆进来是这样的

21端口修改为区间【修改一个也说明】
- 修改默认21简单的多,直接添加下面这行,后面21改为想修改的端口即可
listen_port=21 /默认没有这一行 #ftp监听端口
-
如字面意思,修改端口。不知道自己在干嘛不要操作这个,否则会导致ftp没法使用。
-
最后一行添加如下3行即可
-
pasv_enable=YES -
pasv_min_port=59601 -
pasv_max_port=59611
【vsftpd被动模式配置,命令端口21 控制端口59601-59611】
[root@centos76_2 vsftpd]# vim vsftpd.conf
可以添加在最后一行,初始端口和结尾端口自定义
pasv_enable=YES
pasv_min_port=59601
pasv_max_port=59611
[root@centos76_2 vsftpd]# systemctl restart vsftpd
说明
-
在linux,使用vsftp建立用户后,默认使用ftp访问的时候,是访问对应的用户家目录。想要多个用户同时访问一个目录,同时对同一目录有着不同的权限,这些设定只能通过vsftp中的虚拟用户来进行设定,普通用户无法达到这样的效果。
-
配置过程:
首先通过建立一个普通系统用户,建立家目录,然后将所有的虚拟用户映射到对应的普通系统用户家目录,然后对各虚拟用户进行权限控制,虚拟用户没有查看目录的权限。
配置【demo说明】
-
这里我以一个测试做说明,原理会了,用户功能增删改就行;
-
要求
-
yb1只能进行下载
-
yb2能进行下载和上传
-
对下载/上传流量进行控制
配置过程
(1)操作虚拟用户列表并生成认证文件
- 建立虚拟用户的用户名、密码列表的文本文件
[root@centos76_2 vsftpd]# vim /etc/vsftpd/vsftp_users.conf
#下面一行用户名一行密码【奇数行用户名,偶数行密码】
#下面的用户名和密码是虚拟出来的,本地用户中不存在下列用户名和密码
yb1
yb1_passwd
yb2
yb2_passwd
~
- 用db_load转换工具,将文本文件(上一步所建立的文件)转化为数据库文件
#如果是最小化安装,没有db_load命令【完整安装忽略这步】,先安装命令:yum -y install db4-utils【可以先执行下面命令,有命令忽略这步】
[root@centos76_2 vsftpd]# db_load -T -t hash -f /etc/vsftpd/vsftp_users.conf /etc/vsftpd/vsftp_users.db
- 修改虚拟用户列表文件及数据库文件访问权限。
#600权限是只有用户有读和写权限
[root@centos76_2 vsftpd]# chmod 600 /etc/vsftpd/vsftp_users.db
[root@centos76_2 vsftpd]#
[root@centos76_2 vsftpd]# ll vsftp_users.*
-rw-r–r–. 1 root root 16 May 7 05:15 vsftp_users.conf
-rw-------. 1 root root 12288 May 7 05:16 vsftp_users.db
[root@centos76_2 vsftpd]#
(2)创建虚拟用户对应的本地用户
禁止他们本地登录
设置用户主目录的访问权限
useradd -d 是指定家目录,指定以后/home里面就看不到了
[root@centos76_2 vsftpd]# useradd -d /var/ftp/share -s /sbin/nologin vuser1
[root@centos76_2 vsftpd]# useradd -d /var/ftp/noshare -s /sbin/nologin vuser2
[root@centos76_2 vsftpd]# echo “vuser1_passwd” | passwd --stdin vuser1
Changing password for user vuser1.
passwd: all authentication tokens updated successfully.
[root@centos76_2 vsftpd]# echo “vuser2_passwd” | passwd --stdin vuser2
Changing password for user vuser2.
passwd: all authentication tokens updated successfully.
[root@centos76_2 vsftpd]#
[root@centos76_2 vsftpd]# chmod 500 /var/ftp/share #500是只有用户有写和执行权限
[root@centos76_2 vsftpd]# chmod 700 /var/ftp/noshare #700 是只有用户有 读写执行权限
[root@centos76_2 vsftpd]#
[root@centos76_2 vsftpd]# ll /var/ftp/ | grep re
drwx------. 3 vuser2 vuser2 78 May 6 21:57 noshare
dr-x------. 3 vuser1 vuser1 78 May 6 21:57 share
[root@centos76_2 vsftpd]#
(3)创建日志文件
[root@centos76_2 vsftpd]# touch /var/log/vsftpd.log
[root@centos76_2 vsftpd]# chown vuser1:vuser1 /var/log/vsftpd.log #如果有多个用户,可以不用指定用户和用户组的
(4)修改SELinux安全上下文,允许对用户主目录读写
[root@centos76_2 vsftpd]# chcon -t public_content_rw_t /var/ftp/noshare/
[root@centos76_2 vsftpd]# chcon -t public_content_r_t /var/ftp/share/
(5)selinux 开放对ftp的访问
selinux可能会阻止对其他目录的访问,所以最好放开。
最全的Linux教程,Linux从入门到精通
======================
-
linux从入门到精通(第2版)
-
Linux系统移植
-
Linux驱动开发入门与实战
-
LINUX 系统移植 第2版
-
Linux开源网络全栈详解 从DPDK到OpenFlow
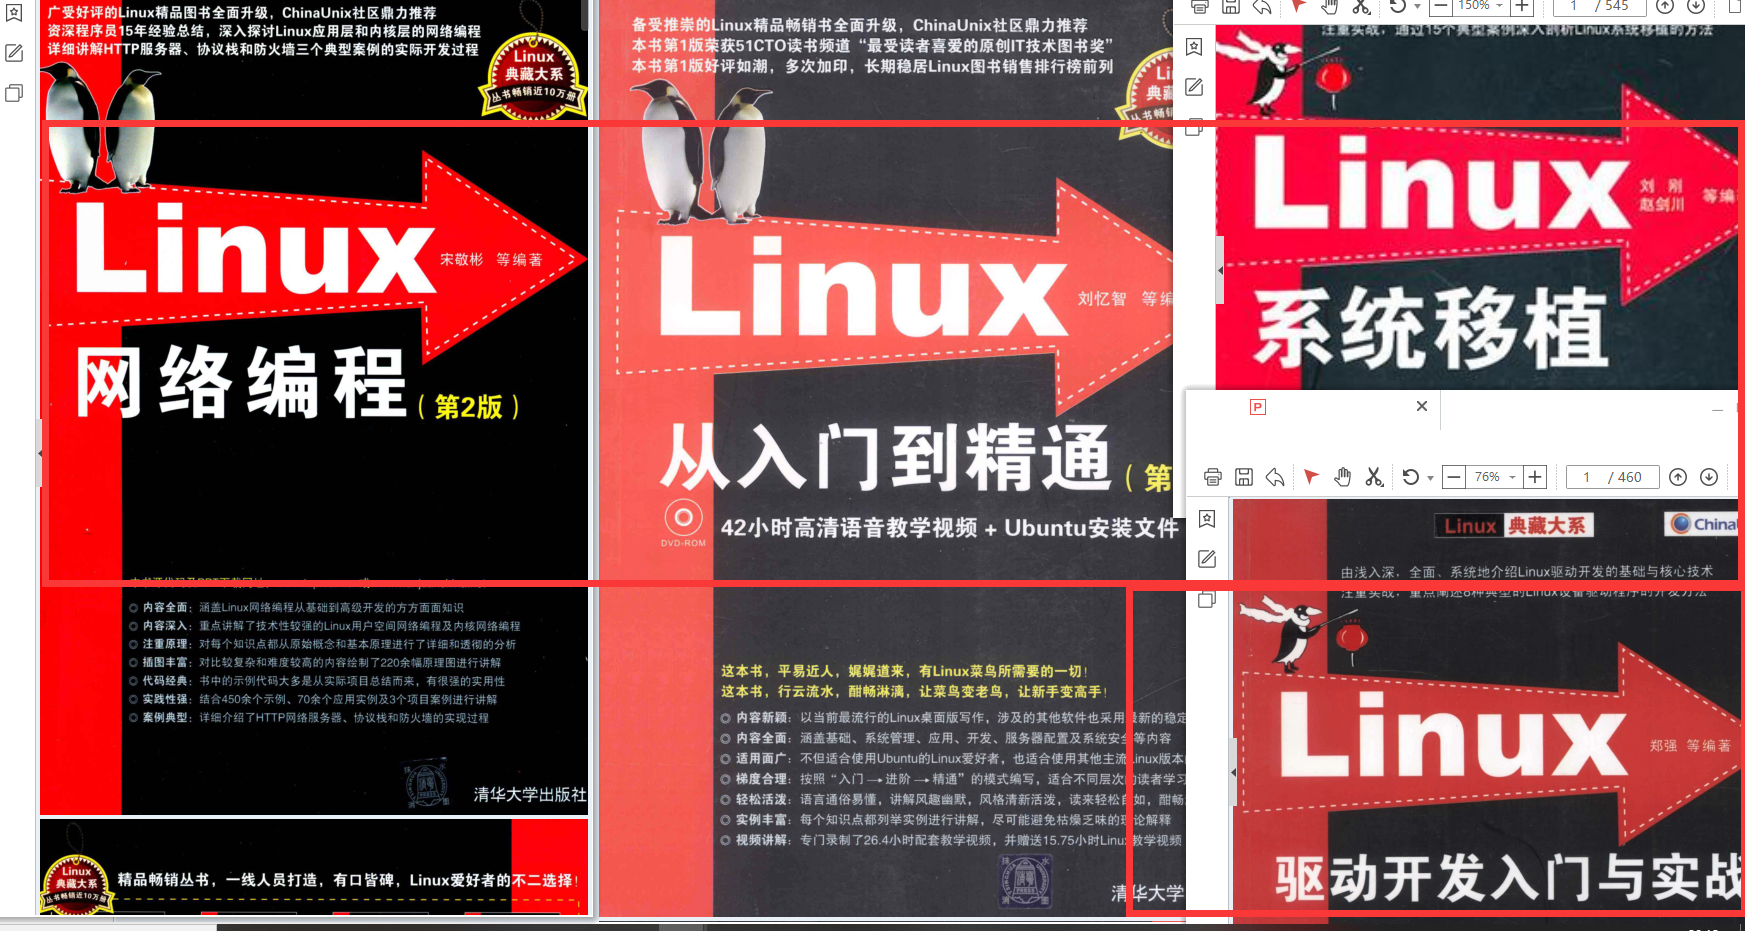
第一份《Linux从入门到精通》466页
====================
内容简介
====
本书是获得了很多读者好评的Linux经典畅销书**《Linux从入门到精通》的第2版**。本书第1版出版后曾经多次印刷,并被51CTO读书频道评为“最受读者喜爱的原创IT技术图书奖”。本书第﹖版以最新的Ubuntu 12.04为版本,循序渐进地向读者介绍了Linux 的基础应用、系统管理、网络应用、娱乐和办公、程序开发、服务器配置、系统安全等。本书附带1张光盘,内容为本书配套多媒体教学视频。另外,本书还为读者提供了大量的Linux学习资料和Ubuntu安装镜像文件,供读者免费下载。

本书适合广大Linux初中级用户、开源软件爱好者和大专院校的学生阅读,同时也非常适合准备从事Linux平台开发的各类人员。
需要《Linux入门到精通》、《linux系统移植》、《Linux驱动开发入门实战》、《Linux开源网络全栈》电子书籍及教程的工程师朋友们劳烦您转发+评论
网上学习资料一大堆,但如果学到的知识不成体系,遇到问题时只是浅尝辄止,不再深入研究,那么很难做到真正的技术提升。
一个人可以走的很快,但一群人才能走的更远!不论你是正从事IT行业的老鸟或是对IT行业感兴趣的新人,都欢迎加入我们的的圈子(技术交流、学习资源、职场吐槽、大厂内推、面试辅导),让我们一起学习成长!


 9
9


 被折叠的 条评论
为什么被折叠?
被折叠的 条评论
为什么被折叠?
 到【灌水乐园】发言


