


 本文详细介绍了Docker镜像的结构,包括分层的概念,强调了分层存储带来的资源共享优势。同时,文章涵盖了如何使用Docker进行镜像搜索、下载、加速、查看、导出、导入、删除及打标签等操作,是Docker使用者的实用指南。
镜像结构和原理
镜像结构
镜像是创建容器的模板,包含了应用程序与相关的运行环境,使用镜像可以方便、快速的创建并启动容器
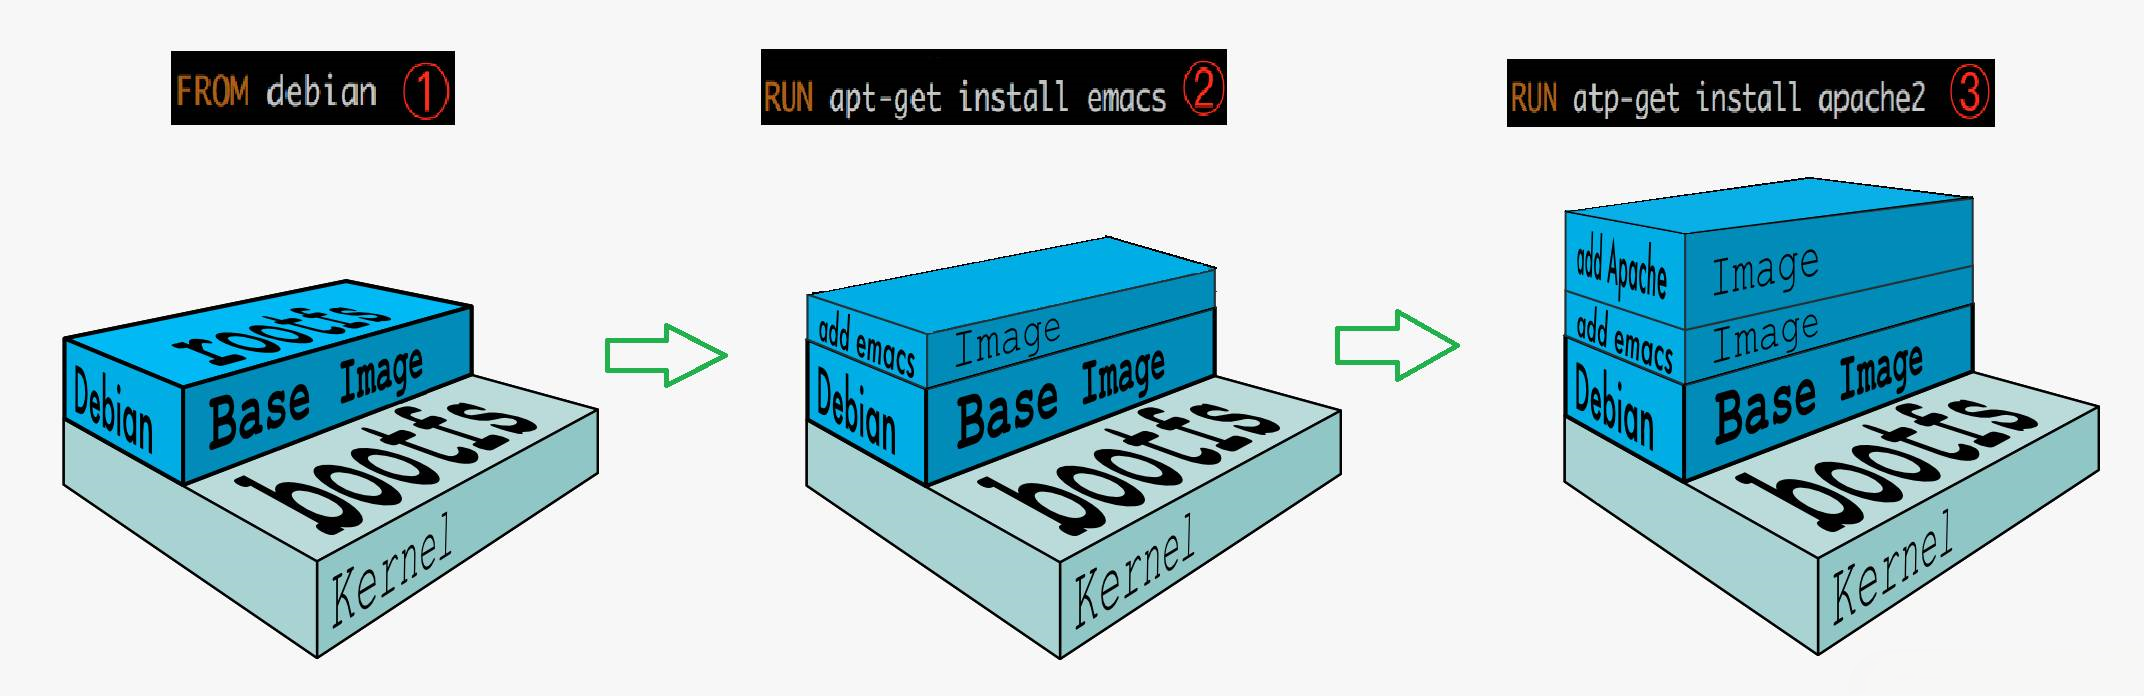
镜像是分层的,由文件系统叠加而成,每一层都称为一个镜像,底层的称为父镜像,上面一层称为该父镜像的子镜像:
- 镜像在直接调用宿主机内核的基础上,最底层由一个最基本的操作系统开始(即图中的 Debian、BusyBox)
- 从一个最基本的操作系统开始,每个构建提交的操作都相当于做一层的修改,增加了一层文件系统,一层层往上叠加
- 镜像构建时,会一层层构建,前一层是后一层的基础;每一层构建完就不会再发生改变,后一层上的任何改变只发生在自己这一层
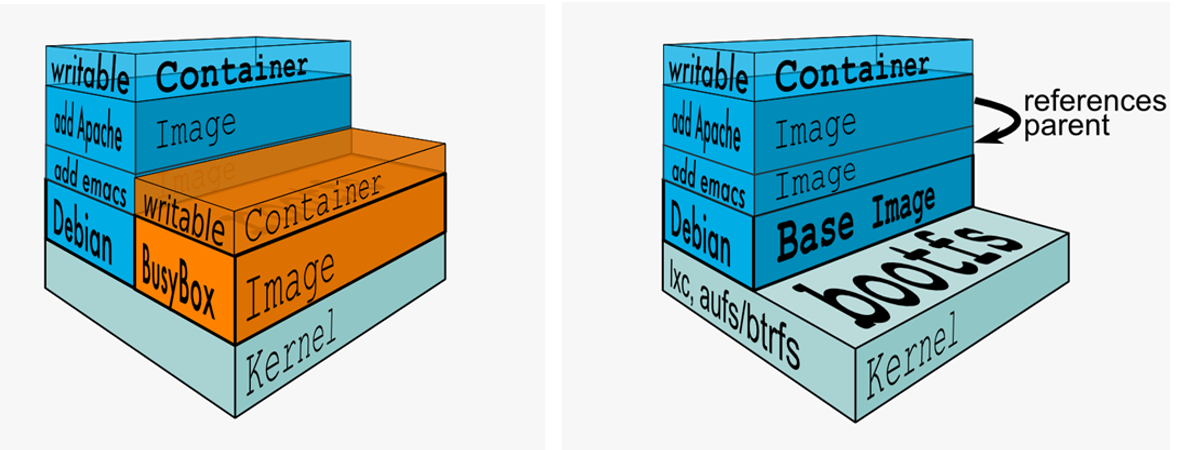
- 镜像的最底层必须是一个称为**引导文件系统(bootfs)**的镜像,用户不会与这一层直接打交道
- bootfs 的上层镜像叫作**根文件系统(rootfs)**通常情况下是一个操作系统,如 Ubuntu、Debian 和 CentOS 等
- 用户的镜像必须构建于根镜像之上
- 每一个操作(ADD 文件、安装应用程序),都会增加一层文件系统,在现有镜像的基础上增加一层
可使用
docker image history 镜像来查看镜像分层
一个典型的 Linux 文件系统由 bootfs 和 rootfs 两部分组成:
- bootfs:主要包含 bootloader 和 kernel,bootloader 主要用于引导加载 kernel
- rootfs:包含的就是典型 Linux 系统中的 /dev,/proc,/bin,/etc 等标准目录和文件
而镜像直接调用宿主机内核,镜像中只提供 rootfs,也就是只需要包括最基本的命令、配置文件和程序库等相关文件即可,镜像通过这些文件再加上宿主机的内核共同提供了一个虚拟的 Linux 环境
为什么要分层
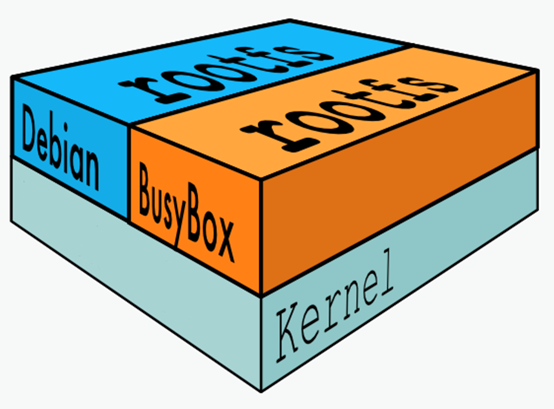
镜像采用分层存储的架构,最大的好处体现在 - 共享资源:
从镜像仓库拉取镜像后,本质上是下载到宿主机的某个磁盘文件上,大部分镜像都采用相同的基础镜像构建而来的,采用分层存储,宿主机只需要在磁盘上保存一份基础镜像,同时内存中也只需要加载一份基础镜像,所有基于该基础镜像构建出来的镜像,都可以共享
注意:能共享的不仅仅是基础镜像,镜像的每一层都可以被共享
使用镜像
搜索镜像
镜像是创建容器的模板,想要创建容器,首先需要拥有镜像,可以通过搜索来获取自己想要的镜像
- 通过官方网站搜索镜像:官网地址:http://hub.docker.com
- 通过
docker search命令进行搜索
下载镜像
使用 docker pull 命令从 Docker 仓库中将镜像下载到本地。镜像下载后保存在 /var/lib/docker/overlay2/镜像ID目录下
# docker pull 使用帮助
[root@docker ~]# docker pull --help

Usage:  docker pull [OPTIONS] NAME[:TAG|@DIGEST]

Pull an image or a repository from a registry

Options:
  -a, --all-tags                Download all tagged images in the repository
      --disable-content-trust   Skip image verification (default true)
      --platform string         Set platform if server is multi-platform capable
  -q, --quiet                   Suppress verbose output


# 命令解释
docker pull [OPTIONS] NAME[:TAG|@DIGEST]

NAME		# 镜像名称;一般形式为(仓库服务器:端口/项目名称/镜像名称)
:TAG		# 镜像的版本号;若不指定则下载最新版
范例:
# 下载 hello-world 镜像
[root@docker ~]# docker pull hello-world
Using default tag: latest					# 默认下载最新版
latest: Pulling from library/hello-world
2db29710123e: Pull complete 				# 分层下载
Digest: sha256:faa03e786c97f07ef34423fccceeec2398ec8a5759259f94d99078f264e9d7af		# 镜像摘要
Status: Downloaded newer image for hello-world:latest
docker.io/library/hello-world:latest		# 完整路径

# 下载指定版本的 Nginx 镜像
[root@docker ~]# docker pull nginx:1.20
镜像加速
Docker 默认会从官方仓库拉取镜像,由于官方仓库位于国外,下载速度可能不尽人意,因此可以通过更改 Docker 配置文件添加一个加速器,实现达到加速下载镜像的目的
国内有许多公司都提供了 Docker 加速镜像,比如:阿里云、腾讯云、网易云,以下以腾讯云为例
# 修改 /etc/docker/daemon.json 配置文件使用加速器
[root@docker ~]# vim /etc/docker/daemon.json
{
   "registry-mirrors": [
       "https://mirror.ccs.tencentyun.com"
  ]
}

# 重载配置文件并重启服务
[root@docker ~]# systemctl daemon-reload
[root@docker ~]# systemctl restart docker
查看本地镜像
docker images 命令可以查看下载至本地的镜像
# docker images 使用帮助
[root@docker ~]# docker images --help

Usage:  docker images [OPTIONS] [REPOSITORY[:TAG]]

List images

Options:
  -a, --all             Show all images (default hides intermediate images)
      --digests         Show digests
  -f, --filter filter   Filter output based on conditions provided
      --format string   Pretty-print images using a Go template
      --no-trunc        Don't truncate output
  -q, --quiet           Only show numeric IDs


# 命令解释
docker images [OPTIONS] [REPOSITORY[:TAG]]

-a				# 查看所有镜像
--digests		# 显示摘要
-f				# 根据提供的条件过滤输出
--format		# 使用 Go 模板精确打印
-q				# 只显示镜像 ID
范例
# 查看本地镜像
[root@docker ~]# docker images
REPOSITORY          TAG                 IMAGE ID            CREATED             SIZE
hello-world         latest              feb5d9fea6a5        14 months ago       13.3kB

REPOSITORY			# 镜像所属的仓库名称
TAG					# 镜像版本号(标识符),默认为 latest
IMAGE ID 			# 镜像唯一 ID 标识
CREATED 			# 镜像在仓库中被创建时间
VIRTUAL SIZE 		# 镜像的大小
查看镜像详细信息
使用 docker image inspect 命令查看镜像详细信息
# 命令格式
docker image inspect 镜像名称

# 范例
[root@docker ~]# docker image inspect nginx:1.20
镜像导出
利用 docker save 命令可以将从本地镜像导出为一个 tar 打包文件,然后复制到其他服务器使用。使用该方法导出的只是一个打包文件,并没有实现压缩,建议打包完使用 gzip 命令压缩
# docker save 使用帮助
[root@docker ~]# docker save --help

Usage:  docker save [OPTIONS] IMAGE [IMAGE...]

Save one or more images to a tar archive (streamed to STDOUT by default)

Options:
  -o, --output string   Write to a file, instead of STDOUT


# 命令解释
docker save [OPTIONS] IMAGE [IMAGE...]

-o			# 打包为文件
范例
# 导出 hello-world 镜像
docker save hello-world -o /opt/images.tar

# 导出所有镜像(导入后只显示镜像 ID)
docker save `docker images -aq` -o /opt/images.tar

# 导出所有镜像(awk 方法)
docker save `docker images | awk 'NR>=2{print $1":"$2}'` -o /opt/images.tar

# 导出所有镜像(专业用法)
docker save `docker images --format "{{.Repository}}:{{.Tag}}"` -o /opt/images.tar
镜像导入
利用 docker load 命令将导出的打包文或压缩文件导入
# docker load 使用帮助
[root@docker ~]# docker load --help

Usage:  docker load [OPTIONS]

Load an image from a tar archive or STDIN

Options:
  -i, --input string   Read from tar archive file, instead of STDIN
  -q, --quiet          Suppress the load output


# 命令解释
docker load [OPTIONS]

-i			# 从文件中导入
范例
# 从镜像打包文件中导入镜像
docker load -i /opt/images.tar
删除镜像
利用 docker rmi 命令可以删除本地镜像
# docker rmi 使用帮助
[root@docker ~]# docker rmi --help

Usage:  docker rmi [OPTIONS] IMAGE [IMAGE...]

Remove one or more images

Options:
  -f, --force      Force removal of the image
      --no-prune   Do not delete untagged parents


# 命令解释
docker rmi [OPTIONS] IMAGE [IMAGE...]

-f			# 强制删除
范例
# 删除 hello-world 镜像
docker rmi hello-world:latest

# 删除所有镜像
docker rmi `docker images -aq`
镜像打标签
利用 docker tag 命令为镜像打标签,镜像在遵守一定的命名规范打上标签后,才可以上传到指定的仓库
# docker tag 使用帮助
[root@docker ~]# docker tag --help

Usage:  docker tag SOURCE_IMAGE[:TAG] TARGET_IMAGE[:TAG]

Create a tag TARGET_IMAGE that refers to SOURCE_IMAGE


# 命令解释
docker tag SOURCE_IMAGE[:TAG] TARGET_IMAGE[:TAG]

命名规范			# 仓库主机 FQDN 或 IP[:端口]/项目名(或用户名)/image 名字:版本
范例
# 为 hello-world 镜像打标签
docker tag hello-world www.harbor.com:80/docker/hello-world:1.0
命令总结
生产环境使用镜像常见操作:搜索、下载、导出、导入、删除
docker search		# 搜索
docker pull			# 下载
docker save			# 导出
docker load			# 导入
docker rmi			# 删除


 被折叠的 条评论
为什么被折叠?
被折叠的 条评论
为什么被折叠?
 到【灌水乐园】发言


