


一、接口的概念
接口就是公共的行为规范标准,大家在实现时,只要符合规范标准,就可以通用。
在Java中,接口可以看成是:多个类的公共规范,是一种引用数据类型。
比如:笔记本上的USB口,电源插座等。
二、语法规则
接口的定义格式与定义类的格式基本相同,将class关键字换成 interface 关键字,就定义了一个接口。
public interface 接口名称{
// 抽象方法
public abstract void method1(); // public abstract 是固定搭配,可以不写
public void method2();
abstract void method3();
void method4();
// 注意:在接口中上述写法都是抽象方法,跟推荐方式4,代码更简洁
}
注意:
1、创建接口时,接口的命名一般以大写字母 I 开头。
2、接口的命名一般使用 "形容词" 词性的单词。
3、阿里编码规范中约定,接口中的方法和属性不要加任何修饰符号, 保持代码的简洁性
三、接口特性
1、接口中的成员变量被默认为被public static final修饰,因此成员变量必须初始化,并且可以省略public static final
2、接口中的成员方法默认是public abstract修饰,不写也是抽象方法,所以不能具体实现,除了两种(被default修饰和static修饰的方法,后文介绍)
3、接口不能被实例化
4、接口需要被类实现,是不能在接口中实现的,此时需要关键字implements来实现
class A implements IB
注意:子类和父类之间是extends 继承关系,类与接口之间是 implements 实现关系。
5、当一个类实现了一个接口,此时这个类要重写接口里的方法
6、接口也可以发生动态绑定,向上转型,多态
7、重写接口中方法时,不能使用默认的访问权限
8、接口中不能有静态代码块和构造方法
9、接口虽然不是类,但是接口编译完成后字节码文件的后缀格式也是.class
10、如果类没有实现接口中的所有的抽象方法,则类必须设置为抽象类
举例:
IUSB接口
public interface IUSB {
    void openDevice();
    void closeDevice();
}
public class KeyBoard implements IUSB{
@Override
public void openDevice() {
System.out.println("打开键盘");
}
@Override
public void closeDevice() {
System.out.println("关闭键盘");
}
public void input(){
System.out.println("键盘输入");
}
}public class Mouse implements IUSB{
@Override
public void openDevice() {
System.out.println("打开鼠标");
}
@Override
public void closeDevice() {
System.out.println("关闭鼠标");
}
public void click(){
System.out.println("点击鼠标");
}
}
public class Computer {
    public void powerOff(){
        System.out.println("关闭电脑");
    }
    public void powerOn(){
        System.out.println("打开电脑");
    }

    public void useDevice(IUSB usb){
        usb.openDevice();
        if(usb instanceof Mouse){
            Mouse mouse = (Mouse)usb;//向下转型,因为引用子类的对象
            mouse.click();
        }else if(usb instanceof KeyBoard){
            KeyBoard keyBoard = (KeyBoard) usb;
            keyBoard.input();
        }
        usb.closeDevice();
    }

    public static void main(String[] args) {
        Computer computer = new Computer();
        computer.powerOn();
        computer.useDevice(new KeyBoard());
        computer.useDevice(new Mouse());
        computer.powerOff();
    }
}
11、接口中还可以包含default,static方法。
举例:
public interface IA {
    void test1();//必须重写

    static void test2(){
        System.out.println("static");
    }
    default void test3(){
        System.out.println("default");
    }//可以重写也可以不重写
}
class TestDemo implements IA{
    @Override
    public void test1() {
        System.out.println("重写方法test1");
    }

    @Override
    public void test3() {
        System.out.println("重写test3");
    }//可以重写default也可以不重写
}
public class Test {
    public static void main(String[] args) {
        TestDemo testDemo = new TestDemo();
        testDemo.test1();
        testDemo.test3();
        IA.test2();
    }
}
四、实现多个接口
在Java中,类和类之间是单继承的,一个类只能有一个父类,即Java中不支持多继承,但是一个类可以实现多个接口。
interface IA{
    void testA();
}
interface IB{
    void testB();
}
class Test implements IA,IB{
    @Override
    public void testA() {
        System.out.println("接口IA");
    }

    @Override
    public void testB() {
        System.out.println("接口IB");
    }
}
public class test3 {
    public static void main(String[] args) {
        Test test = new Test();
        test.testA();
        test.testB();
    }
}
接口解决了多继承的问题,类可以继承类并且实现接口
继承是is-a的关系,接口是具有某种特性
举例:
public abstract class Animal {
    protected String name;
    protected int age;

    public Animal(String name, int age) {
        this.name = name;
        this.age = age;
    }
    //共性抽取
    public abstract void eat();
}
public interface IRunning {
void run();
}
public interface IFly {
void fly();
}
public interface ISwimming {
void swim();
}
public class bird extends Animal implements IFly{
    public bird(String name,int age){
        super(name,age);
    }

    @Override
    public void eat() {
        System.out.println(this.name + "吃虫子");
    }

    @Override
    public void fly() {
        System.out.println(this.name + "正在飞");
    }
}
public class duck extends Animal implements IRunning,IFly,ISwimming{
public duck(String name, int age) {
super(name, age);
}
@Override
public void eat() {
System.out.println(this.name + "吃小鱼");
}
@Override
public void run() {
System.out.println(this.name + "正在跑");
}
@Override
public void fly() {
System.out.println(this.name + "正在飞扑");
}
@Override
public void swim() {
System.out.println("正在游");
}
}public class Plain implements IFly{
@Override
public void fly() {
System.out.println("飞机正在飞");
}
}
public class test {
    public static void func(Animal animal){
        animal.eat();
    }
    public static void fly(IFly Fly){
        Fly.fly();
    }//无需关心将来是什么对象(鸭子,小鸟,飞机,只需关心这个对象是否具有这个功能)
    //接口的可扩展性
    public static void main(String[] args) {
        fly(new duck("鸭子",11));
        fly(new bird("小鸟",12));
        fly(new Plain());//甚至可以不是动物
    }
    public static void main1(String[] args) {
        func(new duck("小黄",10));
        func(new bird("小黄",10));
    }
}
五、接口中的继承
在Java中,类和类之间是单继承的,一个类可以实现多个接口,接口与接口之间可以多继承。即:用接口可以达到多继承的目的。
interface IRunning {
    void run();
}
interface ISwimming {
    void swim();
}
// 两栖的动物, 既能跑, 也能游
interface IAmphibious extends IRunning, ISwimming {
    void eat();
}
class Frog implements IAmphibious {
    public String name;
    public int age;

    public Frog(String name, int age) {
        this.name = name;
        this.age = age;
    }

    @Override
    public void eat() {
        System.out.println(this.name + "正在吃");
    }

    @Override
    public void run() {
        System.out.println(this.name + "正在跑");
    }

    @Override
    public void swim() {
        System.out.println(this.name + "正在游");
    }
}
六、接口使用实例
给对象数组排序
1、用接口Comparable来实现
需要重写compareTo方法
先来看通过年龄比较两个学生的大小
class Student implements Comparable<Student>{
public String name;
public int age;
public Student(String name, int age) {
this.name = name;
this.age = age;
}
//@Override
public int compareTo(Student o) {
return this.age-o.age;
}//写死了就不能动了,默认的比较方式
//根据年龄
@Override
public String toString() {
return "Student{" +
"name='" + name + '\'' +
", age=" + age +
'}';
}
}
public class Test {
public static void main(String[] args) {
Student student1 = new Student("张三",10);
Student student2 = new Student("李四",12);
//比较两个学生对象的大小
//实现一个接口Comparable,重写compareTo
int ret = student1.compareTo(student2);
if(ret == 0){
System.out.println(student1.name + "和" + student2.name+"一样大");
}else if(ret>0){
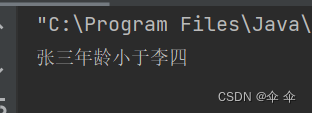
System.out.println(student1.name + "年龄大于" + student2.name);
}else {
System.out.println(student1.name + "年龄小于" + student2.name);
}
}
}
再来看通过名字比较
先要明白字符串怎么比较大小
以及String是不是引用数据类型:答案是“是”
可以用compareTo比较字符串的大小

public class Test {

    public static void main(String[] age){

        String str1 = "abcd";
        String str2 = "cdef";
        System.out.println(str1.equals(str2));//false
        //不是比较大小,是在比较相不相同,因此要用到compareTo
        System.out.println(str1.compareTo(str2));//a比c小返回负数-2
    }

}
用Arrays.sort()将数组排序
import java.util.Arrays;

class Student implements Comparable<Student>{
    public String name;
    public int age;

    public Student(String name, int age) {
        this.name = name;
        this.age = age;
    }

    @Override
    public int compareTo(Student o) {
        if(this.name.compareTo(o.name)>0){
            return 1;
        }else if(this.name.compareTo(o.name)==0) {
            return 0;
        }else{
            return -1;
        }
    }


    @Override
    public String toString() {
        return "Student{" +
                "name='" + name + '\'' +
                ", age=" + age +
                '}';
    }
}

   public class Test {


    public static void main(String[] args) {
        Student[] students = new Student[3];
        students[0] = new Student("zhangsan",12);
        students[1] = new Student("lisi",11);
        students[2] = new Student("wangwu",14);

        System.out.println(Arrays.toString(students));
        Arrays.sort(students);//实现sort的源码是将students对象强转Comparable,需要实现Comparable接口
        System.out.println(Arrays.toString(students));
    }

}

冒泡排序实现Arrays.sort()
    public static void mySort(Comparable[] comparable){

        for (int i = 0; i < comparable.length - 1; i++) {

            for (int j = 0; j < comparable.length - 1 - i; j++) {

                if(comparable[j].compareTo(comparable[j+1])>0){
                    Comparable tmp = comparable[j];
                    comparable[j] = comparable[j+1];
                    comparable[j+1] = tmp;
                }

            }
        }
    }
2、用Comparator接口实现
需要重写compare方法
更加灵活,想从小到大排还是从大到小排都很容易更改
import java.util.Comparator;

public class AgeComparator implements Comparator<Student> {
    @Override
    public int compare(Student o1, Student o2) {
        return o1.age - o2.age;
    }
}
import java.util.Comparator;

public class NameComparator implements Comparator<Student> {
    @Override
    public int compare(Student o1, Student o2) {
        return o1.name.compareTo(o2.name);
    }
}
class Student{
    public String name;
    public int age;

    public Student(String name, int age) {
        this.name = name;
        this.age = age;
    }

    @Override
    public String toString() {
        return "Student{" +
                "name='" + name + '\'' +
                ", age=" + age +
                '}';
    }
}
public class Test3 {
    public static void main(String[] args) {
        Student student1 = new Student("张三",10);
        Student student2 = new Student("李四",12);

        //Comparator更加灵活
        //年龄比较器
        AgeComparator ageComparator = new AgeComparator();
        int ret = ageComparator.compare(student1,student2);
        System.out.println(ret);
        //名字比较器
        NameComparator nameComparator = new NameComparator();
        int ret2 = nameComparator.compare(student1,student2);
        System.out.println(ret2);
    }
}
还可以用Arrays.sort(),通过传数组和比较器,通过向上转型来实现排序

public class Test3 {

    public static void main(String[] args) {
        Student[] students = new Student[3];
        students[0] = new Student("zhangsan",12);
        students[1] = new Student("lisi",11);
        students[2] = new Student("wangwu",14);

        NameComparator nameComparator = new NameComparator();
        System.out.println(Arrays.toString(students));
        Arrays.sort(students,nameComparator);//可以传比较器
        System.out.println(Arrays.toString(students));
    }

}
七、Clonable 接口和深拷贝
1、Clonable
Java 中内置了一些很有用的接口, Clonable 就是其中之一。
Object 类中存在一个clone方法, 调用这个方法可以创建一个对象的 "拷贝"。但是要想合法调用 clone 方法,必须要先实现 Clonable 接口,否则就会抛出 CloneNotSupportedException 异常(会在后面的异常中讲解)。
先来看Clonable 接口

发现Clonable是一个空接口/标记接口,用来证明这个类具备此功能的能力
class Student implements Cloneable{
    //必须实现Cloneable接口,但是里面没有方法,此时叫空接口/标记接口,只要实现了这个克隆接口才能证明这个类具备可以克隆的功能
    public int age;

    public Student(int age) {
        this.age = age;
    }

    //右键generate-》Override Methods-》clone()
    @Override
    protected Object clone() throws CloneNotSupportedException {
        return super.clone();
    }

    @Override
    public String toString() {
        return "Student{" +
                "age=" + age +
                '}';
    }
}
public class test {
    public static void main(String[] args) throws CloneNotSupportedException {
        Student student1 = new Student(10);
        Student student2 = (Student) student1.clone();//需要进行向下转型
    }
}
2、浅拷贝
拷贝一份student1给student2
class Money{
public double money = 12.5;
}
class Student implements Cloneable{
//必须实现Cloneable接口,但是里面没有方法,此时叫空接口/标记接口,只要实现了这个克隆接口才能证明这个类具备可以克隆的功能
public int age;
public Money m = new Money();
public Student(int age) {
this.age = age;
}
@Override
protected Object clone() throws CloneNotSupportedException {
return super.clone();
}
@Override
public String toString() {
return "Student{" +
"age=" + age +
'}';
}
}
public class test {
public static void main(String[] args) {
}
public static void main1(String[] args) throws CloneNotSupportedException {
Student student1 = new Student(10);
Student student2 = (Student) student1.clone();
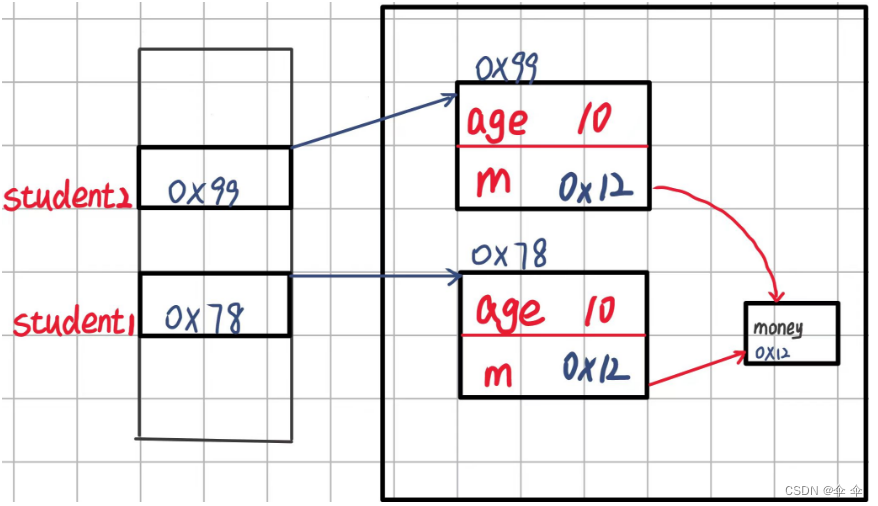
System.out.println(student1.m.money);
System.out.println(student2.m.money);
System.out.println("======");
student2.m.money = 100;
System.out.println(student1.m.money);
System.out.println(student2.m.money);
}
} 
我们发现更改克隆student2的m.money的值,student1中的也会被改变,如果我们不想这样就得进行深拷贝。
3、深拷贝
这次也要拷贝一份money给student2,因此类Money也需要具有被克隆的功能
class Money implements Cloneable{
public double money = 12.5;
@Override
protected Object clone() throws CloneNotSupportedException {
return super.clone();
}
}
class Student implements Cloneable{
//必须实现Cloneable接口,但是里面没有方法,此时叫空接口/标记接口,只要实现了这个克隆接口才能证明这个类具备可以克隆的功能
public int age;
public Money m = new Money();
public Student(int age) {
this.age = age;
}
@Override
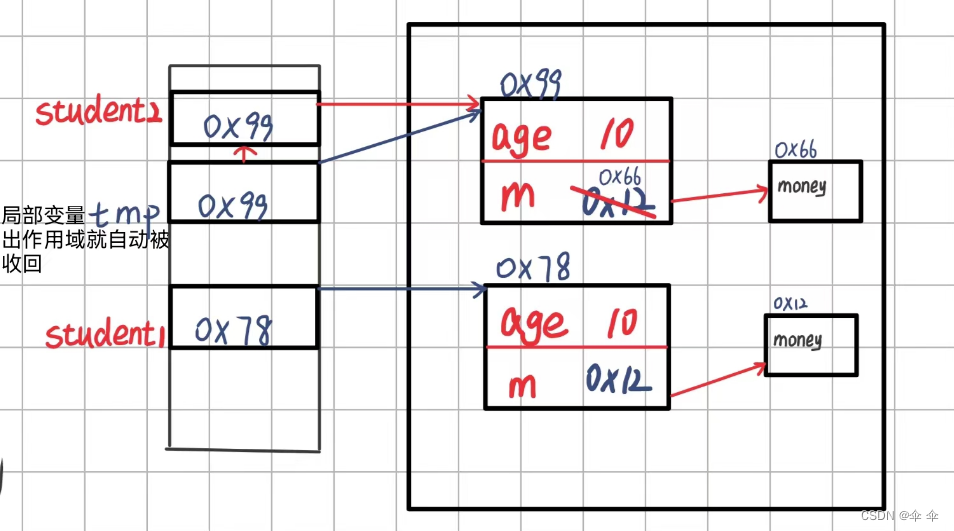
protected Object clone() throws CloneNotSupportedException {
Student tmp = (Student)super.clone();
tmp.m = (Money)this.m.clone();//将克隆的对象向下转型为Money的类
return tmp;
}
@Override
public String toString() {
return "Student{" +
"age=" + age +
'}';
}
}
public class test {
public static void main(String[] args) throws CloneNotSupportedException {
Student student1 = new Student(10);
Student student2 = (Student) student1.clone();
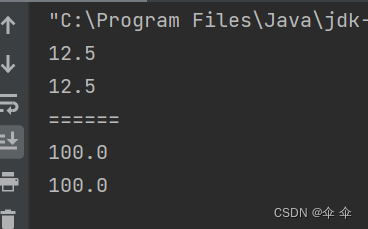
System.out.println(student1.m.money);
System.out.println(student2.m.money);
System.out.println("======");
student2.m.money = 100;
System.out.println(student1.m.money);
System.out.println(student2.m.money);
}
}

这样修改student2里的money值student1里的money值就不会被修改了。


 676
676


 被折叠的 条评论
为什么被折叠?
被折叠的 条评论
为什么被折叠?
 到【灌水乐园】发言


