


本篇主要是net.forward()得到结果的输出例程,以及非极大值抑制 (NMS)
板块一:结果打印例程
本人模型用的yolov5s,输出格式如下
-
形状为 [1,25200,85] 的张量,每个检测框含 85 个参数:
-
[0-3]:中心坐标 (cx,cy)、宽度 (w)、高度 (h)
-
[4]:置信度 (confidence)
-
[5-84]:80 个 COCO 类别概率
-
实现功能
-
将置信度大于0.5的结果打印出来,比较简单易懂
常用函数及参数说明
minMaxLoc():
在矩阵(或图像)中查找最小值、最大值及其对应的位置坐标。
void cv::minMaxLoc(
    InputArray src,           // 输入矩阵(单通道)
    double* minVal,           // 最小值的指针(可为NULL)
    double* maxVal,           // 最大值的指针(可为NULL)
    Point* minLoc,            // 最小值位置的指针(可为NULL)
    Point* maxLoc,            // 最大值位置的指针(可为NULL)
    InputArray mask = noArray()  // 可选掩码,指定查找区域
);-
src(必填):输入单通道矩阵(YOLOv5输出的 80 个类别概率)。
-
minVal:存储最小值的指针,若不需要最小值,可设为 NULL。
-
maxVal:存储最大值的指针(即最高类别概率)。
-
minLoc:存储最小值位置的指针。若不需要,可设为 NULL。
-
maxLoc:存储最大值位置的指针(即类别 ID)。
-
mask(通常默认):可选掩码,指定参与查找的区域(非零元素有效),极少数情况下用于屏蔽特定类别(如过滤背景)。
例程
//省略前文
  output = net.foward("output0");
  const float confThreshold = 0.5;  // 置信度阈值
  const int numClasses = 80;        // 类别数量(COCO 为80类)
  for (int i = 0; i < output.size[1]; ++i) {
      const float* data = output.ptr<float>(0, i);  // 指针指向第 0 通道第 i 个框
      float confidence = data[4];
      if (confidence < confThreshold) continue;  // 置信度不足,跳过
      // 提取边界框坐标(前 4 个元素,索引 0-3)
      float cx = data[0];  // 中心 x
      float cy = data[1];  // 中心 y
      float w = data[2];   // 宽度
      float h = data[3];   // 高度

      const float* classScores = data + 5;  // 指向类别概率起始位置
      // 找到最高概率的类别
      double maxScore;
      Point maxLoc;
      minMaxLoc(Mat(1, numClasses, CV_32F, (void*)classScores),
          nullptr, &maxScore, nullptr, &maxLoc);
      int classId = maxLoc.x;  // 类别 ID(0~79)
      // 打印检测结果
      cout << "检测框 " << i + 1 << ":\n"
          << "  中心坐标 (cx, cy): (" << cx << ", " << cy << ")\n"
          << "  宽高 (w, h): (" << w << ", " << h << ")\n"
          << "  置信度: " << confidence << "\n"
          << "  类别 ID: " << classId << "\n"
          << "------------------------" << endl;
  }
部分结果如下:
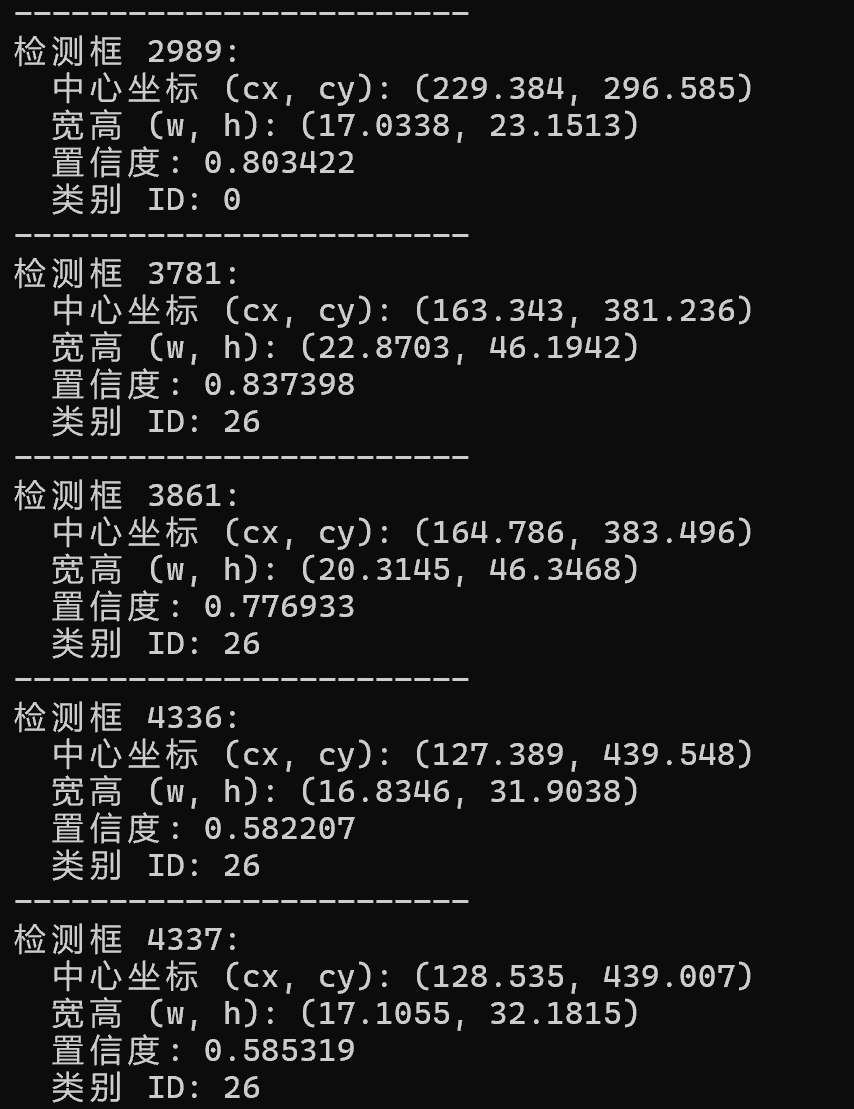
可以看到有一些距离很近且类别相同的点,我们需要过滤掉这些重复的点,可使用非极大值抑制 (NMS)算法。
板块二:非极大值抑制 (NMS)
实现功能
-
对于重叠度较高的多个候选框,仅保留置信度最高的那个,抑制其他重叠框。
常用函数及参数说明
NMSBoxes()
// OpenCV 官方 NMS 函数(C++)
void cv::dnn::NMSBoxes(
    const std::vector<Rect>& bboxes,  // 所有候选边界框
    const std::vector<float>& scores,  // 对应边界框的置信度分数
    float score_threshold,             // 置信度阈值(过滤低置信度框)
    float nms_threshold,               // NMS 的 IOU 阈值(抑制重叠框)
    std::vector<int>& indices,         // 输出:保留框的索引
    float eta = 1.0f,                  // 自适应阈值参数(Soft-NMS 相关)
    int top_k = 0                      // 最多保留的框数量(0 表示不限制)
);-
bboxes(必填):所有候选边界框,由模型输出(左上角坐标和宽高)
-
scores(必填):每个边界框的置信度分数,由模型输出
-
score_threshold(必填):置信度阈值,仅保留置信度≥该值的框
-
nms_threshold(必填): IOU 阈值,若两个框的 IOU > 该值,则抑制低置信度的框
-
indices(必填):输出保留框的索引(按置信度降序排列)
-
eta(低频自定义):自适应阈值参数(仅用于 Soft-NMS,默认 1.0 表示传统 NMS)
-
top_k(中频自定义):最多保留的框数量(0 表示不限制,常用于限制检测结果数量)
打印例程(接续上文)
//...
output = net.foward("output0");
vector<Rect> boxes = ...; // 边界框数据
vector<float> scores = ...; // 置信度分数
vector<int> indices; // 存储结果索引
//...
for (int i = 0; i < output.size[1]; ++i) {
//...省略上文
//转换为int,这么写比强制转换不容易出错
int x = static_cast<int>(cx - w / 2);
int y = static_cast<int>(cy - h / 2);
int width = static_cast<int>(w);
int height = static_cast<int>(h);
//储存结果
boxes.push_back(Rect(cx, y, width, height));
confidences.push_back(score);
classIds.push_back(classId);
}
vector<int> indices;
NMSBoxes(boxes,confidences,0.5,0.4,indices);
for (int idx : indices) {
Rect box = boxes[idx];
int classId = classIds[idx];
float confidence = confidences[idx];
cout << "检测框 " << idx << ":\n"
<< " 坐标 (x, y): (" << box.x << ", " << box.y << ")\n"
<< " 宽高 (w, h): (" << box.width << ", " << box.height << ")\n"
<< " 置信度: " << confidence << "\n"
<< " 类别 ID: " << classId << "\n"
<< "------------------------" << endl;
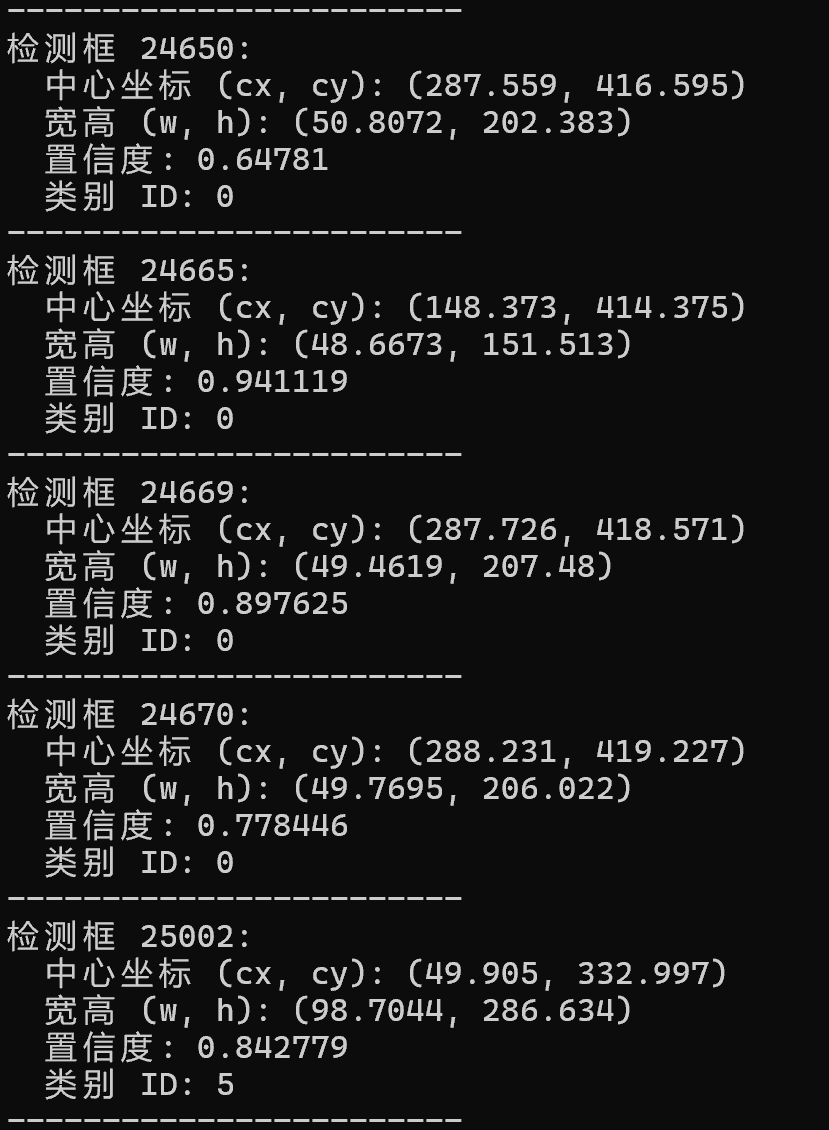
}可以看到结果少了很多,且没有重复。
板块三:可视化
实现功能
-
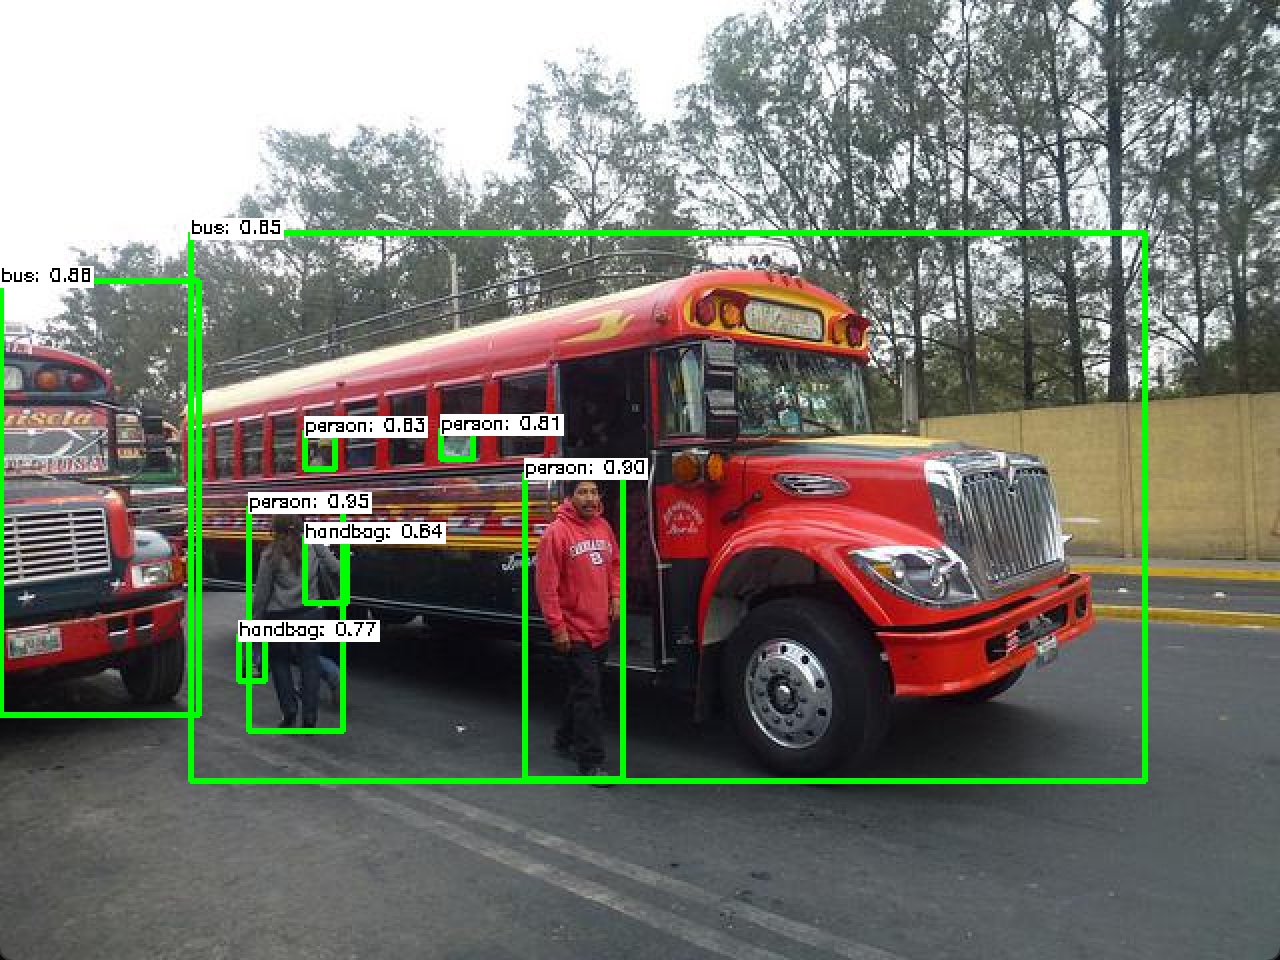
将检测结果在输入图片上框出来
常用函数及参数说明
1. rectangle() 显示矩形框(两种重载)
//基于两点坐标
void cv::rectangle(
    InputOutputArray img,        // 输入/输出图像
    Point pt1,                   // 矩形的一个顶点
    Point pt2,                   // 矩形对角线上的另一个顶点
    const Scalar& color,         // 矩形颜色(BGR格式)
    int thickness = 1,           // 线条粗细(-1表示填充)
    int lineType = LINE_8,       // 线条类型
    int shift = 0                // 坐标点的小数位数
);-
img(必填):输入&输出图像,绘制操作会直接修改此图像。
-
pt1(必填):矩形的一个顶点(通常为左上角)。
-
pt2(必填):矩形对角线上的另一个顶点(通常为右下角)。
-
color(必填):矩形颜色,格式为 Scalar(B, G, R)。
-
thickness:线条粗细(像素),负值表示填充矩形。建议2(过细会看不清)。
-
lineType:线条类型(如 LINE_8、LINE_AA),可选LINE_AA(抗锯齿,视觉效果好一点)
-
shift(常默认):实际坐标值 = 传入的整数值 / (2^shift),用于提高精度。
//基于Rect对象
void cv::rectangle(
    InputOutputArray img,          // 输入/输出图像(如Mat对象)
    Rect rec,                      // 矩形区域(左上角坐标x,y和宽高)
    const Scalar& color,           // 矩形颜色(BGR格式)
    int thickness = 1,             // 线条粗细(-1表示填充)
    int lineType = LINE_8,         // 线条类型
    int shift = 0                  // 坐标点的小数点位数
);-
rec(必填):矩形区域,指定为 Rect(x, y, width, height)。(x,y为左上角坐标)
-
其余同上
2. putText() 显示文本
void cv::putText(
    InputOutputArray img,             // 输入/输出图像(如Mat对象)
    const String& text,               // 要绘制的文本
    Point org,                        // 文本左下角的坐标
    int fontFace,                     // 字体类型
    double fontScale,                 // 字体缩放因子
    Scalar color,                     // 文本颜色(BGR格式)
    int thickness = 1,                // 线条粗细
    int lineType = LINE_8,            // 线条类型
    bool bottomLeftOrigin = false     // 文本坐标系原点位置(默认false)
);-
img(必填):输入&输出图像,绘制操作会直接修改此图像。
-
text(必填):要绘制的文本内容。
-
org(必填):文本左下角的坐标(x, y)
-
fontFace(必填):字体类型(如FONT_HERSHEY_SIMPLEX、FONT_HERSHEY_DUPLEX...)
-
fontScale(必填):字体大小缩放因子(1.0 表示默认大小)。
-
color(必填):文本颜色(BGR 格式)。
-
thickness:文本线条粗细(像素),建议2
-
lineType:线条类型(如 LINE_8、LINE_AA),可选LINE_AA(抗锯齿,视觉效果好一点)
-
bottomLeftOrigin(常默认):坐标系原点位置(默认左上角,True为左下角)。
总完整例程
#include <opencv2/opencv.hpp>
#include <opencv2/dnn.hpp>
#include <iostream>
using namespace cv;
using namespace dnn;
using namespace std;

int main() {
    // 加载模型
    Net net = readNet("last.onnx");
    if (net.empty()) {
        cerr << "Error: Failed to load model!" << endl;
        return -1;
    }
    // 设置后端
    net.setPreferableBackend(DNN_BACKEND_OPENCV);
    net.setPreferableTarget(DNN_TARGET_CPU);
    // 读取图像
    Mat image = imread("input1.jpg");
    if (image.empty()) {
        cerr << "Error: Failed to load image!" << endl;
        return -1;
    }
    Size size = image.size();
    cout << "Image loaded: " << size << endl;
    float scale_h = size.height / 640.0;
    float scale_w = size.width / 640.0;
    // 创建输入Blob
    Mat blob = blobFromImage(
        image,
        1.0 / 255.0,
        Size(640, 640),
        Scalar(0, 0, 0),
        true,  // swapRB
        false  // crop
    );
    cout << "Blob shape: " << blob.size << endl;
    // 获取输出层名称
    vector<String> outNames = net.getUnconnectedOutLayersNames();
    // 执行推理并获取所有输出
    net.setInput(blob);
    Mat output = net.forward("output0");

    vector<Rect> boxes;
    vector<float> confidences;
    vector<int> classIds;

    const float confThreshold = 0.5;  // 置信度阈值
    const int numClasses = 80;        // 类别数量(COCO 为 80 类)

    for (int i = 0; i < output.size[1]; ++i) {
        // 获取当前检测框的原始数据(第 0 批次,第 i 个框)
        const float* data = output.ptr<float>(0, i);  // 指针指向 [cx, cy, w, h, conf, class0...class79]
        // 提取置信度(第 5 个元素,索引 4)
        float confidence = data[4];
        if (confidence < confThreshold) continue;  // 置信度不足,跳过
        // 提取边界框坐标(前 4 个元素,索引 0-3)
        float cx = data[0] * scale_w;  // 中心 x
        float cy = data[1] * scale_h;  // 中心 y
        float w = data[2] * scale_w;   // 宽度
        float h = data[3] * scale_h;   // 高度
        // 提取类别概率(后 80 个元素,索引 5-84)
        const float* classScores = data + 5;  // 指向类别概率起始位置
        // 找到最高概率的类别
        double maxScore;
        Point maxLoc;
        minMaxLoc(Mat(1, numClasses, CV_32F, (void*)classScores),
            nullptr, &maxScore, nullptr, &maxLoc);
        int classId = maxLoc.x;  // 类别 ID(0~79)

        double score = maxScore * confidence;
        //转换为int,这么写比强制转换不容易出错
        int x = static_cast<int>(cx - w / 2);
        int y = static_cast<int>(cy - h / 2);
        int width = static_cast<int>(w);
        int height = static_cast<int>(h);
        //储存结果
        boxes.push_back(Rect(x, y, width, height));
        confidences.push_back(score);
        classIds.push_back(classId);
    }
    vector<int> indices;
    NMSBoxes(boxes,confidences,0.5,0.4,indices);
    vector<String> classNames = {
    "person", "bicycle", "car", "motorcycle", "airplane", "bus", "train", "truck", "boat", "traffic light",
    "fire hydrant", "stop sign", "parking meter", "bench", "bird", "cat", "dog", "horse", "sheep", "cow",
    "elephant", "bear", "zebra", "giraffe", "backpack", "umbrella", "handbag", "tie", "suitcase", "frisbee",
    "skis", "snowboard", "sports ball", "kite", "baseball bat", "baseball glove", "skateboard", "surfboard",
    "tennis racket", "bottle", "wine glass", "cup", "fork", "knife", "spoon", "bowl", "banana", "apple",
    "sandwich", "orange", "broccoli", "carrot", "hot dog", "pizza", "donut", "cake", "chair", "couch",
    "potted plant", "bed", "dining table", "toilet", "tv", "laptop", "mouse", "remote", "keyboard", "cell phone",
    "microwave", "oven", "toaster", "sink", "refrigerator", "book", "clock", "vase", "scissors", "teddy bear",
    "hair drier", "toothbrush"
    };
    //绘制最终检测结果
    for (int idx : indices) {
        Rect box = boxes[idx];
        int classId = classIds[idx];
        float confidence = confidences[idx];

        cout << "检测框 " << idx << ":\n"
            << "  坐标 (x, y): (" << box.x << ", " << box.y << ")\n"
            << "  宽高 (w, h): (" << box.width << ", " << box.height << ")\n"
            << "  置信度: " << confidence << "\n"
            << "  类别 ID: " << classId << "\n"
            << "------------------------" << endl;
        // 绘制边界框
        rectangle(image, box, Scalar(0, 255, 0), 2);
        // 绘制类别标签和置信度
        string label = format("%s: %.2f", classNames[classId].c_str(), confidence);
        int baseLine;
        Size labelSize = getTextSize(label, FONT_HERSHEY_SIMPLEX, 0.3, 1, &baseLine);//baseline为基线到文本最低点的像素距离
        rectangle(image, Point(box.x, box.y - labelSize.height),
            Point(box.x + labelSize.width, box.y + baseLine),
            Scalar(255, 255, 255), -1);//画个白底
        putText(image, label, Point(box.x, box.y), FONT_HERSHEY_SIMPLEX, 0.3, Scalar(0, 0, 0), 1);
    }
    // 显示结果
    imshow("YOLOv5 Detection", image);
    waitKey(0);
    return 0;

}
结果如下
至此教程完结


 被折叠的 条评论
为什么被折叠?
被折叠的 条评论
为什么被折叠?
 到【灌水乐园】发言


