


setup选项
函数是 Vue3 中引入的一个新配置项,它的值是一个函数,用于配置组件的逻辑。setup 函数的返回值是一个对象,这个对象中的属性和方法可以直接在组件的模板中使用。
setup的使用
代码示例
export default{
   setup(){
     const username = 'Han'
     const getUsername = () =>{
       console.log("调用了getUsername")
     }
     return{
       username,
       getUsername

     }
   },

   beforeCreate(){
     console.log('调用了beforeCreate')
   }
 }
调用时机
在beforeCreate()钩子之前被调用,因此在 setup 中访问 this 会得到 undefined。
注意事项
- 数据和函数需要return后才可以在模板中应用
- setup 函数不支持 async,因为这会使得返回值变为 Promise,而模板无法直接访问 Promise 中的数据。
- setup 中的逻辑不能与 Vue 2.x 中的 data、methods 等配置项混用。
- 如果 Vue 2.x 的配置项与 Vue 3 的 setup 中存在同名的属性或方法,则 setup 中的配置会优先。
语法糖简化
Vue 3 提供了 <script setup> 语法糖,允许将 setup 函数的逻辑直接写在 <script> 标签中,不需要return
reactive和ref函数
reactive 和 ref 是 Vue 3 中的两种响应式数据绑定方式,ref 适用于简单的响应式数据,而 reactive 则适用于复杂对象或数组的响应式数据。
区别与联系
数据类型
ref 是对普通值的包装, reactive 是对对象(或数组)的包装。
访问与更新
ref使用.value访问或更新
reactive通过直接修改对象或数组的属性或元素来触发更新
代码示例
// ref示例

const count = ref(0);

console.log(count.value); // 访问值

count.value += 1; // 修改值


// reactive示例

const state = reactive({

  name: 'Han',

  age: 19,

});

console.log(state.name); // 访问属性

state.age += 1; // 修改值
组合式API-computed
与vue2相比
计算属性基本思想与vue2一致,组合式api只修改了写法
在vue3中的使用
核心步骤
- 导入computed函数
- 执行函数在回调函数中return基于响应式数据计算的值用于变量接收
代码示例
import{ computed , ref}from 'vue'
const list=ref([1, 2, 3, 4, 5])
const computedList =computed(()=>{
return list.value.filter(item=>item>2
)})
注意事项
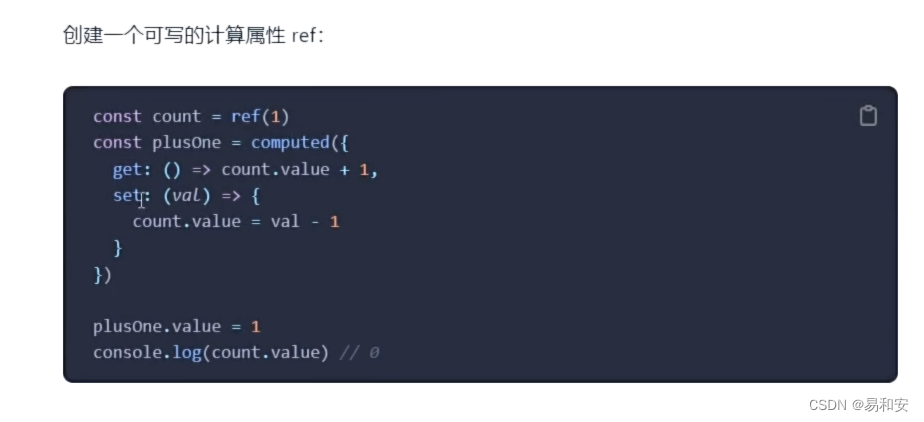
- 计算属性是只读的,直接通过.value修改是错误的,可以配置get set来实现,如图所示。
- 计算属性中不应该有副作用,不应该进行多余的处理比如异步请求,修改dom等,这些会放在watch中进行
组合式API-watch
倾听一个或多个数据变化,执行回调函数
基础使用:侦听单个数据
步骤
- 导入watch函数
- 执行watch函数传入要侦听的响应式数据和回调函数
代码示例
import{ computed , watch}from 'vue'

const count=ref(0)

watch(count, (newValue, oldValue)=>{

console.log(`老值为${oldValue},新值为${newValue}`)

})
基础使用:侦听多个数据
步骤与单个数据相似,具体见代码示例
代码示例
import{ computed , watch}from 'vue'

const age=ref(18)

const name=ref('Han')

watch([age, name], [newArr, oldArr]=>{console.log(`姓名或年龄变化了`,[newAge, newName],[oldAge, oldName])

})
配置项immediate和deep
immediate
在侦听器创建时立即触发回调,响应式数据变化后继续执行回调
代码示例
const count=ref(0)

watch(count, (newValue, oldValue)=>{

console.log(`老值为${oldValue},新值为${newValue}`),{

immediate:true

}

})
deep
作用:deep是深度监视,默认watch是浅层监视,简单类型可以直接监视,复杂类型监视不到内部数据变化
使用:和immediate一样加上deep:true
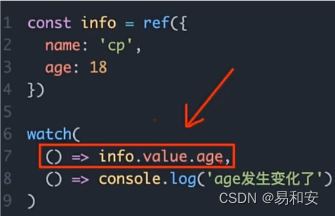
精确侦听对象的某个属性
在不开启deep的前提下侦听age的变化,指定要侦听的对象的具体某个属性
组合式API-父子通信
父传子
步骤
- 父组件中给子组件绑定属性
- 子组件内部props选项接收,通过defineProps“编译器宏”接收子组件传递的数据
- 子组件的script中,使用props.获取数据子组件的template中,可知直接使用传递过来的数据
代码示例
父组件代码
<script setup>

    import SonCom from '@/components/son-com.vue'

</script>

<template>

    <div>

        <h3>父组件</h3>

        <SonCom info="父传子"></SonCom>

    </div>

</template>
子组件代码
<script setup>

    const props = defineProps({

        info:String})

    console.log(props.info)

</script>

<template>

    <div class="son">我是子组件- {{ info }}</div>

</template>
子传父
步骤
- 子组件通过编译器宏定义事件
- 子组件emit触发事件
- 父组件通过@监听事件
代码示例
子组件代码
<script setup>

// 通过 defineEmits编译器宏生成emit方法const emit - defineEmits(['get-message'])

    const sendMsg=()=>{

// 触发自定义事件 并传递参数

    emit('get-message', 'this is son msg')}

</script>

<template>

    <button @click="sendMsg">sendMsg</button>

</template>
父组件代码
<script setup>

//引入子组件

import sonComVue from './son-com.vue' const getMessage= (msg)=>{

    console.log(msg)}

</script>

<template>

    <sonComVue @getmessage="getMessage"/>

</template>


 920
920

 被折叠的 条评论
为什么被折叠?
被折叠的 条评论
为什么被折叠?
 到【灌水乐园】发言


